If you’ve ever grown up in a country, or a city, with a large ethnic Chinese population, or been invited out for lunch by Chinese friends, then you might well have experienced the Chinese custom known as “yum cha”.
But what is Yum Cha, where does it come from, what does it mean, and what are the customs and traditions that surround this most Chinese of Chinese meals? Today, we find out together.
What is Yum Cha?
Literally, “Yum Cha” means “Drink Tea”, in the Chinese dialect of Cantonese, spoken largely in southern China and Hong Kong. In a broader context, “yum cha” refers to a late-morning or early-afternoon meal, eaten with friends and family, which comprises of loads of dumplings, small dishes, light meals and pots of Chinese loose-leaf tea. In this respect, “yum cha” is similar to the British traditions of Elevenses, Brunch, Morning Tea, Luncheon, or Afternoon Tea, in that it is a meal taken with tea, shared with friends, and made up of loads of little snacks and dishes.
A word commonly associated with “yum cha” is “dim sum”. What is it?
Various dim sum dishes in their round, bamboo steamer-baskets. Almost all dim sum are either steamed, or fried, because it’s faster to cook.
Dim sum refers to the small dishes served to diners in yum cha restaurants, usually in bamboo steamer-baskets. Most people think that “dim sum” refers to dumplings, but actually it can refer to any of these small dishes served in this manner, which accompanies the tea. Together, tea and dim sum = yum cha.
Where did Yum Cha come from?
The tradition of dim sum, light snacks (the words ‘dim sum’ translate to ‘barely fill your stomach’) eaten during late morning or early afternoon, date back centuries, and are believed to go as far back as the Song Dynasty in the 1000s or 1100s A.D. At this time, tea and dim sum remained separate entities, and there was not yet a meal which combined them both. This remained the case for centuries. The combination of tea and dim sum, to create the meal known today as “yum cha”, is believed to have started in Canton Province (Guandong Province today) in the 19th century.
Originally, the focus of the establishments which served tea and dim sum was still on the service of tea, and were still identified largely as tea-houses. However, as the 1800s progressed, it made more sense to combine service of tea and dim sum together, in a purpose-built restaurant – this became known as yum cha.
One of the first mentions of yum cha in literature was by the Xianfeng Emperor of China, who ruled during the mid-1800s, when he wrote of “one cent houses”, referring to how a cheap meal comprised of tea and dim sum could be purchased at special restaurants.
And yum cha culture flourished from there!
Yum Cha flourished, especially in southern China through the late 1800s into the 1910s, 20s and 30s. The growing Civil War, the Sino-Japanese War, and the Second World War forced many refugees to flee mainland China, settling in Taiwan, and Hong Kong, where they could live beyond the grip of the communists. These refugees also fled to British colonies in Southeast Asia, particularly Malaya and Singapore (where they were known as “Sinkeh” or “New Guests”).
Where-ever it was that they ended up – they brought their yum cha culture and expertise with them, and established yum cha restaurants in these new locations. Apart from Taiwan, Hong Kong and Singapore, war-refugees also fled to Australia, New Zealand and to the West Coast of the USA, where a large Chinese expat community (largely based around San Francisco) already existed, introducing western audiences to yum cha dining. When the wars ended in the 1940s and 50s, yum cha dining took off once more. It has remained popular ever since.
Yum Cha Customs
For yum cha virgins who have never attended (or attended very few) yum cha meals, there are certain traditions or customs which are followed to ensure a pleasant, comfortable and enjoyable dining experience. Here are the main ones to take note of. Not everybody follows them, and not all of them make sense, but they’re interesting to think about, nonetheless…
Keeping the Lid Up
“Fill ‘er up!”
While you can of course, order other drinks while enjoying yum cha, the traditional drink is, of course – tea. The meal wouldn’t be called “drink tea” without it, now would it?
When the pot is low on tea, pick up the teapot lid and flip it over, or close it halfway. This is the traditional way of getting a waiter’s attention that the pot is empty and needs refilling.
Tapping the Table
Another really common yum cha practice is finger or knuckle-tapping. This is done when somebody else at the table refills your teacup during the meal, but you can’t (or don’t want) to stop and thank them verbally. This is either because you’re eating, reaching for something to eat, or are busy talking, and don’t want to interrupt the conversation. Traditionally, it’s done by tapping the index and middle-finger together on the table, or the first knuckles of the same two fingers.
This practice is said to have originated in the 1700s during the reign of the Qianlong Emperor, who ruled China for sixty-odd years between the 1730s-1790s. While traveling incognito around his kingdom, he insisted on pouring tea for his dining companions, like anybody else. As the emperor was deified by the Chinese people, this was seen as a gigantic honour for the recipient. The traditional way to acknowledge this was to kowtow in the emperor’s presence – something which would’ve of course, immediately blown his cover! Instead, the emperor asked his friends and companions to knuckle-tap instead. The bent fingers symbolised kneeling, and tapping the knuckles represented bowing to the floor.
Is this legend true? Not very likely, if at all. But it is a fun urban legend to spread around. The truth is that we may never know where the tradition of finger/knuckle-tapping came from, but what is true is that people still do it today.
A Group Affair
Yum Cha is always done with friends and/or family. I guess you could yum cha alone, but…that’d be pretty sad, wouldn’t it? Plus, you’ve got all that damn food to eat! Nah, yum cha is always done with others, and always in the late morning, or over lunchtime, into the afternoon. Nobody goes out to yum cha for dinner. It’s just not the done thing.
To Peel or Not to Peel, that is the Question…
…whether ’tis nobler in the mind to suffer from the bacteria and fungi, or by peeling, end them…
A popular staple of yum cha are steamed buns! Charsiew Bao (pork buns), or similar buns (usually served as part of dessert) come hot from the wok, all steamed, shiny, glossy and smooth on top! Some people will tell you that if you eat these buns, you should always peel away the shiny upper skin on top of the bun, to expose the soft, fuzzy under-pastry beneath, prior to eating.
Right?
Eeeehm…no.
The reasoning behind this practice dates back to the days when you could buy buns like these from street-vendors. The belief was that since you didn’t know who had handled the food, or how it was cooked or steamed, you should always peel the shiny layer of dough off the top of the bun, before eating the bun itself. This stopped you from getting all kinds of bacteria and nasty stuff in your food when you ate it. But is there any truth to this?
Hehehe…no.
The fact is, if there is anything on top, it’d be killed off during the steaming process, so eat that bun confidently, with pride, indulgence, and enjoyment!
BUT!
Do, please, make sure, that you peel off the PAPER LINER that is UNDERNEATH the bun, before you eat it. Or else, you’re going to look like an idiot trying to explain to people why you’re chewing on a sheet of paper with your meal. Or you could just tell them that it’s extra protein or whatever. I dunno. Yummy, yummy protein… Regardless, no, you don’t need to peel anything, except for the paper liner – which, by the way, is there to stop the bun from gluing itself to the bamboo steamer-basket during cooking.
Concluding Remarks
Anyway, that’s the end of this little look at one of Chinese cuisine’s most popular and famous creations: Yum cha! Now, go forth – eat, drink, and be merry. Or at least try to be, in our current global climate.
You may remember, several months back, now, that I wrote a review about the Pelikan Stone Garden M800 fountain pen, a special edition released fairly recently, which I fell in love with, at first sight – which honestly, is not something I thought that I’d ever say about a Pelikan. I loved the pen for its bright colours, easy usability, light weight and its ability to stand out in a crowd. If you haven’t read that posting, I’ll leave a link here.
Moving on.
In that review, I wrote about how if I ever bought a Pelikan pen, then it’d probably end up being the Pelikan Souveran-line “Stresemann” release, which came out a few years back. It struck me largely because it was so different from all the other Pelikan pens which I’d seen. It wasn’t jet black, it wasn’t blue, red, green or white, and its style was historically inspired. And me, being a history-loving person (gee! Who would’a guessed??), naturally found it very interesting. I liked the darker, less-conspicuous colours used in its design, and the sort of…gravitas…that it gave the pen. This was a serious pen, a pen which had a background to it, and that’s what I liked.
That I liked so much, in fact, that I finally went out and bought one!
…Or at least, I bought one online…going out to buy a pen these days is almost impossible because of all the coronavirus restrictions…but…you get the idea. So that’s what this posting is going to be about. The Pelikan M805 “Stresemann” fountain pen.
The Pelikan Stresemann – Appearance
Like the rest of the Souveran line, the Stresemann has a solid-colour cap, section, and blind-cap. In this case – black. It’s decorated with silver-tone trim on the two blind-cap rings, the two cap-rings, the pelican-beak clip, the section, and the cap-jewel. The striped barrel is done in heavy, dark grey pinstripes. By default, the pen comes with an 18kt white gold nib, to match the silver trim on the pen, and to harmonise with the grey stripes on the barrel.
The pen, like all Pelikan Souverans, is a piston-filler with a removable nib-section. That means that it is possible to unscrew the whole nib-section and replace it with another one, should you need, or want to. I didn’t want to ruin the nice black-and-silver look that the pen had going on with itself, so I left it in its default configuration.
The Stresemann. What’s in a Name?
The Pelikan Stresemann (“Stray-zehr-mahn“, in case anybody can’t pronounce it), is named after the German foreign minister, former chancellor, and Nobel Peace-Prize winner, Gustav Stresemann! I think we can all agree that a guy who held that many titles and accolades, did a hell of a lot of writing, and certainly deserves the distinction of having a fountain pen named in his honour!
Stresemann died in 1929, but before his death, he was a highly influential figure in German Weimar-Republic-era politics. He mended relations between Germany and France, and was one of the few politicians to hold onto their positions in an era when Germany was highly politically and economically unstable. Between the German Revolution of 1919, the Hyperinflation Crisis of the early 1920s and the coming of the Depression in 1929, he remained Foreign Minister for six whole years. This is saying quite a lot, when you consider that during the same period, there were FIVE different German chancellors!
Apart from his political career, Stresemann was famous for one other thing: His fashion-sense!
As a politician and diplomat, Stresemann naturally had to attend all kinds of conferences and meetings with neighbouring European powers – it kinda happens when your title is “Foreign Minister”. In those days, very formal attire for politicians was still considered de-rigeur. And I mean VERY formal attire! Morning suits or stroller suits, with their top hats, grey waistcoats and heavy, black tailcoats, were still the preferred form of dress for a lot of politicians and diplomats (for example, look at the photos of the conference at the signing of the Treaty of Versailles).
Stresemann disliked having to wear the heavy, long tailcoat, which you can see in the photograph above. So he didn’t! Instead, he wore a slightly more relaxed form of formal daywear, known as a stroller suit. Stroller suits were black, but they still had the heavy tailcoat – so Stresemann just gave up wearing it! He removed the tailcoat, and instead, wore an ordinary, black suit-jacket, of a kind familiar to almost anybody today. This, combined with the black waistcoat, and the striped, grey trousers which finished off the look, became known as a stroller-variant still known today as a “Stresemann” suit!
Gustav Stresemann (seated, right), wearing his trademark ‘Stresemann’ suit, with a suit-jacket, as opposed to the more normal tailcoat (for example, as the man holding the cigarette next to him, is wearing).
Remember how the Pelikan Stresemann fountain pen has grey pinstripes on the barrel?
This is where they come from. They’re an homage, and a reference, to Stresemann’s distinctive style of dress.
The Pelikan Stresemann – the Good, the Bad, and the Ugly
Honestly? I couldn’t find much that was bad, or ugly about this pen, if anything. The only thing that did kind of annoy me was that the ink-window on the Pelikan Souveran line is very subtle – almost – ALMOST – to the point of being invisible. They’re not like the ink windows on say, the Montblanc 149, which is chunky and visible and easy to see – especially when the pen is half-empty. No. The Pelikan ink window is very discreet. If you didn’t know it was there, you’d probably never spot it.
To some people, this might be a good thing, because they won’t want or don’t like ink-windows in their pens, because they break up the look of the pen’s lines and colours, which I totally understand, but on the other hand, if you’re the kind of writer who loves using their pen’s ink-windows to check how much fuel they have left to drive their imagination-journey while they write the next great epic novel, you will likely be sorely disappointed. Unless you hold the pen up to VERY strong light, the ink window is all but invisible.
The Pelikan Stresemann with the Stone Garden
Apart from that one critique, I really couldn’t find anything that I didn’t like about it. The 800 size is big, without being uncomfortable. It’s roughly analogous to the Montblanc 146 size, whereas the much larger 1000 series of Pelikan Souveran pens, are significantly longer and chunkier, and are probably even bigger than the Montblanc 149, which is saying quite a lot! So the 800 is a comfortable size to hold and write with for a long time. Also, it’s the same size used for my Pelikan Stone Garden, so they match in size, which is nice.
I liked the pen’s colouring a lot. The silver, black and grey work well together. the colours don’t clash and they’re not garish, bright or ostentatious. They don’t scream at you to look at it, or demand attention, but at the same time, they’re different enough from most of Pelikan’s other offerings to stand out in a crowd. In a sea of blue, red, black, and green, the dove-grey pinstripes of the Stresemann will definitely stand out.
Closing Remarks
Is the Stresemann M805 worth it?
In my mind, for the money which I paid (I bought the pen secondhand) – the answer is “Yes”. It’s lightweight, comfortable, distinctive and comes with a story. It’s a worthwhile pen to consider if you’re looking for something a bit more serious and refined than the usual offerings in the Pelikan ‘Souveran’ line. It doesn’t cost more, or less than any other Pelikan, and will definitely stand out in your collection.
Most people who know anything about pocketwatches and how they’re used or worn, will be familiar with the wide variety of attachments you can clip onto the bow (the ring at the top of a pocketwatch) for decorative, or security purposes.
Double-Alberts, Single-Alberts, ring-clip chains, belt-hook chains, grosgrain fobs, and drop-fobs are the most common types of pocketwatch adornments, but one type of pocketwatch accessory is almost forgotten in the 21st century – the pocketwatch chatelaine fob.
I’ve wanted a chatelaine fob for years, I just didn’t know it. Or rather…I did know it…I just didn’t know what they were called! I found out what their proper title was when I was browsing an antiques website a few years ago, and ever since, I’d been chasing after one, trawling eBay, trying to find one that I liked enough (and could afford!) to buy. Man, these things are expensive! I finally got lucky and found one which I could afford without breaking the bank, and made a dive for it.
What Is a Chatelaine?
When most people think of chatelaines, they think of those things that women used to wear back in the Victorian and Edwardian eras – large, elaborate clasps or brooches which hung from a woman’s belt or waistband, with chains hanging off the bottom, which were used to carry all kinds of little accessories: Scissors, keys, sewing equipment, pocketwatches, change-purses, pillboxes…the list of things you could clip to a chatelaine was almost endless. Chatelaines for women died out in the 1920s, when changing fashions and an increase in the use of handbags meant that was no longer fashionable (or necessary) to carry all your necessities on a set of chains hanging off your belt!
A man’s chatelaine is little different from a lady’s chatelaine, except that male ones aren’t quite as complicated! They’re comprised of a hook-clasp, which fastens to the user’s garments, a watch-chain, to hold the watch, and a metallic drop-fob, usually with a plaque or cartouche at the bottom for engraving the owner’s name or initials into.
The chatelaine fob which I ended up buying
The construction or style of the fob is completely open to interpretation. Some have braided wire, some have chains of different sizes and lengths, some have panels held together with rings or rivets…it’s really up to you, what you’re after, what you can find, and what your personal style is.
How do you Wear a Chatelaine Fob?
Since chatelaine fobs are so obscure these days, it’s probably not surprising that most people don’t know how to wear them.
The watch is clipped to the chain, and stored in the watch-pocket of your jeans, slacks or shorts. And yes, that “fifth pocket” on your jeans IS a WATCH-POCKET. It’s not for your keys, or coins, or condoms, or your cyanide pill if your mission goes pear-shaped…it is for your pocketwatch!
The clasp-hook is slid over your belt, or the waistband of your jeans, or shorts, and then clipped into place. The drop-fob just…drops down the side! It’s function is largely decorative. And there you have it! All done.
That’s neat! I wanna buy one!
Sure you do!…um…good luck finding one, but, sure!
Search eBay, using terms like “pocketwatch fob” or “chatelaine fob”, or “antique watch-fob” or word-combinations in that general direction, and you might find what you’re looking for. But be sure to pay really close attention to what you’re buying. In particular, make sure of the following:
Make sure that the drop-fob has the seal-fob at the bottom. Sometimes, they’re missing.
Make sure that the watch-chain is included. And make sure that if it is, the lobster-claw clasp at the end (that goes around the watch) is also included! Make sure that the hook-clasp (that goes around the watch) is also there.
How much do they cost, you ask? Well, it really depends. They run the whole gamut of prices, from under $100, to over $300! How much you wanna spend on the style you like is entirely up to you. But keep in mind that the vast, vast majority of chatelaine fobs are gold-filled. They’re not solid gold, hell they’re not even silver vermeil. They’ll be gilt brass in most instances. Think about that before you potentially drop hundreds and hundreds of dollars on a watch chatelaine.
For any of my regular readers who are also on Facebook, and who have a passion for antiques, and history, I have created a new group for like-minded history-buffs and antiques-collectors to hang out!
The scope of the group covers all aspects of history between the years 1800 – 1960. So that means art, culture, music, movies, architecture, famous and obscure historical events, persons, wars, social history…the list goes on…all over the world. The group rules are in the description, and are pretty straightforward and obvious. Don’t do anything silly, enjoy the group, and share the group and its contents with any other like-minded Facebook friends!
Last year, I wrote an article on this blog about the time I discovered pair of sterling silver cufflinks with the Scotch College school crest on them. Discovered online, it was the biggest shock of my life that such a pair of cufflinks might even exist! I absolutely had to have them, and come hell-or-high-water, I added them to my collection.
This posting is all about the unlikely, and frankly – unexpected – sequel to the discovery of nine months previous.
Suffice to say that I was contacted by a retired antiques dealer up in Brisbane, who said that he’d stumbled across my blog while researching a discovery that he’d made in a pile of scrap gold and jewelry. His researches had led him to my blog, and after reading the first article I’d written about the sterling silver Scotch College cufflinks that I’d found, he was very eager to get in touch with me.
The cufflinks in gold (top) and sterling silver (bottom)
We made contact via text-message, and that was when he dropped the bombshell information on me that while digging around in some of his antique jewelry, he’d found a pair of the same cufflinks in 9ct solid gold!
I’ll admit it took me a couple of minutes to register this information. Silver cufflinks belonging to a high school are rare enough, but solid gold ones!? And antiques!? What the hell’s the chances of that?? He told me that he’d found my silver pair while researching the school motto, and asked me if I would like to buy the matching gold ones as well!
Uh, no. Thanks. It’s fine, no really…
OF COURSE I SAID YES!!
The back of the gold cufflinks, showing the maker’s mark and the hallmark for 9ct gold
After exchanging a couple of photographs and confirming what they were, and that they were real, we tossed a few numbers back and forth, finally settling on a price, with free express postage thrown in! They arrived within 24 hours, and were everything that I’d hoped them to be!
As you can see, these cufflinks are the exact same size, and design as the sterling silver pair in my previous posting. For this reason, I figured that they were made during the same era – the late 1920s through the 1930s, and manufactured by the Melbourne-based firm of G. Damman’s, which held a large jeweler’s and tobacconists’s premises on the corners of Swanston & Collins Streets in the Melbourne CBD.
The storefront of Damman’s, Tobacconists & Jewelers, 211-213 Collins Street, Melbourne
I do not know for what reason, nor under what circumstances cufflinks of such quality were manufactured for, and sold by, the school, and we may never know, but the fact that they exist at all is tantalising and fascinating! I absolutely love having both sets in my collection, and I think I can safely say that I would never, ever sell them!
Damman’s Tobacconists & Jewelers, Melbourne. Ca. 1963
Where the hell would I ever find another set!?
One of the most unusual elements about this whole story is where the cufflinks came from – not Melbourne, not even Victoria. No! They came all the way from Queensland, up near Brisbane!
How on earth a pair of antique gold high school cufflinks from Melbourne ended up in a suburb just outside Brisbane on the other end of the country is anyone’s guess, but now they’re back home in Melbourne where they belong, and safe in the company of their silver brethren!
The DAMMAN’S STG SIL mark for Australian sterling silverThe DAMMAN’S 9CT mark for 9-karat gold
Other Scotch College Memorabilia
Along with gold and silver cufflinks, the school also commissioned everything from chinaware and cups, glasses, tie-bars, tie-pins, badges, cigarette lighters (also commissioned from Damman’s Jewelers) and stationery. You can still buy a lot of this stuff (OK, maybe not the lighters) from the school, brand-new, or if you’re after something vintage, then online.
I’m very pleased to be given the chance to add these, possibly quite rare, cufflinks to my collection, where they can rest alongside their sterling silver brethren!
So, here’s something that I picked up at my local flea-market on the weekend. It was dusty, grimy, battered, and very, very faded. Despite that, a cursory examination told me that it was actually in excellent condition, despite being, what I judged, to be upwards of 100+ years old! It took me all of five minutes to decide that I really wanted this, and haggled a discounted price with the stallholder, and trotted away a very, very happy young man.
Once I got the folio home, I started examining it in more detail.
The more I looked at it, the more it appeared to me that this beautiful leather-good was significantly older than I initially believed. The styling of the pockets, as well as their general orientation and size, as well as the tri-opening panels, were all reminiscent of men’s wallets from the Edwardian era of the early 1900s – only – larger. Much larger!
Added to these observations was the fact that the folio was devoid of any modern features. No zippers, no snap-buttons, no elastic strap to hold it shut, no plastic of any kind, and – surprisingly – no indication at all – of where it was made! There wasn’t a thing on it, or in it, to tell me anything about it! No maker’s marks, no company logos, trademarks, company names, retailers’ addresses…nothing!
Once I got it home, I started the restoration process. This mostly consisted of double-checking, and reinforcing any loose or missing stitching – and going through the original needle-holes, where possible, to hold the folio together (fortunately, there wasn’t much of this which had to be done!). The next step was to clean the leather, and then came the labourous task of polishing it.
For this, I used ordinary dark tan boot-polish…and my right hand. Honestly, I just find it so much easier to apply shoe polish with your fingers, than fiddling around with a cloth or polishing rag of some kind. I just scooped it up, smeared it onto the leather, and started rubbing it in with my fingers. Once it was on, I just used a regular buffing brush to distribute and work the polish into the grain, spreading it out, and in, as I went. This was the real calorie-burner! I started on the outside and worked my way in, removing the belt entirely because it’d just get in the way (I polished that separately, later on).
The next thing to do was to do the interior. This was much more fiddly because of all the pockets and sleeves, but I got there in the end. Here, you can see what the folio looked like originally, vs. what it looked like when I was done…
Originally, the entire folio was this sort of…paper-bag brown. You can still see hints of the original colour showing through, where it had faded over the years (this also accounts for the uneven colour-distribution on the left and right). The interior received the same hand-applied polish and brushing, and then the entire thing was rubbed all over with a generous amount of dubbin.
Here you can see the final product, with the folio closed-up and belted…
…and the other side…
One element which I really loved was the decorative tooling around the belt-loop:
And finally, the interior…
If you look on the right, you might be able to see a light discolouration – a horizontal line running across the middle of the panel – that’s the result of the strap or belt being fastened across it for years and years, and the leather fading as a result.
Here it is fully opened…
On the left are three pockets (two small ones on top, one big one underneath). Next to them is the loop or sleeve to hold a writing instrument. The loop is VERY small. It will hold a pencil, or a dip pen, but that’s about it! Part of the restoration will have to involve enlarging (or replacing) this loop so that the folio can actually store at least one, decent sized fountain pen for the future!
The central panel holds one large pocket for storing documents, and three smaller ones for storing stamps and cards. Finally, on the right is one more large pocket, again for storing papers and documents. If you look very close, you can see the remains of an elastic strap sewn into the leather bordering, which would’ve been used to hold a notebook in place. Replacing that will be another part of the restoration.
Restoring the Folio
Apart from cleaning, polishing and rubbing in beeswax, the folio needed a few minor repairs and alterations. I hand-sewed some of the corners and edges where the stitching had come undone, to hold the folio together and to stop the pockets from tearing. Where possible I used the original stitch-holes to keep things neat, and also to preserve the integrity of the leather.
The next step was replacing the pen-loop. The original loop was extremely small and a pencil barely fit inside. To remove it, I cut away the original stitching using a pocketknife, removed the old leather forming the loop, used it as a pattern to cut a new piece of very thin leather, folded it over, stuck it inside, and using my sewing machine, I sewed the new loop back into place where the old one had been – again, using the original stitching-holes to try and keep things neat. The change is barely perceptible, but now, the new loop can actually hold a pen! I deliberately sewed the new loop out from the seam by about half a centimeter or thereabouts, so that it could fit a decent-sized modern fountain pen (and most vintage ones, too).
The final step in the restoration was sewing in a new, black elastic book strap (see above). To do this, I cut the stitches around the old book strap, removed the worn out remains of the old elastic, fed the new elastic through the same hole and sewed it back in. Then I stretched the elastic across, repeated the same thing on the other side, and sewed that in as well. To get the tension right (if it’s too loose, the book will just flop around everywhere), I measured the length, and then cut off two inches so that the elastic would have to stretch the last two inches, giving the right tension.
And here’s the final result:
As you can see, there have been a few changes. The enlarged pen-loop will now hold a modern cartridge-converter sized fountain pen (the pen in question is a Montblanc No. 145), and it has been made out of leather of a very similar shade to the original. In time, it will age to look more or less exactly the same.
The black elastic strap now holds the book in place, allowing me to flip it over either side, and access the two large pockets without having to remove the book entirely.
The night air is crisp, the seas are rolling, the ship is rocking as it ploughs through the waves, swaying back and forth, the muffled sloshing of the distant water sending you to sleep. To the casual observer, nothing is wrong, and nothing would be wrong, if not for a series of individually inconsequential events, which all conspired to create one of the greatest maritime disasters which few people today have ever heard of.
Everybody has heard of the sinking of the Titanic. If you’ve studied First-World-War history, then you’ll also be familiar with the sinking of the Lusitania, and maybe the Wilhelm Gustloff, if you’ve studied Second-World-War history. But how many people have ever heard of the sinking of a ship called the S.S. Atlantic?
To most people, the S.S. Atlantic sounds like the title of some cheesy 1970s B-movie disaster-film. The name just sounds so generic and bland and made-up-on-the-spot because somebody in charge of the creative processes for the movie couldn’t come up with anything more original! And yet, despite the rather uninteresting-sounding name, the story of the steamship Atlantic is probably more dramatic than any disaster-epic that Hollywood could’ve dreamed up back in the age of bell-bottoms, disco balls and loud, garish suits.
In this posting, we’ll be exploring the true story of the wreck of the S.S. Atlantic – when it happened, how it happened, and why.
What was the S.S. Atlantic?
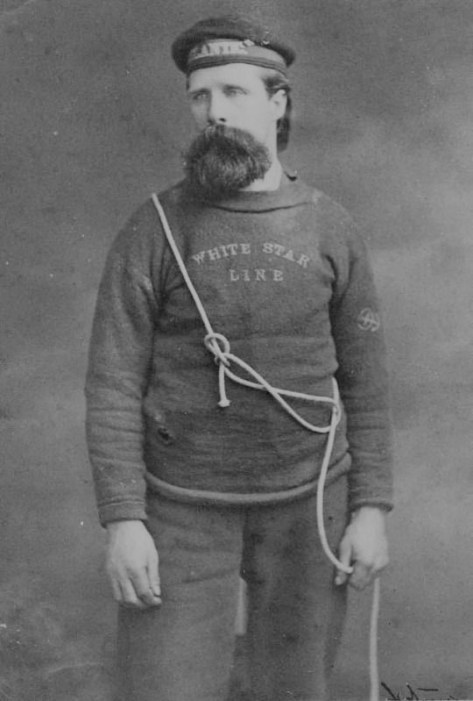
Launched in 1870, and departing on its maiden voyage on the 8th of June, 1871, the SS Atlantic was the latest in a series of ships built by Harland & Wolff – shipbuilders – for a company owned and operated by a man named Thomas Ismay – the company? The White Star Shipping Line.
The Atlantic was meant to be the second ship in the new ‘Oceanic‘-class of steam-powered sailing ocean liners. The others being the Oceanic, the Baltic, and the Republic. These ships were designed to be the most modern and up-to-date ships used by White Star since the company’s purchase by the Ismay family back in the 1850s. Previous ships were all sailing cutters, which differed little from other sailing ships of the early 1800s. By the second half of the 19th century, however, sufficient advances had been made in the area of maritime steam engines that the Atlantic and her sisters were among the first in this new generation of steam-powered sailing ocean liners.
And yes – I said steam-powered sailing ocean liners.
While White Star had started experiments with steam-powered ships as far back as the 1860s, the fact of the matter was that the public had little faith in these new ships – hard to blame them when a steam explosion on board the SS Great Eastern back in the 1850s, had killed 6 people!
To try and reassure the public that these ships were reliable (or at least, that they wouldn’t be in any danger if they weren’t!), early steam-powered ocean liners were still fitted with a complement of masts, rigging and sails – in this way, if the coal ran out, or if the engines broke down in the middle of the ocean, the ship could still be powered by sails. That said, sails were only ever seen as a secondary propulsion option. Since companies were eager to embrace the easier and faster method of steam propulsion, they would only have been hoisted in the event of a real emergency.
The S.S. Atlantic under full steam and sail. You can see the White Star pennant (flag) flying from the mainmast in the middle of the ship
Along with steam engines, the S.S. Atlantic featured other new innovations. The creation of steamships had caused a big design-shift in how ships were laid out. In the past, ships were always steered from the back, with the helm (steering wheel) mounted on the poop-deck over the tiller and rudder. Because steamships had huge smokestacks in the way, positioning the steering wheel all the way at the back was just no longer practical – it just wasn’t possible to see where you were going, past all the smokestacks, and the smoke, and the rigging…you get the idea.
To stop mariners from sailing blind, the ships’ wheels were now positioned forward, in a new structure known as the wheelhouse, and the steering mechanism was connected to the rudder by a series of gears instead of ropes and pulleys as they had done in the past. In many cases, the wheelhouse was built into a larger structure around and behind it, encompassing officers’ quarters, navigational chart-rooms and meeting rooms known as the ship’s bridge.
The ‘bridge’ was a new design feature on steamships, and they dated all the way back to the earliest paddle-steamers (think about the riverboats that you see on the Mississippi). Initially, the ‘bridge’ was…quite literally…a bridge! A long, flat, railed structure that bridged the gap over the hull, from one side of the ship to the other. By standing on the bridge, the ship’s captain and his officers could see everything that was going on, without getting in the way of passengers on the main deck below. It also allowed them to move quickly from one side of the ship to the other to inspect paddle-wheels, or to watch out for dangers such as rocks, icebergs, and other ships.
A typical engine-order telegraph
Along with repositioning the steering wheel to make navigation easier, enclosing it and the officers’ quarters in a new bridge superstructure and wheelhouse, and replacing ropes and pulleys with more reliable geared steering mechanisms, the Atlantic and her sister-ships had another innovation: The engine-order telegraph!
Engine-order telegraphs were used to convey orders from the bridge down to the engine-room below, regarding the ship’s speed and direction. Orders were typically FULL AHEAD, HALF AHEAD, SLOW AHEAD, DEAD-SLOW AHEAD, STANDBY and STOP – with the same repeated for reverse (or ‘ASTERN’). Pulling the handles on the telegraph would strike a bell which could be heard down in the engine-room, alerting the engineers to the requested change in speed or direction. The engineers (who had identical telegraphs down below) responded to the orders from the bridge by pulling their own telegraph levers to the appropriate position, indicating that the orders had been received, and were being acted upon. This was indicated up on the bridge by the ringing of another bell, so that the officers on watch knew that the engine-order changes were imminent.
The Atlantic was large for the day – it could transport over 1,000 passengers, after all, spread across four decks. The ship boasted ten lifeboats, a steam power-plant capable of 600hp, and a top speed of just over 14kt (approx 27mph), which was just fast enough to ensure a weekly service between Europe and America.
Sailing on the S.S. Atlantic
The S.S. Atlantic had a very successful sailing career…right up until it didn’t…and crossed its namesake ocean, running the transatlantic route between Liverpool and New York several times without incident. The second half of the 1800s saw a huge rise in the number of passengers sailing between North America and Europe – principally Canada and the United States on one side, and Britain, France and Germany on the other. The rise of steamships in general meant that for the first time, it was possible to actually have a reliable service of ships between North America and Europe.
A steamship, traveling at a set rate of speed, could do the one thing that sailing ships never could: Arrive on time! Not being reliant on weather and wind-power, steamships and the companies that operated them, could do the one thing that sailing ship companies never could: Have an actual sailing schedule! For the first time in history, you could say with fair reliability, that you would leave Southampton, or Liverpool, or Cherbourg, on Friday, and arrive in New York or Boston, or Montreal, the following Friday – and that exactly one week after arriving, you could sail home again if you wished, because exactly a week after you arrived, another ship would have arrived from Europe to take you home again!
Because of this, companies like White Star were desperate to have new fleets of ships that could capitalise on this suddenly gigantic market of people who wanted to travel – immigrants looking for a new life, titans of industry traveling for business, families going across the ocean to visit relatives or friends, and people journeying to Europe to take the Grand Tour! The steamship and its older brother, the steam-train, had given birth to an age of mass travel and tourism!
Having a reliable service did come with other advantages: for the first time, fresh food was available to paying passengers! Since nobody ever expected to spend more than a week or two at sea, it was finally possible to load fresh provisions on board, knowing that the voyage would be over (or nearly over) by the time they went off.
While speed, reliability and catering had definitely improved – not everything had. For example – sleeping arrangements. Ships like the Atlantic had a two-class system: steerage-class for paying immigrants and people looking to cross the Atlantic ocean on the cheap, and more affluent ‘Saloon-Class’ passengers…the closest equivalent to First-Class in the 1870s.
Like as on other ships of the era, passengers were segregated, typically into three (or depending on how you count them, four) broad groups: Single men, married couples and/or families with children, and finally, single women. Your marital status determined where you were allowed to sleep on the ship. Single men were housed forward of the main saloons and lounges, in the front of the ship. Couples, or families with children, were housed in the middle of the ship, and single women were housed at the back, or stern.
The idea behind this arrangement of the cabins (which ranged from comfortable four-berth family cabins, to two-bunk arrangements for couples, etc) was that respectable, upstanding men and women of good breeding, married (or nearly married) and with children, would be a suitable and safe barrier to prevent horny, single young men from falling upon defenseless, single women!
By separating single men and single women with married couples and families in the middle of the ship across both saloon or cabin-class passengers, and steerage-class passengers, the ship would avoid any instances of unwanted groping, sexual assault or other instances of shocking impropriety! The segregation between the various groups aboard ship was firmly enforced by the ship’s officers and stewards.
The two classes on board the Atlantic were divided, not only by marital status, but also by class, and class determined where you could go on the ship. For example, saloon or cabin-class passengers had access to the lounge and dining saloon, but also access to the open main decks, so that they could see the views of the sea around them as the ship steamed along. The ship’s dining room or saloon was the largest, most open room on the ship, and even included a piano for passenger entertainment. Steerage passengers could only move around within the interior of the ship, and not out on deck. While they were free to mix and mingle among themselves during the day – after lights’ out at 11:00pm each night – everybody was expected to know their place – to be in it – and not to leave it until the next morning!
As far as steamers went, the Atlantic was modern in many respects, boasting flushing toilets, hot, running water (warmed by the steam that drove the engines), fresh hot food, and technological advancements which would ensure a faster, and safer crossing. The ship also boasted one of the first uses of electricity at sea – not in electric lighting – not even in wireless telegraphy – but in call-bells. Passengers lucky enough to book cabin-class tickets had the benefit of call-buttons in their cabins, as well as in other parts of the ship such as the main public rooms. Stewards could now literally be summoned at the press of a button!
That said, the ship was still old-fashioned in other respects: For example, in an age before the widespread use of electricity, lighting the ship was done entirely by oil-fired lamps and candles – a significant safety-hazard on a rocking, rolling steamship in the middle of the ocean. In fact, one of the duties of the ship’s stewards on the Atlantic was to be on the lookout for smashed oil-lamps in heavy weather, when they might fall, break, and spread flammable liquid all over the floor.
The Last Voyage of the Atlantic
The Atlantic was considered a highly successful, and safe, ocean liner. Food was plentiful, cabins were comfortable, and the amenities were surprisingly modern. Remember that most homes in the 1870s didn’t have hot, running water, flushing toilets and central heating! Since its maiden voyage in 1871, the Atlantic had had nearly twenty successful voyages between New York and Liverpool and apart from a minor tussle involving bumping into another ocean-liner (a common accident in those days), it had a spotless record of sailings.
Everything changed on the 20th of March, 1873.
On that day, the Atlantic departed Liverpool as usual, and nothing was seen to be out of the ordinary – just another Thursday, like any other. On board were 835 passengers, including 14 stowaways, and two pregnant women (who gave birth during the voyage). The ship followed its usual route sailing past the southern Irish coast, and then out into the transatlantic shipping lanes.
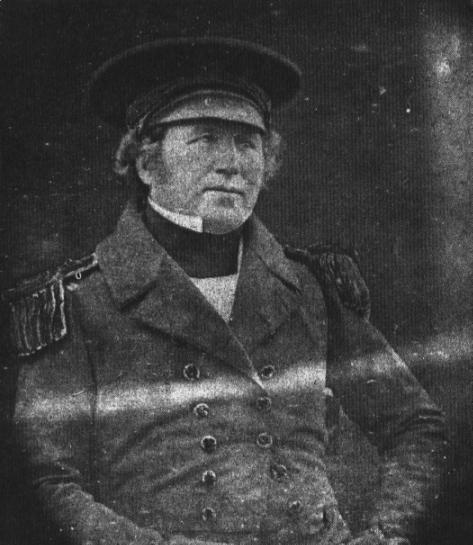
The journey was hard going. The weather was hardly ideal, and the heavy, rolling seas meant that the ship was fighting against the swells for every yard of forward momentum. In command is Captain James Agnew Williams. Beneath him are the Chief Officer, John Firth, 2nd Officer, Henry Metcalf, 3rd Officer, Cornelius Brady, and 4th Officer John Brown. Unlike on later, and larger ships, the position of Chief Officer and First Officer (which, for example, on the Olympic-class ships of the 1910s, were separate positions), were combined into one position in the 1870s.
Along with the deck-officers are a number of other crew, including up to seven engineering crew, six quartermasters, the ship’s surgeon or medical officer, and several dozen members of the crew, mostly able seamen. In total, officers and crew numbered 143 in total.
The 830-odd passengers included 32 passengers in “saloon” or “cabin”-class, and 615 passengers (men, women and children) in steerage. In all, there were 86 children aboard, approximately 40 each, of boys and girls, of various ages, ranging from toddlers and infants, to adolescents.
Thus loaded, the Atlantic set out to cross the ocean which it had done so many times in the past with no issues. As the ship sailed further westwards, however, the weather, fresh to begin with, only started getting more and more turbulent with every passing day. During his daily rounds, Captain Williams would confer with his officers regarding speed, position and heading. He would also speak to Chief Engineer John Foxley for a report on the engines, boilers, and most importantly – fuel consumption. Like every steamship of the era, the Atlantic was a coal-fired steamer, with coal being brought from the coal-bunkers on wheelbarrows, by trimmers, to be dumped next to the boilers, whereupon it was shoveled into the furnaces by stokers or firemen.
It was the job of Foxley and his fellow engineers to keep an eye on things like steam pressure, lubrication, and wear and tear on the engines – especially important during rough weather. It was also Foxley’s job to inform the captain of any issues involving the engines, boilers, or fuel-supply. One of Foxley’s daily tasks was measuring fuel consumption. Every day at the same time, he would have to determine how much coal had been burnt in the last 24 hours, against how much coal they had left, and how far they could travel on the reserve.
The voyage was rough. While the Atlantic’s billed top speed was 14kt (maybe 15 in good weather), during the heavy seas on its latest crossing, the ship would be lucky to reach 12kt, with the whole vessel pitching and rolling with every wave.
Halfway through the voyage, during one of his daily inspections, Captain Williams asked Foxley for his usual morning coal-report. Foxley duly gave his morning report about the amount of coal still available onboard for the onward journey. However, the information provided to the captain was not always 100% accurate. Engineers routinely under-represented the amount of coal left in a ship’s bunkers during the voyage. This practice meant that the amount of coal reported was always less than the actual amount of coal available. The reason for this was very simple – in the event of a real emergency, there would actually be more coal than reported, to keep the ship going.
Into the Storms
As the Atlantic’s voyage continued, Captain Williams grew increasingly concerned. A trip that usually took a week was now taking eight days…nine days…ten days. The storms that the Atlantic had started to encounter were not dissipating, and the ship’s engines continued to struggle against the heaving waves. Just seven days out from England, the ship was hit broadside by a rogue wave that reached as high as the boat-deck, tearing lifeboat #4 from its davits and washing it out to sea.
It was through these fearsome waves that the ship had to fight, constantly slowing its engines to prevent mechanical failure. From 14kt down to 12, down to 8…down to 6kt…the Atlantic was struggling to make headway, and while the ship was in no danger of sinking – there was another danger: Running out of coal.
Just to maintain speed and heading, the ship’s engines were burning enormous amounts of coal to keep up the seam pressure required to power the engines, and the ship was still nowhere near New York City. Fearing that the ship might run out of coal before it reached New York, Captain Williams decided to take emergency actions, and executed the 19th century equivalent of an emergency aircraft landing – premature docking.
In the event of a ship running low on coal, it was common practice to divert to the nearest port, drop anchor, re-coal the ship and then continue on to your original destination, however, re-coaling mid-voyage was usually seen as an action of last resort. Coaling halfway to your destination suggested that the ship had not been properly provisioned when it left its home port, or else, had been poorly managed during the voyage – either instance being an embarrassing miscalculation which would reflect badly on the ship’s crew, and by extension, the shipping line that employed them! After all – the whole purpose of taking a steamer was because they were more reliable – what was the point of taking a steamer if the steamer had to keep stopping for coal?
Diverting to Halifax
Despite efforts to conserve coal, the Atlantic still appeared to be running out of fuel. Two days out from New York City (approx 400 miles), Captain Williams once again asked Foxley about the coal situation. Foxley knew that the ship still had 160 tons aboard, but – as was his habit in under-representing the amount of coal on board, so that there would be a fuel-reserve for emergencies – Foxley reports 127 tons remaining.
Williams knew that the ship required at least 130 tons to reach New York – less than what the ship actually had on board – but thanks to Foxley’s misrepresentations, Williams decides to err on the side of caution instead. Not wanting his ship to be caught literally dead in the water with no steam, he decides to divert to the nearest major port to re-coal his ship, re-provision with fresh food, drinks and other necessities, and then proceed to New York fully stocked (or at least, stocked enough to reach New York with supplies to spare).
The ship’s officers prepare to alter course, from West-Southwest, to Nor-Northeast, heading, not for New York City – but for Halifax, Nova Scotia. While ships docking at Halifax is a common occurrence, for the purposes of coaling and re-provisioning, the Atlantic has one great disadvantage:
None of the officers have ever gone to Halifax before. Never having traveled there, they were not familiar with the harbour conditions, nor the precise layout of the coastline, and to make things even more treacherous, they will be traveling there at night, in stormy conditions, which would make the ship harder to control.
With coal-supply no longer an issue, Captain Williams orders to officers on watch to alert the engine-room to the change in direction and destination. The telegraph on the bridge is set to Full Ahead, so that the ship may arrive as soon as possible, thereby reducing as much as possible, any chances of delays once they have arrived in Canada.
The Sambro Island Lighthouse
Halifax Harbour, while one of the largest harbours on the Canadian Atlantic coastline, is filled with dangers. While the harbour is wide, it is also shallow, and running aground on sandbars and rocks is a real risk. To guide ships towards the harbour, in 1759, the Sambro Island Lighthouse was erected on Sambro Island near the harbour entrance. Captain Williams knows this, and gives orders to Second Officer Henry Metcalf, officer-of-the-watch, to keep an eye out for the lighthouse. The captain’s orders are clear:
The ship is to proceed at its current speed and heading until it either spots the lighthouse, or until 3:00am – whichever comes first, upon which time the captain was to be roused from his sleep, the anchors dropped, and the ship would stop engines and wait out the storm, in preparation for entering Halifax at dawn. It is now the 31st of March.
The Approach to Halifax
As the Atlantic changes course towards Canada, Captain Williams declares that he is going to bed. He leaves his instructions with Officer Metcalf, as well as a separate order with his personal steward, to wake him just before 3:00am, the time specified that the ship should stop for the night. The captain retires to his cabin, but before he can turn in, a newspaper journalist traveling as a passenger asks for a brief interview. The captain agrees, and the two men retire to his cabin to talk. Past midnight, the journalist finishes his interview and leaves the bridge. Captain Williams turns in.
On the bridge are Officer Metcalf, and quartermaster Robert Thomas – as on most ships of the era, the actual steering of the vessel is managed by quartermasters, usually nicknamed ‘QM’s’ for short. At the very front of the ship, able seaman Joseph Carroll is acting as forward lookout. To starboard is Patrick Kiely, and Fourth Officer Brown is patrolling the ship’s stern, along with quartermaster Charles Roylance, who is also the aft lookout.
By now, it is 2:45am, April 1st. As requested, the captain’s steward walks onto the bridge and heads to the captain’s cabin to wake him up. However, he’s intercepted by Officer Metcalf, who says that the captain is not to be disturbed. Ahead, the sea is stormy, but there are no obvious obstructions in sight, giving Metcalf the incorrect assumption that the ship is on course for Halifax. What neither he, nor any of the other crew realise is that the Atlantic is not actually heading towards Halifax! The storm has blown the ship far off course, twelve miles west of the harbour entrance.
Unaware of this, the ship’s officers and lookouts expect to spot the beacon of Sambro Island Lighthouse any minute now, off to the port, or left, side of the ship’s bow. Quartermaster Thomas, one of the few crew on board who has actually traveled to Halifax before, grows suspicious – surely if they were on course, they would’ve seen the lighthouse by now? He informs Officer Metcalf that the ship may be off course, and that they should either slow down, stop, or alter course as a precaution.
Before Metcalf can decide what to do, the two forward lookouts called “Breakers ahead!“. Officer Metcalf realises too late that the ship is heading, not for the open mouth of the harbour, but towards the Nova Scotia coastline! As with the Titanic, the next order is “Hard a’Starboard!“, the order to turn the ship’s wheel hard to the right, to push the tiller in that direction, thereby steering the ship left! Metcalf’s next order was for the ship’s telegraph – FULL ASTERN. Before the ship can clear the rocks and make a full turn, however, it slams headfirst into the breakers off of Meagher’s Island!
The grinding, screeching sound wakes up the passengers and the ship’s keel is torn out like a tin can! The shuddering and vibrating makes some passengers think that the ship has finally arrived in Halifax, and that the anchor-chains are being dropped to keep the ship from drifting.
The sudden loss of momentum causes the ship’s slipstream to rush through the vessel, extinguishing almost all the lamps and candles in the corridors and cabins, plunging the ship into almost total darkness! Captain Williams is thrown awake from the impact against the rocks and rushes out onto the bridge. The time on the wheelhouse clock: 3:15am.
Captain Williams took immediate charge of the situation. He orders the ship’s engines to remain at FULL ASTERN, so that they can reverse the ship off the rocks, but before the engines can affect any kind of serious movement, another huge wave hits the stern of the ship, throwing it up onto the rocks! The Atlantic is now broadside to the shore, with its port (left) side facing the sea, and starboard side towards the shore.
Officer Metcalf orders the lifeboats to be swung out, and loaded with women, children and what few men there are around. The captain decides that this is suicidal – with the waves so high, there is no way to row the ship’s ten lifeboats to shore, and orders the passengers out. Metcalf refuses to leave, and the lifeboat with the men onboard, and himself as commanding officer, is lowered down the port side into the sea.
Once the lifeboat was cut free from the falls connecting it to the ship, the massive waves which had so successfully shifted the entire ship up onto the rocks grabbed the lifeboat and smashed it against the hull, obliterating it completely, and killing everybody aboard – including officer Henry Metcalf.
With the ship not appearing to be in any immediate danger, the captain ordered everybody on deck. Stewards walked through the corridors, knocking on cabins to wake up passengers and order them up onto the boat-deck. On the bridge, Captain Williams issues another order, to the two quartermasters on duty: QM Roylance, and QM Speakman. They are to begin the process of calling for help.
Wrecking on Meagher’s Island
With the ship stuck fast on the rocks, Captain Williams has to decide what to do next. Not being awake at the time of impact, Williams has no idea where the ship is, and with the lamps extinguished because of the crash, there’s almost no light with which to see for him to try and pinpoint their position.
After raising the alarm and canceling any further attempts to evacuate passengers by lifeboats, the captain orders the two quartermasters, Roylance and Speakman – to begin summoning help.
30 years before the advent of wireless telegraphy, the two quartermasters are limited in using whatever they can find to raise the alarm. They open a crate of flares and, standing on the bridge, they start launching distress rockets high over the ship, and into the storm. They use the only source of light – the still-burning binnacle lamp on the bridge – to ignite the rocket-fuses and launch them into the sky. It’s hoped that the sound of the rockets exploding, or the flash of the flares, will alert villagers on the island to the presence of the sinking ship.
Wedged across the rocks, the Atlantic starts to take on water, and becomes unstable. Pounded by waves, every last one of the ship’s ten lifeboats are either smashed against the hull of the vessel as they’re lowered into the sea, or else are torn off the davits before they can be loaded.
As Roylance and Speakman continue to light and fire the distress rockets, the stern of the Atlantic shifts dramatically and the propeller strikes the rocks under the keel, shearing off the blades and causing the propeller-shaft to over-spin. Chief Engineer Foxley orders the engines to be shut down, and prepares his fellow engineers to evacuate the ship’s engine room and boiler rooms. Before leaving, they open the safety valves on the boilers, discharging the pressurised steam inside, to prevent a catastrophic boiler explosion. Further destabilised by the loss of the rudder and propeller, the ship rocks violently and the aft end slides off the rocks which it had been swept onto, and starts to sink.
As the stern slides off the rocks and into the water, calamity is unfolding below decks. Unable to find their way out of the rapidly flooding passenger quarters in the pitch-blackness, hundreds of women and children drown in their cabins, or in the corridors that lead to the boat-deck. The bow, still out of the water and wedged on the rocks, fares slightly better, and male passengers and some crew, housed in the bow and admiships, are able to scramble out on the hull by opening portholes or smashing windows.
Escaping the Sinking Ship
What passengers and crew which had managed to scramble out of the ship started climbing onto the railings, rigging and masts of the ship to keep them from being swept off the decks and into the waves. As the ship rocks even further, Speakman and Roylance are unable to keep firing rockets. Up to now, eight have been successfully discharged from the bridge. As they prepare to fire the ninth, the ship rocks and the rocket explodes prematurely, hitting both men in the face. Before they can recover, or fire off more rockets, the rolling hull of the ship causes the crate containing the rockets to be thrown off the bridge and into the sea.
By now, the stern is almost entirely underwater and the ship is listing 30 degrees to port. To keep the passengers and crew safe, the officers, led by Chief Officer John Firth, direct the passengers to climb onto the ship’s masts and yardarms. At least here they will be able to hold on, or sit in the rigging, high enough out of the water that they won’t be hit by the waves, while they figure out how to evacuate them.
What nobody has yet realised is that one member of the crew has already made it to land – Quartermaster Robert Thomas – the helmsman – was thrown off the ship and washed ashore. Alive, he scrambles to his feet and runs up the cliffs to try and find help. At the same time, at a farmhouse on Meagher’s Island, the O’Reilly family is roused by the sounds of – what they initially believed – to be artillery-fire! The head of the family runs out into the storm and witnesses the last of the Atlantic’s distress rockets being fired into the air. As he runs in the direction of the flare, he stumbles into somebody coming the other way – Quartermaster Thomas!
Mr. O’Reilly takes Thomas back to the farmhouse and warms him up while his family provides him with food and drink. Thomas relays the news of the wrecking of the steamship Atlantic and together, the two men rouse the inhabitants of the island to mount a rescue mission. For the first time since 3:15 that morning, the crew of the Atlantic have finally discovered where they are – on the south side of Meagher’s Island.
While Thomas is raising the alarm on Meagher’s Island with the help of the O’Reilly family, Quartermaster Speakman has started trying to rescue passengers and crew from the sinking ship. With a rope, he has managed to swim to the nearby Golden Rule Rock, and after establishing a lifeline, starts guiding people ashore.
Quartermaster John Speakman, who helped to fire the distress-rockets, and rig lifelines from the ship to help the survivors
It’s at this time that Mr. O’Reilly and Quartermaster Thomas arrive back at the wreck-site. Speakman returns with Thomas and Mr. O’Reilly to the farmhouse, where Mr. O’Reilly’s daughter, Sarah, has started preparing bread and soup for any survivors, which are now slowly making their way inland and towards the O’Reilly farm.
Building on Quartermaster Speakman’s efforts, the other members of the Atlantic’s crew start stringing out more lifelines. Ropes taken from the ship are lashed to the railings around the bow and are then swum across towards Golden Rule Rock. In time, five such lifelines have been established, and one by one, survivors start swimming from the ship to the shore, holding onto the ropes for support as they go, some of them bring more ropes so that a further lifeline can be linked between the rock itself, and the beach nearby.
On the ship itself, passengers try to rescue the men still trapped inside the ship. Using whatever tools they can find, those outside the ship walk along the sloping hull of the bow to where those inside hammer against windows and portholes to get their attention. Portholes are either opened or smashed with tools, and roughly 100 men are rescued from inside the ship.
John Hindley, aged 12. Photographed shortly after the wrecking of the S.S.Atlantic. The only child to survive the sinking.
One passenger who is able to fight his way out of the hull and onto the sloping hull with the help of the other survivors, is John Hindley, a 12-year-old boy. As the stern sinks into the crashing waves, every single woman and child aboard the Atlantic is drowned instantly. Hindley survived only because he had begged his mother and father to be allowed to sleep in the men’s quarters with his older brother, at the bow of the ship. This change in sleeping arrangements saved his life, and he was able to escape the sinking ship onto the decks while the childrens’ quarters at the stern sank into the waves.
By now, the residents of Meagher’s Island, and nearby communities, have heard about what has happened, and begin mounting rescues of their own, taking to the rolling seas in fishing boats, and multi-oared, shore-based lifeboats. Survivors are collected from Golden Rule Rock and rowed to Meagher’s Island, while other lifeboats row to the wreck to help survivors on the ship to escape. One of the last men off the ship is Captain James A. Williams, who later recounted his experiences, and how fearful he was that the ship would break its back at any moment, split in two, and sink.
Rescuing the Last Survivors
As dawn broke, the majority of the ship’s surviving passengers and crew had been rescued, either from Golden Rule Rock, or from the wreck of the Atlantic itself, but as the sun rose, it was suddenly realised that the ship still had survivors on board!
Chief Officer John Firth, passenger Rosa Bateman, and an unnamed cabin-boy had spent the whole night sitting in the mizzen mast of the wrecked ocean liner. Too high up for rescuers to reach, and too exhausted to climb down or jump and swim to a lifeboat, they had been abandoned, with the villagers on Meagher’s Island unable to find a safe way to rescue them.
The wreck of the Atlantic (on the left) over on its port side. April, 1873
Their salvation – for some of them, at least – came from an unlikely source – Reverend William Ancient – a clergyman on Meagher’s Island.
Ancient, a former sailor of many years’ experience, had retired from the navy to become a priest, and upon waking on the morning of the 1st of April, hurried to the wreck-site when he heard what had happened. With another lifeboat and a crew of villagers, he rowed out to the wreck and started to try and find a way to reach the three survivors trapped in the rigging. The cabin-boy jumped and was picked from the water. Officer Firth had a rope tied around him and then he too, jumped, and was hauled from the sea. Rosa Bateman, the only female passenger to escape the ship, was not so fortunate, however.
Tied to the mast by Officer Firth in an attempt to stop her from being swept out to sea, Mrs. Bateman had died of hypothermia by the time Reverend Ancient and his fellow rescuers had reached her.
Of the roughly 950 passengers and crew on board, only about 400 had survived – all of them men. Not a single woman, and only one child – 12-year-old John Hindley – had survived the the wreck of the S.S. Atlantic.
The Aftermath of the Disaster
In the days and weeks that followed the disaster, the villagers of Meagher’s Island and the survivors of the shipwreck all struggled to piece together what had happened, what had not happened, and what would happen next.
The most immediate issue was what to do with the ship.
By the afternoon of the 1st of April, 1873, the Atlantic had slipped entirely off the rocks upon which it had run aground, broken in half, and was starting to sink. Divers approached the wreck to retrieve the bodies of dead passengers and crew, some even using dynamite to blast the wreck apart to retrieve, not only the corpses, but also personal belongings of the survivors, and the cargo in the ship’s holds. The dead were laid out on the beach where the ship’s surviving officers stood guard over them, until such time as they could be prepared for burial.
The funeral-service for some of the Atlantic’s dead
Once the ship’s dead and its cargo and other items had been retrieved, the vessel was plundered and looted by villagers looking for anything leftover which might be of value. The cargo, waterlogged and damaged, was the subject of insurance-claims, which were duly paid out. Un-sellable, the ruined cargo was auctioned off to the highest bidders, to do with, or use, as they saw fit.
The bodies were buried across at least three cemeteries, including two for the protestant, and catholic victims of the disaster. Reverend Ancient, who had rescued Officer Firth and the cabin-boy, presided over the protestant burial service.
Newspaper account of the wrecking of the Atlantic. The man in the middle of the spread is the Atlantic’s captain, James Agnew Williams
Funds raised by the White Star Line, the city of Halifax, Nova Scotia, and other entities paid for such things as prizes and rewards for the heroes of the disaster, and compensation for the losses. Reverend Ancient received a gold hunter-pocketwatch in recognition of his efforts in saving Officer Firth and the cabin-boy, the last two people rescued from the ship before it sank entirely.
So, what happened afterwards?
Like with the sinking of the RMS Titanic, 40 years later, the Atlantic was subjected to a full court of inquiry to determine what had happened. In the end, the court found Captain Williams guilty of mismanagement of the ship and poor command of his crew. The White Star Line was blamed for insufficient coaling of its vessels (although this was later disproven and the charges dropped). While he shouldered most of the blame for what had happened due to his previous actions such as not staying on duty through the night, and not being fully aware of the ship’s fuel-situation, Captain Williams was nonetheless praised by the court for his leadership and direction during the disaster itself.
The Atlantic Today
The wrecking of the S.S. Atlantic faded from public consciousness with surprising swiftness. Two private cemeteries, and a memorial cenotaph, are the only period-reminders that the Atlantic was ever lost at all, and even these were quickly forgotten. The cenotaph was only rediscovered and restored in the 1980s!
Perhaps the most telling example of how quickly people forgot about the wreck of the Atlantic happened in 1929. It was in that year that a film was released, titled “ATLANTIC”! It’s a thrilling tale of death, disaster and mayhem at sea! Of a ship with not enough lifeboats! A ship that strikes an iceberg and which sinks with over a thousand people still trapped aboard! A ship named!…the RMS Titanic.
Yes that’s right. 1929 saw the first-ever “Titanic” ‘talkie’ film, with full music, sound-effects and dialogue. Because the White Star Line was still in operation when the film was being made, the producers could not use the name ‘Titanic’ in the title. To get around this, the filmmakers simply renamed their film to what they thought was a more generic title!…Unwittingly naming one disaster film after yet another disaster from the history of the White Star Line! So obscure had the wreck of the Atlantic become, just 56 years after it had happened, that nobody had realised the coincidence!
Today, the memory of the S.S. Atlantic is kept alive in Nova Scotia through museum exhibits, interpretation centers and historic parks, either in Halifax, or nearby Meagher’s Island (today renamed Mars’ Island), where artifacts, models and personal mementos from the wreck are on permanent display, telling the story of the White Star Line’s greatest shipwreck before the disaster of the Titanic, which so overshadowed it that the wrecking of the Atlantic became lost to history…
Further Reading
Want to find out more about the wreck of the S.S. Atlantic? Here’s the sources used for this posting, which cover the sinking in greater detail…
The Passengers & Crew of the S.S. Atlantic – this is an amazing resource. It attempts to list every single person on board the ship during its last voyage (keep in mind that the information here is taken from period records, so is not 100% accurate).
Ever since ancient times, Europeans have held the Far East in awe, fantasizing that countries such as China, India, Indonesia and Japan were magical kingdoms filled with all kinds of wondrous, rare and amazing commodities – silk, porcelain, tea, spices, beautiful timber, rare dyes, ivory, tortoiseshell, and fascinating jewels! Trade-goods such as ivory, ginger, cinnamon and pepper were exported from China and India all the way to Europe along a network of roadways, rivers and coastal sea-routes which eventually became collectively known as the ‘Silk Road’.
Commodities transported along the Silk Road were rare, expensive, exotic…and open to theft…unscrupulous dealers…confidence artists…spoilage or damage…and all manner of mishap. Added to that the fact that products took literally months to travel from India, Indonesia, Japan or China to Western Europe, and it’s no wonder that the prices paid for these things were astronomical!
To try and keep costs down and to maximise how much they could purchase (and sell) at any one time, European traders increasingly took to shipping vast amounts of exotic goods back to Europe by sea. However, this was expensive, dangerous, and extremely time-consuming, with a round-the-world voyage taking the better part of a year, or more, to complete. Having to sail around the Cape of Good Hope, or Cape Horn, meant that sea-voyages between Europe and Asia were never going to be easy, or safe.
To try and rectify this, ever since the 1500s, and the discovery of the Americas, Europeans had set their sights on trying to find a faster, easier route to Asia – one which didn’t sail around Africa, or around South America, one which could vastly speed up trade between East and West.
What is the Northwest Passage?
The route chosen to try and improve trade between Europe and Asia was one which sailed west across the Atlantic, north, past Greenland, and then west, past the northern coasts of Canada, and then south into the Pacific.
This route became known as the Northwest Passage.
In an era when Europeans were still calling mythical continents “Terra Australis Incognitia” (“Unknown Southern Land”), nobody actually knew whether a Northwest Passage even actually existed!…What if it did? What if it didn’t?
The only way to know for sure was to physically sail to Canada, and map out the entirety of the northern Canadian coastline to find out if it was even possible to sail from the Atlantic coast of Canada to the Pacific.
Numerous expeditions had tried over the years, with little success. Even famed navigator and Royal Navy officer, James Cook, legendary for mapping most of the South Pacific – had tried – and failed – to find the Northwest Passage.
In 1837, King William IV died, and his niece, the 18-year-old Princess Victoria, ascended the British throne as Queen Victoria!
The Victorian era, as the period between 1837-1901 is known, was an age of optimism, determination, confidence, and great technological advancements! Huge progress was made in the fields of medicine, manufacturing, industry, technology and communications during this time. It was for all these reasons that, in the 1840s, Britain decided that it was time for another crack at the Northwest Passage!
Equipping the Franklin Expedition
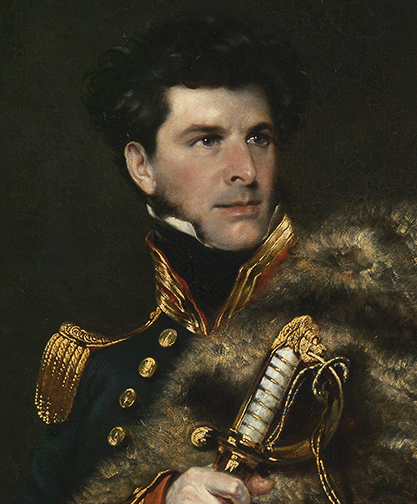
In the 1840s, the British Admiralty decided that the time was ripe for another expedition to the Northwest Passage. To lead this daring venture into the frozen north, it selected what it thought, was the best man for the job: Captain Sir John Franklin.
Born in 1786, Franklin was a man of considerable accomplishment. A veteran of the Napoleonic wars, and naval officer who fought alongside Admiral Nelson, a fellow of the Royal Geographical Society, and former Lieutenant-Governor of Van Diemen’s Land (Tasmania), Franklin was used to a rough life, and spending years away from home – both of which would be vital qualities required of any leader of such a perilous expedition! Franklin was also selected for his intelligence – of all the letters after his name and title, were three which were possibly, the most impressive: FRS. Fellow of the Royal Society!
The Royal Society of London for Improving Natural Knowledge – or the Royal Society, for short – is the oldest surviving, and most famous, learned society in the world. Since its establishment by royal charter by King Charles II in 1660, it has been at the forefront of scientific, technological and medical research and advancements for the past 360 years! Membership to the Royal Society is strictly by invitation ONLY, and to be invited to become a member (or more precisely, to be granted a ‘fellowship’) is not only a gigantic honour, but also confirmation of one’s vast contributions to the worlds of science and technology!
Famous fellows of the society included Sir Isaac Newton, Dr. Stephen Hawking, Sir David Attenborough, Charles Darwin, and brainiac-of-brainiacs: Albert Einstein!
To gain admission to the Royal Society is so difficult that surely anybody who held the letters FRS after their name, was certainly not going to be some addlepated dunderhead, right? As if the powers-that-be needed even more convincing – Franklin had already headed a number of other expeditions to the Arctic in previous years! What else could one ask for? The Admiralty was convinced, and duly appointed Franklin to be expedition leader.
The Ships: Darkness and Terror…
With its leader selected, the next task was to find some way of getting the crew through the Arctic. The Admiralty selected two ships: The Erebus, and the Terror! Erebus is named for Erebos – Greek God of Darkness!
Two ships. Darkness, and Terror.
Sounds like a good omen!
A model of Sir John Franklin’s flagship – the HMS Erebus
To survive the long, likely multi-year voyage through the Arctic, the two ships were renovated or “fitted out” to be as well-built for their new task as possible. The two ships had already proved themselves capable of arctic exploration in the past – in the 1830s, both vessels had sailed in company to Antarctica with Sir James Clark Ross (after whom the Ross Ice Shelf in Antarctica is named), but the British Admiralty wasn’t taking any chances when it came to trying to find the mythical Northwest Passage.
To this end, the ships’ hulls were reinforced with iron plates and rivets to guard against crushing ice, striking icebergs, and slamming into rocks. The interiors were fitted out with cabins, galleys, toiletry facilities, libraries, an infirmary and physician’s offices, and the holds were modified to fit as many of the essential supplies as possible. As a further safeguard, they were also subdivided into watertight compartments, just like on later ships like the Titanic, to try and reduce the dangers of flooding if the ships were holed by ice.
On the technological side, the ships were equipped with steam engines and propellers, and even a rudimentary, steam-powered central-heating system, to keep the ships at least moderately comfortable in the freezing sub-zero temperatures that the crew were certain to encounter. To make sure that the ships weren’t rendered impotent and immovable by some sort of mechanical breakdown during the voyage, even diving suits were included in the equipment-stores, so that underwater repairs could be made.
Food and Drink for the Voyage
The Franklin Expedition was expecting to be away from civilisation for at least two to three years, during which time, they would have to survive almost entirely on whatever food they had brought with them. To this end, the ships were almost exclusively provisioned with one of the greatest wonder-products of the Victorian age!
Canned food.
Canned, and bottled food, have existed since the late 1700s. Canning started becoming really popular in the Georgian era, when Napoleon Bonaparte insisted that somebody had to come up with a convenient way of packaging large quantities of food so that it could be transported easily, stored safely, and wouldn’t spoil for weeks, months or even years at a time.
Food that was canned and sealed tight could last almost indefinitely – a useful trait for an expedition that would be away from civilisation for up to three years! Early canned food was packaged so well that the cans were nigh impossible to open! Soldiers during the Napoleonic Wars were given canned food as rations, but exactly how the hell you get into them – well – that was a matter of ingenuity! Bayonets, axes, hammers, chisels, pocketknives, and even the odd musket-round were all used to try and crack open the almost impregnable containers to gain access to the food within! Canning was almost too effective for its own good!
One of Stephen Goldner’s original cans, as used on the Franklin Expedition, discovered in the 1870s. Now in the National Maritime Museum in the UK. Can-openers not being invented until at least 1855, the Goldner cans were ‘opened’ using a hammer and chisel to cut a hole in the lid
The task of provisioning the Erebus and Terror with the necessary rations was given to industrialist Stephen Goldner. On the 1st of April, 1845 – April Fools’ Day – an order of…wait for it…8,000 cans of various types of foodstuffs…were to be prepared in just SEVEN weeks! If this was Franklin’s idea of an April Fools’ Day prank, then Goldner was not impressed, and while he tried his best to meet the order, the need to cook, pack, lid, and solder, over a thousand cans of food a week – all done by hand, remember – led to inevitable quality-control issues. In the understandable haste, lids were improperly placed on the cans, and the lead-based solder used to ensure an airtight seal between the lid and the can itself was unevenly and sloppily applied by workers who were rushing to meet deadlines. This led to some cans being left with tiny holes and gaps in the solder, or even instances where the lead solder leaked into the food due to improper application!
Whoops…
While Goldner’s canning company provided the crew with the majority of their everyday food, for more specialised, luxury provisions – and what good Victorian exploratory expedition could be without those – the ships’ officers turned to another supplier: Fortnums!
Founded in London in 1707, Fortnum & Mason has, for over 300 years, been one of the most famous department-stores in the world. Specialising in exotic and luxury foodstuffs, Fortnum’s has been patronised by almost every great explorer in history, from Sir Edmund Hilary to Earl Carnarvon and Howard Carter – and the officers of the Franklin expedition were no exception!
Along with the food, equal attention (or perhaps, rather more attention) was paid to something which was…rather more important: What the crew would drink during the voyage. As it would be impossible to bring along enough drinking water, wine, rum, grog, brandy and scotch for a trip expected to last at least two years, the Erebus, and the Terror were fitted out with a new innovation: Desalination plants! These water-filtration systems would be able to process seawater pumped up from the ocean and onto the ships, and make it drinkable, giving the crew – in theory – an endless supply of fresh, drinkable, desalinated water!
The Crew of the Franklin Expedition
Everybody knew that going to the Great White North was going to be a perilous and possibly fatal endeavour. Because of this, the Franklin Expedition had to choose its crew with great care. In total, the two ships – Erebus and Terror, were loaded with 134 men: 24 officers, and 110 seamen and other crew.
Among the crew were four surgeons, two blacksmiths, cooks, stewards, four stokers (to handle the steam-engines), royal marines, engineers, and dozens and dozens of able seamen. Added to this were the two captains: Of the Erebus – Captain Sir John Franklin himself, and of the Terror, Captain Francis Rawdon Crozier.
The two ships were fully provisioned and equipped, crewed and loaded, and left England on the 19th of May, 1845.
The Trip to Greenland
The first leg of Franklin’s voyage was from England to Greenland. Departing as they did, on the 19th of May, the ships sailed north, first to Scotland, and thence to Greenland. During this part of the voyage, the two arctic ships were accompanied by two more ships bringing up the rear with extra supplies and equipment. When the ships arrived in Greenland, the supply ships loaded their cargoes into the two arctic ships and prepared to head for home. Unnecessary equipment, cargoes, and all outgoing mail from the two expedition ships were loaded onto these ships during the expedition’s stay in Greenland, so that they could be returned to England. Along with all the mail and other things that wouldn’t be going on this epic voyage of discovery, were five men:
Thomas Burt, an armourer (aged 22), William Aitken, a royal marine (aged 37), James Elliot, a 20-year-old sailmaker, Robert Carr (another armourer, aged 23), and an able seaman named John Brown.
The five men, one from the Erebus, and four from the Terror, were excused participation in the expedition on the grounds of health – all five men had fallen ill, although what of was not recorded. They were loaded onto the departing supply ship, and went with it when it returned to England.
They didn’t know it yet, but these five men would later count their lucky stars to be the only members of the expedition to ever return alive.
The Voyage to the Great White North
Once the ships had been re-provisioned, and all necessary supplies and shopping had been accounted for and completed, the next step in the voyage was the most perilous: entering the Arctic Ocean!
With their modern, canned provisions, central heating, steam engines, desalination plants, and even the first, rudimentary daguerreotype cameras, everybody back home in England felt that the Franklin Expedition was by far the best-equipped and most prepared crew that had ever set out to tackle the ferocity of the frozen north, and if they couldn’t find the Northwest Passage…if indeed such a passage even existed!…then nobody would!
The ships left Greenland at the height of summer, and sailed northwest, towards Canada. The aim was to reach the Arctic during the warmest months of the year, to give them as much time as possible to explore the region before the all-too-short Arctic warm season faded away, and they would be doomed to spending months trapped in the ice, waiting for the spring thaw the next year.
By the 28th of July, 1845, the ships had crossed Baffin Bay off the west coast of Greenland. It was at this point that the ships were spotted by two whalers sailing south – the Enterprise and the Prince of Wales. This would be the last time that any of the Franklin crew, or their two ships – would be spotted by European eyes. It was shortly after this that the Erebus and the Terror disappeared into the frozen, merciless embrace of the Arctic, to begin their expedition proper.
The Sea of the Midnight Sun
Exactly what happened to the remaining 129 men of the Franklin Expedition from July 28th onwards, can only ever be guessed at. Few written records remain, and what eyewitness accounts that there were (by Inuit eskimoes native to northern Canada) were initially, largely discarded as fanciful, overblown and inaccurate, by rescuers who refused to believe the truth of what had actually taken place so far from civilisation.
1845: The First Year
The Erebus and the Terror sailed in company westwards from Baffin Bay and into the frozen wastes of the Arctic Ocean. With only scant maps to guide them, and absolutely no ability to rely on compass-bearings (being so close to the North Pole, magnetic compasses were useless), the crew had to rely on the positions of the sun, stars and moon to navigate.
The Arctic summer was particularly cold that year, and progress was slow. By the time the ice started to freeze up again in the approaching winter, the two vessels had only made it as far as Cornwallis Island. Unable to go any further, Franklin and his crew made the decision to stop here for the winter. The ships were anchored off the coast of a tiny, gravely outpost sticking up out of the water – Beechey Island.
The Beechey Island graves, three from Franklin’s expedition, and one from a later rescue mission in the 1850s
Along with being their winter camping-site, Beechey was also where the crew of the Franklin Expedition farewelled the first three of their own: John Torrington (Petty Officer), William Braine (private, Royal Marines), and John Hartnell (Able Seaman). Later autopsies on the corpses determined that the three men had died of what the Victorians called ‘Consumption’ – or tuberculosis.
1846: The Second Year
With the spring thaw, the ships started moving forward once more. It was Franklin’s job to find the fastest, safest route through the Arctic to the Pacific Ocean, and to try and achieve this, he was determined to avoid the more extreme, more northern routes that might be available to him, and instead stick to southern passages through the Arctic. After mapping Cornwallis Island, the Franklin expedition had two choices to make:
They could either sail directly west, between Melville Island to the north, and Victoria Island to the south, and out into the Arctic Ocean, or else south, between Prince-of-Wales Island and Somerset Island.
Not wishing to linger in extremely-northern latitudes for any longer than was absolutely necessary, Franklin’s crew elected to sail south, reasoning that it might be warmer, and therefore, easier to navigate. To this end, they sailed from Cornwallis Island through Peel Sound, a stretch of water between Prince-of-Wales Island to the west, and Somerset Island, to the east.
What nobody aboard the Erebus or the Terror could’ve known at the time was that they were sailing into a deathtrap.
‘The Erebus in the Ice – 1846’, a painting by Belgian artist Francois Musin
The problem with sailing south during the spring thaw of 1846 through the Sound was that this was the exact same route that all the sheet-ice, icebergs and growlers took, when they too, broke free from other bodies of ice, and started drifting! Currents drove them south towards Canada, and Franklin’s two ships soon found themselves trapped in the mother of all arctic traffic-jams! Had they sailed west, the ice would simply have floated past them as the expedition made for the open sea past Melville Island, but by going south – the Franklin ships ended up going in the exact same direction as all the ice that they were trying so desperately to avoid! The result? The ships became stuck in ice. Again.
At first, Franklin’s crew were unphased. After all, they knew that something like this was likely to happen, and so once they had made as much forward progress as they could, they dropped anchor off King William Island on the 12th of September, 1846, and prepared to make winter camp, yet again. Not wishing to stay onboard the ships in case they broke free of the ice prematurely, or were crushed by the compacting force of more ice piling up behind them, the crew instead offloaded necessary supplies from the ships and set up camp on King William Island itself, where they would be safe from the risk of ice cracking, breaking and splitting apart if the floes and sheets shifted unexpectedly.
1847: The Third Year
By early 1847, it was time to start moving again. The spring thaw had come and while the ice did start breaking up, as it should’ve done, it wasn’t nearly as much as one might’ve expected. The ships moved at literally a glacial speed, limited entirely by the movement (or lack of movement) of the ice which surrounded them.
At the end of Peel Sound, the two ships once again reached a junction where they would have to make a decision: Sail east, around King William Island, or sail south, past the island, and then westwards past Victoria Island and continue onwards to find the Northwest Passage.
Unsure of the exact geography of King William Island, and whether or not they would be able to sail all the way around it, the ships chose to stick to their current route and sail south.
Again, it was a decision that they would come to regret. What none of them could’ve known was that by sailing east and around King William Island, they would avoid the heaviest ice-floes, popping out near the southern coast, and then sailing on past Victoria Island’s southern coastline and towards the Pacific. By sailing directly past King William Island’s western coast, however, they were headed into a virtual logjam of ice, which packed together in an immovable, frozen barrier, their movement slowed to a crawl thanks to all the small islands that bridged the gap between Victoria and King William Islands.
It was through this narrow, congested, ice-clogged channel that the two ships now had to navigate.
The men tried everything to get through the ice. Axes, sledgehammers, chisels and ice-saws were used to cleave, slice and cut through the ice, which was several inches, or even feet thick, but their efforts yielded negligible results, with the ships barely crawling forwards. In desperation, the men even resorted to using more dangerous (but also more effective) mining techniques to get through the ice!
Using augers, the men drilled shafts into the ice, and packed them with gunpowder. The powder was tamped down and fuses were lit. The explosions fractured the ice, but not nearly enough to break it into manageable chunks, once again forcing the men to expend valuable calories in shifting the tons of ice by using hand-tools.
By May, 1847, the ice remained just as immovable as ever, and it was at this point that the crews started to lose hope. With explosives running low, no coal to fire the engines, and the men exhausted from the freezing cold and backbreaking labour, morale started to plummet among the crews.
What happened next is only known thanks to a message, stored in a metal tube and hidden in a cairn (a pile of stones built up to form a pillar) that was left by the Franklin crew. Dated the 28th of May, 1847, it stated that four days previously on the 24th, a party of eight men (two officers and six men) had left the winter encampment on King William Island, and were attempting to explore and map the island. The note concluded “All Well”.
1848: The Fourth Year
Whatever the hopes of the Franklin crew might’ve been, they appeared to have vanished quickly. Just a few weeks after the note in the cairn had been written, Captain Sir John Franklin died, on the 11th of June, 1847. With the ice refusing to thaw for a second year in a row, the men remained trapped on King William Island throughout 1847 and into 1848, where the ice…AGAIN…refused to melt!
The original message in the cairn – AKA the ‘Victory Point Note’
Getting desperate, the men decided that the time had come to look to their own salvation, and to abandon the mission entirely. On the 25th of April, the cairn was revisited, and the note extracted from within. An addendum was written on the few inches of remaining paper, stating that Franklin had died, and that the crew were abandoning their ships to the Arctic pack-ice. By now, twenty-four additional men had died. From 134 to begin with, minus 5, left them with 129. Minus Franklin was 128, minus 23 others, was 105 surviving crew.
Exactly what the twenty-four men (of which Franklin was one), had died of is not recorded, although later examination of the bodies revealed a mix of scurvy, tuberculosis, pneumonia, hypothermia, and lead poisoning.
Deciding that it was safer to leave the ships and head south to find civilisation, the crews took the drastic step of lowering the ships’ lifeboats onto the ice. Packing the lifeboats with all the available food, tools and other equipment that they might possibly need, the remaining 100-odd men, after consulting a few charts, made for Back River, 250 miles away, to the south. They reasoned that, if they could reach the river, then they could sail the boats south, and find help.
And so, on the 26th of April, 1848, pulling lifeboats and sledges packed with food and materiel, the 105 surviving crew started off on the journey that they hoped, would lead to their own salvation. Leaving the ships behind, they headed to King William Island, and started the agonising, freezing, painful and exhausting trek south.
With little water, freezing temperatures, snowstorms, dwindling provisions of increasingly questionable edibility, and suffering from everything from frostbite to scurvy, lead-poisoning and pneumonia, the men headed off into the frigid arctic wastes towards Back River, never to be seen again.
The Franklin Rescue Missions
Franklin’s crew had been forewarned that they should expect to spend at least two years, if not three, in the freezing north of the Canadian archipelago, and that they would not likely return home for many, many years. Everybody knew this. Franklin knew it, Crozier, his second in command, knew it, the admirality knew it, and Lady Franklin, Sir John’s wife, also knew it.
It was for this reason that two whole years passed, before any great concern was raised about what might be happening to the Franklin crew. In 1847, Lady Jane Franklin started getting worried, and began a gentle pressure on the Admiralty to send out a search party to try and find her husband.
The Admiralty, however…decided not to. They saw no need. After all, the Franklin Expedition was expected to be gone for up to three years! There was surely no need to panic! Not yet, anyway. However, not everybody shared the Admiralty’s confidence in the Franklin crew.
One of the men who didn’t was a certain fiction author and journalist, a man who was a close, personal friend of Lady Franklin – a man named Charles Dickens. Using his journal, Household Words, Dickens and Lady Franklin roused up public support for a rescue mission, and between 1848 to 1858, nearly four dozen search-and-rescue missions were launched to try and find the Lost Expedition, with Lady Franklin personally sponsoring…wait for it…SIX different expeditions to try and find her husband, or else, to discover his fate!
So…what happened to Sir John Franklin?
Franklin’s Lost Expedition
Exactly what happened to Franklin’s expedition has been a mystery for over 170 years. Nobody knows all the facts, and nobody knows all the truths. What is known is gleamed from what few scant documents and relics that could be found, and what eyewitness accounts the search-and-rescue teams could gleam from local Inuit natives. So, what did happen to the Franklin crew?
What follows is the most widely-accepted and, believed-to-be, accurate timeline of events.
April 26th, 1848. After two winters and two summers trapped in the ice, the Franklin crew decide to abandon their vessels, pack what supplies they can carry onto sledges and lifeboats, and trek south to Back River, to try and save their own skins.
The 104 remaining men drag their supplies onto King William Island, and head due south. It is freezing cold and the going is impossibly hard. There are no trees, no grass, no bushes…no vegetation of any kind. Just freezing wind and scattered limestone shale all over the place. The exhausted, hungry, starving men are struggling to heave the massive lifeboats along, stopping every few hours for rest and food, or to try and make camp.
This is what we know, according to all surviving written records. What happened next was gleamed from testimony taken from local Inuit Eskimos living in the area.
Unable to make it to the river, the men returned to the ships, deciding that it was safer to stay aboard them, rather than risk their lives out in the open. In 1849, when they felt stronger, they started out again in smaller groups, heading south once more.
With rations almost exhausted, the crew learn how to hunt seals and caribou to survive. Where possible, the Inuit assist them, either in hunting, or in butchering their kills. Each party thanks the other, using gifts of meat to repay each others’ kindnesses. The men learn how to cook their kills by starting fires using seal-blubber for fuel.
Slowly, parties of men of greater and lesser numbers, start to leave the Erebus to try and once again, make the perilous trek south.
During the winter of 1849-1850, the Inuit witness the crew performing a military-style burial ceremony. It is believed to be the funeral of Captain Franklin’s second-in-command – Captain Francis M. Crozier, officer in command of the Terror.
Captain Francis Crozier, photographed in 1845 before his departure on the Franklin Expedition
After this, more Inuit witnessed more crews of men still trying to head south. One group of up to forty men were witnessed dragging a boat behind them. They later speak of coming across a campsite littered with dead bodies, racked by starvation, cold and disease. Examinations of the bodies…or what’s left of them, anyway…caused the bleak prospect of cannibalism to rise to the surface…a fate later confirmed by proper autopsies.
By summer, 1850, the ice finally thaws. The remaining crew try to get the Erebus moving again, but severely weakened and ill, they almost all succumb to starvation and disease. Inuit recall boarding the ship to find the men dead in their cabins.
After this, in 1851, the Inuit locals report the existence of four more men. Accompanied by a dog, they head west. Who these men are, where they ended up, and what became of them is unknown. These men – whoever they are, and whatever became of them – are believed to be the last survivors of the Franklin Expedition.
These details, pieced together from written records, eyewitness testimonies from the Inuit, and relics and evidence recovered during the several fruitless searches for the Franklin crew, are all that are conclusively known about the fate of the men. Between buried bodies, human remains, and a single ship’s lifeboat with two corpses inside it, there was precious little to go on, and by the end of the 1850s, it was conclusively proven that the Franklin Expedition – widely believed to be the most well-prepared, well-stocked, most technologically-advanced polar expedition ever assembled – had been a horrifying, abject and abysmal failure, which tested mankind’s resolve and limits to so far beyond their breaking-points that polite, Victorian-era society scarcely dared to believe it.
Why did the Franklin Expedition Fail?
The loss of the Franklin Expedition is one of the great human tragic mysteries of the world, up there with the abandonment of the Mary Celeste, the disappearance of the Roanoke Colony, and the loss of the S.S. Waratah.
What happened? How did it happen? Why? These were the questions that Lady Franklin, the Admiralty, and the millions of people all over the world, demanded answers to, when the worst was finally revealed in the years following the exhaustive search-and-rescue efforts made in the 1850s.
So, what exactly went wrong?
The Ships
On the surface, the Erebus and the Terror looked like the ideal vessels for the Franklin Expedition. They were robust, well-built warships which had already proved themselves in arctic exploration well before they were selected as the vessels which would convey the Franklin crews to glory! The ships had been strengthened, reinforced with iron sheeting, had had central heating installed, and steam-engines with propellers and comfortable quarters prepared for the men. So, what went wrong?
Before they were used to convey Franklin and his men into the pages of history, the Erebus and the Terror had been used by Sir James C. Ross, during his explorations of Antarctica. And before that, the two vessels had been bomb ships! Bomb ships were a type of warship designed to fire mortar-rounds, instead of the conventional cannon-shot that most sailing warships would’ve used. They were literally used to bombard the enemy – hence ‘bomb ships’.
Deck-plans of the Erebus
Because of this, their construction meant that they had to be very stable, to withstand the powerful recoil of the mortars going off on their decks. This meant that they were heavy, and had low centers of gravity, to reduce the risk of them capsizing and rolling over from the recoil of the mortars. This is great in battle, and even great when you’re sailing through the depths of the Southern Ocean…but it’s useless up in the Canadian archipelago! These heavy, ungainly ships with their deep drafts were unsuited for the shallow waters of the Arctic, especially when it came to weaving through the dozens of little islands immediately north of the Canadian mainland.
In the 1840s, the two ships had been converted to steam-propulsion, but crudely. Steamships did exist in the 1840s, but the engines installed on these two vessels had one great flaw – they weren’t maritime engines! Instead of purpose-built ship’s engines, the Erebus and the Terror were fitted out with small steam-locomotive engines used to power trains! Weighing up to 15 tons each, the engines were of a poor and inefficient design, and nowhere near powerful enough to generate the horsepower required to move the ships forward at any appreciable speed, or for any great distance, partially because neither were they given anywhere near enough coal! When the ships had been provisioned in England, only 120 tons each of coal, had been provided to them. At 10 tons a day, this would last just 12 days.
12 days’ worth of coal, for a voyage expected to last three years.
Because of this, the engines were almost never used. It took too long to heat them up, boil the water, create the steam and drive the engines to move the ships…and the engines weren’t nearly powerful enough, anyway. Why the Erebus and the Terror hadn’t been fitted out with proper maritime engines is unknown, but the end-result was the same: The engines, being underpowered and rarely used – were nothing but dead weight at the bottom of the ships, making already slow vessels even slower.
The Food
It’s long been believed that one of the main contributing factors to the disaster of the Franklin expedition was the food that the men ate during the voyage. The vast majority of it was canned. In theory, this was a good idea. Canned food is easy to store, easy to ration, takes up less space, is easier to cook and easier to serve.
But only if it’s done properly.
The cans of food and beverages used on the Franklin expedition were poorly sealed and the food was not properly prepared. This led to spoilage, leakage, and loss of nutritional value. The result? The men started suffering from the one disease that all seamen lived in mortal terror of: Scurvy, caused by a crippling lack of Vitamin C.
Scurvy had been the nightmare-fuel of sailors for hundreds of years, even before the Franklin expedition set out. In the 1700s, it was discovered that citrus juices could prevent scurvy, and to this end, the Royal Navy instituted a system whereby every sailor was given generous quantities of grog every day, to keep scurvy at bay. Grog was a mix of rum, watered down with lime or lemon-juice. This sweet-and-sour cocktail, a mix of booze and vitamins, kept sailors hydrated, healthy, and happy.
The canned provisions might’ve done as well, if they had been prepared properly. But apart from the lack of vitamin C, the canned food posed another great danger: Botulism. When food (especially meat) goes bad, the bacteria known as Clostridium Botulinum starts to form, which can lead to symptoms such as sight problems, speech problems and fatigue – all of which would be exacerbated by the freezing cold of the Arctic.
Navigational Issues
Another huge problem for the crew, apart from the shortcomings of their ships and the deficiencies in their provisions, was the much more unmanageable problem of dealing with navigation.
To find your way around the world in the 1840s, you needed three pieces of equipment: A sextant to tell you your latitude, or North-South position, a chronometer or clock, to tell you your longitude, or East-West position, and a compass, with which to give you your direction, or ‘heading’. Compasses are magnetic. They will always point towards the magnetic North Pole, which as we know, is populated by a fat guy in a red suit who runs the world’s largest toy factory!
The problem with magnetic compasses is that the Magnetic North Pole moves. A lot. The rotation of the Earth means that the pole is constantly shifting – more than once throughout the Earth’s history, the poles have flipped completely, and then flipped back again! In most latitudes, this isn’t an issue – the North Pole (ie: True North) is so far away that these slight variations in movement made by Magnetic North are imperceptible, and a general northerly bearing is usually sufficient to guide a ship along its route – if it needs a more accurate fix – well! – that’s what the chronometer and sextant are for!
But the problem is that the shifting poles and questionable compass readings get more and more extreme the further north or south you go. Right up in the Arctic Circle, with the pole moving all the time, the compasses get completely disoriented as they try to keep up with the shifting magnetism of the North Pole. The result?
The compasses don’t point north. They don’t, because they can’t, and they can’t, because they point to Magnetic North, which, as I said, is constantly moving. This leads to the very real problem of your compasses being completely useless. You can’t rely on them at all to point the way, and can only manage to do so by maps, stars and the position of the sun…if the sun will deign to rise, that is – in the Arctic Circle, that isn’t always guaranteed.
Along with faulty compass readings came the added strain of trying to navigate a seascape which had very few accurate charts. No complete maps of the Canadian Archipelago existed in the early 1800s, and for the first time since the search for Australia in the 1700s, mankind found itself quite literally sailing off the edge of the map.
This inability to rely on maps meant that every directional change the crew made would be a literal, and figurative – shot in the dark. They had no idea what lay ahead, or what to expect. Instead of sailing west, they sailed south. Instead of sailing east, they sailed west. Instead of trying to avoid the ice, the Erebus and the Terror found themselves trapped in endless floes which refused to melt for years on end!
Captain Sir John Franklin
The last factor which spelled doom for the Franklin Expedition was, arguably, Sir John Franklin himself. While he was an arctic veteran, a famous explorer, naval hero and man of letters who was immensely popular with the British public, and well-liked by his crew, Franklin did have a number of shortcomings that made him less than ideal for the mission at hand.
Sir John Barrow
Franklin’s unsuitability as expedition-leader is borne out by the fact that he wasn’t even the Admiralty’s first choice for leader! Sir John Barrow, Second Secretary to the Admiralty, and the man in charge of finding the crew to man the expedition, had hoped to convince the elderly Sir John Ross to come out of retirement and head the expedition. Ross was a famous naval officer and arctic explorer of note, but he was already approaching old age, and had no desire to go to sea – especially on such a risky mission as this!
Admiral Sir John Ross
Barrow’s second choice was Sir James Clark Ross – Sir John’s equally-famous and well-accomplished nephew, another famous polar explorer! Unfortunately, Sir James had just gotten married, and, like his uncle, had no desire to go gallivanting off around the world at such short notice!…especially when he had far more interesting diversions waiting for him at home.
Barrow’s THIRD choice for commander was an Irishman named Francis Rawdon Crozier – another polar-exploration veteran of note. While Crozier was experienced, Barrow wanted an Englishman to head the expedition, and since his first two choices had bowed out and his third was not ideal, he finally settled on Sir John Franklin – Option #4!…Ouch!
Sir James Clark Ross, Sir John’s nephew, and a noted polar explorer in his own right
At 59, Franklin was already approaching old-age by Victorian standards. While he was a naval officer, and a polar explorer, and certainly had the intelligence to get himself admitted to the prestigious Royal Society, Franklin had many shortcomings as well. Although he was a popular hero, and was well-liked by the men under his command, whom he treated with kindness, consideration and respect, the fact of the matter was that Franklin was stubborn, hotheaded, took unnecessary risks, and didn’t always respond positively to well-meaning advice.
Captain Sir John Franklin, photographed in 1845 before his departure on the Erebus
All these faults led to his near-death in 1819, when he attempted an overland expedition from Canada to the Canadian Archipelago, to find the Northwest Passage by land. His foolhardiness and inattention led to eleven of his 20-man crew dying of cold and starvation. By the time they abandoned the mission and his men had convinced Franklin to turn back, the remaining men were close to death themselves. Franklin survived by literally cutting up and eating the leather uppers on his hiking boots! This humiliating end to what was supposed to be glorious victory of exploration, led to him being mercilessly lampooned as the “man who ate his own shoes”!
All these issues – the failings of the ships, the problems with the food, and nutrition and health of the crew, and the navigational challenges and uncertainties faced by the navigators aboard the two ships are what led to what was supposed to be the most well-equipped polar expedition in history, going down as one of the greatest exploratory failures of the Victorian era.
In the end, the first successful maritime navigation of the Northwest Passage took place in 1906 under the command of Norwegian explorer Roald Amundsen. Unlike Franklin, Amundsen had the good sense to turn EAST when he reached King William Island instead of continuing south – and that made all the difference. By turning east, he was able to sail around the island and pop out the bottom. All the tiny islands north of him (through which the Franklin Expedition had attempted to sail) now worked in Amundsen’s favour, instead of against him, like with Franklin. The islands which formed the bottleneck of icebergs and field-ice that had so impeded the Franklin expedition, kept the waterways past Victoria Island relatively ice-free, allowing Amundsen a clear passage westwards towards the Pacific Ocean!
What Happened to Erebus and Terror?
Everything I’ve written about thusfar, has just about covered the various fates of the crew, but what about the ships that they left behind? The Erebus and the Terror. What happened to them?
Again, the only way to be sure of anything, is to go by Inuit testimony. The ships were known to be above ice throughout the 1840s, but by the early 1850s, were starting to fall victim to the crushing ice that had by now, surrounded them for years. The Terror succumbed first – carried south by the crushing ice, the ship finally broke apart and sank off the southwest coast of King William Island in an area now known as Terror Bay in honour of the lost ship.
The Erebus was marginally more successful – the pack-ice had drawn the ship south along with its sister-ship, but instead of crushing the ship to matchsticks, the ice thawed enough for it to start moving again, although it did not get very far.
In 2014 and 2016, the wrecks of the Erebus and the Terror (in that order) were discovered by Canadian maritime explorers. To protect their historical integrity, the exact location of the wrecks was (and still is) a closely guarded secret, so as to prevent recreational divers from attempting to find them. The British Government, the official owner of the two shipwrecks, gifted them to the Canadian government, which later entrusted the safekeeping and guarding of the wrecks to the Inuit people, through whose territory the two ships had tried to sail, all those years ago. Among the artifacts raised from the ships was the bell of the Erebus.
The President and the Expedition
The Lost Expedition of Sir John Franklin, and their noble quest to find the Northwest Passage, happened back in 1845, over 170 years ago, and yet, in the 21st century, one particularly poignant reminder of the expedition’s great peril remains with us still. It’s likely that you’ve seen it on TV. Several times, in fact. It’s likely that you’ve seen it in photographs, on the internet, on Youtube, in TV shows, and even in big-name Hollywood movies!
Even if it wasn’t what it is, it would still be an immensely famous artifact, and yet, this irreplaceable piece of history is quite literally overlooked, every single day, without most people realising even in the slightest – what it actually is.
What is this artifact, you ask?
The Resolute Desk in pride of place at the Oval Office in the Biden White House
The desk of the president of the United States of America.
Gifted to President Rutherford B. Hayes in 1880 by Queen Victoria as a token of goodwill between the two nations of America and the United Kingdom, the desk – popularly known as the “Resolute Desk”, was made from the timbers of the British warship HMS Resolute, when it was broken up in the 1870s. The desk is one of three that were commissioned by Queen Victoria when the ship was finally scrapped. The other two are the “Grinnell Desk”, and a smaller ladies’ writing-desk, made for the queen herself.
The Resolute was one of the several ships which in the 1850s, sailed to the Arctic to try and find Franklin’s Lost Expedition. Had it not been for much better planning, the crew of the Resolute could’ve joined the crew of the Erebus and the Terror in their icy fate! When the Resolute got stuck in the ice, the crew decided to abandon ship, and sought refuge on an accompanying vessel which sailed them back to safety. Fearing that their ship would, like the Franklin ships, be crushed into matchsticks by the tons of ice and then sunk, they never expected to see it again. However, to everybody’s amazement, the ship broke free of the ice in the spring thaw, and drifted around the North Atlantic for years, before it was discovered by American whaling ships and sailed back to America.
The Plaque on the Resolute Desk
The ship was restored to full working condition, with replacement rigging, sails and flags, and was returned to the Royal Navy as a gesture of goodwill between the United States and the United Kingdom. Years later, the gesture was reciprocated in the giving of the Resolute Desk – which to this day, still bears a plaque on it detailing its role in the Franklin expedition.
Want to Read More?
For the sake of brevity, I haven’t covered everything about the Franklin Expedition in detail. If you want to find out more, here’s the sources I used…
Pocketknives are fascinating little gadgets. Whether it’s a tiny 2.1/2-inch quill-knife, or a larger 5 or 6-inch stiletto, pocketknives have been part of our lives for centuries. Carried and used for everything from survival situations to cutting open boxes that come through the mail from eBay, opening mail, eating food, carving, cutting, slicing, opening cans, or even something as mundane as sharpening a pencil – pocketknives have been the go-to mainstay tool for all these tasks for generations.
My current knife collection
Collecting pocketknives is a highly popular hobby. Most knives are relatively cheap, portable, robust, and don’t take up a great deal of space. The wide variety of knife-patterns, blade-types, decorative elements, manufacturers and sizes in pocketknives is what makes them so collectible, and knives from famous manufacturers, made of rare or precious materials, or which were limited editions, can command high prices on the secondhand market.
In this posting, I’ll be talking about the general restoration process behind breathing new life into the type of pocketknife that most people will be familiar with: The standard slip-joint pocketknife, as typified by those made by W.R. Case, Victorinox, J. Rodgers & Sons, Southern & Richardson, and countless other manufacturers during the 1800s, and the majority of the 20th century.
Basic Knife Anatomy
In this posting, I’ll be talking about slip-joint knives: the kind of knife with a blade that folds back into the handle, so everything going forward, will relate to this style of knife.
To begin at the beginning, we need to know what the various parts of the knife are.
The body of the knife is made up of various components, which are stacked, one on top of the other, and held together with metallic rods.
On the outsides, working our way in, we have the bolsters. Not all knives have these. Some do, some don’t. Some have them on both sides of the knife, some only have them on one side. Bolsters are the flat, metallic panels at either end of a pocketknife. They’re usually brass, nickel-silver, stainless steel or some other corrosion-resistant metal. Their purpose is to strengthen the knife, and to protect the covers or scales on the sides of the handle, from damage.
Southern & Richardson cutlers, advertising a pocketknife with nickel-silver covers, and a built-in magnifying glass
Covers, also called scales, are the large, decorative panels which make up the majority of the bulk on the handle of a folding knife. Covers can be simply utilitarian, and be made of plastic, or steel or brass, but usually, they’re decorative. Pocketknives have had scales or covers made of anything from sterling silver to mother of pearl, ivory, bone, horn, any number of a variety of different woods, and various types of plastics in any number of finishes. Depending on the knife, scales may be smooth, or corrugated/textured. Textured scales are typically added to a knife to make it easier to grip.
Inlaid into the scales are (although, not always) small, metal panels, which can be almost any shape – rectangular, shield, circular…the list goes on. These are sometimes included for the purposes of embellishment (and to give the customer a place to engrave something like a name, date, or initials), or else, will contain details such as the company’s name, logo, or other trademark. These small panels are known as shields, badges or plates, depending on which name-convention you take to heart. Not all knives have these, but most will. They’re usually made of either brass, or nickel-silver.
The bolsters and the scales fit onto flat strips of metal, known as liners. Usually, they’re made of brass, so as not to rust and jam the knife.
Between the scales, bolsters and liners is the spring. The spring is the flat strip of metal at the bottom of the knife (or the top of the handle, if holding the knife with the blade-edge facing down). The spring is made of spring steel, which is nice and flexible. The spring is what holds the blades of the knife open, or closed.
Finally, you have the blades of the knife. Anything that comes out of a knife is known as a ‘blade’, regardless of whether it actually is a blade, or not. Knives can have anywhere from one, to two, three, four, or more blades, and extra features, depending on the knife’s size, and complexity. I won’t cover all this here, because otherwise we’ll be here all day.
Finally, the knife is held together with pins and rivets. The pins are driven through the bolsters, liners, and blades, and are then hammered and peened over, and smoothed off, to hold the knife together. Smaller rivets or pins are used to hold the scales or covers onto the liners, to stop them from coming loose.
The factory of Joseph Rodgers & Sons, Cutlers, Norfolk St., Sheffield, UK.
A standard slip-joint folding pocketknife will have two pins for holding in the blades and bolsters (one pin on each end of the knife), a third pin in the middle, to hold the spring in place along with the liners and covers/scales, and usually (but not always) extra pins or rivets to hold the scales in place. As with the liners, the pins or rivets are usually brass, nickel-silver, or stainless steel.
Some pocketknives have additional features, such as the very popular lockback mechanism. The lockback mechanism is a toggle or button located at the back of the knife. When the knife is opened, the ‘lock’ prevents the back-spring from shifting, keeping the blade steady while you’re using it. Pressing the toggle depresses the back-spring, which allows the exposed blade to be unlocked and swung back into the closed position. Lockback mechanisms are popular because they prevent the knife from closing unexpectedly if the blade is being used for particularly aggressive tasks (carving, splitting firewood, cutting particularly difficult materials, etc). Because of this, it’s usually seen as a safety mechanism, to prevent user injury.
Blade Anatomy
Now that we’ve covered basic pocketknife anatomy, let’s cover blade-anatomy. At one end you have the point, at the other end, you have the heel. Behind the heel you have the tang. The tang is the part of the blade through which the rivets and pins are passed to hold the blade to the handle. The tang is also where information such as the knife model, or manufacturer-details, are stamped.
At the bottom of the blade you have the edge, at the top, you have the spine. In between is the belly, or main body of the blade. Just below the spine you will have a slit or groove, commonly called a nail-nick or nail-pull. This is the indent which you put your fingernail into, to pull the blade open from the handle.
Buying Antique and Vintage Pocketknives
Pocketknives range from the mundane to the magnificent, from the pedestrian to the precious. Part of the thrill of owning them – of owning any collection – is the thrill of the hunt!
Antique and vintage pocketknives are highly collectible, and they can often be found in antiques shops or flea-markets for a handful of dollars, or online, for significantly more. In buying vintage folding pocketknives, you want to check a number of aspects before coughing up the money.
First and foremost – make sure that the knife is complete. Are all the scales there? Are there any missing pins? Dropped-off bolsters? Broken blades? I know that a lot of knives look very solidly made, but bolsters, pins and scales can all drop off over time, and you want to make sure that all aspects of the knife are firm and tight before you go any further. I bought a pocketknife once which was so badly constructed, it literally fell apart in my hands one day, and I had to throw it out.
Does your knife do that?
No? Good.
Next: Make sure (and this is very important) that the knife is as free from rust as it’s possible for it to be. Unless they’ve been very well cared for, almost all vintage pocketknives will have some sort of rusting on them. Age-spots or pitting may also present themselves, but rust is the real enemy here.
Rust can spread, rust can compromise the integrity of the blade, rust can even cause the knife to snap in half! Any knives with a LOT of rust should be avoided entirely.
After that, make sure that the knife actually functions! Do the blades open? Are they easy to open? Are they stiff? Can you yank them out without snapping your fingernails off? Once opened, do the blades stay open? Do they flop around? Is there any side-to-side wobble? When closed, do they stay closed? Do the blades strike each other (or the liners) when closing next to each other?
I’ve seen some beautiful pocketknives which looked flawless…until you tried to use them. Knives should have nice, strong springs that will cause the blades to ‘snap’ – meaning that the spring will have enough tension on it that the blades will click open or shut, with an audible ‘snap!’ each time. You do not want a knife with weak, floppy springs, that can’t hold the blades open or shut – it’s a safety risk! Put the knife down, and keep searching.
Similarly (on multi-blade knives), make sure that the blades close properly. You don’t want a knife where one blade constantly strikes another blade when closing – it damages the blade, wastes time, means you have to sharpen it more, indicates that the knife is falling apart (or was poorly made), and it’s a safety issue!
Restoring your Pocketknives
Once you’ve purchased your knife, the next thing to do is to breathe new life into it. A lot of vintage knives spend years, decades, in drawers and shoe-boxes, down the back of the couch, and god knows where else! And they are hardly ever looked after. If you expect that beautiful horn-scaled pen-knife that you bought for $30.00 to work like new – it’s now your job to try and give that knife a new lease on life – to ensure that it does work like new!…Or as near to new as it’s possible for it to do so.
This next section of the posting is all about tips and tricks to restore your pocketknives to working condition. All this advice and guidance is assuming that you’re an everyday collector with no prior experience in fixing stuff. No fancy tools or equipment are involved in this, and everything mentioned should be stuff that you can find around the house (or which is easily purchased). These instructions will assume that the knife will remain whole and intact during the entire process. No disassembly will be required.
You will need…
A box of tissues.
Cotton-buds/Q-tips.
Extra-fine-grit sandpaper (as fine as you can get).
0000-grade steel wool (designed for polishing).
A thin, highly fluid, lubricating oil (for sewing machines, or similar).
Polishing paste or fluid (eg: Brasso).
Sharpening stones.
Water.
Optional: Ultrasonic Cleaner.
The first thing to do is to remove all the surface grime. This can easily be done with some oil, and tissue-paper. Drip some oil over the body of the knife and blades, and fill the cavity in the handle with oil, then wipe and sponge it away with some tissues. This will remove any surface grime, grit, and other easily removed detritus. It is important to use oil as much as possible, and not water, as water will encourage rusting, and the spread of any existing rust, which is the last thing you want to happen.
Once the initial cleaning has been completed and you’ve removed as much crud as possible, the next step is the much more fiddly process of removing grime from between the springs and pivot-points inside the knife. This could take a few hours, a few days, or even a week or more, depending on the condition of the knife.
One of the biggest nightmares with vintage pocketknives are all the problems associated with stiff, jerky, jammed blades. Blades which are difficult to pull open, difficult to push shut, which don’t snap into place, and which jam and stick when they’re being used. Not only is this annoying, painful on your fingernails because you can’t get the damn blades open, and wastes time, it’s also a big safety-risk, since all the extra effort required to manipulate the knife can leave you prone to injuries. Nobody wants to fight with a stuck blade only for it to spring open unexpectedly and cut them.
Cleaning the Springs and Pivots
It’s for these reasons that the next step is so important: Flushing out the back-springs and pivots on your knife. It’s a fiddly, messy, time-consuming job – something best done while watching YouTube videos or listening to music, or enjoying a good movie – but it is nonetheless a necessary evil.
Get some tissue-paper and fold it until you have a soft pad. Place it on a hard surface like a tabletop. Flood the pivot-points and back-spring of your knife where-ever there is movement. Open and close the blades several times – dozens of times, hundreds of times. If necessary, you can wrap the blades in tissue-paper so that you can grip the blades safely while you open and close them – this will minimise the chance of cutting yourself, and will help you maintain a firm grip on the blades.
Every few dozen manipulations, close the knife and, pressing the spring-side of the handle against the pad of tissue-paper, rub it vigorously back and forth several times.
Now, watch in horror as black, grey, brown, gunky slime comes oozing out of the knife and all over your pad of tissues.
All these black, grimy streaks come from the crud and grunge trapped inside the knife between the liners, springs and pivot-points. The more of this stuff you remove, the smoother your knife will open and close
Ever wondered why your knives keep jamming? Ever wondered why they’re so damn stiff, and difficult to open? Ever wondered why your fingernails keep breaking every time you try and yank out a blade?
This is why.
The black sludge you see coming out of the knife is years, decades’-worth of grime, dust and other things caught up inside the knife-mechanism, which causes friction, abrasion and jamming. Since pocketknives are usually very close-fitting, it takes a minuscule amount of this grime to cause a lot of problems. Now imagine what a large amount of this grime causes!
Continue to flush, manipulate, and rub the back of the knife with tissue-paper as rigorously as you can. Filling the knife with oil washes out the grime. Manipulating the blades and springs shifts and loosens the dirt while also working the oil through the knife mechanism. Wiping the knife across the tissue-paper draws the grime-clogged oil out of the knife via capillary action, removing the grit that’s causing all the friction and jamming.
This process can be quite involved. It could take hours, days, even weeks to accomplish. You have to keep going until the oil that comes out of the knife is as clear as when it went in. The more of the grime you remove, the better the end-result will be.
Simply oiling the knife will not improve it. All you’ll do is shift the grime around, and attract even more dust into the knife. When the oil dries up (and it will), the knife will simply jam all over again. Flushing the grime out with oil and wicking it away with tissue-paper is the only way to really get the knife clean and functional, short of drilling out the pins and tearing the knife apart to its component pieces in order to clean them individually.
While you’re cleaning the springs, make sure you remove as much grime from around the pivots as well, by using a similar method. Flood the knife with oil, work the blades to shift the oil, and then stuff a folded wad of tissue-paper into the knife and into the gaps around the pivots to draw out the oil and grime trapped inside.
The more you do this, the less crud there will be inside the knife and the smoother the knife will operate when you’re finally done. When done properly, the knife should (in most cases, anyway) have blades which will open and close with a nice sharp ‘snap!’ as it should do, when new. If the blades still jam or stick, then continue the process, until they don’t. If you use your knife often, then you should repeat this process every few years to prevent even more build-up of grime that will be harder to remove later.
Rust Removal
When the knife has reached this stage (or as close to that stage as you can), then the next step is to remove as much rust (if any) as you can from the knife.
Rust builds up where there’s steel – specifically the back-spring, the blades, and their tangs. In the old days, blades were protected from rusting by polishing them to a shine, and either plating them (usually with nickel), or else by keeping them oiled. In instances where the nickel-plating is intact, minor polishing with a liquid polish such as Brasso will be enough to restore the shine and remove the surface-rust, if any.
Heavier rusting will require the use of either a chemical rust-remover, or else, a gentle abrasive such as extra-fine steel wool, or a combination of 0000-grade steel wool and some oil, or polishing liquid to act as lubricant. It will remove the rust, polish the blade, and so long as the blades are kept dry – will prevent the return of any extra rust. Removing rust from either side of the back-spring can be done with fine sandpaper and oil, or with clumps of 0000-grade steel wool, and finished off with a suitable metal polish.
Removing Chips and Cracks
When buying antiques, one of the most common things one has to think about is what one can comfortably afford, what one is willing to pay for an item, and what kinds of compromises one is willing to accept in order to get the object that they truly desire.
As I’ve mentioned in other postings about buying antiques: The more things you’re willing to compromise on, the wider the range (and the cheaper the prices), of things you’re able to buy.
If you do buy a knife with a chipped or cracked blade, however, you still need to try and buy the best that you can. Typically speaking, any chips that you might find should be as small as possible (ideally, no more than 1-2mm), and any cracks should be near the tip of the blade. This makes them easier to deal with.
If you do find a knife that you really like, that you would love to buy, but which does have a tiny little niggling chip that might be dissuading you from forking out the money – don’t worry! There are ways of fixing this!
Sharpening Your Knife
For reasons of safety, sharpening your pocketknives should always be the last thing that you do, once all other restorative processes have been completed. Trying to clean, polish, lubricate, or otherwise restore a knife with freshly sharpened blades in the way invites unnecessary danger, and should be avoided if possible.
To sharpen your knife, you’ll need 2-3 different sharpening stones. A coarse-grit one, a medium-grit and a fine-grit one. Depending on how blunt your knife is, you’ll want to start on the medium and then progress to fine, or coarse then medium, and maybe after that (if necessary) progress to fine.
Before you start on this, though – we need to deal with any of those tiny chips that I mentioned earlier.
If your blade does have chips – provided that they’re small and don’t bite into the belly of the blade too far – then this is when we get rid of them!
First – identify any chips. Then – get your coarsest sharpening stone. Lubricate it with water, and start running your blade – edge down – across the stone, like you’re trying to cut the stone in half with your knife. Make sure that the blade-edge is level on the stone as you do this, and that the blade isn’t angled to the left or right while doing this.
By ‘cutting’ across the stone like this, what you’re doing is scraping off excess metal from the blade-edge. This will wear down the edge until it meets up with the top of the chip that you’re trying to grind out. It’s for this reason that this trick really only works with SMALL chips – anything larger than 1-2mm (unless it’s a REALLY big knife!) will grind off too much metal for this little blade-hack to work on.
It’s worth noting that if you do have to do this – you should do it BEFORE you sharpen the blade, since obviously, grinding the blade like this will affect the edge.
Keep grinding down the edge until just before the nick disappears. Once you reach this spot, sharpen the knife as per-usual, starting on the coarse stone, and then moving to medium and then fine. The usual sharpening process will remove the last vestiges of the chip, leaving you with a clean, sharp, straight blade!
The Correct Sharpening Procedure
I’ve been sharpening knives for years – when you collect pocketknives and straight razors, it’s something you absolutely have to learn. It’s too damn expensive to ask somebody else to do it every single time!
Lubricate your chosen sharpening stones with plenty of water (I usually use a spray-bottle for this), and start from the coarsest grit and work your way up to finest. Exactly how coarse you start depends on how blunt the knife is. In most cases, a medium-to-fine sharpening will do, but for really terrible blades, coarse-medium-fine may have to be used.
Once the stones have been selected and lubricated (you may need to keep lubricating them as you sharpen), it’s time to sharpen the blades.
To stop your stones sliding all over the place – either put them into their bases (if bases they have), or else, put them on top of a small towel or flannel to hold them in place.
Place the knife-blade flat down on the surface, and raise the blade to about 10-15 degrees (or 45 degrees, then half of that, then half of that again), to get the right angle. Start drawing the knife, edge-first, back and forth across the stone at least two dozen times. Repeat for the other side of the blade. Then move up to the next least-coarse stone, and then up to the finest, repeating the two-dozen strokes per-side for each stone as you go along.
Once fully sharpened, cleaned and dried, you should be able to see (and feel) the blade’s sharpness. Hold it up to the light. A freshly sharpened blade will have a very thin, white line along the very edge of the blade (the burr). The burr is the excess metal that’s been ground off the blade during the sharpening process. If you run your finger across the blade, you might even be able to feel the soft prickliness of the tiny flakes of metal scraped off in the sharpening process.
Closing Remarks
Now that your knife has been flushed out, de-grimed, de-rusted, sharpened, and nursed back to health, it should be ready to give you many decades of excellent service.
Shimmering, ethereal, translucent and magical, for thousands upon thousands of years, pearls have been one of mankind’s most sought-after treasures, one of natures greatest mysteries, since the dawn of civilisation.
In this posting we’ll be looking at what pearls are, where they come from, how they’re formed, and how they have been cherished, treasured, and hunted for by countless millions of people across millennia of time.
What is a Pearl?
A ‘pearl’ is the name given to the hard, glossy, smooth and shimmering secretion formed inside of a hard-shelled mollusk (a type of shellfish), usually round in shape, and ranging between a few milimeters, to a couple of centimetres in diameter, depending on the size of the mollusk, and the age of the pearl.
What are Pearls Made Of?
Pearls are made of a sticky, glossy secretion produced by the mollusk – a kind of slime or goo or gel, which is used by the mollusk as a defense mechanism. This secretion is known as ‘nacre’, or more commonly, as ‘Mother of Pearl’, because it’s the substance that ‘mothers’ or ‘births’ the pearls that are found inside oysters.
How are Pearls Formed?
Pearls – which may be freshwater, or saltwater, and which can vary greatly in size, colour, and shape, depending on the circumstances of their creation – are formed when an intruder (organic matter of some kind, such as a parasite, worm or other living creature) breaches the mollusk’s outer defenses (the shell), and tries to attack the mollusk itself.
To defend against infection, parasites or attack, the mollusk expels a gob of liquid nacre, which will drown and envelope the invading organism, stopping it from carrying out its dastardly deed of killing, or infecting the mollusk, or of trying to make the shell its new home. The nacre hardens, and the mollusk will continue to expel more and more nacre over the offending intruder over time. With each successive secretion, the nacre will harden, and form layers of glossy enamel over the top of existing layers.
Finally, the nacre shell over the intruding matter will grow large enough that the oyster will consider it safe enough to detach the nacre-encrusted organism (aka – a pearl!) from the interior wall of the shell in which the mollusk lives – and the pearl will simply sit in the oyster or mussel or abalone – until it is expelled if or when the oyster next opens its shell. If it isn’t, or can’t be removed by the mollusk, then the pearl remains inside the oyster until it might, possibly, be found by humans!
This is what creates pearls, and causes them to grow. The size of the pearl, and its colour, depends on the colour of the mollusk, the size of the shell which the mollusk lives in, and how long it decides it has to attack the intruder, before it feels safe again. The pearl’s shape is determined, again by the size of the mollusk, but also by the shape and size of the intruder which has triggered the mollusk’s defense mechanism.
Along with making the spherical baubles known as pearls, nacre is also the substance that creates the very shells themselves which the mollusks call home. The only difference between the shell, and the pearl, is that the shell is the hard, protective receptacle for the mollusk inside, whereas the pearl is formed (through similar processes) to protect the mollusk from anything that bypasses its first line of defense.
Diving for Pearls
With enough determination, anybody can find a gold mine, or a silver mine, or even a cluster of gemstones hidden inside the Earth. The veins of ore having been discovered, just need to be dug out, crushed, extracted and refined.
Finding pearls, by comparison, is much harder.
While there are countless millions of mollusks of all kinds in the world’s oceans, from oysters to abalones to mussels, only those which have been attacked, and have had their shells breached or otherwise compromised by an invader, might produce a pearl. Only those pearl-bearing mollusks which exist within the range of free-diving water-depths might be found by humans, and only a small percentage of those found will even have pearls inside them. In fact, the chances of finding a pearl in an oyster is something along the lines of 1 pearl per 10,000 mollusks – a 0.01% probability.
Along with the sheer randomness and rarity of pearls – especially – of finding enough pearls of the same size for use in jewelry-making – was the risk entailed in finding pearls.
Anybody can dig a hole and search for diamonds, or shovel the soil from a riverbed to pan for gold – but diving – sometimes several tens of meters – to find pearl-oysters and abalones – was a disorienting and dangerous profession – one which dates back to prehistory in many parts of the world, ranging from Madagascar to China, Greece and Italy, and Indonesia to the Philippines. The risk of drowning, decompression sickness, paralysis, disorientation, or being attacked by sea-creatures – all added to the mystique of pearls.
It is for all these reasons that pearls, for centuries and centuries and centuries, dating back for thousands of years – have been considered one of the most valuable gems ever. The sheer randomness of being able to find a pearl out there in the deep, swirling depths of the oceans is what made them so treasured.
Myths about Pearls
Given the rare and random nature of pearls, it is not surprising that there’s loads of myths about pearls, such as the fact that pearls are formed inside oysters from constant irritation of the mollusk inside. This is not strictly true – pearls are formed due to ONE irritant at a time entering the shell, against which the mollusk defends itself.
Another common myth is that all pearls are perfectly round spheres! Again, this is not true. In fact, it’s so not true that perfectly round pearls are probably the hardest types of pearls to find! In truth – pearls can be almost any shape. Being organically and naturally formed, the shape of pearls is dictated by the size of the mollusk, and by the size or shape of the irritant or invader which caused the mollusk to start forming a pearl in the first place.
Irregularly shaped pearls – which can be anything from flat discs to ovals, pill-shaped or pear-shaped – are called “Baroque” pearls – referring to their erratic shapes and lack of uniformity. In fact, finding enough perfectly round pearls of the same size, shape, and colour to form an entire pearl necklace is a feat so difficult to accomplish that for centuries, pearl necklaces were considered to be one of the greatest status symbols in the world! Literally hundreds of pearls would have to be found, sorted through, and finally, drilled and threaded – in order to create such a piece of jewelry – a feat which could take months, or even years to accomplish.
Pearls as Status Symbols
Because of the significant difficulties in finding pearls, and of finding enough of them to make jewelry with, pearls have been seen as a status symbol since the times of the Ancient Romans. Emperors, kings, queens, dukes and princes, have all used pearls as jewelry at one time or another. Indeed, pearls were so hard to find that they were often more highly prized than most other jewels – such as diamonds, for example!
Baroque pearls – those of irregular shapes – were often used to adorn crowns and coronets, because their odd shapes lent themselves to artistic creativity. This can be seen, for example, in the pearl tiara of the Empress Eugenie of France.
A String of Pearls
In the history of gems and jewelry, there are numerous famous stories. The Hope Diamond, the Star of India, and the Plant-Cartier Necklace!
…You’ve never heard of the Plant and Cartier necklace?
Morton F. Plant, a wealthy New York City financier and philanthropist, owned two houses in New York City in the early 20th century. Deciding that his original house was too close to Manhattan’s bustling commercial district of Fifth Avenue, Plant commissioned the building of another mansion (completed in 1916), further away, to give him more comfort and privacy.
The problem was finding a buyer for his original house – until his wife, Mae Plant – informed her darling husband that she wanted a new pearl necklace!
At the same time, Pierre Cartier, grandson of the founder of the famous, French jewelry house, was looking into expanding his family’s business further abroad. Cartier already had a commercial presence in Paris, and now London, but he was determined to go even further, and try and break into the American market! The only challenge was that he needed a commanding, central location on Fifth Avenue! Surely, nothing else would suffice!
When he heard that the Plant Mansion was up for sale, Cartier immediately became interested, but despite nonstop haggling and debating, neither Cartier, nor Plant, could come to an agreement on price – until Plant told Cartier that his wife was looking for a new pearl necklace!
Mrs. Plant wearing the Cartier double-strand pearl necklace that cost as much as a house!
Seizing on any opportunity to buy the Plant mansion, Cartier told Plant about a stunning pearl necklace that he had in his possession – 128 flawless matched pearls in a double-strand! The most perfect gift for Madame Plant, surely! As Cartier suspected, Plant was immediately interested. After all, the pearls only cost $1,000,000…
Finally, Plant agreed! $100 cash, and a $1,000,000 pearl necklace, in exchange for prime real estate on Fifth Avenue! Plant was happy because he got the pearl necklace that his wife was so eager for, and Cartier was happy, because he got the central New York location that he was so eager to buy! Mrs. Plant owned the necklace until her death in 1956!
The Morton F. Plant Mansion (AKA the Cartier Building) on Fifth Avenue, Manhattan.
As for the Plant mansion on Fifth Avenue? It has remained Cartier’s most famous New York location for over 100 years! The company took formal ownership of the building in 1917…and hasn’t left since!
Cultured Pearls
In 1917, a pearl necklace was enough to buy a house. A very, very nice house.
In 1918, a pearl necklace would be lucky to buy you a car!
This was because of something dramatic which happened in 1917, which turned the entire jewelry industry upside-down!
Since time immemorial, pearls had been naturally formed – discovered by chance on the seabed by divers and fishermen who scooped oysters and mussels up from the depths, to find these lustrous baubles shimmering inside their shells. Finding a pearl – any kind of pearl – was entirely a matter of luck. This immense rarity was what made them so incredibly valuable. But everything changed when, thousands of miles away from Plant, Cartier, and their New York real-estate deal, a man in Japan discovered how to grow pearls!
That man was Kokichi Mikimoto.
Building on discoveries made by Australian, and other Japanese researchers, that pearls are formed when an irritant enters an oyster, Mikimoto was one of the first people in history to successfully use this knowledge to create a pearl in an oyster through human intervention!
Thus began the age of cultured pearls.
Cultured pearls are created when a human agent inserts an irritant, or ‘nucleus’ (either shell fragments or pieces of mantle from another oyster) into a living oyster. The oyster, thus irritated, will start to secrete nacre around the intruder, growing a pearl, replicating what would have happened in nature anyway, but in a more controlled environment. This increases the yield of pearls, or at least, the chances of finding one – but it does not speed up the creation of pearls. You might still get a pearl, and you may get more than one, but they’ll still take months, or even years to form!
That said, creating cultured pearls is not nearly as easy as you might think! Remember – pearl formation is largely down to luck – even when human intervention takes place! Of 100 oysters manipulated in this way, maybe 50 might produce pearls, and of those fifty, maybe five might produce pearls of usable size and shape. There’s still a lot of guesswork and patience, even if you have tampered with the deck.
0.01% for natural pearls. 5.00% for cultured pearls. While that’s a significant jump in the chances of finding pearls, they’re still fairly rare. In the 21st century, natural pearls – those formed by chance – comprise just 1% of all pearls, and the other 99% are made up of cultured pearls.
While cultured pearls are cheaper because they can be produced more readily, differences in quality still remain. While on the outside, they might look the same, the difference is only seen when the pearls are cut open (or x-rayed). To increase the chances of pearl-formation, the irritant placed inside the living oyster is usually quite large – between 5-8mm across! This might not seem large, but when you consider that most pearls only grow to around 1.5 – 2.0cm in diameter, that irritant is taking up a lot of space!
So what’s the trade-off?
Pearl farming or oyster farming allows mankind to produce pearls more readily, and of a more uniform shape and size. It’s not an exact science – but it does greatly increase the chances of making pearls. The trade-off in manmade vs natural pearls is the quality of the pearls produced.
The impact of cultured pearls can be seen in this famous, 1928 photograph of actress Louise Brooks, one of the great screen stars of the Golden Age of Hollywood. Such a profusion of pearls would’ve been impossibly expensive just twenty years before, but by the 1920s…
Natural pearls, formed by chance in the ocean – usually have very small irritants – a wisp of organic matter or a tiny parasite entering a pearl-oyster might create a pearl – but when it does – the pearl formed will be comprised almost entirely of nacre, with the irritant that caused its creation being only a tiny, almost imperceptible speck inside the pearl.
By comparison, manmade, cultured pearls, rely on much larger irritants to greatly increase the chances of pearl-formation. The result is a pearl that will have a very large irritant or nucleus, buried under the nacre.
What’s the problem with this? Well – if the pearl cracks, or splits, or is damaged or altered while drilling or cutting (to make jewelry, for example), then the nucleus is much more evident (a speck 5mm across in a pearl only 10mm wide, is going to be pretty obvious!). Because of the size of the irritant or nucleus used to form cultured pearls, the layers of nacre over the top are much thinner, more fragile, and more prone to damage.
It is because of this that cultured pearls, while more common, are cheaper, and natural pearls, being extremely rare, are still very expensive.
The difference is most clearly noticeable under an x-ray, or when a pearl is sliced in half. A cultured pearl has a larger nucleus and a thin outer layer of nacre, while a natural pearl will have a tiny nucleus, and several overlapping layers of nacre – similar to the rings on a tree.
Although natural pearls are, of course, of much higher quality – the creation of cultured pearls flooded the market, and caused pearl values to plummet almost overnight!
Remember Mae Plant’s pearl necklace? Sold in 1917 for $1,000,000, 40 years later, when she died in 1956 and it was sold at auction by her children, it fetched just… $150,000. By then, cultured pearls were so common that even a large double-strand of natural pearls were not seen as being particularly valuable anymore.
Shells and Mother of Pearl
So. We’ve covered pearls, we’ve covered oysters, we’ve covered cultured pearls…but what about mother-of-pearl? What’s that?
Mother of Pearl, or nacre, the substance that forms pearls – is secreted by the mollusk (oyster, abalone, clam, etc) – inside its happy little home – the shell.
As nacre is the mollusk’s natural defense mechanism, there’s usually a lot of it lying around, and the insides (and even outsides!) of shells are often coated in thick layers of this shimmering, glimmering, literally pearlescent material.
The glistening interior of an abalone shell.
Because of this, mollusk shells (everything from large abalone shells, to smaller oyster shells, or even the shells of the mighty, chambered nautilus!), are often just as prized as the pearls they produce. Often called mother-of-pearl (to differentiate between the pearls themselves), mollusk shell nacre is commonly used in all kinds of applications, either for jewelry, or other types of decoration and embellishment.
A folding fan made out of thin slices of mother-of-pearl, taken from a (or likely, several) suitably large mollusk shells
Knife handles, razor scales, cutlery handles, jewelry, box-lids, cufflinks and countless other items can be made of (or decorated with) mother of pearl.
Mother of pearl for decorative purposes is sourced by using the leftover shells from mollusks. Once the shell has been emptied of its contents (the tasty, tasty mollusks, and any pearls that they might contain), the shell itself is cleaned, sanded, and polished. Almost every mollusk shell will have some sort of growth on the outside – barnacles, seaweed, etc, which will obscure the outermost layer of nacre on the surface of the outside of the shell, and with great care, this must be removed. Using progressively finer abrasives, the encrusted sand, barnacles and other detritus can be scraped and polished off of the shell’s surface, and the glimmering nacre underneath can be exposed! Now all the remains is to polish it to a glossy, reflective finish!
Especially large mollusk shells with beautiful nacre have been used to make everything from caskets and caddies, to trinket dishes, sewing cases, and even jewelry boxes.
The relative ease with which mother-of-pearl, as opposed to pearls themselves, may be found, has therefore made it one of the most popular decorative materials to work with for centuries. Easily carved and shaped, and able to be polished to a lustrous shine, it remains popular even today in everything from jewelry to pocketknives, buttons and hair-accessories.
Pearls in Fiction and Literature
Their rarity, size, colouration, shape and expense made pearls extremely popular plot-devices in fiction, myths, legends and ancient fables.
The very first work of fiction to feature the serial killer, Sweeney Todd, was titled ‘The String of Pearls’. Pearls are mentioned in the bible, and in the writings of Ancient Roman historian and statesman, Pliny the Elder (whose nephew, Pliny the Younger, wrote one of the most vivid eyewitness accounts of the eruption of Mt. Vesuvius in 79AD).
Even Sherlock Holmes tangled with pearls, when, in 1904, Sir Arthur Conan Doyle published “The Six Napoleons”, which featured “the famous Black Pearl of the Borgias!” as the priceless jewel stolen from the hotel-room of an Italian nobleman.
Want to Know More?
There are many excellent videos on YouTube about pearls and oysters, some which I found particularly interesting, were…