Ticket to Ride – A History of Passports

In the past couple of years, I doubt anybody reading this has had cause to use their passport very much, if at all. Those little red, black, blue and green books have been locked away in drawers, cabinets, strongboxes and safes, secure, snug and out of sight…for the foreseeable future, at any rate.

But where do passports come from? How did they come to be? What’s in them and how have they changed over time? Today, we’re going to take a look at the history behind that little booklet of stamps, scribbles and stickers which follows you every step of the way on your world tours and overseas jaunts.

So please have your document open to the information page with the photograph clearly visible, and let’s begin.

The First Passports

Passports in one form or another have existed for centuries, and early forms of passports date back as far as ancient China, among other places. In Europe, King Edward V is believed to have introduced the first type of ‘passport’ that we might recognise today, in the 1400s. By Tudor times, a century later, the Privy Council was in charge of handling these documents, and it was also at this time that the word ‘Passport’ first started being used, originally two words, as in ‘Pass Porte’, from the French ‘Porte’, meaning gate or doorway (ie – a pass to go through the city gates).

A passport from Qing-dynasty China in the 1800s

Passports were originally quite rare, because few people traveled any great distances, and literacy was low. It wasn’t until the 1800s with the rise of steam locomotives and ocean-going liners that passports started becoming issued on a wide scale. So many people were now moving around that while passports were required, the laws governing their examination, use and checking, were pretty lax – there just wasn’t any point in trying to rigidly enforce the rules when it would cause such a massive backlog at train-stations and shipping ports. For example, on the Orient Express, any passengers boarding the train would surrender their passports not to border-control, but to their carriage steward!

As the train stopped at each crossing along its route, border-guards would seek out the steward in each sleeper-car, examine the passports, stamp them, and then leave again. Checking on the passengers wasn’t considered important, since you already had the documents in front of you to read.

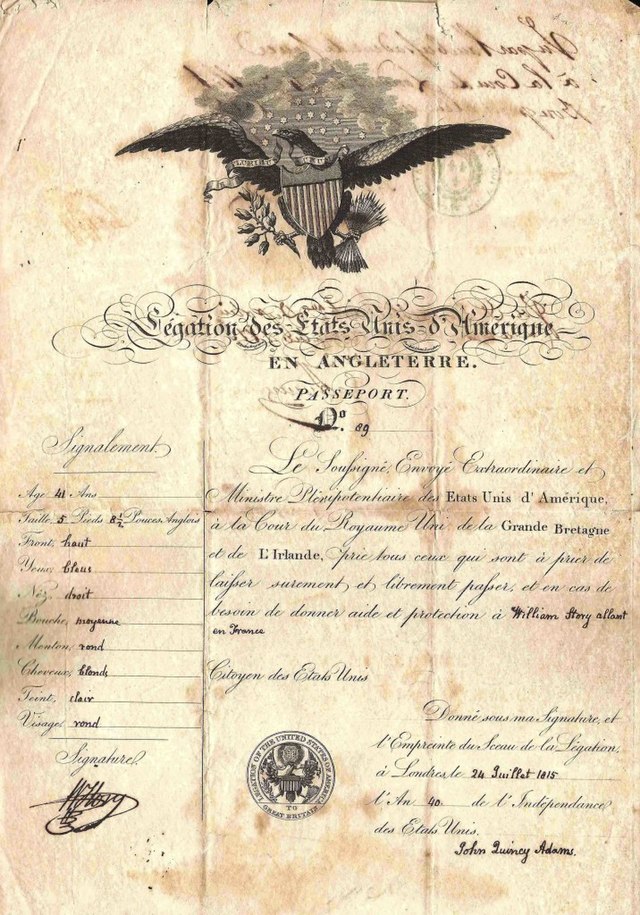
Up until this time, a passport could look like almost anything – early British passports, for example, were just a single sheet of paper! How did they come to be the little booklets which we know today?

A single-sheet passport, from 1815

The modern passport was not designed until a little over 100 years ago!

As I said – laws and regulations surrounding passports were pretty relaxed in the 1800s, and rarely (or at least, only loosely) enforced. This culture changed in the 1910s because of the First World War. After the war, the League of Nations – the predecessor to the U.N., held a conference in 1920 to officially set down the standards for what a passport was, what it had to have, how it operated, and what it would look like. Follow-up conferences in 1926 and 1927 tightened up the definitions, and for the first time in history, what a passport was, did, and would look like – were written down on paper, and internationally agreed to.

Types of Passports

Broadly speaking, there are only a few types of passports: Individual passports (the most common kind that you probably have in your desk right now), official passports (for government officials, etc), and diplomatic passports (for those in the diplomatic service). Previously, a fourth type – the family passport – also existed, where the details of an entire nuclear family might be written down in one document, with a group photograph of all the people mentioned on the information pages. However, these are no longer in use.

An old passport from the Colony of Gibraltar

To differentiate between these various types of passports, each one is usually a different colour, and colours vary by country. Passport colours are usually standardised, and common ones include blue (for example, Australia, the United Kingdom and the USA), red (for example, Malaysia, China, Japan, etc), and green (India, Morocco, and most Muslim countries). While most countries conform to this, not all do – for example, New Zealand passports are black!

A Dutch diplomatic passport

The reason for these standard colours is pretty simple – so that passports can be easily recognised. But also, so that different types of passports can be told apart. For example – which passport is your individual passport? Which one is your diplomatic one? It’d be kinda embarrassing if you had to fly somewhere in your diplomatic capacity and you brought the wrong passport along, because they were both the same colour…whoops! It’s for this reason that, in the United States, for example, individual passports are blue – but official passports are red!

Can you imagine being a passport control agent, and having to remember all these things??

Passport Control

Aaah, passport control. You either love it, or hate it. Some people enjoy it, getting to see all the stamps and stickers fill up their little books – inky souvenirs of their travels around the world, and others are frustrated by the seemingly endless questions and forms. But even here, things have changed over time. The most notable one is in passport photographs.

Early on, passport photographs were not standardised. It was common for men, women and children to wear almost anything, and have almost any expression, while having their passport snaps taken. In fact, it wasn’t uncommon for a passport bearer to simply stick in just any photograph of themselves that they had lying around, so long as it looked like them. Old passport photos show men wearing hats, ladies wearing glasses, kids smiling…what changed?

More stringent passport-photograph regulations are a relatively new phenomenon. For much of their 20th century history it didn’t matter so much, but as more people began traveling – especially after the jet-age of the 1950s and 60s, being able to compare a passport photo to the person holding it became more and more important, since the process had to be done as fast as possible. This is why, in more recent times, passport-photo regulations have become much more strict, so that anything that obscured the face, or anything that obscured a normal, blank facial expression such as hats, scarves, glasses, and cheeky grins – were out.

Thus ends this rather brief look at the history of passports, the one document that we’ve probably used less than any other over the past two years. So while yours might still be gathering dust and cobwebs in a desk-drawer somewhere, at least now you know where, when, and how they came into being.

Checking your Papers – Sources

Information for this posting was gleamed from the following locations…

https://www.dailymail.co.uk/travel/travel_news/article-3437455/Not-passports-equal-travel-documents-come-different-colours-countries-choose-them.html

https://www.theguardian.com/travel/2006/nov/17/travelnews

https://www.imidaily.com/editors-picks/the-passport-throughout-history-the-evolution-of-a-document/

https://thewest.com.au/news/the-history-of-the-passport-ng-ya-377959

https://www.bbc.com/news/magazine-30988833

https://www.atlasobscura.com/articles/passport-photos-history-development-regulation-mugshots


Pair of Cased Antique Straight Razors. S. Hibbert & Son. ca. 1890.

If you wait around long enough, whatever you want to add to your collection will eventually appear.

And such was the case in December last year, when, after years, and years, and years of searching, I finally landed a beautiful set of cutthroat razors to add to my collection!

I’ve always loved using straight razors, ever since I bullied myself into learning how to use one when I first started shaving. Forcing myself to learn how to use one was one of the greatest little personal achievements of my life.

Ever since then, I’d always wanted to assemble a collection of antique razors. My first dream was to secure a coveted “seven day set” – a cased set of seven matching razors – considered by many to be the pinnacle of straight razor collecting. Such sets are extremely rare, and phenomenally expensive (at time of writing, average price on eBay for an antique set is about $1,000 – $2,500+AUD).

Their great rarity is mostly due to the fact that unless they’re perfect – nobody wants them. A cracked scale, a chipped blade, a broken box – anything but the smallest and most inconsequential of defects causes the desirability, and therefore value, to plummet.

I was lucky enough to land a seven-day set for peanuts, which I purchased from a friend a few years ago. It’s remained one of my most treasured possessions ever since – mostly because I could never afford the price of another one!

The next thing I wanted to add to my collection was a two-razor set – a matching pair of cutthroat razors in their original case. These aren’t as well-known as the fancier, larger, more expensive seven-day sets, but they existed as a more affordable, but still elegant, shaving solution for the man who wanted a nice set of straight razors, without the enormous expense of an entire weekly set.

To understand just how expensive a seven-day set is (and always was), in the United States in about 1900, a full, seven-day set cost, on average, $25.00. A two-razor matched set using the same materials and razors, cost just $7.00-$8.00 – 1/4 the price! This at a time when the average wage was about $15.00 a week. So while seven-day sets remained as status-symbols, the cheaper two-day sets or matched pairs could be in reach of most middle-class men, if they knew how to count their pennies.

S. Hibbert & Son – Sheffield

The company which made my set was S. Hibbert & Son, a cutlery firm based in Sheffield in the UK.

S. Hibbert was Samuel Hibbert, who ran his little cutlery firm with his son, Charles Hibbert, in what was at the time – the cutlery capital of Great Britain. Sheffield was famous for anything with a blade – knives, swords, scissors, pocketknives, cutlery knives, straight razors, surgical equipment…if it cut, stabbed, shaved, or sliced – it was made in Sheffield. Or at least, it was until the 1980s, when the cutlery industry finally collapsed, unable to compete with cheaper Asian imports.

S. Hibbert & Son was established ca. 1890, and remained a father-son venture until 1898, when Samuel Hibbert died, leaving the enterprise to his son. Charles saw his family firm survive into the 20th century, and the firm lasted until Charles’ death in April of 1938.

S. Hibbert & Son would’ve been just one of dozens of little cutlery houses operating in Sheffield at the turn of the 20th century. Such firms were plentiful and competition was fierce, especially when there were a lot of much larger, more famous companies around, like Joseph Rodgers, Southern & Richardson, and George Wostenholm & Sons, to take your business away from you!

A Breakdown of the Set

A General Overview

The set is pretty typical of the kind manufactured in the U.K. and the U.S.A., and in Germany…and in most other cutlery-producing countries around the world at the turn of the last century. The razors are a matched pair, originally both with ivory scales. One razor had its scales broken and these were replaced with matching celluloid scales when the razor was repaired at sometime in its life. It’s interesting to note that celluloid was invented in the 1850s as a replacement for ivory, so it’s interesting to see the two materials side by side.

The razors are housed inside a wooden box lined with leather on the outside, and silk and felt on the inside. The main body of the box is hinged, with a spring clasp, and has two sets of ridges on either end for holding the razors in place.

The razor blades themselves are hollow-ground, and in great condition for being, at a guess, 130 years old! They’re both punched with the maker’s marks on the shanks, and – this is a nice feature – the spines of both razors are decorated with leaves, and engraved with “1” and “2” – just to prove that they really ARE a set! It’s a cute little additional feature, and I think it makes for a nice extra bit of decoration. It’s certainly not something that you would find on all sets of this type, so it’s nice to have.

Another nice feature is that the razors have been manufactured with what are called “Spanish” points – meaning that the end of the blade is slightly concave, instead of being straight or outwards-curving. Spanish-point blades are pretty rare in modern times, and they’re usually a feature found on antique blades like this.

Faults and Flaws

The only major flaw was a cracked scale, around one of the drilled pivot-holes. Under other circumstances, this might be awful, but it’s actually pretty common with antique razors which have scales made of natural materials. So long as it’s just a surface-crack and is holding together, there’s really nothing to worry about, and if it ever does get worse, it can simply be reinforced with a drop or two of strong glue to hold it together.

The Storage Box

While you can find two matching razors anywhere if you look hard enough, one thing which is definitely much harder is finding the right box or case to put them in. Sets like these came with slim, hinged two-razor cases, similar, but smaller than, the more elaborate seven-day razor kits sold by high-end manufacturers and luxury retailers like Mappin & Webb or Joseph Rodgers.

Cracks around rivet-holes on antique straight razors – especially those with scales made from natural materials like bone or ivory – are extremely common. In most instances, they are nothing to worry about.

The box, like the razors, was in great condition, and a bit of minor cleaning, and a few touch-ups with shoe-polish and a drop or two of glue was all that was needed to render it serviceable once more. In many ways, the box is rarer than the razors. It’s really common for the boxes to be broken, torn up, or even missing parts entirely, which renders them completely unusable.

Purchasing Antique Straight Razor Sets

Buying antique straight razors is pretty…eh…straightforward.

Buying antique sets of straight razors, however, is rather more involved. Such sets usually came in pairs, such as this one, in three-razor sets (which aren’t too common), four-razor sets, which are somewhat more common, and last but not least – the coveted seven-razor sets, also called ‘seven day sets’, with one blade for each day of the week.

The more razors there are in the set, the harder the sets are to buy. Not just because they cost more, but also because there’s more things to go wrong. For such sets to be worth the expense, they have to be in perfect condition – or in as near-perfect condition as you can find them.

Check for issues like cracked or chipped blades (any razors in this condition are completely unusable – ignore them and keep searching), cracked or chipped scales (depending on the damage, this may, or may not be repairable), and any damage to the box or case itself.

Razors made of natural materials such as horn, bone, ivory, and tortoiseshell almost always have some manner of cracking around the pins and pivots, simply due to the nature of the material. If the cracking is light, then there’s really nothing to worry about. Serious cracking may be repaired with the right types of adhesives (if you have all the pieces to glue back together, of course!), but broken scales should be avoided at all costs, unless you’re intending to re-scale the entire set of razors yourself – it is possible to re-scale antique razors – I’ve done it myself – but it takes patience and skill, and is not something to be rushed into.

When looking to purchase a two, three, four, or seven-razor set – make sure that all the razors are there, and that all the razors are matching, and that they’re all in identical (or near-identical) condition. Count the razors, and check each one individually. Skimping on this means that you could end up with something that you don’t want. But if you don’t want it, chances are, nobody else does – and selling a mismatched or broken set is not going to be easy.

Last but not least, check the box or case.

Razor boxes designed to hold sets of razors were typically made of wood, and covered in leather, with interiors fitted out with slots and ridges to hold the razors, padded with felt or velvet, and with the interior lid-linings being done in silk – sometimes, but not always – with the details of the manufacturer stenciled on top in gold leaf. Some sets were not swathed with leather, and you can find cases out there with polished wooden exteriors, sometimes inlaid with brass, ivory, bone, or some other contrasting material, to add a touch of flair and decoration.

Again – check for defects. In particular – damage to the hinges, damage to the clasps or catches, damage to the lock (if there is one), and if the lock (if it exists) has a key. If it doesn’t have a key, you can usually find another to replace it, however.

As always with buying anything secondhand, the better condition something is in, the higher the price is likely to be. Hunt and shop around, compare prices, and weigh up the pros and cons. Sets like these are hard to find, so you’ll have plenty of time to do that! Last but not least – as always – decide what your level of tolerance is.

By that, I mean – how perfect does something have to be, before you’ll buy it? Does it really matter that there’s a surface-crack? Does it really matter that there’s rust? Can it be polished off? Do you have to have a set by this particular manufacturer or retailer? What are you able to fix or restore by yourself? The more you’re willing to compromise on these things, the cheaper the prices become.

Preparing the Razor Set

Once you’ve found a set that you like and can afford, the next thing to do is to prepare it for use.

First – repair anything that needs repairing. Glue any cracks that need gluing, and stick down any loose parts that might peel or fall off. Apply any necessary polish to the leather or wood that the case is made of, and make sure that everything works.

Next, turn your attention to the razors. In most instances, a fine-grit stone will do for sharpening. Once the blade is sharpened, going edge-first along the stone at least 25 laps (back-and-forth = one lap), then either move to an extra-fine stone, or start stropping at least 20 laps – again – back-and-forth = one lap. Your razors should now be ready to use. If they’re tugging or catching while shaving, then they’re not sharp enough. Repeat another 20-30 laps on the stones and another 20-30 laps across the strop to get the edge properly sharp and ready. A straight razor which is ready to shave should cut effortlessly with no force or pressure applied by the user. Your hand is only there to hold the razor and guide it, not to apply pressure.

And there you have it!

My cased pair didn’t require much tinkering before use. A bit of glue and a lot of blowing and dusting, a thorough sharpening and stropping, and it was ready for use. Honestly, these antique razors are pretty low-maintenance when you think about it, and they shave just beautifully.