When it comes to collecting, buying or selling antiques – one of the hardest things to shift – either towards you, or away from you – are things which come in sets.
Sets are larger, sets cost more, sets have pieces that go missing, sets take up more space, they weigh more, and postage and delivery costs go up as a result. But when you can find a set in great condition, you hold onto it!
This is why antique sets of…anything…are always so hard to find. If you find them, if you can find them, and they’re in fantastic condition, then they have gigantic price-tags. And if you find them, and the price is reasonable, then there’s almost certain to be some kind of strings attached.
This is why I jumped at the chance to secure this beautiful set of matched, antique straight razors, when I saw them for sale online.
Back in the days when the only way to get a decent shave was to master the use of a cutthroat razor, manufacturers went above and beyond to try and make the shaving experience as enjoyable as possible.
One way of doing this was to sell razors in sets – pairs, threes, fours, and if you could afford it, even full, seven-day weeklies. Handsomely presented in wooden boxes with fitted interiors lined in fabric, these sets were designed to entice men to take pride and enjoyment in the art of shaving. They were status-symbols, intended to make you want to use them – to take care of them – and to want to learn how to use them.
Today – such multi-razor sets are prized, and rare, antiques. To find a set in complete and functional condition with minimal wear or damage is becoming increasingly hard, and any such sets usually command high prices. I consider it nothing but great fortune to have landed this deal for under $150.00!
Multi-Razor Sets – Whys and Wherefores?
Multi-razor sets are a strange beast, a curious relic of a bygone age. When’s the last time you went out to buy a new razor, and got told by the salesman at the grooming-supplies store, that you had the option of buying razors in two, three, four, or even seven-piece sets of matching razors?
Never. That’s when. And yet, in an age when one straight razor was just as likely to do as good a job as two, or four, or seven, multi-razor sets were surprisingly common. Sold by department stores, famous manufacturers, and jewelry and luxury-merchandise retailers, sets containing multiple razors were often presented in handsome cases made of wood, covered in leather, swathed in velvet and silk, and with gold-leaf logos and company names stamped on the lids.
But why? Why bother? What’s the point of having more than one razor, when one razor will do just as good a job as two or more?
Multi-razor sets were popular in the Victorian era and the first half of the 20th century, because using a straight razor required considerably more skill than a modern cartridge razor, or even a double-edged safety razor. Straight razors took more skill to strop, and sharpen, and maintain overall. Because of this, having a set of multiple razors allowed you to spread out your shaves across multiple blades, thereby reducing wear on the blades, and by extension, reduce the number of times that it was necessary to sharpen a razor – not a skill that everybody was well-versed in (assuming that they even had the necessary equipment to carry out such a task).
Sharpening razors was done by your local barber, the man who was more likely to know everything about razor maintenance than anybody else in town. To avoid paying for his sharpening services too often, razors were simply rotated and stropped as often as possible, to avoid having to visit the barber. Only when the razors were so blunt that stropping alone wouldn’t return them to full sharpness, would the razors then be touched up again on a razor hone, to bring them up to working condition.
Cased razors require more scrutiny than most, since boxes and storage cases rarely survive intact.
Drawing out the times between sharpening periods was important for another reason, quite apart from cost: Blade wear.
Straight razors have very, very thin blades – thin enough to snap with your bare hands, if you’re not worried about slicing your fingers off, first – and because of this, the edges of the blades can get worn down very easily from excessive or incorrect sharpening. Razors which are over-zealously sharpened can suffer from “smiling” or “frowning”, where the edges (smiling) or the middle (frowning) of the blade-edge are so ground-down by abrasion that the physical blade starts to lose its shape – they aren’t called STRAIGHT razors for nothing, after all – if the blade isn’t straight, it can’t be sharpened. If it can’t be sharpened, it can’t be shaved with – you have a useless blade!
It was to prevent this from happening that people bought multi-razor sets – to cut down on the cost of sharpenings, and also to reduce their frequency to make the blades last as long as possible.
The final reason why multi-razor sets were so popular is because they were considered a status symbol. While anybody could buy two (or more) individual razors, and rotate them day by day or week by week to reduce blade-wear and sharpening, being able to buy a cased, matched set was something that was, in general – on a whole other level. The expense of making a custom case, of lining it in fabric and veneering it in leather, of adding in the fittings that would hold the razors in place, of adding in the hinges, catches, or even locks and keys, all entailed extra time, expense…and therefore – money.
If you were able to afford all that – even for a two-razor set – then it suggested that you were a person of means – a person who could afford a few of the finer things in life – and a person who could justify the expense of buying your own cased set.
Multi-Razor Sets: Buying and How-Tos
As I mentioned before, multi-razor sets don’t really exist these days. A handful of companies still make seven-day luxury sets, but these cost thousands upon thousands of dollars each, and it’s unlikely that most people interested in straight razor shaving would wish to spend that amount of money on such a set, unless it was a real, once-in-a-lifetime splurge.
So if you do want to own such a set, then the only way to get one is either to accumulate the razors yourself, and make the case or box at home (or commission somebody else to make it for you), or to buy one secondhand.
Let’s assume that you want to, and you do. What sorts of things do you need to be aware of?
I already covered most of the details about buying vintage or secondhand razors in my previous posting on razors (see “The Idiot’s Guide to Straight Razor Shaving” that I wrote a few weeks ago), so in this part of the posting, I’ll be discussing other things to keep an eye out for, besides the razors themselves.
Checking the Razors
The first thing you want to do is to check the razors themselves. Now I already covered most of this previously (see the link, above), so I won’t go into it in amazing detail – but suffice to say – you want to be sure that all the razors in the set are identical, and that they are all in functional condition, or can be restored to functional condition.
Blades should be clean, undamaged, and without heavy rusting.
This is one of the biggest pitfalls when it comes to buying antique razor sets like this – all it takes is one TINY blemish – one crack, one chip, or one set of broken scales – to completely ruin an otherwise pristine set. Once one of those razors is damaged and can’t be repaired, the set loses all its value! Nobody will want it because they can’t use it as intended, and because of that, regardless of how cheap the set is, it’s pointless trying to buy it.
This isn’t something that you want to find out AFTER you’ve bought a set, so make sure you check every single razor with microscopic precision, before dropping any money. Light surface-rust and minor scuffs and damage can be repaired, but major issues like cracked, split or chipped blades, heavy rust that goes deep into the steel, or major damage to the box are all things which are irreparable – the set is now worthless. Don’t buy one of those.
Checking the Box
Assuming that the razors are matched, and functional, without major defects, the next thing to examine is the box, or case which the razors come in. Check for any cracks, major blemishes, broken hinges, broken locks or clasps, damaged fittings, excessive wear or rubbing, split leather, major stains or other damage to the interior linings.
Some of these things can be repaired. Missing keys can be found, or re-cut. Hinges can be tightened and you can find new screws for that. Depending on how original you want the box to be, new fabric for lining the interiors can also be sourced (at the sacrifice of any gold-leaf printing inside the lid), and wooden surfaces can be sanded and re-stained to bring back the shine in the wood.
Brass or other metal fittings such as escutcheons, hinges, lock-plates etc, can be polished or replaced. The leather surfacing can be re-polished with an appropriate leather-polishing wax or stain, and gold edging can be retouched to an extent, with things like gold paint of the right hue (or if you really want to do it properly, you can get actual gold-leaf and do it that way).
A clean, unblemished interior.
While examining any prospective purchase, you need to decide just how much imperfection you’re prepared to tolerate, or how far your repair and restoration skills will stretch. The more you’re willing to compromise, the more sets will become available to you. Finding perfect or near-perfect sets for reasonable prices is very difficult – they’re getting increasingly rare, and the sets which are leftover are often more trouble to restore than they’re worth.
So, What about This Set, Then?
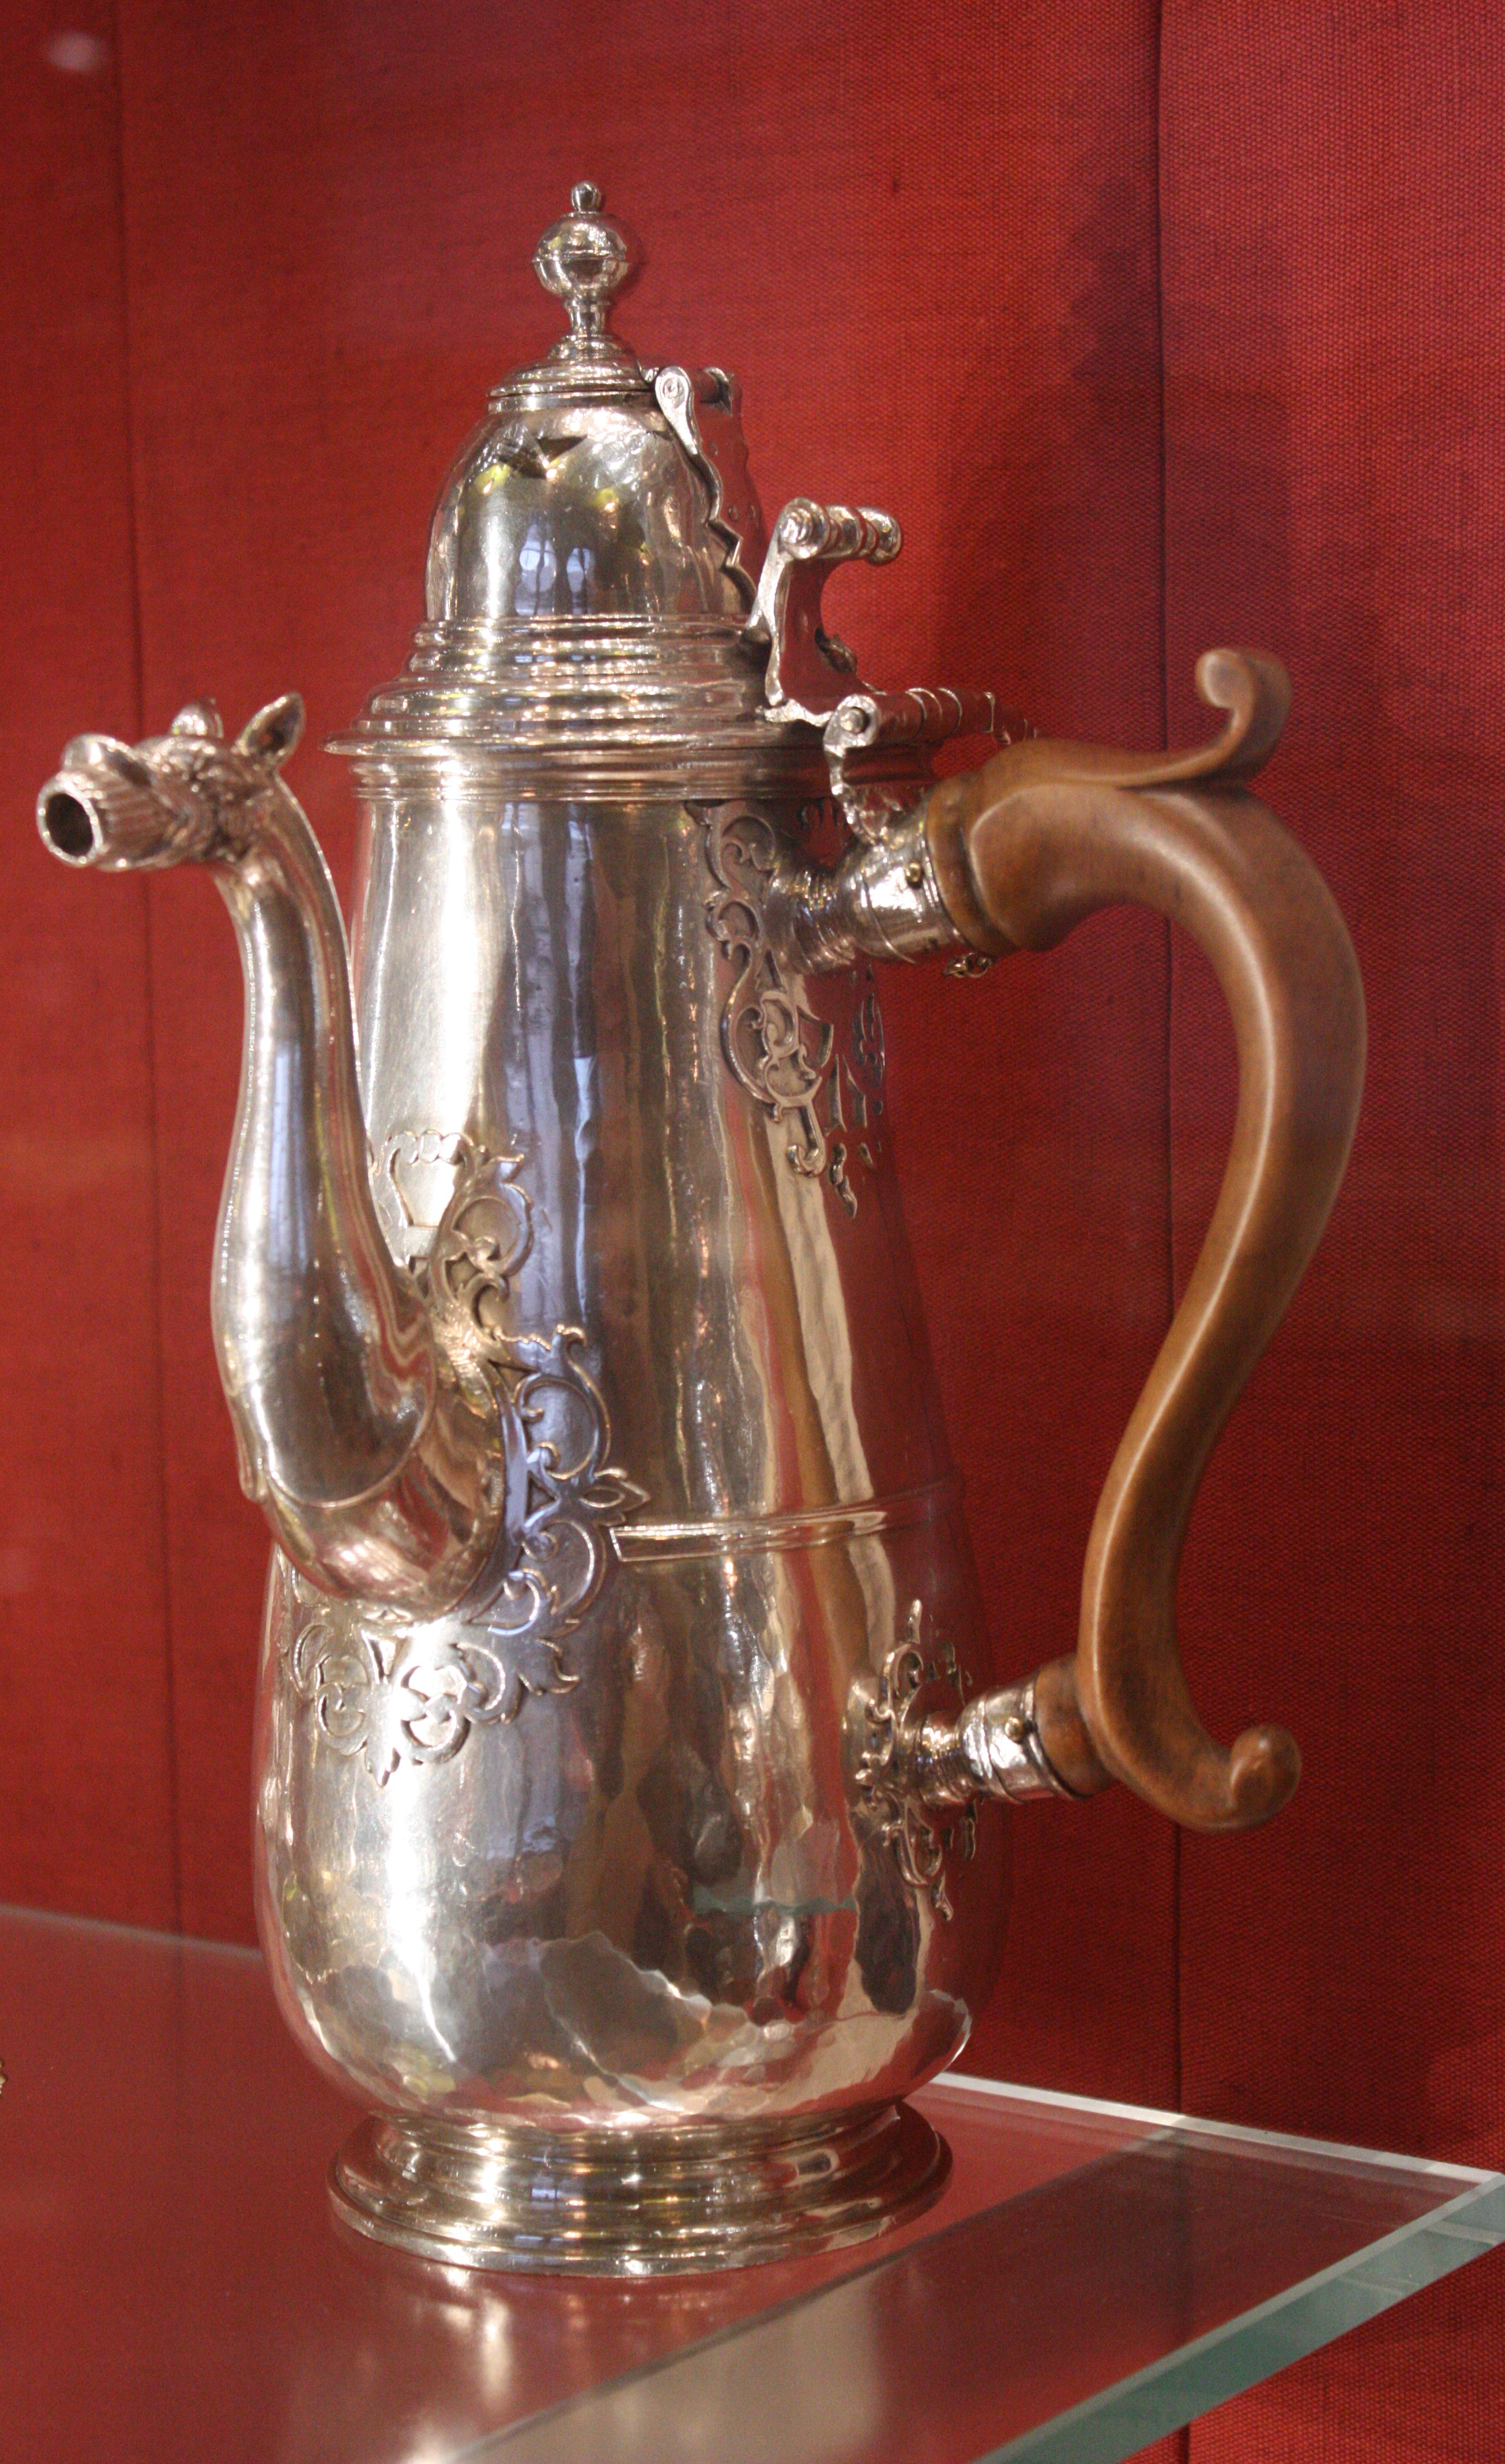
Isn’t it neat?? I picked this up on eBay about a month ago (what with our friend Coronavirus staying around for the foreseeable future, the parcel took forever to get here), and it’s something that I’ve always wanted to add to my collection: An antique, cased pair of matching straight razors!
What is it all Made Of?
This particular set features a wooden case or box, lined with red leather on the outside, bordered in gold leaf, with an interior of blue silk and velvet. The lid also features a nickel silver cartouche in the middle, where the owner’s initials or a date or some-such thing, could be engraved, if desired – a feature which bespeaks the set’s intended role as a gift, or as a significant purchase.
The razors themselves are made of carbon steel, with the original owner’s initials engraved on the blades, and which possess scales made of celluloid plastic. The original eBay listing identified them as bone, but a close look reveals the faux-ivory ‘grain’ pattern, that is so common to so many early celluloid-scaled razors.
Restorations and Repairs
The set didn’t really need much work, once I’d gotten my hands on it – one of the main reasons I bought it. Apart from some polish to hide some marks and bring a bit of colour back to the leather, a bit of metal polishing to the hardware, checking the razors for rust, and then giving them a thorough sharpening, there really wasn’t much to do.
Restoring the finish was largely a matter of rubbing red leather polish in, to bring back the original colour and restore any fading or colour-loss.
All in all, the set was in excellent condition, barring some minor touch-ups, cleaning and general maintenance. A worthwhile purchase which will only ever increase in value.
If ever two words were more opposite to each other, I don’t think you could find a pair more perfect than ‘toothpick’…and…’luxury’.
But here we are.
I have dared to put these two into the same sentence, and it has been done.
Toothpicks have been used for thousands of years for cleaning teeth, picking out stuck food, gunk, grime, or for scraping away at the enamel surfacing to remove hardened plaque or other detritus. In an age before particularly sophisticated (or comfortable) dental care was available, keeping one’s teeth clean with a toothpick was one of the most important things ever! Abscesses, receding, or inflamed guns, and the sheer discomfort of stuck food or tooth decay, were big motivators for keeping one’s mouth (and teeth) as clean as possible at all times.
Precious Metal Toothpicks
Toothpicks made out of metal have been in use for centuries, and ranged from simple copper, bronze or brass ones, to expensive luxury models, such as those made from silver, or from (usually low karat) solid gold. In an age when plentiful food and good nutrition was much rarer than it is nowadays, using a silver or gold toothpick to clean your mouth after a meal was a sign of wealth and extravagance – the fact that you needed to use such a thing indicated wealth, and the fact that it was made of silver or gold only enforced this fact to anybody watching.
Precious metal toothpicks in gold or silver were common in many cultures around the world, and examples have been found which were made in the United Kingdom, Australia, and several countries in Asia, where using toothpicks is much more common overall, than it tends to be in European countries.
In both Europe, and Asia, silver and gold toothpicks were a common accessory. Usually, such toothpicks were housed in cylindrical metal storage tubes, and could be slid in or out upon the demand for use. They were usually affixed to the user’s clothing, or hung around the neck, using a chain or necklace, or else clipped to another piece of jewelry – such as on the end of a pocketwatch chain.
Such retractable toothpicks became increasingly popular in the 1700s and 1800s, when grooming and personal presentation were taken very seriously, and when professional dental care left much to be desired. Numerous silversmiths and goldsmiths all over the world made toothpicks for sale the public – usually out of high-grade silver (800, 900 or 925 sterling), or else, out of lower-grade gold (usually 9kt), owing to the soft nature of gold, which had to be heavily alloyed with copper so that it would be strong enough to be made into something as thin and small as a toothpick, without snapping or breaking while being used.
I picked up this particular toothpick at my local flea-market. There wasn’t much information, except a card that said: “STERLING SILVER TOOTHPICK”, and a price ($5.00). I have no idea how old it is, but going by the “STG SIL” mark on the end of the shaft, I’d say that it was Australian-made (STG SIL is a common, generic Australian silver mark, standing for “STERLING SILVER”).
The pick is square cross-sectioned, with a sharp, pyramidal point, a twisted shaft, and a flat, spatula’d end with the fineness punched into it. It’s 2-3/4 inches long, and is by far the smallest antique I have ever purchased!
For the person who has everything – you can still buy sterling silver toothpicks today. They might be the perfect “green” solution for you, if you’re looking for a portable and discrete way to clean your teeth while out and about, and don’t want to use wooden toothpicks, plastic ones, or miles and miles of dental-floss. A number of online retailers sell them and if nothing else, it’ll definitely be a conversation-piece at your next dinner engagement!…but perhaps just display it, rather than demonstrate it!
Aaah, January, 2021! Time for new years’ resolutions, like saving money, earning more, losing weight, eating healthy…yeah, how about we set a more realistic goal? How about we learn about the most cost-effective, money-saving, and coolest way for the average guy to achieve a crisp, clean, comfortable shave?
In this posting, I’ll be going over what I deem to be the ‘Idiots’ guide to straight razor shaving‘ – a posting dedicated to explaining to you how to start on straight razor shaving, and how to get the best results, what to do, what not to do, what to be aware of, and what to avoid. Everything that follows is written on the assumption that you’ve never done this before, but might possibly be thinking of trying to!
Everything written here comes from over 12 years’ personal experience as a straight razor user. All the tips, tricks, advice, and techniques used are ones which I myself have used for over a decade without incident.
So, let’s begin…
What is a Straight Razor?
A straight razor, also known as a straight-edge razor, or more ominously, as a ‘cutthroat’ razor – is a thin, flat, very sharp blade affixed to a pair of scales (what some people call the ‘handle’) by a set of pins and rivets, and which may be sharpened and reused endlessly.
Razors of one kind or another have been around for literally thousands of years, but the conventional cutthroat razor with which most of us might be familiar with today is an invention of the 1600s, when the first such razors were invented in Germany, whereafter, the basic design was spread throughout Europe, being refined and improved as it went.
The Parts of a Straight Razor
So that you know what’s going on, let’s first go over the parts of a straight razor.
First, we have the blade, which is the main metal component. Flat, thin and very sharp. At the top of the blade we have the spine and at the bottom we have the edge.
When purchasing a straight razor, it’s good to know the razor’s size. The size of the razor is determined by the size of the blade, which is traditionally measured from spine to edge in 8ths of an inch. Razors traditionally went from 4/8 (half-inch wide) to 8/8 (one inch wide). Some go wider, some go narrower. Most razors will fall somewhere between 4/8 and 8/8, though.
At the farthest end of the blade, we have the point and at the other end, the tang. To reduce weight and improve the shaving experience, the vast majority of straight razors are hollow-ground, meaning that their blades have a concave cross-section. Grinding out the excess metal makes the blade lighter, easier to sharpen, and easier to use.
The blade is attached to the scales by rivets or pins, and are held in place by collars and washers. Most straight razors have two pins, but some will have three, for extra strength. Scales are made of almost anything you can imagine. In my time, I have seen scales made of horn, ebonite, celluloid, wood, bone, ivory, mother of pearl, and even sterling silver!
The blade’s tang is where you will find the maker’s details. The company that made the razor, and where it was made. You might also find some corrugations on the tang, next to the blade. These are gimps, designed to give you better grip on the steel. Some blades have upper gimps, some have lower gimps…some even have both!
Next to the gimps (if there are any), there are the transverse stabilisers. These are angular grooves or ridges punched into the blade when it was formed. They are designed to act as a finger-guard, but also to stop the blade from cracking from overzealous stropping or sharpening.
At the far end of the scales, away from the tang is the wedge which is used to hold the scales apart, so that the blade can rest between them when it’s not being used.
What are Straight Razors Made Of?
Straight razors are made of a variety of materials. The main components are the scales, the blade, the pins and the washers. Pins and washers used to be made of brass (to prevent rusting), but nowadays, stainless steel is also available. Blades were traditionally made of carbon steel (and most still are). In modern times, some are made of stainless steel.
Assorted antique straight razors with original ivory scales. Due to the expense, razor scales made of ivory were always kept as thin as possible.
Scales, the two straight pieces which house the blade when it isn’t being used, have, as mentioned above, been made out of almost every material imaginable. Razors with rare or expensive scale-materials, such as mother of pearl, ivory, sterling silver and horn, command a premium on the antique market. Most razors these days have scales made of celluloid or some other variety of hard, wear-resistant plastic.
Blade Shapes & Points
Straight razor blades come in a wide variety of shapes and styles. Almost all modern straight razors are what’s called ‘hollow-ground’ – this means that the sides of the blade are ground into a concave shape. This keeps the razor light, but also makes it easier to sharpen and shave with, without all the excess metal on the blade getting in the way.
Razors range from wedge blades (no grinding), near-wedge, quarter-hollow, half-hollow, full-hollow, and extra-hollow. Straight razors with significant hollow-grinding are called ‘singing’ or ‘ringing’ blades, because of the bright metallic ringing sound that’s created when they’re struck, tapped or shaved with. This was meant to be a sign of craftsmanship, because it reflected the quality of the steel used to manufacture the blades.
An ivory-scaled Bengall with a square-point blade, and a worn-out German blade with a barber’s notch in the tip.
Along with grinding, blades also differ in their points – the tip of the blade opposite the heel. Points vary between round, square, French, Spanish, and barber’s notch. The majority of modern razors are round or French-point. Spanish, squared-off and notched points are only ever found on antique blades. Round and French-point blades became the most popular because they came with the lowest risk of accidentally nicking yourself with the tip of the razor while shaving, due to their rounded-off ends.
Straight Razor Accessories
Just like how fuel alone isn’t enough to make a car run (hey, you also need oil, water, air for the tires, and keys to start it, right?), a straight razor on its own is not enough to start shaving. For a traditional, straight razor shave, you will need, at a bare minimum:
A Leather Strop
A strop is the long, flat piece of leather upon which straight razors are ‘stropped’ (more about this later). A good strop should be made of smooth leather, free of blemishes, and at least 2-3 inches wide, and at least 12 inches long. These are easily available from shaving-supplies shops, online, on eBay, or if you’re a leather-worker – heck, you can even make your own, if you want to!
The point of the strop is to realign the very fine edge of the blade, before and after each use of the razor. As straight razors are, quite literally, razor sharp, the blade comes to a very very fine point at the edge – fine enough to be warped and bent by stubble when it’s being used to shave with. Eventually, this edge will become so jagged that it won’t cut anymore. To smooth the edge, stropping is essential.
My restored, 1920s razor strop. The casing is sterling silver.
The strop should be held tightly in one hand, and the blade placed flat down on the strop. You strop spine-first, back and forth, on both sides of the blade, making sure to roll the blade on the SPINE and NOT on the EDGE – otherwise you’ll undo all your hard work and dull the razor all over again. This should be done at least 20 times, covering the full width of the blade, to get the best results.
To avoid flexing the blade, any pressure applied (although this should be minimal) should be applied to the spine of the blade, not the edge – again, to prevent flexing, rolling or curling over the edge. The whole point of stropping is to straighten the edge so you can shave with it again – if you apply pressure to the edge or curl it over, you’ve just undone all your work. Whoops!
The most traditional kind of strop is the ‘hanging strop’ – you know, it hangs on a hook or a ring or nail on your bathroom wall and you just yank it up and out and strop and then drop it back when you’re done. If you don’t want to use that, you can also buy an adjustable ‘paddle strop’, which you hold in one hand and strop with the other. Paddle strops are usually adjustable, so that you can dictate how tight, or loose, you want the leather to be before you start stropping.
Honing Stones
One of the main reasons why I got into straight razor shaving was to have the ability to reuse my razors over and over and over again. Never having to throw them out, never having to buy new ones, and never having to worry about where I’m going to get new blades, or how much they’re going to cost.
To achieve this end – it’s important to know how to sharpen your razors.
I mean, you don’t have to. You can get somebody else to sharpen them for you, but if you can learn this skill yourself, it’s a lot easier, more fun, and saves you money in the long run.
To sharpen your razors, you will need at least two sharpening stones. A coarse or medium-grit one, and a fine-grit one. I use an old medium-grit oilstone, and a 1,200-grit Japanese water-stone for my razors and these work excellently. Whatever you decide to use will be up to you, but make sure that the stones you buy are quality, and meant for sharpening fine-edged knives and razors. Don’t buy one of those cheap knife-sharpener gizmoes at your nearest kitchen-supplies store – you’re wasting your time, and money.
Assuming you have your stones, you can start sharpening. Place the medium-grit stone in its holder or base (or if you don’t have one, then a small, damp towel will do) – this will hold the stone in place, and stop it from sliding around. Spray the top with water, and commence sharpening.
Lay the blade flat down on the stone. Raise the spine slightly, until the blade is at about 10-15 degrees, or less – and draw the razor across the stone, from heel to point, edge-first. Flip over to the other side and draw it back, again, from heel to toe. This is one pass. Repeat at least 20 passes on the medium stone, and then at least another 20 on the fine stone afterwards, to sharpen your razor, and then strop afterwards, to smooth the edge.
If you have trouble with maintaining the slight angle that you need to sharpen your blades, one common trick is to ‘tape’ the spine. Get some masking tape the length of the blade (about three inches), tape it over the spine of your razor, and start sharpening. The tape raises the angle of the spine slightly, and gives you the right angle-of-attack. It also stops the spine from scraping on the stone, and wearing down the metal. Simply peel off the tape once you’re done sharpening.
If you want a slightly higher angle of attack, use two strips of tape instead of one.
If you’re unsure about how many times to strop, or hone your razor-blade – remember: More often is better than not enough. Shaving with a blunt razor is not only incredibly uncomfortable (razor-burn from a blunt straight razor is an absolute pain in the ass) – it is also extremely dangerous (they don’t call them ‘cutthroat’ razors for nothing!).
Bowl, Mug, or Scuttle
Now that you’ve honed, stropped and prepped your blade, the next thing to look at is what you’re going to make your lather in. Traditional wet-shaving always involved hot water, and a good-quality shaving-soap or cream with which to turn into a hot, smooth, sweet-smelling lather.
This is usually done in some type of vessel – either a bowl, a mug, or a scuttle. Bowls are wider and give more range of movement, scuttles and mugs are smaller, and take up less space. Scuttles have the advantage of drainage-holes and lots of hot water to keep things from getting too soggy, but still nice and warm, and mugs have the advantage of being able to hold them in one hand while lathering with your brush with the other.
Which one of these three options you choose is really up to you, and your own personal circumstances. What you’re comfortable with, what you like, what you can afford, and what you think goes best with your other accessories.
A Shaving Brush
The next shaving accessory you’ll need is a traditional shaving brush. In times past, these were usually made from badger-fur, because the bristles of badger-hair retained water and were thick, soft and strong. Some brushes these days are made from synthetic fur, but the best ones are still made from badger.
A shaving scuttle (filled with water) and shaving brush, on the right.
Shaving brushes vary greatly in size, style, knot-size, and the length of the bristles. The type of badger-hair used also plays a part – they can be stiff, medium, or soft. The type of brush you choose is partly up to personal choice, but also what kind of lathering agent you choose to use.
Usually, soft creams work better with soft bristled brushes. Firmer soaps, which need a bit more friction to work a lather with, typically require brushes with stiffer bristles. Brushes range in size from tiny little travel-sized ones, all the way up to larger full-sized brushes which come with their own stands.
An Alum-Block, or Styptic
Hopefully, you’ll never need to use either of these, but they’re good to have around.
Alum blocks and styptic pencils exist to deal with any minor nicks, cuts or razor-burn that you might get from shaving. They help to sterilise the area, close the pores and reduce bleeding. I keep a block of alum on standby, but I’ve hardly ever had to use it. Hopefully, neither will you!
Aftershave Lotion
Aah, aftershave. Refreshing, sweet-smelling, cleansing…I never use it. I’ve never had the need to take my shaving routine that far. I may start using it in the future, but for the time-being…no.
That said, some guys do enjoy the scent and feel of aftershave on their faces after a good, crisp shave. Again, as with soaps vs creams, the aftershave you choose is largely a matter of personal preference.
Back in the Victorian era, aftershaves were developed when it was discovered the alcohol-based lotions could kill the bacteria that would cause infections introduced to the body via razor-cuts during your morning shave. To guard against these possible infections, aftershaves were marketed as the necessary, final step in the perfect shave. To make them sound less medicinal and more sartorial in nature, aftershaves were often scented to act as both a preventative, and also as a cologne.
Preparing to Shave
You have honed and stropped your razor, and have managed not to warp or fold over the edge. Excellent! Now begins the most perilous, or most pleasurable, part of the straight razor experience: Actually shaving with it!
First, you need hot water. Fill up your basin with hot water – as hot as you can comfortably stand. Soak your brush in the water and get it nice and warm, and then fill your scuttle, mug, or bowl with water, to heat it up.
Pour out most of the water from your mug or bowl (but keep as much water as you can, inside your scuttle), and then add in your cream (if you’re using a block of shaving-soap, it should already be inside there. The hot water will melt the soap and cause it to stick to the inside of the scuttle, mug or bowl, and prevent it from sliding around). You don’t need much shaving cream, a fingernail-sized dot will do.
Fish out your brush, shake off the excess water, and start lathering up the cream or soap. A good lather is like egg-whites – thick, fluffy and dense. If it’s all sloppy and wet, you’ve got too much water. If it’s not forming, then your lather is too dry. Adjust the water accordingly. Shaving scuttles have holes drilled into the soap-dish on top, which allows any excess water to drain away into the jug underneath. If you have trouble regulating how much water you need, try using a scuttle – it’ll do the regulating for you, and make things esier!
The water should have warmed up your bowl, mug or scuttle, and your brush, making the lather nice and warm. While it was soaking, you could also use some of the water to moisten and soften your stubble, or you could let the lather do that.
Once you’ve worked up a lather, massage it into your stubble and face using the brush, using circular motions to spread it around evenly. Paint it on smooth once it’s applied, and then you can start shaving.
Proper lathering is essential for a straight razor shave – the blades are designed to glide across a smooth, wet, lubricated surface – trying to shave without at least first wetting your face in hot water – will be a truly unforgettable experience…and not for the reasons that you might like. Without sufficient slickness, the blade will drag, scrape, and even cut you if you’ve not prepared yourself in the correct way.
Shaving with a Straight Razor
Shaving with a straight-edge razor can be unnerving if you’ve never done it before – after all – you’re about to put three inches of lethally sharp steel against your throat with nothing to stop you from reenacting a scene from a certain Stephen Sondheim musical – but provided that your razor is as sharp and smooth as possible, and you’ve prepared your skin properly, there’s really nothing to worry about.
The first thing to do is to get the right grip on the razor. Open it and swing the scales around so that the blade and scales are perpendicular to each other. Grip the blade across the tang, with two fingers on either side of the scales, and using the thumb to hold everything in place.
Rest the blade flat against your skin, and raise up the spine slightly, so that you have an angle of about 20-30 degrees. This is your angle of attack.
Now, using LIGHT, GENTLE, SHORT STROKES – start shaving.
Straight razors are meant to be, quite literally – razor sharp. This means that the razor should be sharp enough to cut through all your stubble without you having to force it, press it, push it, tug it or wrestle with it in any way whatsoever. The correct amount of pressure to use is none at all. The weight of your hand and the razor alone, should be enough to cut through whatever you need to shave off.
If it isn’t – then your razor isn’t sharp enough, or hasn’t been stropped properly. Try sharpening and stropping it again.
If it is, however – then the blade should glide through with no problems. As it cuts, you should feel minimal resistance, and a soft prickly sensation and scraping noise, kind of like buttering toast. The scraping noise is the sound of the blade cutting dozens of tiny hairs all at once.
Stretching the Skin
As you shave, it’s important to stretch your skin, so that your stubble stands up straight, and is therefore easier to cut. You can do this in a number of ways. Moving your jaw, tightening your facial muscles, puffing out your cheeks, or angling your head will all achieve skin-tightening in one way or another. You can also use your non-razor hand to stretch the skin as you go along.
Direction of Growth
It’s important to know, as you shave, the direction of your stubble-growth. This way, you’ll know whether you’re shaving with, against, or across the grain. With the grain means shaving in the same direction as your stubble-growth, across means shaving perpendicular to it, and against, means…against the grain!
However you choose to attack your stubble, it’s important to apply as little pressure as possible, and to use light, short strokes. Cover a couple of square inches at a time. Naturally, shaving is much easier on flat surfaces, so to get the best shave, divide your face up into – and shave primarily on – as flat a series of surfaces or facets as you can find. Manipulate your jawbone as necessary to achieve this.
Shaving in Passes
Thanks to multi-blade cartridge razors and electric shavers, most people these days are used to shaving everything off in the space of a minute, with multiple blades scraping off one’s stubble in an instant…actions which can lead to razor burn, cuts and even ingrown hairs – nasty!
Our grandfathers got around these issues by shaving in passes – doing one full shave with a single blade, lathering up, and then doing another shaving session or ‘pass’, again with a single blade – to catch anything that wasn’t shaved off the first time. In most instances, two or three passes is the norm.
Shaving in this manner is safer, and less irritating to the skin – useful, if you have dry or sensitive skin which doesn’t hold up well to abrasions or excessive friction. Also, since you’re not literally trying to pull your stubble out by the roots, you’ll have fewer instances (if any) of ingrown hairs and reduced chances of razor burn. If you’ve never had razor burn before, count yourself lucky, because it stings like an absolute bitch!
Manipulating the Blade
As you grow more proficient with using a straight-edge razor, you’ll become more adventurous in how you handle it. Eventually, you’ll find out more about exactly what a straight-edge razor can do, and how to hold and direct the razor to achieve the results you want it to.
For example – resting your fingers against, or gripping the spine of the blade will give you a much higher level of control – especially around fiddly areas such as the upper-lip and the side of the mouth – places where long, swift, sweeping strokes aren’t possible. Holding the razor like this also gives you more control in how you shave with the razor – allowing you to do several short, quick strokes to scrape away irritating fuzz, when full single strokes are impractical.
Exactly how adventurous and proficient you get in manipulating your blade to do what you want, is largely up to practice, and learning exactly how your hand and the razor interact with each other. Some movements are easier than others – find the ones that work for you, and practice them when you shave.
Finishing your Shave
Once you’re done getting off as much stubble as you can with your straight razor, wash off the soap and stubble, and then dry off your face – and your razor. The vast majority of straight razors are made of high carbon steel – which is very sharp, but which can also rust very easily – so be sure to keep them dry as much as possible. Ideally, razors should be stored in a cabinet or storage-case, to prevent them from getting damp, and rusting out the blade. Also – make sure you dry out any water between the scales, or else it’ll get on the blade when you close the razor, and start rusting it out even more.
Once you’ve dried your razor, make sure that you strop the razor once more – just a light stropping – that way you won’t have to do it as much the next time you start to shave. Ideally, you should strop at least once with every shave (most people do it twice, just out of habit – at the start, and end of the shave).
And there you have it! A straight razor shave.
Razor Maintenance and Care
Given proper care, a straight razor will literally last for centuries. Every single razor in my collection is an antique from the 1800s, and they’re all in fantastic, usable condition.
To keep your razors in that condition, proper maintenance is essential.
When not in use, razors should be kept dry, and closed.
When sharpening or stropping, light pressure should be applied, with even force across the width of the blade. This prevents wear and tear on the blade-edge, and the spine, ensuring that the blade lasts for as long as possible.
Razors should be sharpened periodically. When you want to do that is up to you. It could be every month, every three months, six months, even once a year. Exactly when you do it is entirely up to your personal circumstances. You’ll know when to sharpen your razor when stropping alone doesn’t get it up to shaving-sharpness anymore.
Buying Antique Straight Razors
One of the great joys of mastering the art of using a straight-edge razor is being able to start a collection of antique razors.
Because straight razors can literally last for centuries, there’s billions of them out there ready to be snapped up for very little money, if you know where and how to look for them.
If buying a brand-new razor – which can cost several hundreds of dollars – doesn’t appeal to you – then you can just as easily buy a vintage razor for a few bucks, learn to sharpen and strop it yourself, and teach yourself how to use it. If you can be proficient with something that cheap, you’ll have no problems learning how to use better-quality razors which would cost many times more.
So, what do you need to know to buy an antique straight razor?
Checking the Blade for Defects
The most important part of the razor is the blade. When examining an antique razor, make sure that the blade does not have any chips, cracks, dents, dings, nicks, or deep rusting. Any one of these defects will render a blade unusable. Do NOT buy a razor with any of these issues – it is not worth your time.
Next, examine the blade for surface rusting. Light surface rusting is very common on antique razors which haven’t been stored properly. With the right rust-removers, polishes and abrasives, these patches of rust may be removed, and the razor rendered serviceable once more. To prevent injury, always polish, sand or buff the blade from spine to edge.
Avoid any blades which are “smiling” or “frowning”. A ‘smiling’ blade is one where the heel and toe of the blade have been worn away, causing the blade to ‘smile’ (have more metal in the middle, than at the extremities). A ‘frowning’ blade is the exact opposite: A blade with plenty of metal at the toe and heel, but less metal in the middle.
Smiling and frowning blades are the result of improper and overzealous sharpening, which has caused the blade to wear down unevenly. This would cause the blade to become harder to sharpen, harder to strop, and of course – harder to shave with. Do not buy any razors with misshapen blades. They’re simply not worth your effort to try and restore.
Check the Scales for Damage
As mentioned earlier, the ‘scales’ are the two flat panels which make up the ‘handle’ of the razor, into which the blade is placed when not in use.
Scales can be made of almost anything. Mother of pearl, ivory, bone, wood, sterling silver, celluloid ebonite, horn, stainless steel…the list is almost endless.
Regardless of what kind of materials the scales are made of, however, an equal amount of attention should be paid to the scales, as to the blade. Check for defects such as chips, cracks or nicks. Some scales made of natural materials (ie – bone, ivory, horn, etc) may have very thin hairline cracks, as a result of their advanced age – provided that these are not compromising their structural integrity, you can generally ignore them, and use the razor anyway. What you don’t want are scales with so much damage that they’re in danger of falling apart.
Cracks are most common around the stress-points. On scales, the stress-points are the holes which were drilled to drive through the rivets that keep the razor together. Minor hairline cracks are rarely an issue – but large cracks that go all the way through should be avoided.
Another issue is to make sure that the scales have not warped. This happens when, due to improper storage, heat, cold, or other factors, the scales have started to misshape, bend or otherwise deform. Do not buy a razor with these defects! Warped scales are a terrible safety hazard. If the blade does not reliably seat itself between the scales every single time you close the razor, if the blade strikes the scales whenever you try and close it – then don’t buy the razor. The last thing you want to do is to break the blade, or even worse – cut yourself, because the scales got in the way of a moving blade.
Prices for old Razors
The prices for old straight razors vary greatly. Anything made in Sheffield or Solingen is generally excellent quality, and well worth whatever you’re comfortable with paying for it. Razors can be picked up for as little as $10-$20 for a bog-standard mass-produced one, up to $50 for razors with more expensive materials for their scales, such as ivory, silver, or mother-of-pearl. On sites like eBay, restored razors sell for between $100-$200 apiece, again depending on age, condition, materials and completeness.
Straight razor sets – and sets do exist – are the cream of the crop when it comes to antique straight razors. Straight razors were most commonly sold in sets of two, three, four, and seven matching razors. While they can all be tricky to find, especially in good condition, for good money, the hardest and most expensive to procure are the complete, seven-day, seven-piece razor sets, which typically come in a wooden, felt and silk-lined case, complete with matching razors with the days of the week engraved along the spines.
My antique seven-day straight razor set. The grey block next to it is my ca. 1900 “Perforated Razor Hone”, which is excellent for freshening up your blades when they’ve gone a bit dull.
Such sets are extremely hard to find, and very expensive. Most sets are incomplete, broken, or irreparable, and prohibitively expensive. This means that sets which are complete can fetch several hundreds, or even thousands of dollars, because of their condition and rarity. Back in the Victorian era, they were considered status symbols, because they suggested that the person who owned them not only had the money to buy one, but also the manservant whose job it was to sharpen and maintain these razors on a regular basis for his employer.
Other Antique Shaving Accessories
Other antique shaving accessories are easily found on eBay, or at flea-markets, antiques shops and fairs with few problems. Check any honing stones for cracks or chips – ignore any which have those – check any strops for damaged leather, and discard any which have cuts, scraps or tears, and make sure that any bowls, scuttles or mugs you buy don’t have any huge cracks in them. You should always buy your brush brand-new, however. Last thing you want to think about is what kind of gunk might be hiding inside the knot of your brush…
Old lathering mugs and scuttles are cheap and easy to find in good condition. Old strops are a bit harder, but if you’re persistent, you can find them. Or, as I said earlier – if you’re good with leather-crafting, you can even make your own. The perforated razor hone (see photograph above) was all of $20.00 and it’ll last forever!
Concluding Remarks
Straight razors have been used for hundreds and hundreds of years. Variations of the straight razor have existed since antiquity. The straight razor’s ability to give clean, fast, thorough shaves, to cut through entire beards, if need be, and to shave off more in one go than almost any other shaving device, is what has kept it in its position as being the most highly regarded of all the shaving methods developed and invented throughout history.
The fact that shaving with a straight edge requires skill, practice, judgement and a certain amount of bravery, is what makes it appeal to guys, who feel like they might have something to prove – or who want to try and master a new skill – because not just anybody has the courage, patience, or can master the techniques required to shave effectively with a three-inch long open blade at the drop of a hat.
Mastering the use of a straight razor is one of the greatest accomplishments you can achieve, and once reached, is an achievement which nobody can take from you, and which you can use for the rest of your life.
And you can brag about it to your friends, which is pretty cool…!!
Imagine this – It’s December! You’ve booked yourself an international flight to the Far East to enjoy a balmy, sandy Christmas in the sun! You board the plane and take off across the Pacific headed for Southeast Asia, and settle in for several hours of relaxation, conversation and sightseeing over the ocean.
Before you’ve even reached your destination – your entire world is turned upside-down! Reports come in over the radio that suddenly, the whole world is at war! You can’t fly back, you can’t go on ahead, you have no idea where the plane is even going to land, and you could be shot down at any minute!
This is the terrifying tale of the Pacific Clipper, one of the long-haul luxury passenger seaplanes operated by Pan-American Airways in the 1930s and 40s, and the record-breaking flight that it took around the world in December, 1941, as the South Pacific exploded into war beneath its wings.
What Was the Pacific Clipper?
Introduced in 1938, the Boeing 314 Clipper was, in the late 1930s, the most modern of commercial, long-haul passenger aircraft being sold around the world at the time. Only twelve were ever constructed. Nine went to Pan-American Airways, and the remaining three went to BOAC – the British Overseas Airways Corporation.
The Boeing 314 was a large aircraft for the day, but even it wasn’t able to cover the entire width of the Pacific Ocean in a single, uninterrupted flight. Instead, the accepted practice of the day was to “island-hop” around the world, providing long-distance travel to the paying public by flying from one airbase to another, completing long-haul flights in stages. It wasn’t fast, and it wasn’t exactly glamorous, and it certainly wasn’t cheap!…But it beat the hell out of trying to cover the same distance by ocean liner!
PAA’s ‘California Clipper’ in 1940
The Pan-Am clippers came with most of the stuff that modern aircraft come with: Lavatories, seats that could convert to lie-flat beds, delicious food, and full steward service! However, they differed in many other ways:
First – journey-times were much longer. From California to Hawaii took up to 19 hours! Second – Passenger-volumes were much-reduced – The average pre-war Pan-Am clipper barely carried more than 70 passengers. Third – the Pan-Am clippers were all seaplanes, or “flying boats” – they had no landing-gear – instead, the planes took off and landed on flat bodies of water – large rivers, lakes, or along the coastline during calm weather.
Last but not least – tickets were expensive! A one-way flight from California to Hong Kong was $760 – around $14,000USD in modern prices!
Piloting a Pan-Am clipper was very different from flying a modern aircraft. Because the planes could only take off and land on water, pilots had to be extremely skilled, not only in flying, landing, taxiing and take-off – but they also had to know a lot more about weather, sea-conditions, how to spot a safe stretch of water, and how to read the windspeeds and directions accurately enough to know when, where and how to make a safe water-landing! These days, most pilots hope to only make one water-landing in their entire lives, if they ever have to – but for Pan-Am clipper pilots, it was literally a daily occurrence!
In an age when long-haul passenger-flights were limited and the industry was only, quite literally, getting off the ground – flying was far more dangerous than it is today. Engine-failures and emergency-landings happened much more frequently, and a full-service crew flew with the aircraft at all times to tackle all kinds of mechanical incidents that could happen during flight. The crew of the Boeing 314 Flying Boat was 11 in number: The captain, first officer, second officer, third officer, fourth officer, two flight-engineers, two radio-operators, the purser, and his assistant.
It was one of these fantastical flying machines – a Boeing 314 – which came to be known as the ‘Pacific Clipper’.
Pan-American Airways named all its early aircraft, just like how steamship-lines at the time named all their ships. And just like how shipping lines followed naming conventions (Cunard named all ships “-ia” – Carpathia, Lusitania, Muretania, Berengaria, etc, and White Star named all their ships “-ic” – Titanic, Olympic, Atlantic, etc), Pan-Am also followed similar conventions: All their aircraft were called “clippers”, a reference to clipper sailing ships, which were famed for their speed. The names were typically related to the plane’s assigned route.
There was the Atlantic Clipper, the China Clipper, the Caribbean Clipper, the Honolulu Clipper…and the subject of this posting: The Pacific Clipper.
The Farthest Flight of the Pacific Clipper
It is December 2nd, 1941. Off the coast of sunny San Francisco, the Pacific Clipper is preparing for a routine flight across the Pacific towards Auckland, New Zealand. There are twenty-three people on board: Twelve passengers, and eleven crew. The pilot is Capt. Robert Ford, a Pan-Am veteran, well-used to the rigors of long-haul passenger-aircraft flights.
With a range of 5,000 miles, the Pacific Clipper was never able to make the flight from California to New Zealand nonstop, and it was accepted that the plane would land several times during the trip to drop off and collect mail, passengers, food, drinks, trash, and most importantly – fuel! When Captain Ford fired up the engines and took to the skies, nobody on board could’ve imagined what lay ahead.
Pre-war Honolulu in the 1930s
The aircraft’s first stop was San Pedro, California, then out across the ocean. It landed in Honolulu, Hawaii, then Kanton Island near Kiribati, then Fiji, and then finally, New Caledonia. In the preceding days, it had covered over 6,000 miles! The final leg of the journey was still ahead: Auckland, a mere 1,200 miles away – well within the limits of the Pacific Clipper’s operational range.
As the plane took off from New Caledonia and flew southeast towards Auckland, wireless operator John Poindexter was relaxing at his station, his headphones strapped onto his head as the aircraft hummed around him. Right now, he was probably thinking about his wife – the same wife that he had advised, he would be home early for – and to keep dinner for him on the kitchen table.
That was before one of the two radio-operators on the flight pulled out sick, and Poindexter stepped in to replace him. Had he known what was about to happen, Poindexter would’ve told his wife not to bother about dinner, because he was going to be home late.
Very late.
Halfway through their current leg, the radio suddenly crackled to life, and Poindexter scribbled down a message in Morse Code. Ripping it off his pad, he hurried to tell the rest of the crew what had just come in over the airwaves.
It was December 7th, 1941. A date which would live in infamy. Poindexter had just found out about the Japanese aerial attack on Pearl Harbor in Hawaii.
As the pilot, his co-pilot, the stewards, navigator, flight engineers and radio-operators all looked at the message, they suddenly realised what a horrible position they were all in!
While they could safely make it to New Zealand, offload their passengers, cargo and mail, refuel and take-off again – it was immediately obvious that there was no way that they could ever go home…or at least…not in the conventional way.
Under normal circumstances, the plane would’ve flown northeast towards Hawaii, where it would land, refuel, and then continue on back to the mainland United States. With Japanese aircraft, warships and aircraft carriers between the South Pacific and Hawaii, however, such a route was impossible – an aircraft bearing American markings would almost certainly be shot out of the sky if it was discovered by Japanese surface vessels.
With Hawaii on high alert, landing and refueling there, even if they managed to evade the Japanese, would be next to impossible. Unable to make the journey back to California without at least one stopover, getting back home seemed impossible!
Landing in New Zealand
The first leg of this epic adventure was relatively easy – landing. Two hours after receiving the world-changing news that the naval base at Pearl Harbor had been blasted by the Japanese, Captain Ford and his crew executed a landing off the coast of New Zealand, taxiing up to Auckland and tying off. Passengers and cargo were offloaded and the plane was prepared for…well…they weren’t exactly sure what for…but they wanted to be prepared at the very least!
Unsure of what else to do, the crew made their way to the American Embassy in Auckland. Here, they managed to contact Pan-American Airways Headquarters…in New York…and waited for further instructions.
With facilities in Hawaii put out of action, the harbor inoperable and any aircraft-fuel being needed for military aircraft, flying back to California was all but impossible.
In the week that it took for headquarters to make up its mind on the crew’s next move, the Pacific was erupting into war around them. The Philippine Clipper at Wake Island had managed to evacuate all Pan-Am employees and a lucky few civilians, taking to the air as Japanese forces rolled in, riddling the aircraft with gunfire as it fought to get out of range. In Hong Kong, another Pan-Am flying boat had been blown up at its dock before it even had a chance to leave.
Knowing that time was running out and that their options were dwindling rapidly, it was eight days before Captain Ford and his crew found out what they were expected to do.
Finally, on the 15th of December, a cypher-telegram was dispatched from New York to the U.S. Embassy, Auckland, New Zealand. It instructed Captain Ford to strip the Pacific Clipper of all identifying marks, fuel-up, and to get home by whatever means were necessary. During the trip, radio silence was to be observed at all times, to prevent the aircraft from being detected by the Japanese, and to land in New York when it arrived back in American waters.
When he found out what he was expected to do, Captain Ford probably thought that it would’ve been better if he’d kept his mouth shut! There was no way the aircraft could fly that far without stopping several times for fuel. There was no way that they’d have enough food, equipment or supplies to last that long! They didn’t even have any money, and because Captain Ford only flew the Pacific routes – he had no maps or navigational charts to guide him across Eurasia, Africa, or the Atlantic Ocean! They were entirely on their own, with orders to make it home by any means necessary.
After refueling the aircraft, Ford and his passengers and crew took off once more, to an uncertain fate.
It was the 16th of December when they left New Zealand, and their first stop was one of their previous legs – New Caledonia. Here, Ford had been ordered to land, refuel, and take on evacuees – the staff of the Pan-Am facility that operated out of the New Caledonian capital – Noumea. Fearing that the island could be captured by the Japanese at any minute, Ford told the Pan-Am staff that they had exactly one hour to grab whatever they could, and flee. This wouldn’t be easy – each passenger was only allowed one bag each!
While the Pan-Am staff scrambled to pack their bags and secure their essentials, the plane was refueled. With everybody safely aboard, the plane took off once more, this time flying west.
The only other major landmass in the region that had not yet been taken by the Japanese was the Commonwealth of Australia – the Pacific Clipper’s next stop. It landed off the Queensland coast near the town of Gladstone, where once again – it started to refuel. While the ground-staff prepared the clipper for its next leg, the crew offloaded the Pan-Am employees from Noumea, judging Australia to be far enough away from Japanese aggression to be a safe evacuation-point.
While this was going on, Ford had to tackle another issue that hadn’t been an issue before last week!…money!
With each flight, the crew was provided with enough funds to cover their expenditures – food, fuel, and any necessary repairs – from California to New Zealand…but Pan-Am in New York had not been able to send them any extra funds for their long-haul flight around the world!
Wondering what to do, Captain Ford was suddenly approached by a young man, who identified himself as a local banker. The aircraft had enough food and fuel to last the trip – but what about money?
“We’re broke!” Ford recalled saying, and explained how they had only been given enough funds to support them there and back – not for halfway around the world!
“I’ll probably be shot for this”, the banker replied, but he went to his local branch, unlocked the vault in the back, and returned with $500 cash-money – American dollars! A not-inconsiderable sum in 1941!
Accepting the cash without another word, Ford handed it to Rod Brown, the aircraft’s navigator – the only person on board with access to the plane’s strongbox. The funds were deposited, and the aircraft prepared to take flight again.
Darwin in the 1930s. A sight like this would’ve been very similar to what the crew of the Pacific Clipper would’ve seen when they landed in the harbour on the 17th of December, 1941
The Pacific Clipper continued its journey westwards, flying across the Australian interior. Being a seaplane, the Pacific Clipper could only take off or land on water – and Australia being one of the driest countries on earth – there ain’t much water around! Certainly not enough to land a commercial aircraft in!
The afternoon of the 17th saw the Pacific Clipper landing in Darwin, the capital of Australia’s Northern Territory. The weather was atrocious and the plane came down in the midst of a tropical thunderstorm. Although it was the capital of the Northern Territory, Darwin was hardly a bustling metropolis! The crew were stunned to discover just how small Darwin was – little more than a large, country town. Even in 2020, Darwin’s population is still barely 150,000 people!
Darwin in the 1930s.
Despite this, Darwin was still an important military base, with an airfield, army-base, aircraft facilities, and a naval base in the deep-water harbour nearby. Darwin was such an army town that the crew found that their refreshment station was actually the local brothel!
While in Darwin, Captain Ford and his navigator, Rod Brown, had to decide what on earth they were going to do next. Australia was likely to be the last friendly nation that they would be able to land in, before they had to strike out on their own and try and make it home across the rest of the world. There would be no way to know where they could land, find fuel, repair the engines if they malfunctioned, could receive medical care, or even communicate with Pan-Am headquarters in New York, if they had to!
Leaving Australia…
After freshening up, the crew had to refuel the aircraft…again. 5,000 gallons of aircraft fuel had to be poured into the tanks before they could take off – not with pumps or hoses or anything as sophisticated as that!…Oh no.
It had to be done by hand.
1,000 5gal. jerry-cans of fuel had to be literally manhandled up the side of the aircraft and poured into the tanks over the wings, passed down, refilled, and then passed back up again! All this in the raging North-Australian heat! It was past midnight before the job was done, and the crew were exhausted! They allowed themselves a few hours’ sleep, and then took off again the moment it was light.
Lifting off from Darwin on the morning of the 18th, Captain Ford and his crew flew north to Surabaya in Java, then part of the Dutch East Indies.
Desperate to hold the island by any means necessary, British and Dutch forces were understandably on-edge when they saw an unidentified aircraft entering Javan airspace. Unable to make radio-contact, the Pacific Clipper was almost taken out by friendly fire! When it finally was allowed to land – the local authorities refused to give them any aircraft fuel! They insisted that their limited stock was for military uses only – but – they didn’t want to be seen as being unsympathetic – there was a war on, after all!…and they graciously informed Captain Ford that he was welcome to help himself to as much gasoline as he could load onto the aircraft! It’s not like anybody was going for a relaxing, Sunday drive right now, so there was more than enough petrol to spare! Even enough to fuel a commercial airliner!
The lower-quality automobile fuel had never been used in an airplane before, and Ford was skeptical about whether it would even operate properly at high altitudes! But he had no choice – it was either take the lower-grade fuel – or run out of fuel entirely, and crash in the ocean!
Erring on the side of caution, Ford ordered his flight engineers to siphon the remaining aircraft fuel into one tank, and fill the other tanks with the lower-grade gasoline. The plane would take off using aircraft fuel, but would carry out the next leg of its journey using the automobile fuel.
Once the plane was airborne, Ford switched the feed-valves on the tanks, shutting off the aviation fuel and switching on the pumps for the lower-grade petrol – the engines gurgled and spluttered and smoke started pumping out, but once they’d gotten over the initial shock of the change in their diet – they started firing once more.
Chasing the Sunset
Determined to put as much space between himself and the Japanese as possible, Captain Ford steered the Pacific Clipper westwards, and out across the Indian Ocean, and over waters which were, quite literally – uncharted! With no detailed maps, Ford, his navigator, co-pilot and the aircraft’s stewards were basically flying blind, only having the vaguest idea of where they were going. Navigator Brown had no navigational documents for this part of the world, and warned Ford that all they had to go on were rough bearings.
Ford decided that their next logical destination had to be a colony of the British Empire – somewhere that the Pacific Clipper would stand a greater chance of a friendly reception. To that end, the plane attempted to find the island of Ceylon – today – Sri Lanka – off the Indian coast.
Had they been traveling by sea, this would’ve been called an “all-red route” – a sea voyage which stopped only in “red” parts of the map – red being the colour of the British Empire. As they flew on, the crew of the Pacific Clipper encountered heavy cloud-cover. Unable to determine his position, Ford dropped the plane below the clouds to get his bearings – a decision he would immediately regret!
As he broke cloud-cover, Ford got the shock of his life when a Japanese submarine appeared below! The Japanese started manning their deck-guns and began firing at the Pacific Clipper and Ford had to quickly manipulate the controls to bring the aircraft back up into the clouds!
Sustaining no damage from the Japanese attack, the Pacific Clipper finally landed in Ceylon and the crew were welcomed by the local British military garrison, where they were invited to a meeting to give them whatever intelligence they could regarding the current state of the South Pacific.
After the aircraft had been refueled, it took off once more. It was now the 24th of December – Christmas Eve, and Captain Ford was about to get a very nasty Christmas present! They had barely flown more than a handful of miles when an explosion in one of the starboard engines made everybody jump! Peering out the window, Ford and his co-pilot were stunned to see smoke and oil gurgling from the #3 engine! Ford shut the engine down and spun the plane around back to Ceylon!
When they landed, Ford pulled the engine coverings off and discovered that one of the 18 cylinders had ruptured and worked itself loose from its mounting, causing the oil to leak out. Repairing the loosened mounting was not difficult…but it did take a long time, and it was Boxing Day before the plane could take off again.
Deciding to stick with their “British-Empire” strategy, Ford and his crew headed for Karachi, then part of British India (today part of Pakistan), and from there to the Kingdom of Bahrain, at the time, a British protectorate.
So far, so good.
Arriving in Bahrain, the crew once again made contact with the British military authorities stationed there, explained their situation, and their onward plans. Captain Ford was warned to avoid flying over Saudi-Arabia if at all possible, due to the potentially hostile reception he might receive – more than a few British aircraft had been shot down over Arabian airspace, and while the Pacific Clipper had, by this time, been stripped of all its identifying marks to avoid enemy attention, there was still a good chance that an unmarked, un-identifiable aircraft might still be targeted by hostile forces.
The Pacific Clipper in flight
Captain Ford provisioned and refueled his plane, and they took off again. With fuel a precious commodity, Ford wasn’t in any position to take a ‘scenic route’ back to America, and so, ended up flying across Saudi-Arabia anyway! To protect against gunfire, the clipper remained in the clouds for the majority of the leg, only dipping down to check their bearings every few miles. They’d been in the air about 20 minutes when Ford took the plane down to check their progress. The crew got the shock of their lives when they realised that they were flying right across central Mecca! Fortunately, anti-aircraft installations did not exist in Mecca, and the Pacific Clipper flew on, unmolested.
The aircraft’s next stop was Khartoum, the capital of the Sudan. Landing on the famous River Nile, Captain Ford and his crew were greeted by representatives of the British Royal Air Force, who helped them refuel the Pacific Clipper, provision it for the next leg of its epic journey, and wished them godspeed.
Exactly where to go next was a bit of a challenge. Flying to Europe was dangerous at best, unwise at worst. While they could probably head to somewhere like Gibraltar, Ford feared that the clipper’s engines, already taxed to breaking-point, would not survive the heat of the Sahara Desert – a forced landing there would be a death-sentence to everybody! This also meant that places like Casablanca, Spain or Portugal were out of range.
Instead, the crew decided to fly to Leopoldville in the Belgian Congo – it would at least be further west, and would take them one step closer to home.
Landing on the river near Leopoldville, the plane was tied up at a jetty and the crew disembarked for their next rest-stop. Upon their arrival in town, they received the shock of their lives! Two Pan-Am employees – an airport manager, and a radio-operator – greeted them! Relieved to see colleagues again, the crew relaxed, had a meal, exchanged news…and thanks to the two Leopoldville employees – enjoyed something that none of the Pacific Clipper crew had had, probably since leaving Australia – a nice, cold beer!
The crew rested in Leopoldville overnight while they planned the next leg of their journey. They also refueled the aircraft and prepared it for the next day’s flying – in fact, they prepared it so well, that come dawn, the plane was almost too heavy to take off! With tanks full of fuel and oil, cargo and crew, and with the soggy, humid air of the equator all around them, the Pacific Clipper narrowly avoided plunging off the edge of a waterfall as it lurched ungainly into the air once more!
The Atlantic Crossing
The next leg was one of the most dangerous – flying across the Atlantic to South America – a journey that took them nearly all day and night! When they finally landed in Natal on the Brazilian coastline, port authorities insisted that the aircraft – by then looking very battered, worn-out and worse-for-wear, due to it serving as the home for the ten crew-members for the past month – had to be fumigated for mosquitoes, which could carry deadly yellow fever. The crew disembarked the plane and started planning the next part of their journey while a team of fumigators boarded the aircraft and got to work.
And boy, did they ever! When Captain Ford and his colleagues returned, the ‘fumigators’ had robbed them blind! Anything that wasn’t nailed down had been stripped off the aircraft! All their personal papers, most of their charts, maps, travel-documents, company papers, and most of their money had been stolen!…a fact they only discovered once they had already left Brazilian airspace!
Finally back in the Americas and in familiar skies once more, Captain Ford flew towards the Port of Spain, the capital of Trinidad & Tobago. This was the first place they’d landed in since leaving New Caledonia a month before, that had actual Pan-Am facilities, and Ford was relieved to be among friendly faces once more. The next leg was the last one – the final flight home to New York!
Captain Ford and his colleagues were so eager to get home that they took off almost immediately. It was now the 5th of January, and New York was just a short jaunt away. They left Trinidad so early that when they arrived in New York, it wasn’t even daylight yet! As a result, when Captain Ford contacted La Guardia Airport Air-Traffic Control with the words: “This is the Pacific Clipper, inbound from Auckland, New Zealand! Overhead in five minutes!”, the air-traffic controller called back that the Pacific Clipper was not allowed to land!…for 50 minutes. Only when the sun rose near 7:00am, did the plane finally touch down in American waters once more!
The incredible journey of the Pacific Clipper
In the end, Captain Ford had made history! And in so many ways! Let’s count them, shall we?
The first-ever round-the-world flight by a commercial airliner.
The longest continuous flight made by a commercial airliner.
The first circumnavigation of the world by following the equator.
The longest nonstop flight in the entire history of Pan-American World Airways: 3,583 miles from Leopoldville to Natal.
In the nearly four weeks it took them to get home, Ford and his crew had visited twelve nations on five continents, and had made eighteen landings! They had also made incredible history!
The Pacific Clipper on its arrival at La Guardia Airport, New York. 6th of January, 1942
Back when straight razors were still the predominant method for carrying out the daily shave, a wide variety of accessories and nicknacks were invented to go along with them.
Just like how nowadays you have suction-cup stands for your smartphones, or bendy-bendy-all-adjustable tripods and selfie-sticks for all your photographic social-media needs, or how companies are now trying to sell you all kinds of groomers, trimmers and motorised hedgeclippers to trim literally every part of your body that you can reach (and even some which you probably can’t!), back at the turn of the 20th century, all kinds of manufacturers were cranking out an equally wide variety of gizmos that claimed to make your grooming routine oh-so-much-easier!
From specialist sharpening stones to razor-kits, reusable blades and shaving sticks, all kinds of accessories were available from any number of magazines, catalogs and specialist suppliers. One of the most common accessories – especially popular among the well-groomed traveling gentlemen of the world – was the retractable razor strop.
Strops – the long, wide strips of leather used to smooth off and realign the edges of the blades on cutthroat razors – had to be as smooth and as flat as possible. Folding, bending or creasing the strop in any way while traveling would cause excessive wrinkles, kinks or deformity to the leather, which would render it useless as a strop. Because strops had to be kept smooth and flat, they could take up a lot of space when traveling. However – there was nothing against rolling up a strop – simply rolling a strop up wouldn’t cause creases or fold-lines that a razor-blade could trip over – which made it the ideal way to package a strop small enough to the portable, without compromising its structural integrity.
The only thing was – there had to be a way to easily roll and unroll the strop each time it was used. In the end, a simple coiled-spring retractable mechanism was created, and housed inside a metal barrel or casing. One end of the strop was attached to the spring-barrel inside the casing, and the other end of the strop trailed out of the mouth of the casing. The remaining leather was coiled up inside the casing, and wrapped around the barrel. Pulling the strop out for use would cause the spring inside the casing to tighten up, and letting go of the strop would make the spring relax, spinning backwards and pulling the strop back inside the storage case.
Simple, and effective.
So effective that several of these retractable strops were manufactured and sold to the public! What had once been a strip of leather over a foot in length and two to three inches in width, was now little more than a rolled-up leather strap, tucked into a metal casing smaller than a soda-can! So simple, so robust, and so convenient!
The majority of these retractable razor strops were housed in cases made of nickel-silver, or silver-plated pewter, or some other variety of cheap, white metal, presumably to keep costs down. The one which I bought online differs from all these greatly, in that the outer casing is made entirely of sterling silver – and has all the hallmarks to prove it!
I have seen several of the silver-plated ones, but never one which was made of solid sterling silver before. After winning it at auction
Pulling Apart the Strop
The original leather that comprised the main component of the strop was completely un-salvageable. It was dry, cracked, torn, brittle and covered in grime. No amount of beeswax and polishing was ever going to restore it.
The first step was to remove this. To do that, I unscrewed the strop-casing, starting with the large bolt that goes right through the body of the casing. After unscrewing it, I pulled it out, and broke the casing open into its three main components: The barrel, and the two end-discs.
Inside the barrel was the strop, and the winding cylinder, all held together by two end-caps.
The strop with the new leather.
I pulled these out and then removed the spring that activated the recoil-mechanism. The final step was to remove the actual leather from inside the cylinder. The leather is simply held in place by friction, and three triangular claws that hold the leather in place. I ended up just cutting the leather out using my pocketknife and pulling it out with tweezers.
I used the original leather as a template, from which to cut a strip of fresh leather of the same dimensions, from some scrap leather of the same thickness and similar finish.
The next step was to fit this into the winding cylinder, and fit the three claws in place, to stop the leather sliding out. After that, the spring was put back inside, the end-caps slid on, and then the leather was simply rolled up around the cylinder.
After that, the cylinder, spring and leather were dropped into the barrel, and the end-discs were fitted back on. I fed some of the leather out of the mouth of the barrel, and then started screwing the bolt back on. This proved to be surprisingly tricky and took a few tries to get right – but the threads finally meshed and the whole thing was screwed back together.
The final step was to cut and sew a new pull-strap to put onto the end of the strop, polish up the metal to remove the worst of the tarnish, and then hang it up in my bathroom. All done!
The hallmarks on the silver casing reveal that the strop was made in Birmingham, in 1924. For something that’s nearly 100 years old, it works surprisingly well!
The spring is perhaps not as elastic as it once was, but the results speak for themselves…
Sometimes, you buy stuff secondhand, at auctions, at flea-markets, from collectors’ fairs, and you look at it, and think:
“Gee, it’s nice!…Pity it doesn’t work…”
That was the situation I found myself in when last year, I bought a very nice, antique straight razor with ivory scales. The scales were in decent condition…but the same could not be said for the blade housed within them. Ground almost into nonexistence, and as blunt as the flat side of an axe, no amount of a makeover was ever going to revive the career of this blade…which was a shame, because razors with ivory scales are beautiful..and hard to find.
The good news is that straight razors are very simply constructed, and I was certain that with the right equipment and tools, it would be possible to remove the worn out blade, find another blade from another, trashed razor, and replace it.
Fortunately, cheap, broken razors are all over the place, and earlier this year, I stumbled across a perfect candidate for my project at my local flea-market. For $5.00, I nabbed up a square-point BENGALL in excellent condition…bar the fact that the scales…which I judged to be some kind of celluloid…were literally crumbling to dust.
I tore the broken scales off with pliers, and using a file, I ground off the flange around the top of the pivot pin. I popped out the washer, pulled the whole pin and all the other washers out of the scales, threw the scales away, and started in on the blade, polishing away all the rust and staining – once I installed this blade in the new scales, this would be impossible to do, so it had to be done now.
The next step was more delicate: Removing the worn out blade from the ivory scales:
I taped the ivory, and then set in with a file to grind down as much metal as possible. I peeled off the now paper-thin washer that held the pin in place, and with a punch and hammer, I drove the pin out through the scales and blade. This loosened everything up enough to swivel the scale out of the way, drop the pin out, and remove the blade, all at once.
Unfortunately, the ivory, being as old as it is, was more fragile than I had anticipated…which is saying a lot, because the ivory was already wafer-thin and delicate as hell! As I half-expected, the ivory split across the holes drilled for the pins. Apparently, restoring this razor was going to be a bit more challenging than I had first hoped.
Simply gluing the ivory back together would never work – it would have to be reinforced. I found the thinnest strips of steel sheeting that I could find – barely thicker than tin-foil – and cut out rectangular strips which I could use to glue the ivory onto, and then glue that back onto the main body of the scales.
One benefit of the steel strips being so thin is that they’re very easy to cut with ordinary scissors – or fold, or tear…or even punch holes in! So I punched two holes in the strips so that they could still hold the ivory together, while having somewhere for the pin to go through.
I glued everything back together and left it overnight to set. The next step was relatively easy: Putting the razor back together, with the working, replacement blade.
To prevent wear, friction and jamming, razor-blades are inserted into straight razors very carefully in the following manner:
First: A washer or collar goes onto the pin. The head of the pin is “peened” or hammered flat so that it flares out at the end – this stops the collar from dropping off.
Next, the collared pin is fed through one hole in the scales. Another washer is dropped in on the other side, so that the scale is sandwiched between two washers. The razor blade is then dropped in on top of this, and a third washer is added on top of that. This means that the razor is always sliding against smooth metal – not against the body of the scales, which could damage them, cause friction, or jamming.
The other half of the scales is fed onto the pin through another pin-hole, and then a fourth washer is popped in on top of that, when the pin comes out the other side.
So far, so good. I set it all up and left it to dry overnight.
In the morning when the epoxy glue had hardened and the steel strips and ivory had all been bound firmly to the body of the scales which they had broken off from, it was time to do the last step of the reassembly process: Affixing the blade permanently to the scales.
Traditionally, this is done by filing down the head of the pin until it isn’t more than two or three milimeters above the top of the scale. With the collar or washer in place to provide protection, the head of the pin is – once again – peened over.
This is where I really was rather worried – peening the pin would mean putting the razor on my jeweler’s anvil, lining it up, and then belting the top of the pin with my ballpeen hammer to flatten out the head and mushroom the edge over the hole and washer, to keep everything in place.
Normally, this is easy – hold it still – and literally hit the nail on the head. Or it would be easy, if I wasn’t trying to fix a razor with fragile, brittle, antique ivory scales…
I had serious misgivings about whether the ivory would be able to withstand the shock of the hammer-strikes, but in the end, my fears were unfounded. That said – peening the top of the pin enough to hold the razor together, and stop the collar from popping out – took considerably more effort than I had anticipated – and I was hammering away at it for quite a while!
In the end, the results speak for themselves. The final touches were a bit of filing and sanding to clean up the glue and ivory, and of course – a very, very thorough honing and sharpening, to get the blade back up to snuff…
The results aren’t perfect, but the razor is intact, functional, elegant, and has a rustic, vintage charm to it. The razor swings smoothly on the pin and the scales have held together admirably, considering what’s been done to them. The blade opens and closes flawlessly, and is perfectly centered, preventing any possibility of the edge of the blade striking the scales – which is a huge pain in the ass, because it would indicate manufacturing faults – none of which exist here!
A beautifully polished, sharpened blade has been given a new home, and a pair of creamy-coloured ivory scales have been given a new lease on life.
In this final photograph, you can see just how dramatic the difference is between the two blades – the original German one, made in Solingen (on the left), and the replacement Bengall one, made in Sheffield, (installed between the ivory scales, on the right).
The installation of the new blade was both easier, and more difficult, than I had initially expected it to be. Easier, because the steps required to make it happen were not really that difficult to execute, but also more difficult, because of the unexpected steps that had to be taken, over the course of the refurbishment.
Thanks for reading my latest restoration project! I hope you enjoyed it and will return again soon. Fixing antiques and breathing new life into them has always been one of my big hobbies. This isn’t my first antique restoration, and certainly won’t be my last – but it is my first restoration of an antique straight razor! Despite the setbacks, I think we can confidently call this a success.
Here, you can see the completed razor alongside the two other ivory-scaled razors in my collection…
This is probably one of the most interesting, unusual, useful, and, possibly – off-putting – pieces in my eclectic collection of antiques.
This was something that I scored on the great online flea-market we call eBay (remember folks! I’m on eBay now!). It isn’t something especially common, and I thought it’d make a great little novelty addition to my collection.
This solid silver rectangular pendant, with a ring-top and a pair of toggles on the sides was something that I stumbled across completely by chance on the internet, and once I realised what it was, I decided that I simply had to have it, even if only for the novelty aspect of the whole thing!
Very common in Chinese culture, these ear-curette and toothpick pendants were extremely popular in the late 1800s and early 1900s, and were commonly used by Chinese women to remove stubborn earwax from their ear-canals, or crud from between their teeth after meals. In an age before consistent, and quality dentistry, anything extra that you could use to keep your teeth clean would’ve been very useful!
This particular pendant has two slide-out implements: A curette (an earwax-spoon), and a toothpick. They were most commonly made of either gold (usually 18kt), or silver (800, 900, or 925 sterling), and were popular as trinkets, gifts and practical little doodads to carry around with you on a day out.
Here, you can see the toothpick. Fully extended, the whole thing is about 3 inches long, from the point of the toothpick to the end of the ringtop. The slide-toggles are shaped like flowers, and the sides of the pendant are also decorated with leaves and flowers.
On the other side is the little hook/spoon-shaped scoop for removing earwax.
Pendants like this one were commonly worn around the neck with a matching chain of either gold, or in this case – solid silver. My grandmother had a pendant like this in solid gold which I remember from my childhood. It was lost in a move and we never saw it again, but it is nice to have this little trinket – a unique piece of Asian silverware, not likely to be found manufactured anywhere else in the world!
Although this is probably the smallest antique I’ve ever bought, at just over 1.5 inches long, I think that it ranks up there as one of the most interesting, because of how unique it is. They aren’t common, and so far as I know, aren’t made in modern times. At least, not in this configuration! I hope you found this short posting enjoyable and got the chance to see something that perhaps, you’ve never seen before, or perhaps, not even thought might exist!
You know…when you’re stuck at home in lockdown, with nothing to do but watch Youtube videos about the Cinnamon Challenge, or how to tune a ukelele, or how to sing Christmas carols in LOLspeak – a skill which will surely impress all four of your grandparents come Christmas time – you start going a little stir-crazy, and you start thinking about the weirdest, craziest shit that you wouldn’t otherwise think of.
As I sat here at my desk, randomly watching another video of “Ten Celebrities Who Had it all and Blew it!…AGAIN!” or whatever, other, asinine twaddle people upload on the internet these days…my mind started wandering…as it’s want to do…to all kinds of random thoughts – like – what would people be buying other people for Christmas this year? Or for birthdays? Or anniversaries, or whatever? What kinds of desirable consumer-goods are there out in the world today which people just have to have? The latest iPhone? A new laptop? A sparkly purple pimp-mobile with tricked out chrome rims?
And I started to wonder…what were the biggest status symbols of times past? What did our ancestors wish they had, or did have, and used, to show off their status in the world, to other people, and to the higher-ups around them?
In this posting, I’ll be looking at some of the most common, uncommon, strangest, or most unlikely status symbols that have existed throughout history! These aren’t in any sort of order, but I’ll try and include as many as possible…
Status Symbol: Land Symbolises: Wealth & Connections
Since the dawn of humanity, right up to the present day – ownership, control, use, and monetisation of pure, and simple land, has been a symbol of wealth, power, status and influence. From the lowest freeborn peasant, to Lord Muchstuff to the manor born, and even His Majesty King Morestuff, land has been important. From Ancient Rome to Medieval Europe, and even right up to the modern day – land has been important. Back then, they called it “freeholding” – today, we call it – “real estate” – but it’s still land.
In medieval times, in theory, the entirety of a kingdom’s land was the sole ownership of the king himself. The king gave parcels of land to nobility, clergy, the warrior aristocracy, lesser royals, or close friends and advisors, as gifts for them to own – either outright – or to rent. A nobleman who owned the land bore allegiance to the king (his “liege lord”), and was in charge of collecting the king’s taxes on the land he controlled, protecting the king’s subjects who lived on the land, and of upholding the laws and the King’s Peace.
Land – especially large parcels of it – were status symbols because if you owned land, it meant that you were in the good graces of the king, who thought enough of you to sell you or let you rent, in some cases, several thousand acres of his own kingdom. Being a landowner also meant that you could use the land to make money – either by farming, or by renting it out again to tenant-farmers, who farmed the land for you – paid you rent and taxes, and who did all the hard labour.
In many of the most essential ways – ownership of land, the status it brings, still exists today. The bigger someone’s house is, or the grander their address is, the more impressed we are. Would you prefer to receive an invite to a party at someone’s apartment? Or an invite to a party on someone’s private estate?
Status Symbol: Libraries & Books Sybolises: Education
Apart from land, one of the greatest status symbols of history was literature: Physical books, scrolls, maps and documents. Whether or not they were accurate, reliable or even truthful, was rarely the point – the contents were not nearly as important as was the mere fact of personal ownership!
During the medieval era, and for a significant chunk of the Renaissance in the 1400s and 1500s, books were prized, treasured, intensely valuable possessions. Since all books had to be written out laboriously by hand using a quill pen and expensive paper or vellum, producing a book of any substantial size, regardless of its contents – was a very expensive, and time-consuming process. Paper had to be sourced, ink had to be ground up and diluted, quills had to be collected, dried, cut and shaped, and then you had to have the time, and the knowledge to write the contents of the book itself!
Because of this, owning books was a sign of extreme wealth, since having gone to all that effort to make one book – a writer was going to be sure to sell it for as much money as they could! But owning a book – or to be more precise – an entire library of books – indicated, not only great wealth – but also education. At a time when most people couldn’t read, and never had the chance to – books, scrolls and other documents, symbolised access to education and higher learning, at a time when most people had neither the time, funds, or resources to learn how to read or write.
The status of books died away somewhat by the 1500s and 1600s, with the steady spread of the printing press, which made books significantly cheaper and faster to produce, but their status remained high enough that many grand country houses built in the 1600s, 1700s, and even the 1800s, were constructed with expansive libraries and reading-rooms to show off the owner’s wealth of collected knowledge.
Status Symbol: Obesity Symbolises: Ease of living
For millennia throughout human history, one of the most prominent status symbols ever was obesity. At a time when growing, farming, hunting, catching, preparing and preserving food was extremely labour-intensive, and when physical labour such as tree-felling, lumberjacking, mining, farming, and other occupations burned up precious calories, obesity of any kind was virtually unheard of. Because of this, obesity, and pale skin were considered signs of wealth, privilege and plenty. Not for nothing is the Chinese God of Prosperity – Cai Sen – (often mistaken for Buddha) – traditionally depicted as being good-natured, happy, and extremely obese!
A cartoon of George IV, who was as famous for his gluttony as he was for his womanising, literally bursting out of his breeches
To be able to achieve such awe-inspiring obesity, you had to have not only enough food to eat, but enough servants to do all the work which you therefore wouldn’t need to, allowing you to live a life of luxury! This also meant that you could stay indoors, away from the sun while enjoying the high-life. This preference for pale skin and rich living can be seen in figures such as Queen Elizabeth the First, who famously slathered white lead makeup on her face to appear pale and beautiful, and in the fairytale “Snow White” where she is described as having hair as black as ebony, lips as red as blood, and skin as white and pure as snow.
Status Symbol: Gout Symbolises: A rich diet & access to expensive foods
Gout is a condition where hard lumps of crystalised uric acid (lumps known as tophus or tophi) build up in a person’s joints – in particular, the toes and knuckles (but most commonly in the big toe), caused by a heavy diet of red meat, sugar, salt, and excessive consumption of alcohol and other rich, fatty foods. As such foods as sugar, chocolate, and cakes were rare, and beef and mutton were expensive, being able to eat as much of this stuff as you wanted, to the extent that you could contract gout from it was seen as a sign of extreme affluence!
Despite the, at times, excruciating pain, which could render a gout-sufferer all but immobile for days, or even weeks on end, until the tophi broke up or were dissolved (usually aided by applying heat to the affected joints) – gout was seen as a huge status-symbol – it was almost fashionable to try and get it, because it proved how immensely privileged and wealthy you had to be! Because of this association with wealth, privilege and a rich diet, for centuries, gout has been known as “The Disease of Kings“.
‘The Disease of Kings’. Gout was so unbearably painful that it was nigh impossible to walk. Sufferers had their feet bandaged to control the swelling, and elevated on pillows or ‘gout stools’ to relieve the pressure on the joints. There was really nothing else to do except to wait for the attack to pass…which could take up to TWO WEEKS to go away!…Ouch!
One of the most famous sufferers of this ‘royal disease’ was His Royal Highness, Prince George, Prince of Wales, the Prince Regent – later known as George IV. Famous for throwing extravagant banquets, George IV was a lecherous whoremonger, known for chasing two things: Food, and women. His waistline exploded and his obesity shot up. This on its own would’ve been bad enough, but his nonstop indulgence caused agonising flare-ups of gout, which would’ve been treated by warming, resting and elevating the foot, and by taking copious amounts of painkillers – usually in the form of tincture of laudanum – a mix of opium and alcohol – the most common painkilling drug of the era.
Status Symbol: Sugar, Chocolate, Jelly, Ice-Cream, etc. Symbolises: Extravagant living!
In medieval times, and even for hundreds of years afterwards, certain foods were so hard to obtain or hard to produce that they were – right up until the modern era – considered luxuries. Anybody who could afford to eat these foods were living high on the hog! Here’s a list of some of the various foods that were once considered to be highly desirable status foods!…and they’re not always the ones you might expect.
Sugar
For centuries, access to sugar was incredibly rare. Extracted from sugar-cane, grown on large plantations in tropical climates, and processed into raw sugar-crystals before being exported, sugar was a supreme luxury in the Renaissance era, when getting to enjoy it in Europe meant that it had to come on the most amazing, round-the-world voyages from the Far East, or the Caribbean. As late as the 1700s, King George III declared that in the event of war with the American colonies, the French, or the Spanish, and their colonial possessions in the new world, Britain could lose just about anything except its sugar plantations – the enormous amounts of money that sugar brought to Britain were too valuable to risk falling into enemy hands!
Sugar did not start becoming cheaper until the 1800s, when it was discovered that sugar could also be extracted from the much more easily-grown sugar-beet, which could be cultivated in more temperate climates. Before this time, sugar had been so rare that only those with significant wealth were able to afford it.
Chocolate!
Some are convinced that it’s evil in physical form, others are sure that this is the very food of the gods themselves! For centuries, chocolate has been one of mankind’s most sought-after treats, but for much of history, chocolate was nigh on inaccessible, and even when it was, it would be centuries before it could be enjoyed by the masses.
Harvested from enormous cacao-pods grown in tropical countries, chocolate comes from the cocoa beans stored inside the pods. And here’s something you may or may not know: Chocolate in its raw state tastes disgusting!
It’s bitter and rank and nigh inedible! And even if you could get a hold of it, the processes to extract chocolate from the beans were extensive!
A solid silver chocolate pot. The hinged finial at the top is for inserting a molinillo – a long, elegantly-carved wooden whisk – into the pot. Molinillos were used for whipping, mixing and frothing up the delicious, delicious hot chocolate! Mmmm…
First, the beans have to be dried, then crushed, then ground up, and finally, the pure cocoa has to be mixed with other ingredients to make it palatable – such as sugar, water, eggs or milk. Since sugar was already so expensive, combining sugar AND chocolate was considered exceptionally extravagant.
For centuries, chocolate wasn’t even a food – it was a drink! From the 1500s until the 1800s, chocolate existed in only one form: as drinking-chocolate. What we’d call today – hot chocolate. The only way to physically eat chocolate was to incorporate the cocoa and sugar mass into something else – like a cake, pie, tart or a tray of cookies. Eating chocolate on its own did not happen until the Victorian era. Only when this became possible, and mass production of the first chocolate bars began, was chocolate finally democratised to the peasants and plebians!
Pineapples
Introduced to Europe in the late 1500s and early 1600s, the humble pineapple was the latest fruit from the New World to capture the imagination of the old. Nothing like it had ever been seen before, and because pineapples were very difficult, indeed, almost impossible, to grow in a European climate, getting your hands on one was no mean feat!
To grow pineapples in Europe, the only way to do it was to cultivate the plants in a large, glass greenhouse, usually on the private estate of some wealthy landowner. The warm, humid micro-climate inside a greenhouse allowed pineapples to grow, and owning and getting to eat pineapples was an enormous luxury! Greenhouses designed or built specifically for growing pineapples became known as ‘Pineries’. Because why not?
King Charles II, the ‘Merry Monarch’, being presented with a ‘pine apple’ in 1675
Just being able to see, and hold a pineapple – never mind eating one! – was such a rarity that wealthy people used to – and I’m not making this up – RENT – pineapples from other people! Yes indeed! You could go up to a guy, a friend of yours, perhaps, whom you knew owned a pineapple, and you could ask to borrow or rent it! You know, to have it as a centerpiece at your latest dinner-party or banquet! Showing off a physical pineapple showed that not only were you rich enough to rent one, but that you had connections to people who could grow them – a massive brag back in the 1700s!
Jelly & Ice-Cream
In an age before freezers, refrigerators and instant-foods, both jelly and ice-cream were considered extreme luxuries. Jelly – produced by boiling out the gelatin from the hooves of animal-trotters – took hours to create, with the gelatin being continually boiled, skimmed, refined, and boiled again, to extract pure gelatin, which could then be flavoured, shaped and coloured to produce jelly.
Ice cream, made from eggs, cream, sugar and flavourings, was another extreme luxury. Sugar was expensive, and without freezers, the only way to produce ice-cream was to place it in a bath of salt and ice – two more very expensive commodities – which again, increased the price (and status) of ice-cream.
It wasn’t until the mid-1800s that ice-cream could be produced relatively easily at home, or on an industrial scale, with the invention of hand-cranked ice-cream machines, which whipped the mixture inside a metal canister surrounded by ice and salt. This process made ice-cream cheaper, faster to produce, and better-tasting, as the aerated mixture (caused by the constant stirring and freezing) was lighter, and smoother on the tongue.
Status Symbol: The Fountain Pen. Symbolises: Modern Technology and Taste!
Since the dawn of writing, thousands of years ago, mankind has struggled and striven for countless lifetimes, to produce a writing instrument which contained its own ink-supply, and which could operate independently of a separate inkwell. After many false starts and mistakes…and a lot of mess…the fountain pen finally came of age in the late 1800s, with visionaries such as George Parker and Lewis E. Waterman creating the essential elements that would make the modern fountain pen possible.
While fountain pens in the early days were laughably simplistic items, comprising little more than a cap, a nib, feed, section to hold it all together, and a tank for the ink – they were incredibly expensive, and were considered real luxury items! Owning one of these newfangled “reservoir pens” as they were originally called, was a mark of pride and distinction!
Fountain pens have remained a status symbol for over 100 years. The Montblanc Meisterstuck No. 149, AKA, the Diplomat, has been the most famous pen in the world since its creation in 1952
From the late 1800s until the middle of the 20th century, most fountain pens were expensive, and while cheap “third-tier” pens did exist, the cost of a new fountain pen was often out of the reach of most people, which is why institutions like schools, banks, hotels, etc, continued to rely on old-fashioned dip pens, well into the 20th century. They were simply cheaper, easier to use, and easier to replace.
Although ballpoint pens have largely usurped the fountain pen’s throne since the end of the Second World War, fountain pens are making a big comeback in the 21st century, and there is an avid global community of collectors, users, repair-technicians and manufacturers still thriving today.
The chilly winter air, the flurries of snow, the heaving, choking smog, the hissing, flickering luminescence of gas-fired streetlamps. Footsteps in the distance. Somewhere, a clock-tower chimes midnight.
Suddenly, a scrambling of feet! A struggle! The sound of a body falling, and the distant ‘splash!’ of something heavy hitting the water.
A moment of silence. And then the crisp midnight air is sliced in half with the shrill, discordant screeching sound of a whistle…
The Victorian era was obsessed with four things: Crime, death, standardisation, and modernisation. In sixty years, technology advanced by leaps and bounds unheard of in previous lifetimes, and one object encapsulated all these things in one – one of the most iconic items associated with the Victorian era: The humble Metropolitan Police Whistle.
The Origins of the London Metropolitan Police
Established by Sir Robert Peel in 1829, the “New Police” or to give it its proper title: The London Metropolitan Police, was the world’s first modern police force – a state-run organisation of paid, professional officers, designed specifically to detect, deter, and solve crimes.
Prior to this time, ‘policing’ was often carried out by the civic guard, soldiers, parish constables, or the night watch, as in Rembrandt Van Rjin’s famous painting…
“De Nachtwacht” (“The Night Watch”) by Rembrandt Van Rjin
Here, you can see the men of the night watch, armed and protected with pikes and halberds (in the background), helmets, and muzzle-loading muskets (on the left and right).
The whole concept of the police was so new that Peel wasn’t even sure how it was supposed to operate. For example, police were originally expected to be on duty at all times, and to wear their uniform at all times. Then they changed it so that an armband on the sleeve of the uniform indicated whether the officer was, or was not, on duty. Finally, they decided that officers would only be on duty when they wore their uniforms, and did not have to wear them when they were not on duty!…things were very confusing! And it only got even more confusing when they actually had to fight crimes in progress.
The new London police service patrolled the streets day and night, working in timed shifts which covered specific quarters of the city (known as ‘beats’). If a policeman did one thing more than any other – it was walking. In the days before telephones and emergency-service numbers, a physical, visible police presence on the streets was the best way to detect and deter crime.
But what happened when crime was detected? A constable might try and combat the criminal himself, but if this wasn’t possible, then he would need to call for backup. This was usually done by beating his truncheon against fence-railings or along the pavement, or by swinging a heavy, wooden rattle round and round and round. The blades of the rattle snapped and clapped back and forth along the ratchet inside, making an almighty racket!
The problem was that the rattle was bulky, difficult to carry, heavy (it had to be large enough to make a loud-enough noise to be heard over the traffic, don’t forget), and it could easily be taken by a criminal and used as a club to attack the officer, if he so desired. On top of that, despite the rattle’s size and weight, it was not always distinguishable over the sounds of a busy city – thousands of pedestrians, horses, carriage wheels, market cries and the sounds of industry could easily drown it out.
This was why, in the 1880s, the police, finally fed-up with this inefficiency, decided to rethink the equipment issued to constables on the beat.
Enter a man named Joseph Hudson.
Joseph Hudson & Co – Whistle Makers
Joseph Hudson was a Birmingham toolmaker and whistle-manufacturer who had established his business in 1870. Moderately successful, Hudson was quick to see that what the police needed was not a heavy, bulky rattle, but something small, lightweight, easy to carry, and which could produce a deafening noise!…They needed whistles! And by gum, he was going to be the fellow who was going to provide them!
A competition was announced in the London Times newspaper, and competitors were encouraged to submit their entries, which would be compared and tested. Hudson started manufacturing his whistle, trying to find a design which would be loud, distinct, and portable. The story is often told that he got the idea for how the whistle should sound when he knocked his violin off his workbench. The twanging, reverberating strings gave him the idea that the whistle should be two-toned – one blow by the user should produce two different notes. Combined, they would not only be louder, but also very distinctive – anybody hearing the whistle would know at once that it was a police whistle.
The Original Metropolitan Police Whistle
Hudson’s whistle performed admirably in tests conducted by the police. It was loud, had a long audible range, was compact, lightweight, robust, and distinct. The police liked it so much that they asked Mr. Hudson to start manufacturing these new whistles at once! Joseph Hudson was so eager to fulfill his enormous new contract that a lot of the earliest whistles came with manufacturing faults, and had to be sent back to the factory for repairs – awkward…
The whistle and its chain
But eventually, they got the manufacturing processes and quality-control up to snuff, and in 1883, the London Metropolitan Police started carrying the new whistles. Rattles were to be handed in as soon as possible, and the new whistle was to be introduced to the force to replace it. Originally, the whistle was hooked onto the uniform tunic with a chain, and the whistle hung straight down the front. This proved to be less than ideal – the whistle and chain would flop around if the officer had to engage in a foot-pursuit, or a suspect could grab the whistle and pull it away from the officer.
Later, police regulations were changed so that the whistle was stored in the breast-pocket of the uniform tunic, with the chain-hook going through the buttonhole of the nearest available button. The chain hung out of the pocket in a “U” shape. This arrangement allowed for inspectors to see that their officers were carrying their whistles, while also keeping them out of sight. The hanging chain also made it easy for the officer to pull his whistle out quickly in an emergency, but wasn’t so long that a suspect could grab hold of the chain during a scuffle. This arrangement is still used today with police dress-uniforms.
The hook at the end of the whistle-chain
Police whistles were largely made of either nickel-silver, a nickel-alloy, or else were made of brass, and later plated in nickel. Which whistles were made of which material changed over time, depending on which metal was more available.
During the First World War, for example, J. Hudson & Co. actually had to make its whistles out of steel (donated by the Cadbury Chocolate Co. workers over in Bournville!) because the British government decreed that brass (the usual whistle-material) was required for the war-effort! But nobody needed the steel used to make chocolate-boxes and biscuit-tins, so it was used to make whistles, instead!
Dating Antique Police Whistles
As police whistles started becoming more and more popular, both in London and then further afield in the UK, and then around the world, mostly following the British model, manufacturers rushed to meet the demand. Other industries such as railroads, insane asylums, prisons, and countless other institutions and organisations suddenly realised how useful whistles could be, and they too, started putting in orders.
The earliest Metropolitan police whistles, as made by J. Hudson & Co., were produced in the company’s factory on 84 Buckingham Street, in Birmingham, starting in 1883. Within two years, demand was vastly outstripping supply, and Joseph Hudson was forced to close his original factory, and move to larger premises at 131 Barr Street, in 1884-85.
Even as the company moved manufacturing facilities, it also changed manufacturing processes, styling, stamps, and marks. This is what makes antique whistles so easy to date. Knowing how long and between what dates a company remained at a particular address helps you to date when a whistle was made.
The address of 131 Barr Street, on the whistle barrel
While changes in barrel markings and addresses can give you a date-range for when the whistle was made, more subtle changes in the whistle’s manufacturing can help to narrow down the date to an actual year. Variables such as the shape of the loop on the top of the whistle, the shape of the mouthpiece, and even the style and spacing of the branding-stamps on the barrels all changed over time as manufacturing techniques changed or improved. This is how it was possible to date this particular whistle to 1887!
How were the Whistles Used?
So far, I’ve covered why the whistles were created, what they were made of, and how they were dated, but how were they used?
The whole purpose of the whistles, like the rattles which they replaced, was to raise the alarm and call for assistance. In Victorian times, the only way for the police to respond to crime was to literally be there on the spot when it happened. There was no such thing as telephone or police radios in those days. Officers walked beats (timed patrol-routes) around their city, town or village, usually in shifts of one hour, after which they could return to the station-house for a break, a drink, a rest, and either go back out on patrol, or go home, if their shift had ended.
While out on the road, officers had no way of communicating with each other. If they spotted a crime in progress – a mugging, burglary, theft or even a murder – it was up to the officer on the scene to take charge of the situation. If the situation was more than he could handle, or if it suddenly went out of control – that’s what the whistle was for. Blowing the whistle as long and loud as you could would alert other officers on nearby beats that immediate assistance was required, and they would respond by rushing in the direction of the last whistle blast.
In this way, the whistle acted as both an instrument for calling backup, and as a siren, to alert people to what was going on. It also acted as a physical marker, so that people could hurry to the location where a policeman needed assistance, by following the sound of the whistle.
Police whistles remained in regular use from the 1880s up until the 1970s, when factors like improved portable communications devices, cars, and better electronics finally rendered them obsolete. They’re manufactured today largely for tourists, collectors, police dress-uniforms, and for historical reenactments or as movie- or television-props.
Collecting antique police whistles is a big hobby, and high prices can be paid for whistles which are particularly old, or which have rare stamps on the barrels, indicating that they were manufactured for, or issued to, different police forces or organisations.
Of the original J. Hudson whistles, probably the rarest or most collectible are the first-generation ones marked “84 Buckingham St.” on the barrels, because these were only made for two years. Even rarer than that are the handful of whistles from this time with even rarer markings on them. Rarer, because they were manufactured specifically for the various lunatic asylums around the UK at the time, and bear markings of the asylums to which they were issued. These whistles are among the most expensive, costing several hundred or even thousands of dollars each.
The second generation whistles, from the 1880s and 1890s, such as the one featured in this posting, are a little easier to find, although they are a bit more expensive than the average price for an antique whistle, due to their age.
I hope you found this glimpse into the history of whistles interesting. More postings along a similar theme are planned for the future, so keep an eye out for them!
I have been updating a few things on my blog over the past week or so, and one of those things was removing and updating the links and information in the “EXTERNAL LINKS” page on the side.
I have now added in a link for my eBay page! I’ve been selling antiques and collectibles online since 2015, and since the start of the pandemic this year, I’ve been slowly moving across to eBay.
As of the time of this posting, I’ve been selling on there for about six months. Feel free to shop and browse all the stuff on sale.
While I sell mostly to Australian customers, where possible, I’m also happy to sell to international customers, too. Just keep in mind that obviously, international sales will incur higher postage costs and longer delivery-times (especially with the coronavirus pandemic going around at the moment). If you decide to buy multiple lots, postage will be combined where possible, to save costs.
So, feel free to look around and bid! I’m also open to reasonable offers on most items. The link is the red button down below.