Operation Bernhard: The Nazi Counterfeiting Ring


During the Second World War, Britain worked tirelessly to undermine the German war-effort through epic feats of deception and cunning. Everything from the “Magic Gang” with Jasper Maskelyne, to General George Patton and the imaginary First United States Army Group (“FUSAG”), and the infamous “Operation Mincemeat”, where a dead body was dressed as an officer, filled with “sensitive documentation”, and then dumped off the Spanish coastline by a British submarine.

The majority of British deception-plans against the Nazis during the Second World War are well-known, and are rightly famous – the story of Operation Mincemeat was even turned into a major motion picture – in colour! But what is less well-known by the general public is the almost-forgotten German counter-effort against Britain, to pull off one of the greatest feats of forgery ever witnessed in human history.

This is the true story of the German attempt to produce millions upon millions of FAKE British banknotes during the Second World War, and to bring about the collapse of the British economy through hyperinflation. A story known as ‘Operation Bernhard’.

The Beginnings of Bernhard

The origins of Operation Bernhard came to fruition on the 18th of September, 1939, just a few days after the start of the Second World War, and the German invasion of Poland. The original idea was formulated by Arthur Nebe and Reinhard Heydrich, two architects of the famous “final solution” that would eventually lead to the Jewish Holocaust. The original plan was to produce hundreds of millions in forged, British banknotes and to distribute them throughout the United Kingdom. This would cause economic collapse, and destroy the world’s confidence in the Pound Sterling as a globally-accepted currency, which it was in the early 1900s.

Looking for any way to cripple the British war-effort, Hitler gave the plan his official approval, although for obvious reasons, it had to be kept as secret as possible…something which didn’t last very long, because before too much time had passed, Sir Michael Palairet, British Ambassador to Greece, had already been tipped off about the potential Nazi counterfeiting scheme, and forwarded full details, such as they were known at the time, to the government in Whitehall, and to the Bank of England, to be on the lookout for potential forgery of British currency. The warnings were heeded, even though the Bank of England believed that existing anti-counterfeiting measures already in place should be more than sufficient to thwart any potential forgery efforts.

Planning the Deception – Operation Andreas

Operation Bernhard was comprised of several different elements, all of which had to be as perfect as possible for the plan to proceed. The first element of making the fake banknotes was, of course, to make the notepaper upon which the denominations of currency would be printed. This first stage of the plan was known as Operation Andreas, and involved finding the right combination of cloth rags and old paper and the right manufacturing processes to make the paper (or as close as possible) which British banknotes were printed on. Following steps were the engraving of the printing plates, the making of the ink, the forging of banknote serial numbers, etc.

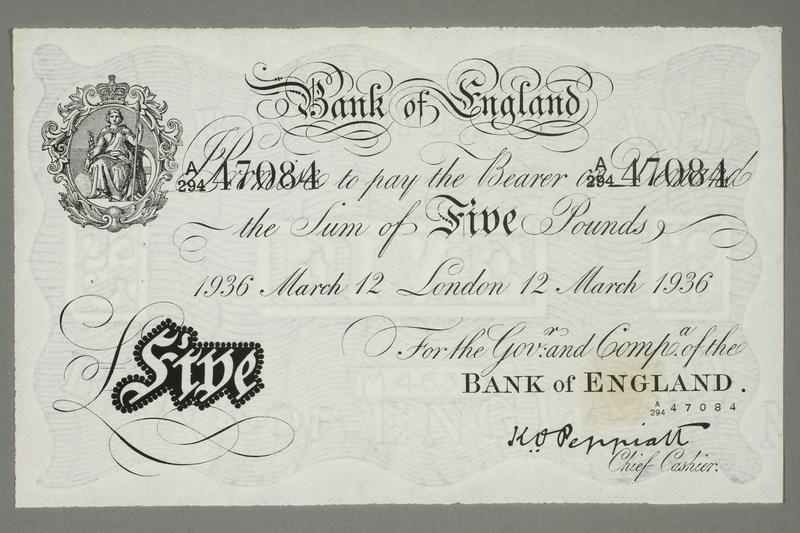
The Germans were very confident in their ability to replicate British banknotes. The type of banknote (and the design printed upon it) used in the UK during WWII had been designed nearly 100 years before, in 1855. The banknotes were printed in black ink on large sheets of white paper – smaller sheets for five-pound notes, and larger sheets for 10, 20 and 50 pound notes.

To guard against forgery, every single plate used to print the notes had numerous little imperfections (up to 150 of them in total!) worked into the designs. These were usually imperceptible to the naked eye – but if they were perceived, then they would simply be passed off by the general public as minor printing-errors – the result of plate-wear, and of printing thousands of banknotes a day. Only bank officials would know what the marks and imperfections were, how many there were, their significance, and where these could be found on the various notes in circulations. As the imperfections were put down to wear-and-tear, the idea was that any forger making a banknote would try and make it even better than the original. A forged note with perfect printing would therefore stand out against a genuine note with small, but deliberate imperfections worked into the design.

Making the paper was surprisingly difficult, and the German forgers encountered several roadblocks along the way. The type of cloth and rags used, whether they’d been cleaned and bleached, how they were pulverised, how the paper was formed, and even the chemical composition of the water used to make the paper-mass, all had to be carefully examined and tested so that the notes looked perfect.

In the end, the decision was made to try and counterfeit five-pound notes. Being the most common notes in circulation, they were less likely to be scrutinised, and would more easily blend in with genuine British banknotes, becoming too widely dispersed too quickly for the Bank of England to pick up on the deceit until it was too late. As the war progressed, ten, twenty and even fifty-pound notes were also added to the list of fraudulent banknotes.

Early attempts at producing these forged five-pound notes proved highly problematic, and one of the biggest issues with trying to create accurate forgeries came from trying to reproduce the image of Britannia printed on every five-pound note. The engraving was so intricate that try as they might, a 100% accurate copy just wasn’t possible. It became so difficult that in 1942, the forgery plan was abandoned.

The Start of Operation Bernhard

While German forgers had given up trying to forge British banknotes, the German SS had not, and later in 1942, the plan was revived under the direction of Heinrich Himmler, and SS Major Bernhard Kruger – after whom the operation was named.

Major Bernhard Kruger

The original plan with the forged banknotes was to flood Britain with fake fivers so that confidence in the British Pound Sterling would collapse, or to cause hyperinflation. Spies and contacts had alerted the Bank of England about the possibility of this German plan as early as 1939, and first evidence of these forged notes started popping up in 1943. Fears that high-quality forged German notes could flood Britain, bringing down its economy started to rise.

Fortunately, this didn’t happen (or at least not on a large scale) because of a quirk of the Bank of England.

What none of the forgers or their controllers knew was that the Bank of England kept gigantic ledger books – some of them hundreds of years old – in which they laboriously recorded literally every single British banknote in circulation! See – every banknote issued by the Bank of England was a promissory note – a note which promised to pay the bearer five pounds – as in, five pounds sterling worth of gold or silver – upon presentation of the note.

To stop forgeries, every note had a serial number – this much, the Germans knew. What they did not know was that every single serial number, without exception – was recorded in a ledger before it was issued to the public. When a note was worn out or required replacement, it was returned to the bank. The serial number on the note was then crossed out of the ledger and the note was destroyed.

The problem was that several of the forged banknotes that the Germans produced had serial numbers on them which, when they were compared against the Bank of England ledgers – showed that they were fake! The genuine notes had already been turned in and canceled. So why were there suddenly notes showing up with identical, canceled numbers? They had to be fake! It sounds stupidly simple, but it really was that easy to find out which notes were forgeries. To catch the forgers out, the Bank of England had to do just one thing:

Stop making banknotes! Any other banknotes that were found in circulation would therefore obviously not be printed by the bank and could only be forgeries! So they did!

When they realised that their grand scheme for destroying the British economy had just gone out the window, Himmler and his S.S. confederates had to figure out some other use for their millions in forged fivers. This was when they got the idea that the banknotes could be used to fund the German war-effort. The pound sterling being a globally-accepted currency, it would be easy to pay for arms and materiel using the fake banknotes, and pass them off as genuine to unsuspecting arms-dealers or German allies, who, presumably, wouldn’t look too closely at the notes.

And this is exactly what happened.

To ensure that their plan was as foolproof as possible, Major Kruger started looking for more forgers, and eventually gathered up a group of Jewish prisoners from Auschwitz who had the necessary skills – engraving, artistry, calligraphy, and so-on, and set them up in their own barracks in Sachsenhausen concentration camp. In the end, 140 men were chosen.

Because the prisoners were essential to the German war-effort, they were treated much better than other prisoners. Guards were forbidden to harass them, and they were given regular food, proper shelter and care. Of course the prisoners knew that all this relied on them producing the most perfect forgeries ever. This would be the only thing that kept them in the good graces of the SS.

Between 1942-1945, the prisoners (with their bases of operations constantly moving to keep them from escaping, or from being bombed by the allies) produced millions upon millions of pounds of British banknotes, along with a healthy dose of American dollars. These funds were then laundered and exchanged to secure Swiss Francs, genuine British banknotes, or genuine American dollars, with none of the other parties ever being any the wiser. In total, the prisoners were believed to have forged up to three hundred MILLION pounds!

The End of the Operation

Operation Bernhard came to a juddering halt in 1945 with the gradual collapse of Nazi Germany. The prisoners responsible for the forgeries were shifted continuously from place to place to try and keep them from escaping to allied lines. They were constantly broken up, reformed, separated and reunited. In the end, the SS decided that they were too much of a liability – that they knew too much – and would have to be “silenced”.

However, in typical German efficiency, the order given was that all the prisoners involved in the forgery operations had to be executed together – this way there was no chance of one or two of them escaping, or of there being any sorts of mix-ups. It was this strict adherence to this rule that actually saved all their lives!

In early May, 1945, the prisoners were moved yet again – this time to Ebensee Concentration Camp. The men had been broken up into three groups and were transported to the camp by truck separately. Two groups arrived, were sent into the camp, and then their guards fled to try and save their own necks. The order that the prisoners had to be killed together meant that they could not yet be executed – delays in transportation (the truck broke down!) meant that the third group had not yet arrived. Instead, they had to be marched to Ebensee, which took the better part of two days. This delay only increased the group’s survival.

When the third group did arrive, they too were simply dumped into the camp before their guards also fled from advancing U.S. troops. It would be impossible to pick out 100-odd specific prisoners from the thousands within the camp, so the SS guards who had escorted the forgers there simply didn’t bother. They had more important things to do – like try to get out of Europe! In this way, the prisoners were left in the camp on the 5th of May to await an uncertain future.

On the 6th of May, 1945, Ebensee camp was liberated by American soldiers, and against all the odds, the Jewish forgery prisoners had survived the entire war – and with an incredible story to tell!

The Fate of the Fake Fivers

So much for the fate of the forgers, but what about the forgeries?

When the war ended, Major Bernhard Kruger was arrested by the British, but they soon discovered that there wasn’t much that they could hold him on. While certainly illegal at any other time in history, forging an enemy’s currency in wartime was not actually a war crime! With nothing to hold him on, the British interrogated him extensively for two years during his denazification process, and then released him to French authorities, with whom he stayed with for one year. Some of the liberated forger-prisoners, after being interviewed by British officials, agreed to sign testimonies in Kruger’s favour, stating that he had been nice to them, had looked after them, had protected them and seen to their welfare as best he could during the war.

Eventually, Kruger was released from custody in 1948 and got a job at the Hahnemuhle Paper Mill…ironically, one of the places responsible for making the paper he used in his forging operations! He died in 1989 at the age of 84. The Hahnemuhle Paper Company is still operating today.

So much for Kruger. What about the banknotes?


Most of the leftover funds ended up here – Lake Toplitz in Austria, where crates of banknotes and equipment were dumped in the dying days of the Second World War. Expeditions and dives in subsequent decades hauled up some of the estimated 100,000 pounds sterling of forged banknotes which had been disposed of in the lake, and today, these forged banknotes are highly collectible as historical artifacts.

Want to Know More?

Most of the information for this posting came from the excellent documentary film “The Great Nazi Cash Swindle”, from 2004, which you can find on YouTube.

https://www.jewishvirtuallibrary.org/operation-bernhard

Restoring a Wilkinson Sword Single-Edge 7-Day Safety Razor Set


When we’re taught about great innovations in the history of manufacturing and design, we’re often told that prior to 1900, the only way that men had to shave themselves was to use a cutthroat razor – three inches of hollow-ground steel sharpened to a lethal edge, and which could be fatal if you didn’t know how to use one correctly. We’re then taught that all this changed in 1901, when King Camp Gillette came along with his swanky new double-edged safety razor and revolutionised the shaving industry forever!

Right?

Not really.

The Origins of Single-Edge Safety Razors

Yes, Gillette’s safety razor was an innovation, yes, it made shaving cheaper, faster and safer…but it isn’t the game-changer that everybody seems to think that it is – mainly because Gillette was not the first person to invent a safety razor!

Safety razors date all the way back to the last quarter of the 19th century when inventors and manufacturers, spurred on by the Industrial Revolution, attempted to improve on the effectiveness and the ease-of-use of the razors then in use – that is to say – straight razors!

To this end, there were actually loads of companies in the late 1800s and early 1900s all trying to find a system whereby a safer razor could be sold to the public, which was easier to use than the traditional straight-edge, which took skill, time and patience to both use, master, and maintain. Companies like GEM, EverReady, Valet-Autostrop, STAR, and Wilkinson Sword, were all on the bandwagon!

In fact, the very notion of marketing a new device as a “safety” razor wasn’t even Gillette’s idea! Nope – the Kampfe Brothers beat him to it by twenty years! When they launched their new “STAR” Lather-Catcher in 1880, it was the first safety razor! No, it wasn’t the first to be invented, but it was literally the first safety razor in the sense that Kampfe Bros. was the first company to use the term “Safety Razor” in their very aggressive advertising. The idea caught on, and soon, loads of other manufacturers were all trying to jump on this new bandwagon of selling “safety” razors.

These early versions of safety razors were about as different from modern double-edged razors, and modern cartridge-razors as it’s possible to be. For one thing – the blades were not disposable! Nope – the whole idea was that once the blades were dull, you’d sharpen them up again like any other razor or knife or pair of scissors – and then you’d give them a thorough stropping with a piece of leather, and put the same blades back into service. In an era when money could be tight and people wanted as much value out of their products as possible, this was an attractive, and cost-saving feature.

These razors were what’s known today as “single-edge” or “S.E.” razors, because only one side of the blade was sharpened. They were basically modified straight razors, with the blade cut into chunks, fitted inside a protective steel cage or guard, and then affixed to a handle or grip – the same as just about any other safety razor today, except for the shape, fit and finish.

Wilkinson Sword Single-Edge Safety Razors

Wilkinson Sword is one of the most famous cutlery companies in the world, founded by famed London gunsmith Henry Nock in 1772. As the name suggests, the company originally made…swords! When the demand for swords started to fall away however, after the American Revolution, French Revolution and the Napoleonic Wars of the 1770s, 80s, 90s, and early 1800s, the company had to find something else to make, and they turned from edged weapons to edged tools.

While the Wilkinson company made loads of things – rifles, guns, bayonets, swords, and even motorcycles during WWI – they became famous for razors in the late 1800s and early 1900s, shortly after the company was officially named “Wilkinson Sword”, in 1891. Along with companies like Kampfe Bros., GEM, and Valet-Autostrop, Wilkinson Sword became one of the most famous manufacturers of razors in the world, and they started cranking them out in earnest in the 1910s and 20s.


Wilkinson Sword safety razors made in the early 1900s were all of the single-edged variety, with removable hollow-ground blades designed to be reused and re-sharpened over and over again. Sets came in handsome stained wood, or leather-covered boxes, with a little rack to hold the blades, and a cradle to hold the razor and strop. The company gave the sets attractive, classy-sounding names like “Empire” and “Pall Mall” to appeal to customers aspiring to be seen owning and using the very latest in personal grooming devices.
In the 1930s, these sets started becoming more simplified. The wooden boxes with their metal fittings or leather exteriors were replaced with simpler steel boxes, nickel-plated, and adorned with more hip, Art Deco-style designs.

In our increasingly waste-conscious world, people have started rejecting throwaway cartridge razors, and some are even rejecting the less-wasteful, but still disposable double-edged razors – the kind introduced by King C. Gillette at the turn of the last century. There’s a growing interest, in the 21st century, in using vintage razors such as the classical cutthroat straight-edge, and in single-edged safety razors with reusable blades.

So, how exactly do you use them? Where do you get them? What kinds are there?

One of the most easily accessible manufacturers of these types of vintage, single-edge razors are those made by Wilkinson Sword! I purchased a set on eBay, and spent the last few days restoring it to as close to its original condition as I could reasonably manage. So, what exactly needed doing?

Restoring the Razor Set

The good thing about these sets is that they’re very over-engineered. The metalware is typically brass, heavily plated in nickel for extra protection, and the blades are carefully protected in their own little racks inside the storage case.

So what’s the biggest issue with these sets?

Perhaps unsurprisingly – water damage. They’re razors, they’re used in wet, damp environments, after all, and water-damage (specifically rust) is their greatest enemy.

The set I bought was a bit battered, but in usable condition, barring rust, to greater or lesser degrees, on almost every single one of the seven blades which made up the kit’s seven-day set. The first thing to do was to take everything out of the metal case, blow it out, dust it and clean it.

Once that was done, I was able to more closely examine the blades, which had obviously been used rough and put away wet – literally. To de-rust the blades meant having to slide them out of their protective brackets, the little metal sleeves which allow the blades to be mounted inside the razor head. In some cases, this was pretty easy. In others, the blades had to be tapped loose with a hammer! In some instances this wasn’t too difficult, in others, the blades required real persuasion.

When metal rusts, it expands, and that causes the friction which jammed the blades into their mounting brackets. Liberal use of WD-40 and a lot of firm but determined hammer-tapping loosened the really stiff blades, however, and meant that I could get on with the main job:

Cleaning the mounting brackets, and de-rusting the blades. Fortunately, the brackets are, like the razor, heavily plated in nickel, so there’s no rust or corrosion to be found there – just a lot of dust and gunk, easily removed with cotton-buds.

De-rusting the blades required treatment with an acidic de-rusting solution, and then polishing with 0000-grade steel wool to remove the final encrustations back down to bare steel. Removing the water-marks on the blades would be nigh impossible (and even if I did remove them, they’d only come back after more contact with water), so I left them as they were. I did however, remove all the rust and smooth off the steel, and then sharpened and stropped the blades (again, with them removed from their mounting brackets) before putting them all back together and back into the razor case.

The next thing to do was to attend to the razor itself. It has a number of moving parts, such as the comb, the bar that holds the razor-blades, the spring-loaded teeth which hold the blades in place when the razor is in use, and the swivel-knob at the base of the handle for releasing or tightening up the razor-head for when you want to insert or remove a blade. Obviously, when you’re dealing with something that’s literally razor sharp, you don’t want any sort of stiffness and jerky components!

Replacing the old Strop

One feature of these old single-edged razor kits which is pretty nifty is that they almost all came with some type of automatic stropping device, to smooth off the blades and realign the edges between shaves. You can see this in the STAR razors, the Wilkinson Sword razors, the Rolls Razors, and – pretty obviously – in the Valet Autostrop razors. The basic premise was that you fed the strop through the razor (or put the blade into a specially-made stropping handle) and ran the blade back and forth across the strop.

The strops were made of leather. This means that they don’t always last. They dry, they crack, they break, or they wear out from overuse – so replacing them, if they can’t be revived, is rather important.

This is easily done with a piece of leather of the right thickness, length, and finish. The leather must be smooth, soft, and thin. In the case of the Wilkinson Sword razors, the leather must be thin enough to fit into the gap in the razor-head through which the strop is designed to run. Then it’s simply a matter of finding a way to mount one end of the strop to the wall, and being able to feed the other end through the razor. The leather has to be long enough to strop the razor effectively – at least 12 inches long.

How Does this Set Work?

It’s pretty simple, really.

You sharpen the blades on sharpening stones of appropriate grits, until they’re literally razor sharp. Then, you strop them on a strop.

Make sure that you remove the blades from their brackets before sharpening, to prevent damage, and to put them back into their brackets when stropping, so that they’re easier to hold. You can either use the automatic-stropping system that comes with the razor, or if one doesn’t exist, because the original strop is unusable or missing (or you haven’t had the opportunity to make a new strop, which is easily done with enough of the right leather), then you can use an ordinary straight razor strop. It’s not ideal, because these small blades can be fiddly to hold, but it does work.

If you do have a compatible strop for the razor, then you mount one end of the strop to the wall, and feed the other side through the razor where it says “INSERT STROP THIS SIDE”. With a firm grip on the razor, and keeping the strop straight and level, slide the razor back and forth across the stop – the faster, the better.

The faster you do it, the faster the gears on the razor engage with the strop, causing the blade to flop over to the correct side for each pass along the strop. Thorough stropping typically involves a couple of dozen passes to ensure complete coverage of the blade. It’s important to keep the strop level so that the blade connects with the leather, and it’s equally important to keep the strop tight, so that the blade doesn’t slice up the leather due to improper angle between the blade and strop.

When you’re done, you simply slide the razor off the strop, and now you’re ready to lock the blade into the razor, and commence shaving.

If you’ve used the razor method of stropping, then you can ignore most of what comes next. If you had to strop the blade by hand, then you will need to read what comes next, because that’s how to put the blade into the razor, ready for shaving…

This is done by unscrewing the knob at the base of the razor, so that you loosen up the razor head. You swivel the mounting bar that holds the blade upwards, and slot the blade (in its mounting bracket) onto the bar at right-angles to it, so that the knob on the bar fits into the hole in the bracket. Then you twist sideways, and this locks the blade into place.

Flip the blade down the correct way (pointing towards the adjustable comb feature at the front of the razor) and hold it in place by pressing the adjustment-knob at the back of the razor head. This slides out the comb, which locks the blade in place with two little teeth, stopping it from flopping around everywhere. Finally, adjust the razor head and tighten up the knob in the handle to hold everything in place.

You’re now ready to shave!

To remove the blade, you simply release the knob in the handle, press the adjustment-knob at the back of the razor head to unlock the blade, and twist it off the mounting bar. Easy! Just make sure that in all these operations, you don’t cut yourself on the blade.

In this last image here, you can see the razor with the blade correctly inserted, with the two prongs or teeth holding the blade down, ready to shave. As you shave, the stubble and soap builds up under the blade, between the edge, and the teeth or ridges on the comb. You can remove it all easily when the time comes to remove the blade after use.

Looking After the Razor Set

Looking after a Wilkinson Sword or similarly-styled single-edged safety-razor set is much like looking after a set of straight razors, and the same rules apply.

The blades should be sharpened thoroughly, stropped generously, and kept DRY when they’re not in use. These old blades are made of carbon steel, and as such, they can rust extremely easily. If you expect your set to last, the blades must be kept dry between uses, and any blades used must be cleaned and dried after shaving, before they’re put away. Any damp at all will cause the blades to start growing rust. In fact this was such a problem with early razors that Wilkinson Sword was one of the first companies in the world to start selling stainless steel razor blades in the 1960s!

Closing Remarks…

So – what are my thoughts on this? Are these old SE razors effective? Do they shave?

Yes they do. They take a bit of getting used to, but having used my Wilkinson Sword set, I can assure you, they most definitely do shave, and they do it passably well. Their bulk may make them tricky to handle in the beginning, but I’m sure with practice, you could get quite good at it.

Are they worth buying and using as everyday shavers?

Yes, if you don’t mind the extra maintenance, and the potentially high costs of purchase and possible need for restorations.

What should I check for when buying such a set?

Quite a lot, actually. Make sure that the set is complete, that the blades are in usable (or at least, restorable) condition, that the razor is functional and free from cracks or other damage, and that they can be cleaned thoroughly before use. As for yourself, make sure that you know how to properly sharpen a razor blade before using it. Shaving with a blunt razor is a recipe for disaster, so it’s better to over-sharpen a razor than it is to try and cut corners with it, and make sure you strop the blades thoroughly before use.


A Belated Birthday: A Pilot Vanishing Point


With the latest passing of my birthday (and the less said about that, the better), came the arrival of the latest addition to my pen collection: A postwar masterpiece of design which has remained popular for over 50 years – the Pilot Vanishing Point.

Alternatively called the Pilot Capless, the Vanishing Point or “VP” was invented by the Pilot Pen Company in 1963. It’s the world’s only click-action retractable fountain pen!…which is why I wanted to add it to my collection – because it’s such a unique and different design.

The Vanishing Point works like any other retractable click-action pen. There’s a button at the back, which works on a catch-and-release principle, using ratchets and springs. Pressing the button down pushes the whole pen assembly out, and locks it in place. Pushing the button again releases it and the spring shoots the assembly back inside the pen-barrel – with a sliding door or shutter at the opening that closes upon retraction, to seal the pen and stop the ink from drying out on the nib.

The Pilot Vanishing Point in Stainless Steel with 18kt gold rhodium-plated nib


Refilling the pen is as simple as unscrewing the pen in the middle of the barrel, pulling, or letting the pen-assembly slide or drop out, and then refilling it using its converter, like you would any other modern fountain pen. Once it’s filled, you dry off the excess ink, and re-insert it into the barrel.

Because the Vanishing Point is a fountain pen, however – you can’t just shove the assembly back into the barrel any old way – it has to (and can only) go in ONE way – which is the correct way. And that correct way is with the nib lining up with the pocket-clip at the pen’s base, before you drop it into the barrel again. If it doesn’t – then it’s very simple – the pen doesn’t work! The pen has to be assembled this way because fountain pen nibs only write when they’re in the correct orientation, and anything else would render the pen useless!

Now of course, you could just as easily move the pocket-clip to the back of the pen, near the click-button, like on every other click-action retractable pen – so why don’t they?

The reason is because of a simple quirk of fountain pens – that they should always be stored nib-upwards, when they’re placed in your pocket. This prevents jolting and leaks and ink-splashes. You couldn’t do this with a Vanishing-Point, if it had the clip near the click-button – hence the clip’s positioning near the nib. It keeps the nib up, and prevents ink from being spat out of the pen if it’s jolted or shaken around while it’s clipped inside a pocket.

Doesn’t this make the pen tricky to write with?

Honestly? No. The clip is minimalist and smooth, and doesn’t get in the way of your fingers, so it’s not an issue while writing.

So, apart from the upside-down clip and the nifty click-action retractable mechanism, what else does the pen come with?

Well – it also includes an 18kt gold nib!

A small nib, but 18kt, nonetheless, in the standard sizes of XF, F, M, and B. Vanishing Point nibs come in two varieties – the traditional yellow gold, and the less traditional, but still stylish rhodium-plated gold, which gives the nibs a glossy, silvery sheen, without sacrificing the quality, or prestige, of having a nib made of 75% gold!

Another nifty feature about the Pilot Vanishing Point is that the nibs can be removed and exchanged!…Or at least, the whole interior pen-mechanism can. So, if, for example, you wanted a Vanishing Point with a fine nib, and could only find Broads, you could easily buy a broad-nibbed VP, and then find somebody else with a fine-nibbed VP who wanted to swap out their nibs. All you’d have to do is unscrew both pens, swap the pen-assemblies around – and hey presto! A fine nib! It’s similar to the nib-swapping abilities of the Pelikan Souveran series, where the nib-units can just be unscrewed from the sections and swapped out between pens.

This ease of disassembly also makes the Vanishing Point extremely easy to clean – which is great, because not all pens are!

Pilot Vanishing Point – CONS

The Vanishing Point is about as different from a conventional fountain pen as you could get, and this does lead to a few things which may take some getting used to…

The first one is the pen’s ink-capacity. Its cartridges and converter, by necessity, have to be kept small, to give space for the retraction-mechanism to work inside the pen. Because of this, refilling the pen will have to be done more often.

The upside-down clip may be irritating to some people, because they may find it interrupts their natural grip on a pen. Be sure to try out a few Vanishing Points in person before you commit to buying one, to be absolutely sure that you’re comfortable holding it and writing with it for extended periods of time.

Pilot Vanishing Point – PROS

The pen is lightweight, comfortable, and smooth to hold.

It’s very easy to operate.

The click-action retractable mechanism is smooth and robust.

It’s extremely easy to clean.

It’s easy to swap out nib-units with other VP owners.

It comes in a WIDE variety of finishes, from elegant, futuristic, colourful or plain.

Being able to click the pen open and shut with literally a flick of the finger, without having to worry about what to do with the pen-cap (because it doesn’t exist!) makes the pen a great one for jotting down quick notes on the move.

Is the Vanishing Point worth Buying?

The Vanishing Point is not for everybody, but then, neither is any other pen. If you’re after a pen which is unique, futuristic, which stands out, and which will confound and surprise your non pen-collecting friends, then the Vanishing-Point will definitely turn heads. If you want a pen that’s different, unique, convenient and low-maintenance, the Vanishing Point may well be for you.

However, if you need a pen with a large ink capacity, which you can write with for hours and hours at a time, then you might be in strife. Not that this pen can’t do that, of course, but that you’ll need to carry extra ink with you, should you choose to do so.

Solid Silver Bombilla – Fancy Antique Tea Straw!


Picked this up at the flea-market before our current lockdown happened. At least it gave me something to play around with, something to write about, and something to restore, during this winter of our discontent. Great discontent!

This is an antique, silver bombilla.

What is a Bombilla?

A bombilla (“Bom-bee-yah”) is a straw, designed for drinking yerba mate, a type of tea popular in South America. To prepare mate, a quantity of tea-leaves are crushed and then poured into the teacup – or mate gourd – and then hot (but not boiling) water is poured on top. The bombilla is inserted, and once the tea has brewed, it may be drunk out of the gourd using the bombilla.

To prevent rusting, bombillas were always made of non-ferrous metals – brass, copper, pewter…or if you could afford it – solid silver, like this one. These days, most bombillas are made of stainless steel.


Due to the high quantity of tea-leaves and leaf-powder present in yerba mate, it’s usually impractical to drink the tea as one might with other types of tea – since you’d end up swallowing half the tea-leaves along with the drink! It’s for this reason that the bombilla was invented. The bombilla allows you to suck up the tea, while bypassing the tea leaves. And in case you can’t, then there’s always the filter or strainer, at the bottom of the bombilla, to catch any tea-leaves or grit that might be sucked up by the straw. This stops the leaves from clogging the straw, or from being swallowed…or choked on…by the drinker, while enjoying their tea.

Antique bombillas made of silver are often intricately formed and decorated. The straws are chased, engraved, they might twist and turn in a spiral fashion (think of those plastic crazy-straws that kids use), or they might even have applied, silver decorations to them, similar to mine.

How is a Bombilla Used?

You suck on it.

OK, actually it’s a bit more complex than that. Not by much, but a bit.

Bombillas come with a filter at the bottom. That’s the little perforated strainer that you see at the end. It’s purpose, as mentioned earlier, is to prevent you from sucking up and either swallowing, or choking on – the tea-leaves or tea-dust inside your mate. The mate tea-leaves are pressed to one side of your cup or gourd, and then the hot water is poured in. This means that only a small amount of tea-leaves are steeped at any one time, so that you can get the strongest flavour! This is also why you have the bombilla, anyway – to drink the tea at the bottom of the gourd, since you sure as hell can’t hold it up and drink it – unless you want the tea-leaves going all over you!!

One useful feature about bombillas is that you can pull them apart. Usually, the filter-bulbs unscrew, or unplug from the straw. This allows you to clean out the straw, clean out the filter, remove any clogging from tea-leaf residue, and keep the whole thing in working order. In my case, the filter just unscrews, like so:

Once your bombilla’s been cleaned – you simply screw the two parts back together. Easy!

Because bombillas are metal, the tea they’re used to drink is rarely served (or at least, drunk) at boiling-hot temperature, to prevent burning your mouth or lips on the straw. The length of the bombilla (this one is 8 inches long!) also aids in helping the tea to cool down during the journey from the teacup to your mouth.

Cleaning your Silver Bombilla

As it’s going to be something that you’ll put in your mouth, it probably goes without saying that if you do buy an antique silver bombilla, you should definitely clean it before using it. This can easily be done with soap, hot water, and a thin, stiff-bristled bottle-brush or tube-brush, to scour out and clean the inside of the straw, and the filter.

If you need to polish the silver, you can do that with either a liquid or paste silver polish (I use Hagerty’s polishing paste), a silver-polish cloth, or, if you’re worried about the residue from the polish getting into the straw – you can use the baking-soda method!

This has become a very popular method for cleaning silver over the last few years, and you can find loads of videos about it on YouTube.

Put simply – you line a wide, flat-bottomed container with aluminium foil (shiny side up). You put the silver item into the foil-lined container (in this case, the bombilla), and then you fill the container with BOILING HOT WATER. It has to be boiling hot, or else nothing happens.

Next, you pour in copious amounts of baking soda, making sure to cover as much of the silver item as possible. The baking soda and the hot water react, and you get a fizzy, sizzling sound, and lots and lots of bubbles. The baking soda reaction eats away at the tarnish on the silver, scouring the metal with the fizzing water, and loosens and removes blemishes from the surface of the metal. Then – fish the silver out, and dry it off. The baking soda will either have removed the tarnish entirely, or if not, then will have loosened it enough to remove it by regular polishing.

This method is useful if the silver item you’re cleaning is intricate, fragile, extremely dirty, and/or hard to clean, or if you’re cleaning loads of things at once.

Can you Still Find Silver Bombillas?

Absolutely!! There’s loads of them – mostly antiques – on eBay, but they can be quite pricey. Anywhere from $100 – $500, depending on the age, condition and size. Some are quite small, others, like mine, can be quite lengthy. If the bombilla is silver, it’s usually stamped on the filter at the bottom of the straw with 800, or 900 silver. When buying, make sure that the filter is undamaged, without dents, and can be easily removed and replaced on the straw (this is vital, because otherwise, you can’t clean it if it gets clogged or needs rinsing out!).

But – you might be asking – what about the yerba mate gourds? The cups used to drink the tea out of? Are they made in silver, too?

Oh, you bet! They’re not as common as silver bombillas, but silver gourds can be found, although, like the bombillas, they can be fairly expensive. Sometimes, you can find them together, sold as bombilla-and-gourd sets.


Japanese Personal Chopsticks – In Sterling Silver!


I love silverware. There, I said it. I love the colour, the history behind pieces of wrought silver, and the limitlessness of the vast array of items which can be made out of silver. One thing I’ve always wanted is a pair of silver chopsticks!

After hunting and digging around on eBay for literally months, and using every combination of words that I could possibly conjure, I finally settled on a pair of silver chopsticks which were affordable, in great condition, which were marked, and which would be easy to use, and maintain.

The chopsticks I bought are Japanese in style, and they showed up in a nice, wooden presentation box, where they can be stored when they’re not on active duty as waistline-enhancement devices. All in all, a pretty nifty package.

The History of Silver Chopsticks

Silver chopsticks have existed for centuries, throughout Asia – mainly in the three major chopstick-using countries – China, Korea, and Japan. Just like silver cutlery in Western countries, the purpose of silver chopsticks was much the same – they were a status-symbol, a store of wealth, and a source of familial pride.

The tale is often told that silver chopsticks were favoured by the great emperors of China and Japan in ancient times, because eating with silver chopsticks would tell the emperor if his food had been poisoned. Supposedly, the poison would turn the silver black! – and this would be a sure sign that the food was tainted, and deadly!

Right?

No.


Actually, loads of things turn silver black – eggs, meat, spicy foods…basically anything which might have high levels of sulfur in it. It doesn’t mean that the food is poisonous – it just means that the silver has been tarnished by a chemical reaction – not that anybody in Ancient China would’ve understood what that was. It’s the sulfur dioxide, and the acids, in various foods (for example, lemon juice, salt, etc) which causes silver to turn black and discolour. Poison has nothing to do with it.

I want my own Set of Silver Chopsticks! Where do I get them?

Antique silver chopsticks can be found, if you’re patient enough, but you can also buy modern sliver chopsticks! Yes, silver chopsticks are still made today (try eBay, if you want to find a set), but beware of fakes!

As a general rule – never buy silverware (chopsticks, or otherwise) which is not hallmarked! Especially from online sources, like eBay. One of the main reasons for collecting silverware, now, as it was in centuries past – was to act as a store of wealth. That wealth doesn’t exist if the silver isn’t real! And in most cases, your word that the silver is real, isn’t going to convince most people – so why should you take the word of somebody else, that the silver they’re trying to sell you, is real, if they can’t independently prove it, by showing the hallmarks? Always remember this when buying silverware, especially from some Asian countries, where hallmarking is less stringent than it is in say, North America, and in Europe.

After all – that is the whole point of hallmarks – proving that silver is real. Believe it or not, but hallmarks on gold and silver are the oldest surviving form of customer-protection IN THE WORLD – and date back literally 1,000+ years, all the way to the Byzantine Empire of the 5th century!

“SILVER 925”, or 92.5% silver by purity. AKA – Sterling Silver.

I bought these chopsticks because they were clearly marked “SILVER 925” on the shafts. Without that – I wouldn’t have bothered. There are loads of sellers out there with “silver” chopsticks assuring you that they are silver, but until you get them tested, you only have their word for it. And sorry, but a person’s word isn’t enough to convince me to blow money on something silver, if it isn’t marked – and it shouldn’t be enough for you, either. And a lot of these chopsticks online and elsewhere, aren’t marked. Whatever you decide to buy – make sure they’re marked. If they don’t show you a photograph of the marks, or if you can’t find them – then move on and keep searching.

Japanese Personal Chopsticks!

One thing I loved about the chopsticks I bought is that they came from Japan. This interested me for a few reasons…

One, because Japan loves making things out of silver (seriously, have you seen Japanese silver sake sets?), but also, two, because Japan has a strong culture of personal dining utensils.

Unlike China, it’s really common in Japan for people to have their own personal, individual chopstick-sets, instead of just digging out a pair of mismatched whatevers, from the darkest depths the cutlery drawer in the kitchen, whenever it’s time to eat. You can even go to that Japanese super-store, DAISO, and you’ll see individual chopsticks-sets for sale – usually aimed at children – so that they can get used to the idea that “this is MY set, and only I am going to use them!” (by the way – those child’s sets are also really useful if you ever decide that you need a small set for traveling, or keeping them at the office for lunch, or whatever!) – they even come in their own little pouches and cases, enforcing the idea that these are your chopsticks, and none shall have use of them, apart from you!

The culture of personal chopsticks sets is so strong in Japan that there’s even stores there (bricks-and-mortar, or online) which sell a stunningly wide array of chopsticks in all kinds of styles and designs, from retractables, glass, porcelain, bamboo, bone, steel, exotic woods, screw-apart compact ones – and hell yeah – even ones in solid silver!

So – if you are looking for a nice pair of silver chopsticks – probably best to start in Japan, and widen your search from there.

Aside from that…

…happy eating!


My New Facebook History Group!


For those who don’t already know, I do have a Group on Facebook now, for the discussion and sharing of history!

It covers the years from 1800 – 1960, and all aspects of history, art, and popular culture during this time period. Feel free to join and interact, and invite like-minded people who might find it interesting. All I ask is that discussions remain relevant to the scope of the group, that folks do their best to remain polite and civil, and that people don’t complain about the contents of the group being “offensive!”.

Here’s the brutal truth, folks: History doesn’t care if, when, how, or even how much, it offends you. So announcements of how offensive you find it, regardless of what it is, will see you removed from the group. Declarations like that only cause issues and problems for the other members, and I would dearly like to avoid this.

Other than that – have at it!

As for the group?…

You can find it here!