Japanese troops invade the capital of Nationalist China, sweeping before them the feeble defenses thrown up by the forces of the Chinese nationalist army. On the banks of the Yangtze River, the U.S.S. Panay is moored. A river gunboat and part of the US Navy’s Asiatic Fleet, it is tasked with protecting American interests along the Yangtze.
When the Japanese invade Nanking, the Panay is commanded at once to evacuate the city and make steam for Shanghai. The order goes out for all American civilians in Nanking, and all staff working at the U.S. Embassy in Nanking to evacuate immediately, to go to the waterfront, board the Panay, and prepare to leave at once.
The U.S.S. Panay on the Yangtze River in China
December 12th, 1937; as the vessel prepares to depart, the Panay has on board five officers, 54 members of the crew, ten civilians, including newsreel cameramen and reporters, and four staff of the U.S. Embassy – Nanking. American flags are stretched across the vessel to mark it as a neutral ship. Before it can even make headway, the Panay is attacked by thirteen Japanese aircraft, bombing the ship and strafing the decks.
The crew man the lifeboats but the ship sinks so fast that everybody is forced into the water, to swim to the banks. Japanese aircraft strafe the water, shooting unarmed civilians and noncombatants. In total, five are killed, and 48 are wounded. The Japanese claimed that they did not spot the American flags, and paid compensation to the U.S. government for loss of the Panay and the deaths of those on board.
The sinking of the U.S.S. Panay near Nanking, China
The Panay was one of the last ships out of Nanking, and one of the last hopes for Chinese civilians attempting to flee the Japanese. On the 13th of December began the Rape of Nanking, which saw the deaths of 300,000 Chinese men, women, children, POWs, and any other foreign nationals still stuck in the city when the vessel sank.
During WWII, the famous piano-manufacturer, Steinway & Sons, was forced to give up its tons of seasoned timber for the American war-effort. The aged lumber was to be used to manufacture rifle-stocks, and lightweight glider-aircraft for use during large-scale allied troop-landings in Europe.
Once the war in Europe started going the way of the Allies, the army approached Steinway again and asked them to start building pianos once more – despite the fact that all their best timber-stocks had already been spent on the war-effort!
Victory Verticals being tuned
The army wanted Steinway to produce a lightweight piano which could be air-dropped into Europe so that soldiers, and liberated civilians, could have a cheap but cheerful way to entertain themselves, produce music, and raise morale!
The result was the army-green Steinway & Sons “Victory Vertical” upright piano.
Victory Vertical packed for shipping
Just over 2,400 Victory Verticals were manufactured, and shipped to Europe and either flown or trucked inland and air-dropped over liberated population-centers.
The piano had to be small enough to be packed easily aboard cargo-ships, light enough to be transported by air, robust enough to survive a parachute landing, and capable of being moved around easily by two or three men, since specialist moving-equipment was unlikely to be available where these pianos would end up.
While it does sound incredible, advertising materials and publicity documents published by Steinway during WWII attest to the fact that – yes, Victory Verticals really were airdropped from bombers during the war, where they were rescued by Allied troops and liberated civilians, and put to use.
American soldiers having a singalong around a Steinway Victory Vertical
Due to the small numbers produced, few Victory Verticals exist today, and they’re an almost forgotten chapter of Steinway…and world war…history.
Few of us are likely to forget the 2001 September 11 terrorist attacks, when two planes crashed into the Twin Towers in Manhattan and into the Pentagon. I was a 14-year-old schoolboy at the time, and I remember watching it unfolding live on television.
But how many of us have heard of what happened on September 16th? Not September 16th 2001…but September 16th, 1920.
This date commemorates one of the first big terrorist attacks in United States history, a criminal act which has since drifted off into the fog of history. In this posting, we’ll be looking at the first time that terror came to New York: The Wall Street Bombing of 1920.
What was the Wall Street Bombing?
The Wall Street Bombing was just one of several terrorist attacks which took place in the USA in the early 20th century. Until the Bath School Disaster of 1927, it was also the most deadly terrorist bombing in the United States at the time, and the first terrorist attack on New York soil.
In the early 1920s, the United States was enjoying the coming boom years of the Roaring Twenties, brought on by post-WWI prosperity. Nowhere was this prosperity more evident than on Wall Street, in Lower Manhattan, the center of the financial world. It was in this bustling nook of trade and commerce, that the attack happened, killing and injuring dozens of people during the midday rush, all in a matter of seconds.
What Happened during the Bombing?
These days, we’d probably call it an “improvised explosive device”, or to use the common parlance, a ‘car-bomb’; or more specifically, a ‘cart’ bomb. Just before noon on the morning of the 16th of September, 1920, a horse and cart, loaded with 100lbs of dynamite and 500lbs in sash-weights (those small, metal weights used to operate sash windows), pulled up outside No. 23 Wall Street, the J.P. Morgan Bank. A minute after midday the dynamite was detonated, destroying the cart, killing the horse, and sending hundreds of pounds of metal shrapnel flying through the crowded, lunchtime rush on Wall Street!
The bomb-blast could be felt right across the narrow thoroughfare. Its victims were mostly messengers, couriers, stenographers and stockbrokers, moving between their various places of work. The blast killed thirty-eight people and wounded over a hundred and forty other people! The exterior of the J.P. Morgan bank, which the cart was parked outside, was severely damaged by broken glass, chips of masonry and flying shrapnel.
Several other buildings on Wall Street were significantly damaged. Cars, trucks and other vehicles nearby were flipped over and smashed from the force of the exploding dynamite, as you can see in the photograph above. Within minutes, emergency services were on the scene to clear up the wreckage and treat the injured.
The injuries sustained in the blast were horrific. A stockbroker was decapitated by the flying debris, his headless body found in the street, a packet of work-papers and stocks still clutched in his hands. One man was blinded in the explosion and lost the use of his eyes. Dead bodies lay everywhere. Initially, the death-count was low, but the appalling injuries soon caused it to rise to the number of 38, which was the official number of deaths caused by the blast.
Some of the bodies of victims killed in the blast
The police were quick to respond to the explosion, and within minutes, they’d cordoned off the blast-area and had commandeered all operational motor-cars within the radius of the explosion, using them to transport the injured to hospital. One 17-year-old messenger-boy packed thirty people into one of these cars before driving it to safety.
The Aftermath of the Explosion
Terrified and furious New Yorkers were quick to condemn the blast that killed over three dozen people and horribly maimed and injured up to a hundred and forty or more of their friends, colleagues, family-members and just plain fellow New Yorkers. The BOI (that’s the Bureau of Investigation, the forerunner to the current FBI) immediately launched an investigation into the attack. Business-owners and the Board of Governors for the New York Stock Exchange were anxious to start trading again as soon as possible. The street was cleaned up overnight (literally) and trading resumed the next morning.
The front page of the New York Times, September 17th, 1920. The day after the bombing.
Investigators theorised that the bombers might have been communists or anarchists. Why else would they wish to attack America’s centre of wealth, business and finance? The noted newspaper, the Washington Post, declared the bombing an “act of war”.
While the BOI theorised about possible foreign terrorist groups, or the possibility of a group of Italian anarchists, the police started investigating the source of the horse and cart. Despite checking dozens of stables, they were unable to find out who had purchased, or perhaps stolen, the horse and cart which was used to transport the dynamite to Wall Street. While investigative authorities came up with many theories and leads, officially, at least – the case was never definitively solved.
Born in 1942, and dying in 1963, Wojtek (“Voy-Teck”) was the name given to a Syrian brown bear-cub discovered by Polish soldiers in Iran, who had been released from Soviet gulags after Germany invaded Russia in 1941. The soldiers of the Polish II Corps raised Wojtek as their unit mascot, but their commanding officer refused to let the troops have a bear – or any other animal – as a mascot! So instead, the troops pulled a fast one, and enlisted Wojtek as a private in their unit.
And thus began Private Wojtek’s career in the Polish Army.
Wojtek the Bear
Wojtek was a popular mascot, and he spent so much time with the soldiers that he started copying their every move. He learned how to drink coffee, drink beer, smoke, march, and even salute!
In their spare time, the soldiers would wrestle with Wojtek…which was no mean feat, because before long, Wojtek was 5’9″, and over 200lbs! As he grew more and more attached to the men, the soldiers assigned one of the men to be the bear’s personal minder.
Wojtek wrestling with a Polish soldier
During the Battle of Monte Cassino, Wojtek observed his fellow Poles carrying crates of artillery-shells to the front for their artillery officers to load into their guns and mortars. Like with everything else, Wojtek started copying this behaviour, too, and easily carried the 100lb crates of shells to the front line.
After WWII, Wojtek lived out his life in Edinburgh Zoo in Scotland, where he became a bit of a star with the locals, and with soldiers from his former unit, who would drop by to visit. As a result of his activity, the Polish 22nd Artillery Supply Company changed their unit badge to depict an image of Wojtek carrying an artillery shell.
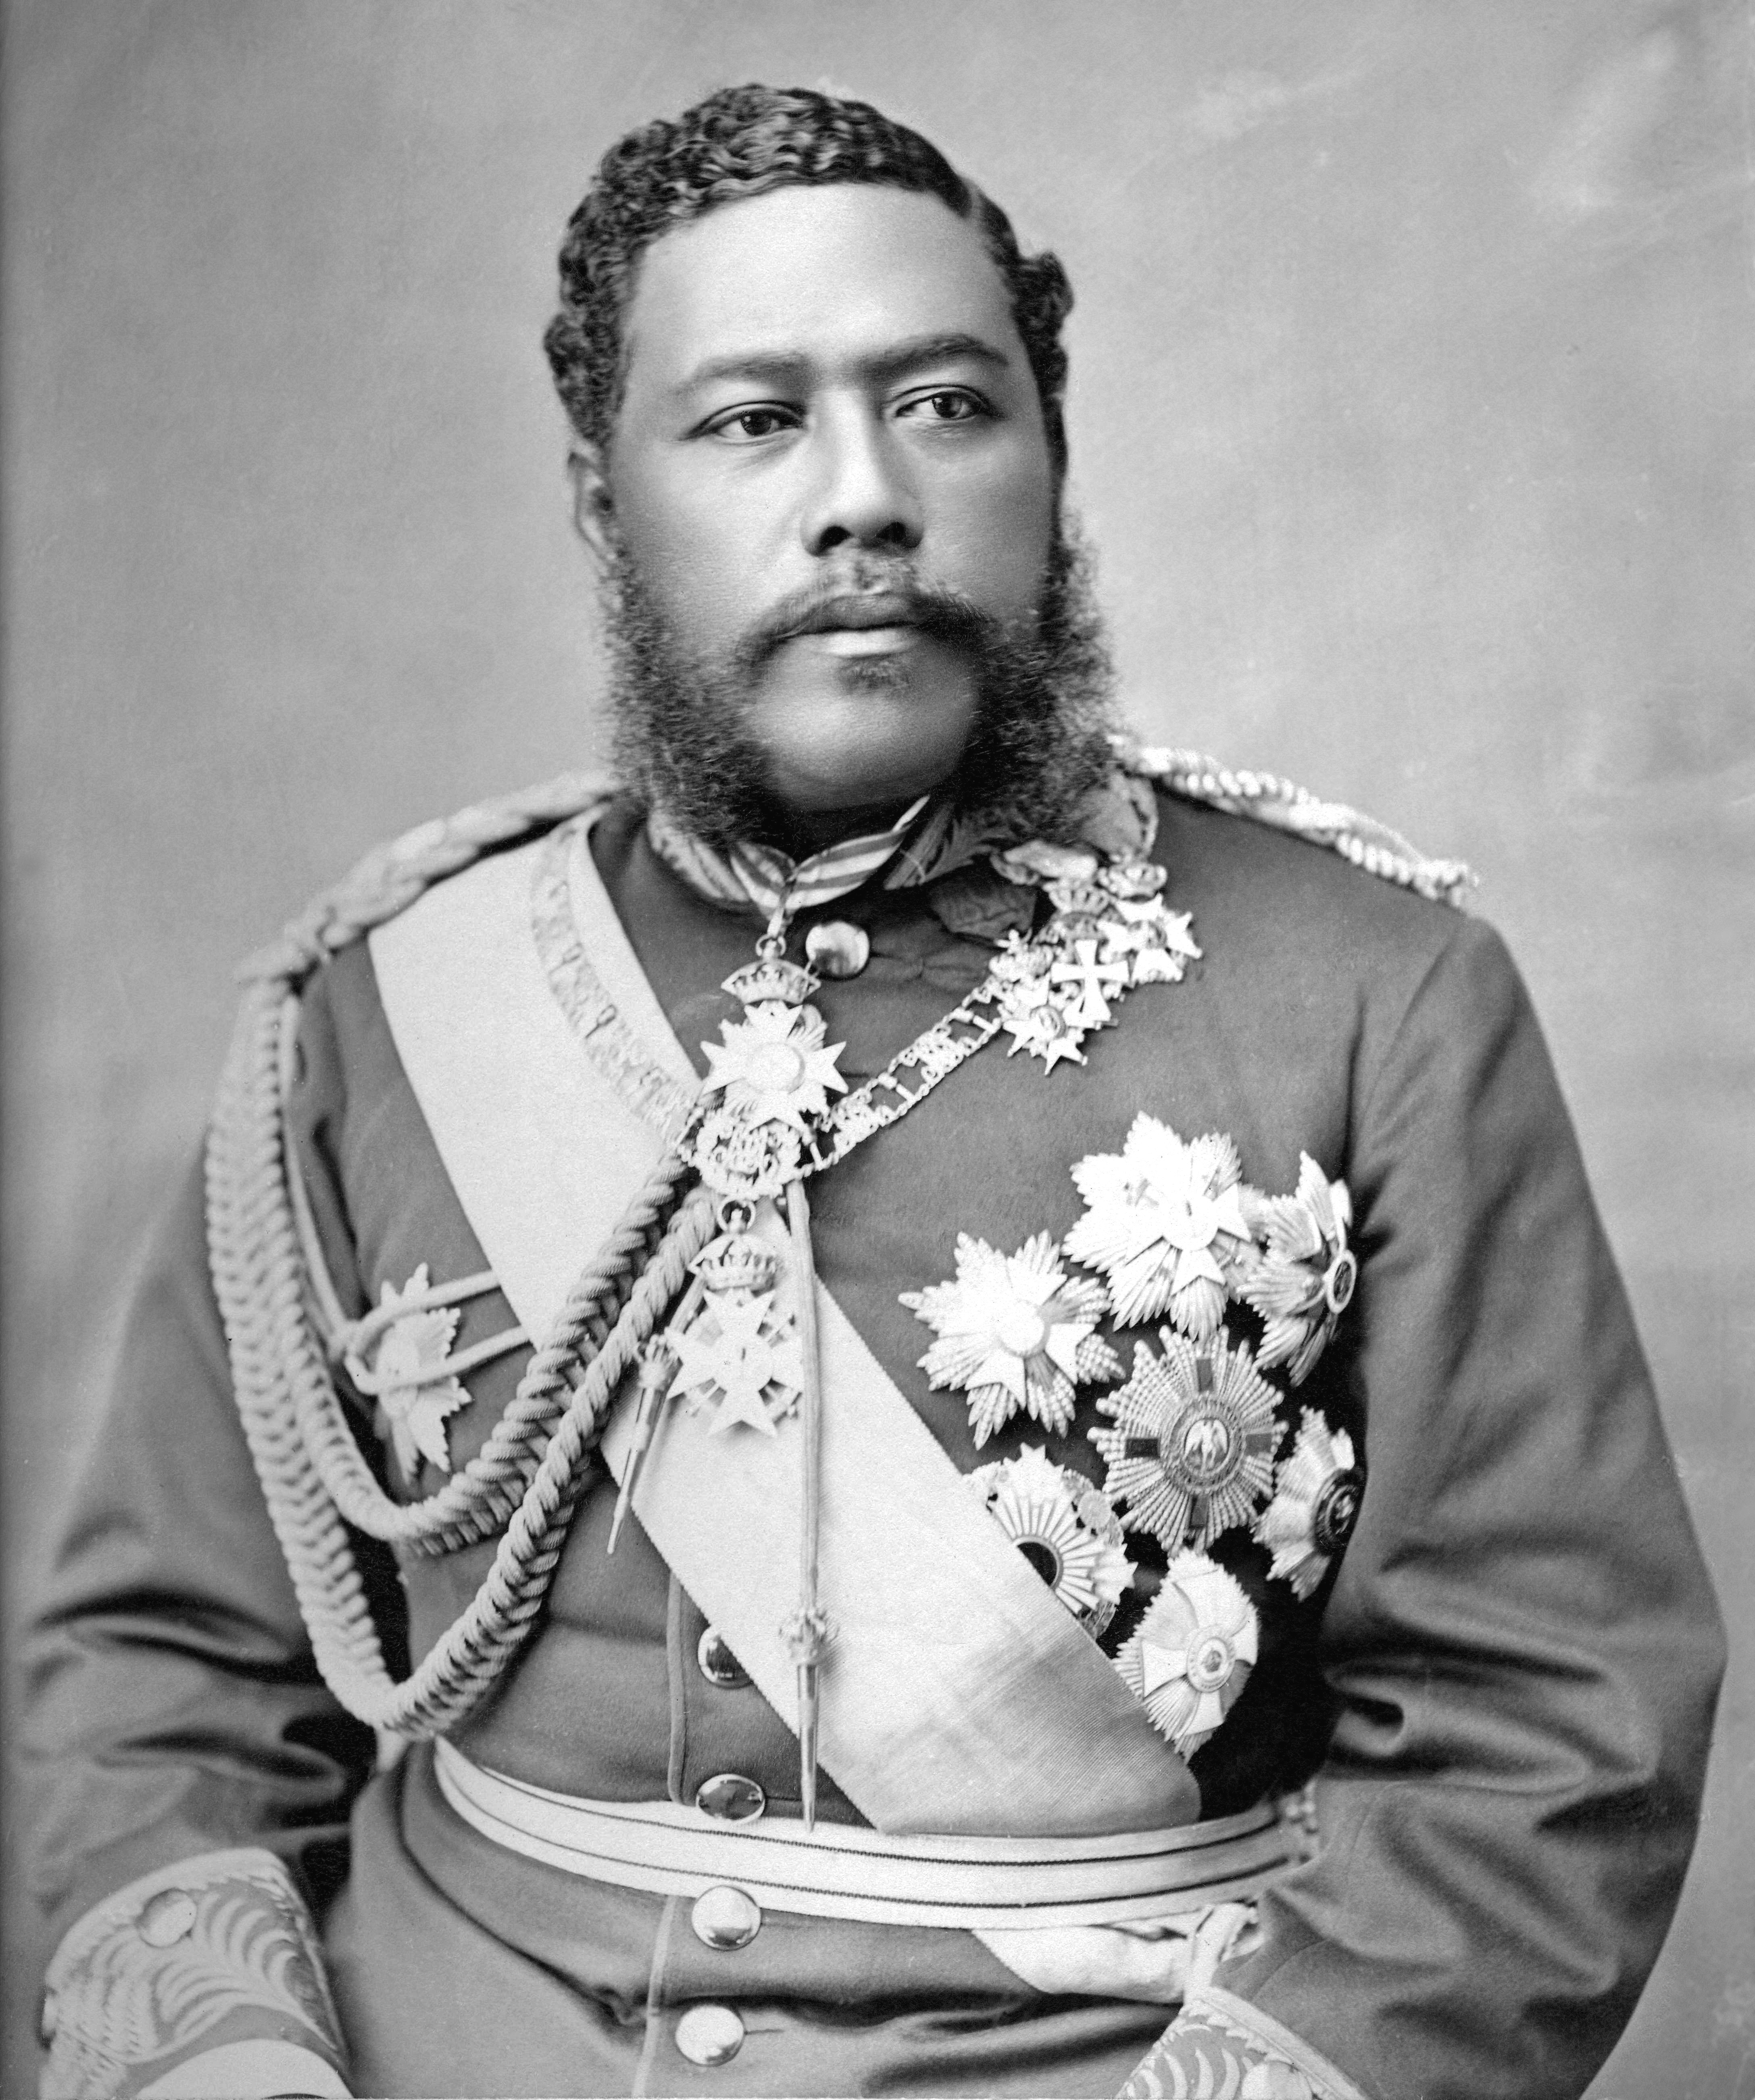
White sandy beaches, beautiful food, tropical weather and endless sunshine. Just some of the tropes that come to mind when people think of the islands of Hawaii. In fact, Hawaii has been associated so much with tropical getaways, relaxing summer holidays, or a particular day in 1941, that most people have completely forgotten (or never learned) that long before any Japanese attack on Pearl Harbor – Hawaii used to be a country!
That’s right – its own country, with its own flag, own national anthem, own government, and even its own monarchy!
The Kingdom of Hawaii was proclaimed in 1795 when Kamehameha the Great, the first ruler of a united Hawaii, declared the official union of the islands!
Actually this isn’t true – not all of the islands were unified – but the ones which were not eventually decided by majority rule, to join the union anyway.
The Kingdom of Hawaii lasted for not quite a hundred years, from 1795 to 1893. In that time it had eight rulers. Seven kings, and one queen, all native-born Hawaiians. It was to be the last independent ruler of Hawaii – and the island nation’s first, last, and only queen regnant, who would have, arguably, the greatest impact upon Hawaiian culture and history.
King Kalakaua, the last King of Hawaii, and Queen Lili’uolakani’s older brother
Queen Lili’uokalani, who also went by the Christian name of Lydia – was born in Hawaii on the 2nd of September, 1838. Due to the early deaths of the previous monarchs, including that of her older brother, the popular King Kalakaua – who we can thank for bringing back the tradition of hula-dancing to Hawaii – Queen Lili’uokalani ascended the throne in 1891. Her time on the Hawaiian throne was brief, just two years before the monarchy was forcibly overthrown – but even before her short reign, Lili’uokalani was to have a big impact on Hawaii – largely thanks to her brother.
King Kalakaua was the first Hawaiian monarch to travel widely around the world. In his absence, his sister, then-Princess Lili’uokalani officially ruled Hawaii as Princess Regent. She was responsible for saving much of traditional Hawaiian culture.
She documented many traditional Hawaiian customs, dances, songs, and even pieces of music, which previously had only existed orally, passed from generation-to-generation without ever being written down. She helped to contain the spread of a smallpox epidemic among the Hawaiian islands, and, when she finally became queen upon the untimely death of her brother, she rewrote the Hawaiian constitution in an attempt to give more power to her native people.
Lili’uokalani – Queen of the Hawaiian Islands
But of all Queen Lili’uokalani’s lasting legacies, probably her most famous one of all – was a song.
Written in 1878, and supposedly inspired by the sight of two lovers bidding farewell to each other, then Princess Lili’uokalani penned a song which was to become the most famous piece of music ever written on Hawaiian soil. A song so famous that even now, over 140 years after its composition, just a few bars of its melody immediately conjours up images of coconuts, palm trees, white sandy beaches and tropical paradises.
A song called “Aloha Oe“. Also known as “Farewell to Thee“, after its English title.
Ever heard of it?
You might not know the title, but you’ll certainly know the tune. It’s been used in countless TV shows, films, short-cartoons and animated series, and has been a popular choice for recording-artists for well over 100 years. It’s been covered by everybody from Bing Crosby in the 1930s to Elvis Presley in the 1960s!
Queen Lili’uokalani’s original handwritten manuscript for the song – including all musical notation, and full lyrics in native Hawaiian, and English – are still held by the Hawaiian State Archives.
The song proved so popular and so famous that, when Queen Lili’uokalani died in 1917, the thousands of people who turned out to watch her funeral procession all sang “Aloha Oe” as her casket was borne past, as a tribute to their island nation’s last queen.
A recent discussion with some friends brought up this little historical tidbit, and it made me wonder how many people know…or don’t know…about this curious historical oddity.
Almost without exception, every pair of jeans, ever since they were invented in the 1870s by Levi Strauss, and almost every pair of slacks or chinos produced ever since, has featured a small pocket sewn into the right-front pocket. It’s not very big, and if you’re lucky, you’ll manage to get three or four fingers into it before it gets too tight to fit anything else in there!
But what is it?
A lot of people like to call this the “fifth pocket” and believe that it was an afterthought added to jeans by the L.Strauss company when they were designing their first pairs in the late 1800s. But actually, nothing could be further from the truth.
The mysterious inner pocket on the right side of a pair of jeans was an intentional add-on, and it was placed there from the very start to serve a very particular function – It’s a watch-pocket, for storing your pocketwatch!
The pocketwatch goes into the pocket, and the chain or fob clips to the nearest belt-loop for security.
The Mysterious Fifth Pocket
What, then, you might ask – is this mysterious “fifth pocket” that everybody keeps talking about? Does it even exist? If the watch-pocket or fob-pocket isn’t the fifth pocket, then which one is?
There is a fifth pocket, and it does exist. But it isn’t the little one on the right where your pocketwatch lives.
Nope – actually, it’s round the back! The “fifth pocket” mentioned so often in association with jeans refers to the rear hip-pocket, sewn on the left-hand side! Prior to 1901, Strauss jeans were not sold with this feature, and it was this pocket – and not the watch-pocket – which was sewn onto jeans later on as an afterthought, to balance out the number of pockets available for use.
The Function of the Fob Pocket
So if your friends ever ask you – what is the fifth pocket – you can tell them – it’s not the little pocket on the front – it’s the big one at the back! And that little pocket on the front isn’t for keys…condoms…pepper-spray…coins…or anything like that. It’s for your pocketwatch!
Sources:
Webpages about the function and history of their pockets, from the official Levi Strauss website:
Politics is a noisy business. Senators, congressmen, MPs, lords and representatives hammering out speeches, deals, new laws and arguing over everything from taxes to immigration.
To keep the peace, the house’s presiding officer needs an instrument with which to call people to order – traditionally, this was a gavel – a ceremonial hammer which produced a loud enough noise to be heard over all the arguing and debates.
In the U.S. Senate, this gavel, which dates back to 1789, and which was first used by John Adams, was an hourglass-shaped piece of ivory, sans handle, which was in use by the senate for over 100 years…until an unfortunate day in 1954.
The original U.S. Senate Gavel being used by Vice President John Garner, in 1938
By the 1940s, the gavel, by then in use for over 100 years, was starting to show its age. Repeated hammering had caused the edges to weaken and the ivory to chip. In an effort to prolong the gavel’s use, the decision was made in 1952 to carry out some repairs, and two sterling silver plates were riveted to the flat top and base of the gavel to protect the ivory and absorb the shock of it striking the lecturn during use.
And this might’ve been enough, if not for Richard Nixon.
Yes, that Nixon.
In 1954, Nixon, during a heated senate debate about atomic energy, slammed the gavel down so hard that, despite the silver reinforcements, the gavel cracked down the side!
Whoops.
In a second, a priceless historical artifact had been irreparably damaged!
The shattered-off piece of ivory was found, and carefully glued and screwed back into place, but the damage was done. Embarrassed, Nixon and his colleagues tried to find a new piece of ivory to make another gavel! The problem was that they couldn’t find any chunks of ivory large enough to replace the original gavel.
The Senate’s two ivory gavels. The original 18th century one on the left, and the 20th century replacement one on the right. You can see the screw and the cracked-off piece of ivory on the left, on the original gavel
Famous for its elephants, and ivory carving, the government of the newly independent Republic of India volunteered to make the Senate a new gavel. Hourglass-shaped, made of ivory, and to the exact dimensions of the original 18th century gavel, the new gavel was delivered to the Senate on the 17th of November, 1954 by Sarvepalli Radhakrishna, the first vice-president of India, as a token of friendship between the two nations.
The Senate Gavels in their presentation & storage box
On the day of delivery, Nixon thanked the Indian vice-president for India’s gift to the Senate, and said that the gavel would be used in place of the original, which had started to “come apart” from “overuse”.
He tactfully omitted the fact that it was HIS overuse that had caused the gavel to come apart in the first place!
That gavel, and its older brother, are still in use in the U.S. Senate today.
In this posting, we’ll be looking at what travel was actually like during the late 19th and early 20th centuries, and see just what the pre-war travel experience was actually like. What could you expect? What happened? And how did it perhaps differ from what we might have today? On top of that, we’ll see what changes occurred that meant that the pre-war experience could not be recreated in the decades after the Second World War.
A guard waves his flag. A whistle-chirrup echoes down the platform; a foghorn sounds and the roar of four diesel engines powering a magnificent airship through the air calls us to attention. All aboard for another trip back into the past…
Travel during the Golden Age of Travel
These days, the journey itself is the least luxurious and exciting part of travelling. You get on a bus or train or plane and you just…sit there. For hours at a time, with almost nothing to do. You have a boarding-pass and your passport and nothing else. If you’re lucky, you’ve got the in-flight movie, or you brought a book or your laptop or iPad, with which to while away the time. Or maybe, just maybe, you might actually fall asleep. Only to be woken up an hour later by flight attendants shunting past you with trolleys loaded to the brim with food of questionable quality at best.
And before all this, you had to go through check-in, immigration, luggage-weights, and security checks for you and your luggage, and now, you’ve got a flight in front of you that’ll eat up all of the first day of your holiday and you’re starting to wonder why the hell you ever decided to go to Barcelona. You could’ve stayed home and gone to the beach instead! But what was the travel experience like before all this rigmarole got started? Let’s find out.
Back in the early 20th century, when life on a whole moved at a slower pace, a steamship journey took several days at least. Because of this, the journey itself had to be comfortable, memorable and relaxing – and steamship companies and railroad companies constantly strove to improve their service and amenities in order to lure in as many customers as possible by advertising speed, comfort, luxury, great food, electric lighting, running hot water…anything that would put their service above that of a rival company.
Before you even reached your destination, what was the ‘travel’ part of the ‘Golden Age of Travel’ really like? Let’s go on three imaginary journeys during the 1930s and see what kind of travel experience you could expect. To sample the best of everything, we’ll do the transatlantic crossing, the Orient Express, and to top it all off, a ride in the most famous airship of all.
Trip No. 1 – The Transatlantic Crossing
Route: London, England to Chicago, Illinois, U.S.A.
Expected Travel-Time: 7 Days (dependent on weather)
The Transatlantic Crossing – Part I – The Boat Train
A typical trans-oceanic journey of the late 1800s or early 1900s started at a railway station. Let’s say you’re sailing on one of the great Cunard steamships from England to America! What happened?
To get from London to Southampton, you boarded the boat train at Waterloo Station. The boat train was a special express train that ran regular services from major metropolitan stations to port cities around England such as Dover, Southampton and Liverpool. They worked in a similar fashion to airport shuttle-bus services today which scoot you back and forth from major cities to your nearest airport. These trains were in service specifically to make fast, punctual connections between major population centers, and the great ports of embarkation. However, even express, a journey by boat train took a few hours. You might nap, read or eat lunch on the train, depending on the time of its departure. The train of choice from London-Waterloo to Southampton was the Cunarder or Statesman boat train which would whisk you across the south of England to the great ocean terminal at Southampton.
At Southampton Docks, you got off the boat train with your mountain of luggage and boarded your ocean liner for your ‘crossing’ or ‘passage’ to the New World – the United States. The next leg of your journey would now begin…
The Transatlantic Crossing – Part II – The Crossing
Having arrived at Southampton, you now had to find your ship! Every major shipping company had docks assigned to them, much like how today, every major airline has a terminal and gates at an airport assigned to them. In the 1920s a wide variety of ships were available. If you wanted old world charm, you might sail on the R.M.S. Olympic, sister ship to the Titanic. If you wanted something grander and more modern, perhaps take the Berengaria, notorious for hosting American ‘booze-cruises’, where dried up Americans purchased return tickets and sailed to England and returned to America in a fortnight round-trip where they could drink to their kidneys’ discontent. Not being an American ship, the Berengaria was not subject to American prohibition laws!
Or maybe your ship is the Aquitania, a vessel which, until 2004, held the distinction of being the longest serving ocean liner plying the transatlantic route – thirty-six years! This record was broken in 2004 by the Queen Elizabeth 2, whose service reached 40 years doing the same route! The Aquitania became known as the ‘Ship Beautiful’ and was a common choice for passengers crossing the Atlantic.
RMS Aquitania. Source: Wikimedia Commons
In the old days, much care was taken in selecting which ship you would take to cross the Atlantic. There were loads to choose from, and each ship and company came with different things to recommend them to the discerning traveling public. The two biggest rivals were Cunard and White Star. They competed fiercely for passengers by boasting of larger ships, faster crossings, more luxuries, better food, improvements in safety and an ever-expanding range of on board diversions ranging from swimming-pools, spas and even cinemas.
After boarding the ship and being shown your cabin, you were allowed to settle in. The ship was dragged out to sea by tugboats and then would set sail for New York, a crossing that could take anywhere from five, to seven, to ten days, depending on the ship, the route, and the weather that it encountered on the way. That said, ships were typically expected to be able to make a crossing a week on the transatlantic route, so that passengers would never have to wait more than seven days to get another ship.
Once on board, you now had to find things to do. Southampton to New York takes the better part of a week, or more, depending on your chosen vessel. Are you a gambler or a betting person? Perhaps you should get in on the ship’s pool? No, not the swimming pool on E-deck, the ‘ship’s pool’ was the pool of cash which passengers contributed money to. You all had to bet how far the ship would go in 24 hours. At a prearranged time each day, an officer or steward would stick up a notice on the public noticeboard detailing how far the ship had gone during the night. The passenger whose guess was closest to the actual distance traveled won the pool!
This map of the Atlantic is found in the Grand Saloon of the R.M.S. Queen Mary, one of the most famous ocean liners of the Golden Age of Travel. The two lines track the ship’s routes from Southampton to New York. Small crystal models of the Queen Mary moved along these lines each day, indicating the ship’s progress during the voyage.
Of course, ships did come with actual swimming-pools, and gymnasiums, daycare centers, libraries, barbershops, cafes, restaurants and dining-saloons. During the 1930s, ships also started having cinemas on board, showing the latest films. If you wanted to take in the sea air up on deck, you might take part in a game of deck shuffleboard in which you had to slide painted wooden pucks along the deck using a long wooden paddle. The pucks would slide along the deck and across a painted and numbered grid. The skill in playing deck shuffleboard was in knowing how much force to put into your push to get your puck to slide across the grid and get the highest score – not always as easy as you might think, if the ship was rocking and lurching in the waves.
There was no internet access back during the Golden Age of Travel, no WIFI. But that didn’t stop you from contacting friends and relatives thousands of miles away. Perhaps your ship’s been delayed by storms and you’ll be in New York a day or two late? No problem. Off you went to the purser’s office. Here, you were given a telegraphic form where you could send off a brief message to your friends via the ship’s radio.
Telegrams were charged by the word. For example, it might be a shilling for the first ten words, and then a penny for every word thereafter. Unsurprisingly, telegrams were sent as infrequently as possible and when they were, were kept as short as possible. After filling out the telegraphic form with your message and having paid the fee, the form was torn off the pad and sent up to the radio-room by messenger or by pneumatic tube. The form was rolled up, stuffed in a cylinder and rammed into a pneumatic tube. The air-pressure in the tube or pipe pushed the cylinder up to the radio-room where it was spat out and landed in a basket. The radio-operators would open the tube, take out the message, and transmit its contents to the nearest land-station.
For all its glamour, ocean-travel did not come without risks. Ships were in constant danger of crashing into each other, of running aground, and of course, of sinking. In 1942, the RMS Queen Mary was sailing as a troopship off the coast of Scotland when a rogue wave of an estimated height at least 90ft (approx. 28m) hit the ship broadside. The entire vessel rocked over 52-degrees, and the wheelhouse windows were blown in from the force of the impact. In 1934, the SS Morro Castle, steaming the New York-Cuba route down the Atlantic coast of the U.S.A. caught fire. One of the worst fires at sea, the ship beached itself near the coastline. Passengers who could not escape on a lifeboat (what few which were not burned or made inaccessible in the inferno) jumped overboard and swam to shore, or floated in the water waiting for rescue from passing boats.
The RMS Queen Mary in New York Harbor, 1961.
In 1925, the Cunard Line offices in New York received word that a terrorist bomb had been loaded on board the RMS Berengaria. At the time, the ship was over a thousand miles out at sea. A radio distress-signal was sent to the ship from shore-stations and the vessel was searched. Passengers were herded to their lifeboat stations under the pretext of a fire-drill. The bomb was never found and the threat later turned out to be a hoax.
When shipboard life was calm, however, it could be idyllic. If the weather was fine you might take a stroll around the deck. You might visit the ship’s library, listen to the ship’s band or orchestra, or relax up on deck in a folding, wooden ‘deckchair’. Deckchairs could be rented, or they could be reserved. If you spotted a deckchair in a particular spot that you wanted to use, a steward might tack a card onto it, saying that it was reserved for a particular passenger, that way, you wouldn’t lose your special place in the sun!
The relaxed, carefree nature of ocean liner travel, as well as the friendships and connections that might’ve been made during long voyages around the world was captured in a popular song of the period, simply titled: “On a Steamer Coming Over”, about a blossoming shipboard romance between two passengers previously unknown to each other. Other popular songs of the 1920s and 30s which glamourized the allure and romance of international travel included “A Slow Boat to China”, “On a Sunny Street in Singapore”, and “Nagasaki”. In the 1920s, with America officially under prohibition, the song “I’ll See You In C-U-B-A” (1920) recommended that frustrated Americans should “…plan a wonderful trip, to Havana, hop on a ship, and I’ll see you, in C-U-B-A…”
When a ship docked in New York, customs and health officers and pilots were ferried aboard to begin the docking procedures. After going through customs and ensuring that nobody on board was seriously ill, the ship was permitted to dock and passengers were allowed off.
The Transatlantic Crossing – Part III – The Sleeper Car
Perhaps after landing at New York, you haven’t finished your journey? Then what? Well, another train-trip, of course. From New York, let’s say you travel to Chicago, the Second City, and Mobster Central! To do this, you would head to Grand Central Station in Manhattan, and from there, board one of the most famous trains in the world: The 20th Century Limited.
The 20th Century Limited ran nightly expresses from New York to Chicago, leaving Grand Central at 6:00pm every night, and arriving at Chicago’s LaSalle Street Station at 9:00am the next morning. The 20th Century Limited was so famous, it was featured in a number of films. The train featured in ‘The Sting’ (1972) was the Century Limited. The train featured in ‘North by Northwest’ (1959) again, was the 20th Century Limited.
The Twentieth Century Limited, ca. 1907. Source: Wikimedia Common
To ride the Century Limited was one of the greatest experiences in Golden Era tourism. Catering to first-class passengers and wealthy businessmen, passengers riding the Century Limited were given the Red Carpet Treatment – literally. A broad, red carpet with “Twentieth Century Limited” printed on it in gold letters was run along the platform, parallel to the train, so that passengers could spot it easily and board it without confusion. It was from here that the expression to be given the ‘red carpet treatment’ originated.
Once on board the famous train, you had dinner in one of the train’s dining-cars, eating food prepared on board. The train left New York City at 6:00pm and travelled nonstop through the night. The train didn’t stop to pick up coal or water. Instead, it relied on track-pans – large steel troughs between the railroad lines which collected rainwater, (or if rainwater was not available, were recharged using pipes connected to a reliable water-source) to refill the boiler with water during the trip – a steam-powered vehicle requires more water than fuel when it’s in operation. Upon approaching a track-pan, a crank-and-screw mechanism was operated and a scoop was lowered from the bottom of the locomotive. The force of the train rushing over the pan forced water up the scoop and into storage tanks in the tender. Pipes then channeled the water into the boiler at the front of the train.
On an overnight train journey, dinner would typically be served on board. This wasn’t just some cheap snack-bar with packets of chips, hotdogs and chocolate-bars as we might expect today. Oh no, on the Century Limited, you were treated to a full, silver-service dinner, where passengers could choose from a menu of dishes cooked on board and served in the dining-car which was accessible from other parts of the train. After dinner, you might go to the lounge car or the bar for a drink, a smoke, a game of cards or a chat with friends. If you considered yourself too sleepy, you would retire to your assigned berth or compartment in your assigned cabin. Here, you could stretch out on a bed and relax.
Travel on trains like this wasn’t entirely primitive. You had running water if you had to wash up. And flushing toilets if you had to answer a call of nature (just so long as that call wasn’t while the train was in the station – toilets emptied their contents right between the rails in those days), but in the cramped quarters of railroad carriages, don’t expect to have a bath or a shower – that would have to be reserved for the end of your trip.
Once you arrived at your destination (in this case, Chicago), you alighted the train with your luggage. Depending on how much luggage you had, you might have stored it all in your compartment. If this wasn’t possible, then it was stored in the luggage-van at the back of the train. To offload all your trunks and suitcases and move them around the station, you might need a luggage-trolley. Not one of those tiny things that you see in airports today, a real trolley, capable of carrying up to half a dozen or more bulky, well-packed trunks, cases, boxes and suitcases.
In all, this is a journey that would’ve taken you roughly a week, depending on weather conditions and delays. And this was considered fast! To make connections faster and smoother, things like boat trains, steamship tenders, express services and nonstop water-filling on long train-journeys all aimed to cut out as many of the delays as possible, and give passengers a smooth, fast and comfortable journey as possible.
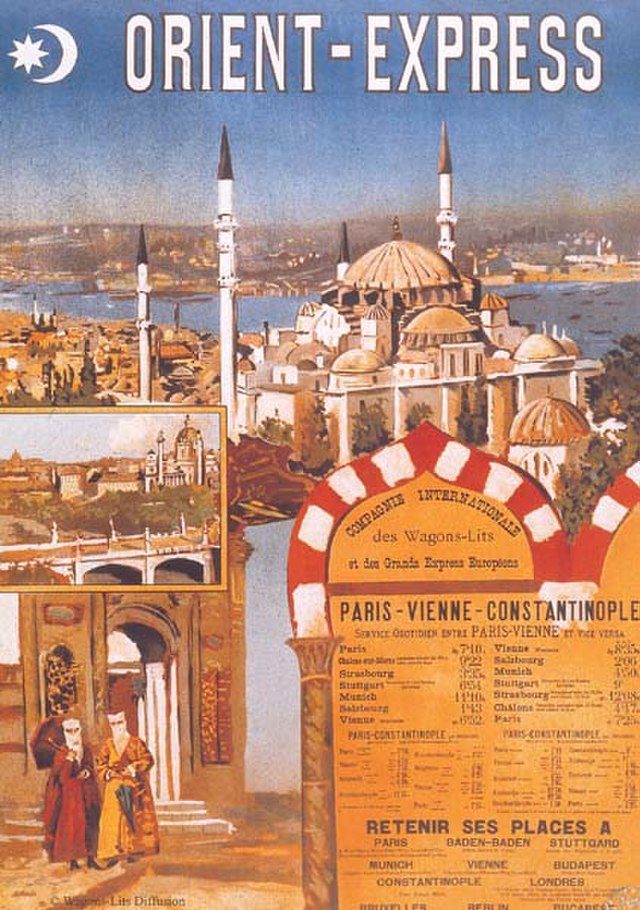
Trip No. 2 – The Orient Express!
About the Orient Express
Ask any group of people to name the most famous ship in the world, and the argument could go on until the end of time. The Titanic, the Olympic, the Berengaria, the Queen Mary, the Normandie…like a box of Whitman’s Samplers, it would be impossible to try and name them all!
Now, turn the question around. Ask any group of people to name the most famous train in the world. Almost at once, only one answer will come to the minds of most people: The Orient Express.
The Orient Express is a legend, a myth, and a time-machine. It has been running almost nonstop for over 100 years. It’s lasted through two world wars and the Iron Curtain. It’s been marooned in snowstorms, blown up by terrorist bombs, broken up, remade, threatened with closure and bankruptcy, and yet, somehow, it survives, and has outlasted almost all other famous trains in history. But what is it? A very valid question indeed, because the Orient Express is probably THE most confusing journey you will ever take in your life. Why? Simple.
Because there isn’t one Orient Express.
There are FIVE.
The first is the Orient Express, which ran from 1883-2009.
The next is the Simplon Orient Express, which ran from 1919-1977.
The third one is the Arlberg Orient Express, which ran from 1930-1962.
The fourth one is the EuroNight Orient-Express, which ran from 1977-2009.
The fifth one is the Venice-Simplon Orient Express, established in 1982 and which runs to this day as a period recreation of the original Express which ran the transcontinental route started back in 1883.
Confused, much?
On top of that, all these different Orient Expresses didn’t all run the same route. And they didn’t all run the whole route. And they didn’t always run all routes all the time. Routes depended on factors such as passenger-loads, public requirements and of course, the weather. But where and when did the Orient Express start?
Established in 1883, the Orient Express ran through Europe on various routes at various times. The most common short route was Paris, France, to Venice, Italy. The most common long route was the legendary long-haul train journey to beat all train journeys – London, England to Istanbul, Turkey. This is the route that is the most famous of all. It’s the route that everyone has heard about, read about, seen on TV and watched in movies. It’s the route where Hercule Poirot, travelling from Istanbul to London, has to solve the most baffling, famous and morally confusing case of his entire career, that of the ‘Murder on the Orient Express’.
Some might think that the Orient Express was supposed to go all the way to Asia, the ‘Orient’. It doesn’t, and never did. The name ‘Orient Express’ comes from the Latin ‘Oriens’ or ‘East’, so literally, ‘The Eastern Express’.
The original Orient Express ran from 1883-2009, with stops and starts and changes along the way. The Express was originally operated by the Compagnie Internationale des Wagons Lits, or ‘International Sleeping-Car Company’ in English. The running of the Orient Express was interrupted at numerous times throughout history, most notably in 1914, 1939, and in the 1960s and 70s during the Cold War.
But what was it like to ride the Orient Express back in the Golden Age of Travel? As it would be too confusing to pick through the minutiae and differences of all the different Orient Express trains, the trip presented here will be one which takes the best of all the Expresses, to give us a general feel of the whole journey. Now for the starting point: London, England.
The Orient Express – Part I – The Boat Train & Boarding the Orient Express
Route: London, England to Istanbul, Turkey
Expected Travel-Time: 3-4 days (dependent on weather)
Just like with any other international trip from Great Britain, your first stop was the boat train. This time, you caught the Continental Express boat train from London’s Victoria Station, to the docks on the south coast. From here, you caught the cross-channel ferry to France. Having arrived in Calais, you would board the Orient Express and ride it from there to its main embarkation point, which was Paris’s Gare de l’Est station, which was where it picked up all passengers not travelling on the Express from Britain.
The Orient Express near Constantinople, 1900
One thing you have to understand is that the Express was not a huge, long train of a dozen grand carriages, hauled proudly along by a gigantic, steam-powered, smoke-belching locomotive chugging ahead through the European countryside. At most it was only a half-dozen carriages at any one time. A typical layout of the Orient Express included the locomotive, its tender, a luggage-van, a couple of sleeper-cars, a dining-car, a galley-car, and another luggage-van. The train made frequent stops along its route, changing and shunting carriages and coaches all the time. Carriages were added and subtracted as the route required it, so that the train wouldn’t be overburdened. But we digress; back to the Gare de l’Est.
It was here (and always from here) that the Orient Express departed when it left from Paris. It left this station for the first time on the 4th of October, 1883, for its marathon run across Europe. The original eastern terminus was not Istanbul, but the port city of Varna in Bulgaria. Here, passengers had to get off the train and take a boat to Istanbul, then called Constantinople. It was on the 1st of June, 1889 that the first, uninterrupted rail journey from Paris to Constantinople was accomplished. Today, the modern Venice-Simplon Orient Express still leaves from the Gare de l’Est on its two different routes, to Venice and to Istanbul.
Paris Gare de l’Est, Paris, France, 2009. The main western terminus of the Orient Express.
The Express was not a daily service. It departed from London and Paris three days a week, (Wednesdays, Thursdays and Sundays) for either Bucharest, or Constantinople/Istanbul, depending on the day of the week. Travel-time took three-to-four days, depending on the weather and delays. If the weather was really bad, the train might not make it through at all. In 1929, the Express was trapped in a mammoth snowdrift that took rescuers ten days to dig out. This legendary event hit the newspapers and inspired Agatha Christie’s famous murder-mystery. It’s even referenced in the David Suchet TV production of the novel.
The Orient Express became wildly popular. Travel across Europe had previously taken weeks. Now, you could go from one end to the other in just less than a week! The Express became so popular that other trains with similar names started running similar routes across Europe, to pick up the excess passengers which the original Express couldn’t handle.
Sirkeci Terminal, Istanbul, Turkey. The eastern terminus of the Orient Express.
Whether you got onto the train at Calais, or Paris, what happened next?
Well, first you entered the station and presented your ticket. Your less important luggage was stored in the luggage-vans, and your more important cases were brought on board the train. You were assigned a carriage, and a compartment within that carriage – always a sleeper-car. Your steward (there was one steward for each sleeper-car, whose job it was to look after the passengers under his care) would show you to your compartment, put your luggage safely away, and then he would ask for your passport.
As the Orient Express was a transcontinental train, it passed through several borders and countries (thirteen countries in total!) At every stop along the way, border-officers would board the train to check the passports of each passenger. So that passengers wouldn’t be disturbed at every single border crossing, their steward would handle their passports, and present them to border-guards at each stop, where they would be checked and stamped with a minimum of fuss and disturbance.
A typical compartment on an Orient Express sleeper was very small. Designed to hold two people and their most essential luggage, it came with a double-bunk bed (which could be turned into a couch in the daytime by your trusty carriage-steward), electric lights, a call-button, a hook on the wall for your watch, to stop it sliding around, space for your luggage and clothes, and a closing wash-basin. All packed into a space 5ft wide by 8ft deep by about 8ft high! Pretty snug!
The Orient Express – Part II – Riding the Orient Express
Within the confines of about three or four passenger-carriages, the Orient Express had a surprisingly large number of features. You had electric lights, heaters, a call-button system, hot running water and cold running water provided by cisterns on board, and one flushing toilet per-carriage. But no shower, and certainly no bath! The Express was luxurious, but not that luxurious!
A carriage of the Orient Express in CIWL livery.
During your trip, your constant guide and assistant was your carriage-steward. He handled passports, answered questions, provided assistance, helped with your luggage and answered the light above your door if you called for assistance. But for all his efforts, your poor steward didn’t get too much in return!
For all the services that the carriage-stewards provided, they had almost no personal space of their own. At best, they slept in small, cramped quarters at the end of the carriage, or if not even that, then on padded benches or chairs out in the corridor at the end of each carriage. From here, they could monitor the service-lights above each compartment door, and help passengers if they exited their compartments.
A poster advertising the Orient Express
The Orient Express did not run one route. It ran several routes of varying lengths, with terminations in Athens, Paris, Calais, Venice and Istanbul. Common stops along the longest Express routes included Venice, Krakow, Budapest, Vienna, Belgrade, Munich and Bucharest, until the train finally arrived in Istanbul. The train was a popular mode of transport for the rich and famous. Authors, actors, musicians, dancers, and artists all travelled on the Orient Express. So too did diplomats, since the Express ran through many major European cities. It was also popular with British colonial officials hoping to reach India as fast and as comfortable as possible.
The three-and-half-day journey of the Orient Express meant that comfort and luxury had to be part of the package. Passengers weren’t going to pay to go on just any train if it didn’t come with some sort of draw-card. On the Orient Express, you were served meals cooked fresh and hot in the kitchen-car, which were served in the dining-car. The train was restocked at each stop along the way, so that the kitchen could be cleaned out and empty containers thrown away. Whenever the train stopped at a station, you could get out and send telegrams or letters from the station’s telegraph office or nearby post office, and have opportunities to take photographs and stretch your legs.
At the end of three-and-a-half grueling days, you would arrive at your destination. The eastern terminus for the Orient Express was the Sirkeci Terminus in Istanbul (or ‘Constantinople’ during the early years of the Express). From here, you could travel to countries like Egypt, Persia (Iran), India, Palestine (Israel), or sail further on towards Asia, reaching countries like Ceylon (Sri Lanka), Siam (Thailand), Burma (Myanmar) or the colonial holdings of the Straits Settlements (Malaysia & Singapore), the Dutch East Indies (Indonesia) or French Indochina (modern-day Vietnam).
Come Take a Trip in my Air-Ship!
One of the most powerful and enduring symbols of the Golden Age of Travel was the new kid on the block: Airships!
Controlled, powered air-transport had been a reality ever since 1852, when French inventor Henri Giffard took to the skies in the world’s first powered airship. This crude technology was a full fifty-one years before the Wright Brothers made their legendary flight at Kittyhawk in 1903. The Wright Brothers were not the first people to fly. They were not the first people to attain controlled flight. They were the first to do so successfully in an airplane. Airships predated them by half a century!
It was because of this that in the early 20th century, most people put great expectations upon the airship to be the air-transport king of the future! Flimsy airplanes with tiny engines, wooden frames stretched over with cloth and strung together with wires couldn’t possibly transport great numbers of people in speed, comfort and safety! But an airship, floating gracefully through the air, powered along by its propellers, looked big, sturdy and capable, although this was mostly due to publicity rather than fact. Early airships were slow, inefficient and lacked sufficient lift to make them effective modes of transport. In the 1880s and 1890s, experiments were made using batteries (which were too heavy and inefficient), and first-generation internal-combustion engines, which were too slow. It would not be until the turn of the century that the first real strides in airship technology allowed for practical transport.
Throughout the Edwardian era, airship technology, a pet project of Germans such as Count Ferdinand Von Zeppelin, and Hugo Eckener, continued to advance. Nonrigid airships (‘Blimps’, we’d call them today) were phased out in favour of dirigibles, or rigid-frame airships, where gas-bags were inflated inside a rigid frame with fabric stretched over it. Airships remained largely experimental until the end of the decade, when the first flights of significant distance were achieved, first across Germany, and then across the European continent. In October, 1910, the first ever airship, the Clement Bayard II, managed to fly from Europe to Britain and made aerial-transport history. The airship captured the imagination of the travelling public like no other form of transport before it. In 1904 the song: “Come take a Trip in my Air-Ship” was published, many years before the airship became a popular form of long distance transport. Despite this, the song’s lyrics spoke of fantastical trips far beyond the vehicle’s capabilities at the time.
The first successful passenger-carrying airships started taking to the air around this time. This growth in confidence and advancement in technology led to the establishment of airship companies towards the end of the decade. In 1908, the Zeppelin Company was established in Germany, headed by Count Ferdinand von Zeppelin. In 1909, DEFLAG, or the German Airship Transport Company, was established. DEFLAG stood for Deutsche Luftschiffahrts-Aktein-Gesellschaft, the company’s name in German.
Between the 1900s until the start of the First World War in August of 1914, the Germans had established the world’s first commercial passenger airship companies and a network of routes and airship fields around Germany. German expertise with airships was growing, and growing enough for them to start using airships in bombing raids.
In 1915 during the First World War, airships were used in the first long-range bombing missions ever carried out in wartime over a civilian population. London, although almost out of the effective range of airship technology at the time, was still a big target. The British were largely unprepared for this new form of warfare and had to hastily adopt strategies for attacking and destroying German military airships, as well as warning the public of air-raids (this led to the post-war creation of Air Raid Precautions in 1924). Airships, for all their size, had a notorious Achilles Heel – the fact that they were inflated with highly explosive and flammable hydrogen gas. British fighter-pilots took advantage of this by firing incendiary bullets at the airships as they flew past them in their primitive combat biplanes.
Despite the death and destruction wrought by the German ‘Baby-Killers’ as they were called by the British propagandists during the First World War, airships became wildly popular in the post-war era. By now, Friedrichshafen in Germany was the name that everyone associated with airships. It was where they were built, launched from, and where passengers travelled in order to board. With airplanes still being little more than open air, unpressurised biplanes – unreliable at best and lethal at the worst of times, airships stood to take on the rising market in international air-travel.
The golden age of the airship was truly the Roaring Twenties and the 1930s. Although other countries such as America and Britain had attempted to establish airship programs, either for passenger transport or for military purposes, only the Germans really succeeded in either of these endeavours. The British airship program ended in disaster with the crash of their most famous airship, the R101, in 1930. Similar disasters marred the American airship program in the years to follow. The result was that by the mid-1930s, only the Germans were still operating regular passenger airship routes. Their most famous was airship LZ-129, better known as the Hindenburg.
Trip No. 3 – LZ-129 Hindenburg!
Route: Frankfurt, Germany, to Lakehurst, New Jersey, U.S.A.
Expected Travel-Time: 2½ days (3 days if you were flying Germany to South America)
The Hindenburg – Part I – Boarding the Hindenburg
If the rigid airship or dirigible was the symbol of cutting-edge transport technology in the 1920s and 30s, then the Hindenburg was rightly considered the flagship of this new glamorous and new-age technology – the most famous airship of its age, and of any age. The Hindenburg was to be the pride and joy of the Zeppelin Company, and its design and appointments were expected to rival even the most luxurious of the transatlantic ocean liners chugging across the ocean over which it glided, free of the dangers of Atlantic storms, icebergs, and wrecks with other vessels. It symbolized a bold, new post-war age of scientific advancement and technological skill. But what was it like to ride on? To find out, let’s take a typical flight on the Hindenburg. This would’ve been from Frankfurt in Germany, to Lakehurst, New Jersey, in the United States, a trip that typically took two-and-a-half days.
The Hindenburg’s departures were remarkable events. Docked on the ground, and tethered off, passengers would have their tickets clipped and their luggage loaded on board. As an obvious safety-precaution, passengers’ cigarette-lighters and matches were confiscated upon boarding. You were not allowed to use them, you were not allowed access to them, and you would only get them back at the end of the trip. Smoking in unauthorized parts of the airship was forbidden. Any fire could rapidly get out of hand, and if it did, the risk of explosion was high.
That’s not to say the Hindenburg didn’t have water on board – Water was stored in ballast-tanks and cisterns on board. These tanks controlled the ship’s weight and speed of descent and ascent. At the appropriate time, water was jettisoned from the ballast-tanks, and the tethers and ropes holding the airship down would be released. The Hindenburg floated into the air so quietly and noiselessly that many passengers on board never noticed the takeoff. On many occasions, passengers would ask the stewards why the airship had not yet left the ground! In reply, stewards would simply tell the passengers to look out the window, and they would see that they were already well on their way!
Despite the airship’s size, only a small percentage of its space was given over to passenger and crew accommodations. The majority of the airship’s space was taken up by the metal framework, maintenance shafts and corridors, and the huge gas-bags, which gave the airship its lift. Passenger and crew-quarters were limited to the small cabins or ‘cars’ underneath the airship. The airship had an auxiliary control-car at the rear, a main control-car at the front, and the large combined (but segregated) passenger-and-crew accommodations between them. The ship was powered by four ‘engine-cars’, two slung out on each side, with large propellers to power the ship through the air. They were kept well away from the passenger and crew-quarters, to cut down on noise interference.
Fully loaded, the Hindenburg could house seventy-two passengers in comfort. They were broken up into pairs, and each pair shared a cabin with a double-bunk bed and wash-basin with running hot and cold water. Cabins were housed on A-deck, along with the airship’s promenade area, dining-room, and lounge, complete with grand piano for passenger entertainment. Below, on B-deck, were the mess-rooms for officers and crew, the airship’s kitchen, bathrooms and toilets, the airship’s bar, and beyond the bar, the smoking-room.
The Hindenburg allowed only one functioning cigarette lighter on board, to cut down the danger of fire and the subsequent risk of igniting the hydrogen gas in the gas-bags above. This single cigarette-lighter was an electric one which was fixed to the central table in the smoking-room. To make the room as safe as possible, there was even a double-airlock door between the smoking-room and the rest of the airship.
To look after you once the ship got underway, the Hindenburg had forty crew and officers, and a dozen stewards and cooks to see to passenger comfort and cook the food for all the passengers, officers and crew. Officers, the captain and passengers all ate in the same dining-room.
Food on the Hindenburg was prepared fresh every day. The airship featured an electric stove, roasting and baking ovens, an ice-maker, and a refrigerator. A typical crossing would see the ship’s chef cook his way through 440lbs of meat and poultry, 800 eggs and up to 220lbs of butter!
The Hindenburg – Part II – Travelling on the Hindenburg
The Hindenburg represented the pinnacle of early 20th-century air-travel. It was dignified, smooth, quiet, classy, modern, and comfortable. Airplanes by comparison were considered cramped, noisy and uncomfortable. Given a choice, most people would probably have flown anywhere in an airship, and the world expected these graceful, mechanically-powered balloons to transport people everywhere in style and comfort. The spire at the top of the Empire State Building in Manhattan was originally designed as an airship-dock, although this was later deemed to be so unsafe that the idea was scrapped.
A voyage on the Hindenburg took from 2-3 days, depending on the destination: either Rio in South America, or New Jersey in the United States. Passengers on board could kill time in the smoking-room, the reading-and-writing room, or the lounge. Passengers wanting a drink could go to B-deck, and visit the bar, located next to the smoking-room.
If you wanted to enjoy some music during the voyage, the Hindenburg’s grand piano was available for any and all musically-gifted passengers. This piano might be considered unique in the history of piano-manufacturing. Due to the strict weight-limits that governed the Hindenburg’s maneuverability and lift, the majority of this piano (a baby grand) was manufactured out of aluminum, to make it as light as possible! Even the legs were made of hollow aluminum tubing, to cut down on weight. The instrument’s weight was just 162kg, remarkably light for a piano!
Passengers on the Hindenburg could get amazing birdseye views of the seas and landscapes below by looking through the downward-angled windows on either side of the main cabin.
On opposite sides of the main cabin, both the dining-room and the lounge offered amazing views of the earth below, through down-facing windows. Passengers could lean on balustrades and handrails on the outer sides of these two rooms, and look down through the glass at the world passing by beneath them. If you had a camera on hand (and some passengers did bring them), amazing views of the world from above could be taken from these vantage points.
The Hindenburg – Part III – Landing the Hindenburg
Landing a modern jumbo jet is a fairly straightforward affair. After receiving clearance from air-traffic control, a plane lines up with a runway, slows speed, drops its landing gear, extends flaps and thrust-reversers and touches down, sometimes as smoothly as a landing feather.
Landing a huge airship like the Hindenburg was a significantly more challenging procedure. Here is how it happened:
Once the Hindenburg had been cleared for landing by radio, it would make for the mooring-area – on trips to the United States, this was the Naval Air Base at Lakehurst, New Jersey. The crew on board the Hindenburg would drop mooring-lines out of the airship’s body and ground-crews would grab them and physically pull the ship towards the mooring-mast. A main, central mooring-cable was dropped from the ship’s nose, and this was affixed to the mooring-mast. The cable was then winched in, drawing the ship towards the ground. The extra mooring-lines held by ground-crews would stop the airship from blowing off-target as it was being winched to the ground.
As the airship descended, water from its ballast-tanks would be released. This was to lessen the ship’s weight, and to reduce the chances of the airship crashing to the ground if it landed too heavily. Once near to the ground, mooring-lines would be made fast, and then the stairs and hatches under the airship could be opened so that passengers and crew could get out.
Landing the Hindenburg at Lakehurst in 1936
Bags were unloaded and sorted. Every passenger on the Hindenburg had his bags marked with a company stamp. On the stamp was a letter corresponding to the first letter of his surname. Bags were unloaded and sorted alphabetically, so that passengers could find them more easily. After a two-and-a-half day journey floating across the Atlantic, your trip on one of the great marvels of the Golden Age of Travel was over.
The End of the Golden Age of Travel
The Second World War signaled the beginning of the end of the Golden Age of Travel. The powerful changes caused all over the world by this conflict meant that it was impossible to revive the glory days of travel that had existed before the war. Too much had happened and too much had changed or been lost forever, to make this possible. And it would be decades before anything even resembling a tribute to the Golden Age of Travel would be possible once more. Technological changes, as well as political and geographical ones would further speed the end of the Golden Age, as old forms of transport were replaced with new ones, and a whole new way of travelling swept across the world in the 1950s.
Countries once open to travel, like China, were now closed. Ravaged by war and internal political strife, the decadence and grandeur of pre-war Shanghai was lost forever after the Japanese invaded the International Settlement on the 7th of December, 1941 – the Day of Infamy. Foreigners fled the city by the shipload, and one of the most popular tourist spots in the world was abandoned almost overnight. It would be another forty years before Shanghai would open up to the West again, when the Americans re-established their consulate in Shanghai in 1980.
The Dutch, French and British Empires were rocked by powerful independence movements, especially in French Indochina (Vietnam), the Dutch East Indies (Indonesia), India and Malaya. This made travel to the Far East unwise at best and dangerous at the worst of times. European countries like Germany, Austria, Italy, Denmark, the Netherlands and Greece were heavily bomb-damaged. Malaya and Singapore were still recovering from the Japanese occupation.
The original Hotel Adlon, opened in 1907. Berlin, 1926, near the Brandenburg Gate.
Hotels from the Golden Age which once boasted famous journalists, actors, artists, politicians and diplomats as their guests, had been burned down, shelled or destroyed entirely during the War. The Hotel Adlon in Berlin, a popular haunt of foreign journalists and international celebrities in pre-war Germany, was badly damaged during the Russian occupation of the city. The Adlon has since been rebuilt in a style closely resembling the original hotel, and on the original site that it has occupied since it was opened in 1907. It was from the balcony of his room at the rebuilt Hotel Adlon, that Michael Jackson famously dangled his son, in 2002. However, the Hotel Adlon is a rare example of the Golden Age reborn. Most Berlin hotels destroyed by enemy air-raids or cannon-fire were not rebuilt after the War.
Destroyed by Russian artillery-shells and fire in the Second World War, the rebuilt Hotel Adlon opened in Berlin in 1997, 90 years after, and on the same site as the original. Source: Wikimedia Commons
In Singapore, the world-famous Raffles Hotel was taken over by the Japanese when they overran the island. With the Japanese surrender in 1945, officers committed suicide in its rooms. In 1942, at the start of the occupation, Raffles’ waiters had dug a huge pit in the gardens and threw in the hotel’s silverware and buried it, hiding it from the enemy. When the war ended, the hole was dug up, and the silverware was retrieved, cleaned and put back into service. One of the items dug up was Raffles’ solid silver antique carving-trolley, used to present and serve the Sunday roast. After being carefully restored, it’s still used in the hotel today!
The rise of communism and the Eastern Bloc in Europe meant that as soon as the Second World War was over, it was replaced by the Cold War. And countries and cities which might once have been popular tourist destinations, like Poland, and the Free City of Danzig, were increasingly difficult to visit because of the ‘Iron Curtain’, a word coined by Winston Churchill. The rise of the Iron Curtain also put an end to the traditional Orient Express. It continued to run, but it would be the 1990s before it could reopen its classic London-to-Istanbul route once again.
Airplanes now replaced ocean liners as the main means of intercontinental travel. The disastrous crash of the airship Hindenburg in 1937 and the subsequent Second World War forever squashed any ideas of airships being the primary mode of air transport around the world. Airplanes were faster than airships and ocean liners, and much cheaper. Before long, many shipping companies were sending their ships to sea with half or even one-third capacities. It wouldn’t be until the Queen Mary 2, that grand, ocean liners would cross the seas of the world in grandeur and style once more.
By the 1960s, grand ocean liner travel was something of the past. Ships like the Aquitania and the Queen Mary were either too old to run, or too expensive to rebuild or maintain. Competition from airports and airlines meant falling passenger numbers. And shipping lines could no longer get enough revenue from fare-paying passengers to keep their expensive seagoing ships in good repair. Famously, the Aquitania suffered structural failures late in her career. Corrosion, leaking decks and ceilings and rotting timberwork and unsafe floors resulted in a spectacular incident involving a piano falling through the deck into the dining-room below!
Airports replaced seaports. Luggage restrictions, security scares, hijackings and terrorist plots shaped the travel experience that we have today, and the era of relaxed, glamorous travel which we’ve seen in movies, novels and TV shows vanished forever.
Sources used in thewriting of this posting included:
ARCHBOLD , Rick – “HINDENBURG – Reliving the Era of the Great Airships – AN ILLUSTRATED HISTORY” – Weidenfeld & Nicolson, Orion Publishing Group, London (1994) – Illustrations and artwork by Ken Marschall.
DANKER, Leslie – “Memoirs of a Raffles Original”, Angsana Books, Singapore (2010)
DONG, Stella – “Shanghai – The Rise and Fall of a Decadent City”, Perennial, New York, U.S.A. (2001)
KRASNO, Rena – “Once Upon a Time in Shanghai: A Jewish Woman’s Journey through 20th Century China”, China Intercontinental Press, Beijing, China (2008)
MATTEOLI, Francisca – “WORLD TOUR – Vintage Hotel Labels from the Collection of Gaston-Louis Vuitton” – Abrams, New York, U.S.A.
SERVER, Lee – “The Golden Age of Ocean Liners”, Todtri, U.S.A., (1996)
“Great Journeys – Travel the World’s Most Spectacular Routes”, Lonely Planet, Victoria, Australia (Aug. 2013)
http://www.airships.net/– One of the most comprehensive web-sources out there, on the history of airships and the Hindenburg – Accessed 25th, June, 2014
From powder-monkeys to newsboys, climbing boys to pages, what are some other jobs that kids used to do back in the days? Join us once more as we go through the job-listings available to young children throughout history…
Tweenies
Since time immemorial, children have had jobs in domestic service.
One of those jobs was that of the “Tweenie”.
“Tweeny” or “Tweenie” came from the job’s actual title: a Between Maid.
A between maid was the maid or servant-girl who worked down in the servants’ quarters of a large household, passing messages and orders around between the butler and the housekeeper, or the housekeeper and the cook, or between the cook and the butler, or between the under-butler and the butler…you get the idea. She also had to move between the pantry and the kitchen, between the kitchen and the servants’ hall, for setting and clearing awy the dining table, or to help serve meals, and so on.
Having to constantly move from one part of the house to the other to pass messages, fetch, carry, move, watch something or follow various orders, usually between one senior servant and another, it’s little wonder that the girls became known as “Tweenies”.
The “tweenie” died out in the early 1900s when grand houses with large staff started becoming obsolete, but in their heyday, a tweenie was almost always a young girl, between the ages of 10-15.
The Hallboy
If the poor tweenie ever felt lonely in her job, then she at least had companionship from another youth in the same position: The hallboy.
The hallboy was the lowest-paid and lowest-ranking male servant in a grand household. And he was almost always one of the youngest. Unlike the pageboy, the hallboy could only ever dream of dressing up in a smart uniform, and swanning about upstairs answering summons to deliver letters, collect parcels, fold the newspapers and deliver the master’s telegrams.
The hallboy did all the unenviable grunt-work in the house. In fact, he did so much work that he didn’t even get his own room! The name “hallboy” comes from the fact that he worked (and sometimes even slept!) in the servants’ hall, the dining-room or common-room where servants hung out for their meals or relaxed during their off-time.
Other servants – the butler, cook, housekeeper, valet, etc, all got their own rooms. Hallboys were lucky enough to get a bed! Not that they used it much – hours were long and the work was never-ending.
The stove needs more coal? Get the hallboy to do it.
The study fireplace needs more wood? Get the hallboy to do it.
The trash needs emptying in the kitchen? Hallboy.
The boots and shoes need cleaning up? Hallboy.
Polishing the brassware? Cleaning the windows? Sweeping the floors of the servants’ quarters? Fill the lamps? Trim the wicks? Replace the candles? Hallboy, hallboy, hallboy.
It was an exhausting and thankless occupation, but compared with some of the other jobs that kids did back in the 1800s, it was at least relatively safe and clean. If they showed aptitude, some hallboys might one day become footmen, and then butlers or valets, earning more money, and gaining more trust and privileges from the family which they served. Hallboys, like Tweenies, died out in the 1900s when wealthy families with huge private staffs started to dwindle.
The Coal Hurriers
In my previous posting about the jobs that children have done throughout history, one of the most dangerous I mentioned was that of the climbing boys, or the child chimney-sweeps which scrambled up inside chimney-flues to sweep and knock down the ash and soot that had clogged up the insides of chimneys.
Well – at the other end of the chain was another boy!
Coal hurriers were children – some as young as three or four years old! – who used to drag, push, and pull carts or sleds of hacked-off coal from the coalface to the mouth of a mine-tunnel…for up to twelve hours a day. Full carts or sleds out, and empty ones back in. Back and forth, over and over, in near pitch-blackness, covered in dust and breathing in fumes. And just like their adult-counterparts, these children were in constant danger of things like fires, coal-dust explosions, suffocation from gas-leaks, drowning if they dug below the water-table and the pumps failed – and the most feared fate of all: A cave-in.
Just like their brethren, the climbing boys, the hurriers worked in amazingly filthy environments. The sweat, the dust, the grime, the heat, the jagged rocks and coal-seams all made working in the mines extremely dangerous and unpleasant. So, like the climbing boys – the hurriers had a solution for that – and it was the same one the climbing boys had – work butt-naked!
Sending kids down the mines remained a common practice right up until 1842 in the UK, when the practice was finally outlawed.
Sweated Tailor
Sweated tailors were the poor (usually immigrant) tailors who worked in making clothing for the poor and working-classes. The places where they worked is where we get the term ‘sweatshop’ from today. Back in the 1800s, they were given piecework jobs to do by big clothing factories, and it was often the job, not only of the tailor, but of his wife, and yes – his kids – to turn out the orders.
Piecework is very simple: The more pieces you make, the more money you earn. This meant that you could be working for hours and hours and hours! Factories often sent out massive piecework orders or quotas which had to be fulfilled. These factories recycled clothing and cloth which had been thrown out or discarded in some other way (like off-cuts from the more fashionable tailoring houses in Saville Row!), and the fabric was shredded, washed, sorted, and then respun into new cloth.
This cloth was called “shoddy” and was used to make clothes for the lower-classes – clothes cut and sewn by the sweated tailors and their children.
Ever heard the term “Shoddy”, meaning something cheap, poorly-made, something of no real quality, and which just falls apart? This is where it comes from – cheap, secondhand cloth, used to make cheap, secondhand clothes.
Being a pieceworker was one of the safer jobs that kids used to do, but the work was fiddly, long, boring and tedious. That said, tailors were among the better-paid pieceworkers – with their earnings, they could save up a few pennies or shillings after each work-order and eventually buy a sewing-machine which would speed up their output. The real drudgery with piecework came from things like toy-making, or making fake flowers, or other pointless fripperies which were sold dirt cheap anyway – the kinds of jobs which took no skill at all. Tailors at least, had the pride of knowing that they were skilled labourers who did specialised work. But it was still hard.
Piecework for children started dying out in the later 1800s, when the education acts came in. The first of these was the 1870 Education Act, which said that schooling was now compulsory for all kids between the ages of 5 – 13.
Closing Remarks
So, were these all the jobs done by kids in the past? Certainly not. But they are some of the most memorable, notorious, and infamous ones. There were loads of others, from match-sellers to cotton-mill boys and girls, to the telegraph boys who pedaled around on their bicycles delivering messages. When it came to labouring jobs of almost every description, children (usually, but not always boys) were expected to work alongside men – for the same hours, doing similar work, but for half the pay.
In many cases, it took generations and decades of effort to end the practice of child labour – in the developed world, at least. some of the children who grew up as child-labourers became social reformers and campaginers in the 1900s, and fought for the right of children not to be exploited and abused. To give you an idea of how long this took – in the UK, the Royal Society for the Prevention of Cruelty to…Animals – the RSPCA – was founded in 1824.
By comparison, the National Society for the Prevention of Cruelty to Children (NSPCC) was not founded until…1884.
Want to Know More?
Much of the information used in these postings came from:
“The Children Who Built Victorian Britain” “SERVANTS: The True Story of Life below Stairs” “The Worst Jobs in History”.
All excellent documentary film series, and well worth watching.
In developed nations in the 21st century, we expect children to have a pleasant fun-filled, loving childhood, to go to school, to learn, develop and blossom, to be safe and carefree, and to enjoy life, build memories, skills and experiences.
We’re so used to this idea of childhood that it’s easy to forget that as recently as two or three generations ago, children having to work for a living, to earn money at a job to support themselves or their families, was not only common, but legal – something which certainly isn’t true, or encouraged in the modern world.
In this posting, we’ll be exploring the wide variety of jobs that children have done throughout history (Ah! See that? That’s why this blog has the title that it does!), and what happened to make these jobs obsolete or illegal.
These jobs will not be in any particular order, and can come from any period of history. Let us begin!
Link Boys
It’s after sundown. The streets are cold and damp and windy, and you need to head home after a long night out at the theater, or at your club, or perhaps you spent the evening at a tavern or restaurant with friends. Either way, it’s time that you made your uncertain way back to your own front door.
In the dark.
With nothing to light your way.
No candles, no oil lamps, no streetlamps, no moon…how on earth are you going to make it even six feet without tripping over something?
Enter the link boy.
A link boy and his customer
From the Middle Ages, right into the early 19th century, streetlamps were few and far between…if they existed at all…and after sunset, it was extremely common for streets to be plunged into near complete-darkness. Traveling through town at night was a perilous business. You could be run over by a horse and carriage, you could be mugged, raped, stabbed, or even murdered! It was in this environment that young boys carrying flaming torches or flambeaus, could earn a living by lighting streets and pathways, walking alongside their customers to light their ways home in the dark. They became known as “link boys”, after the “links” (flaming torches) which they carried.
Being a link boy was a cold, dangerous, thankless job. You spent all night outside, sometimes in miserable weather, you survived on tips, and you ran the constant risk of being assaulted, raped or molested. Despite this, link boys could earn a decent wage, if they worked in a busy part of town. They were nicknamed “Moon Cursers” because on nights when there was strong starlight or a full moon, their services were less likely to be required, and so they would earn less money.
Link boys died out in the later 1800s, when oil (and later, gas)-fired streetlamps became commonplace.
Climbing Boys
These days, chimney-sweeping is a highly romanticised job. It’s considered good luck for a bride to spot, meet, shake hands, or even be kissed by a chimney-sweep on their wedding day (and some sweeping companies even hire themselves out for this purpose!), but back in the 18th and 19th centuries, being a chimney-sweep was one of the most dangerous, and demonised occupations out there, and one of the most notorious child labouring jobs of all time was that of climbing boy.
Climbing boys were child apprentices of adult chimney-sweeps, purchased from workhouses, or adopted from poor families, and raised to be the master sweep’s assistant.
These child chimney-sweeps led miserable, dangerous, and tragically short lives. Although laws were supposed to limit the age at which a boy could be hired for this sort of work, it wasn’t uncommon for children as young as six, five, or even four years old, to be used in this way.
Climbing boys had the unenviable task of scrambling up inside a fireplace, and climbing up into the flue, with a brush in one hand, to scrape, brush and knock down all the soot and ash which had caked the interior of the chimney. The ash and soot was then collected by the sweep, bagged up, and carried out of the house.
Sweeps didn’t actually charge for their services – they went around town offering to sweep chimneys for free. The money they made was from selling-on the ash, dust and other waste-products generated by millions of fireplaces across big cities such as London, Paris, and New York to farmers, gardeners and brick-makers.
Climbing boys worked in phenomenally cramped, dusty, dangerous and claustrophobic conditions. They suffered from skin-rashes, breathing conditions, burns, infections, falls, and the most feared of all – being trapped inside a chimney and suffocating to death. If a child did get trapped inside – well – that was it. There was almost no way of getting the boy out, short of smashing the wall apart with axes and sledgehammers. As Sir Arthur Conan Doyle observed in one of his famous Sherlock Holmes stories:
“The wind cried and sobbed like a child in the chimney”.
– Dr. Watson, “The Adventure of the Five Orange Pips”
To try and protect themselves from this terrifying fate, climbing boys did everything possible to reduce their chances of being trapped inside chimneys. Clothes were a particularly dangerous hazard. They could tear, they could snag, they could get caught on rough brickwork and they could cause a boy to be irretrievably wedged inside a chimney-flue. To try and get around these risks it was common practice for climbing boys to work sans-clothing. That’s right – they worked butt-naked, with nothing to cover them except a thick layer of soot once they were done.
As if this wasn’t bad enough, climbing boys were often horribly abused. Kids who couldn’t climb or work fast enough were often punished by their masters. If a boy couldn’t climb up the chimney fast enough to sweep down all the soot, then the master sweep might start a fire in the grate…yes, in the fireplace that was having its chimney being cleaned…right now…and the heat of the fire and the smoke would ‘encourage’ the boy to climb faster, and work harder.
Ever heard of the expression of “lighting a fire under your ass” to get someone to work faster?
Now you know where it comes from.
If that wasn’t bad enough, climbing boys even had to climb up chimneys which were…wait for it…on fire! An uncleaned chimney was a fire-hazard because the cinders and sparks going up the chimney could ignite the creosote and soot that was stuck to the insides of the flue. This would start a fire in a part of the chimney where no fire was ever supposed to be. The extreme heat could set the roof on fire, and eventually burn down the whole building!
Putting out these chimney-fires with a wet towel or blanket was another terrifying duty of climbing boys.
The conditions for child chimney-sweeps were so dangerous that over a period of nearly 100 years, between 1788-1875, at least FIVE acts were passed through the British Houses of Parliament to try and outlaw the practice, but every time a new law was introduced…it was simply ignored! As was observed in Charles Dickens’ famous novel ‘Oliver Twist’:
“Young boys have been smothered in chimneys before now!”
– Oliver Twist, by Charles Dickens.
One of those young boys was George Brewster, who got trapped inside a chimney in a ward at Fulbourn Mental Hospital. His screaming could be heard all over the hospital and despite attempts to get him out (they smashed the wall open with sledgehammers to get him free) he died shortly after. This was the last straw. His master sweep was convicted of manslaughter, and a law was finally passed to make the act of sending people up chimneys illegal.
Powder Monkeys
The 1700s and 1800s was the heyday of sailing warships. This was the time when Britannia really did rule the waves. The British Royal Navy was the most powerful entity in the world, taking on the French, the Dutch, the Spanish and the Americans in wars that stretched across Europe and the world. Cannonballs and grapeshot, canisters and chains were fired from the muzzles of English guns, obliterating their enemies and destroying their ships!
British gun-crews were trained brutally hard, and were expected to be able to load and fire a cannon every ninety seconds! But all this speed, efficiency and fighting prowess relied not on sweat or muscle or timing…but on the shoulders of a little boy.
To fire a gun, you first need gunpowder. On a sailing warship, gunpowder was stored in the Magazine, a copper-lined room at the bottom of the ship below the waterline. To get the powder (stored in casks and bags) from the magazine to the gun-decks required dozens of children running back and forth between the magazine and the gun-deck with their little powder-flasks, carrying charges of gunpowder.
Their constant scurrying and running around earned these boys the nickname of “powder monkeys”, and it was their job to be as efficient as possible when it came to getting powder from the magazine up to the guns. When the ship wasn’t fighting, the boys served as cabin-boys or stewards’ mates, or servants to senior officers, but the moment the call to action was announced, they were expected to drop everything and run for the magazine. Powder monkeys risked being blown up, maimed, being injured and having their limbs amputated, or else killed outright, but they worked knowing that if their actions led to the enemy ship being captured or put out of action – they could win a share of the prize-money!
While their job could be extremely dangerous, powder monkeys were vital to the running of a fighting frigate, so they were often well cared-for, well-fed, and even taught their lessons by a senior officer who would’ve doubled as a schoolmaster when aboard ship. The chance of making their fortunes at sea was what encouraged many of them to sign on. If they were lucky enough to work for a skilled and successful captain, their share in the prize-money could set them up for life, and they could rise through the ranks and become a captain themselves one day.
Midshipmen
Powder-monkeys and cabin-boys weren’t the only kids to be found aboard warshpis in the days of fighting sail – oh no! Some of the youngest kids around actually held officer rank!
In the Royal Navy in the late 1700s and early 1800s, if you wanted to become a captain and commander, you had to climb the slippery slope of officer training and pass the tests to prove that you had the smarts and the know-how to be able to manage your own ship. And this all started as a Midshipman at the wizened age of…twelve. In fact, it was so common for midshipmen to be teenaged or even pre-teen boys, that they were nicknamed “Snotties” by the crew!
A midshipman was a junior or trainee-officer aboard a fighting frigate or Man o’ War sailing ship. Their jobs included passing orders between other officers (such as the captain and his lieutenants), directing sailors, or even ordering the firing of the cannons and controlling their gun-crews during battle. And they were expected to do all this starting at the age of twelve!
By the late 1700s and early 1800s, midshipman training lasted for three years, and to be eligible to stand for examinations for the next rank up (Lieutenant) those same midshipmen had to have had at least six years’ experience at sea. Given that the average age of midshipmen was between 10-13 when they started, that meant that they could become a lieutenant before they reached their 21st birthdays!
As almost all midshipmen started as children or young teens, you might wonder how they ever ended up on ship in the first place? Most midshipmen came from families with money, status, or with a naval or military background. Usually, their fathers, uncles, older brothers, or cousins, also served in the Navy, and put in a good word with their commanding officer that here was a likely lad who desired a life at sea! This was how Horatio Nelson started at sea in 1771, when, at the age of twelve, he began life as an ordinary seaman aboard the HMS Raisonnable, under the command of Captain Maurice Suckling!…who also happened to be young Horatio’s uncle.
So what happened to the boy-officers of the Royal Navy?
Well, the practice was eventually phased out. In the early Victorian era, boys had to be at least 12 years old to sign up as a midshipman. By the middle of the century it was 14. By the 1940s it was 16, and by the 1950s, a midshipman had to be at least 18, and be a highschool graduate.
Crossing Sweepers
So far, we’ve covered jobs which were dangerous, wet, hot, dirty and explosive. Now, we’re going to cover a job that – by comparison – was a bit of a cakewalk!
Before the 20th century, when automobiles started to take over, the only way for people to travel around town was by horse and carriage. Carts, carriages, coaches, broughams, barouches, Clarences, Hansom cabs, fire-wagons, paddy-wagons and countless other horse-drawn vehicles turned the city streets of the world into an open sewer, with dust, mud, straw, horse-dung and god knows what else, all over the streets. To cross the street without getting your shoes, breeches, trousers, overcoats or long dresses muddied up was an expedition in and of itself!
To assist these pedestrians – up sprang the crossing-boy!
Although this job could be done by almost anybody, it was most commonly associated with young boys, and the job is exactly what it sounds like – sweeping or shoveling a path through the street-muck to allow people to cross the road without muddying up their clothes. Looking at modern streets, you might wonder if there was ever any call for this – but in Victorian London (and in other major cities) there were so many people employed in this task (usually as freelancers) that some people saw them as a public nuisance!
Vagrancy and begging laws dictated that you could not ask for payment as a crossing-sweeper, but it was still common practice, and basic decency, to give the crossing-sweeper a tip for his efforts. If a sweeper had loads of customers, he could earn himself quite a tidy sum for a day’s effort in keeping the streets clean. Boys who worked in particularly busy parts of town could obviously earn more, and the job was not dangerous, or even that unpleasant. A bit smelly perhaps, but so long as you could walk, talk, and were able-bodied, just about anybody could do this job.
The job was not without its perils – you could get run over by an out-of-control carriage, you could freeze in winter if you had to shovel or sweep snow off the streets, or you could catch some horrible bout of influenza from being out in all weathers, but at least it was out in the open air, and away from any serious dangers.
Crossing-sweepers were demonised as pickpockets, beggars, vagrants and street-urchins. However, just as they had many people pouring scorn upon them, the humble crossing-sweepers also had a lot of supporters. Many members of the walking public were only too eager to praise them for their work, their industriousness and their eagerness to serve, and were only too happy to give a young lad their spare change as a tip for services rendered.
The Printer’s Devil
A printer’s ‘Devil’, as he was called, was a young boy or apprentice (typically seven or eight years old) who worked for a master printer. The printing devil’s job involved doing all kinds of menial and easy tasks around the print-shop – sweeping, dusting, cleaning, but also cleaning the print-type, lifting the printed pages off the press, and maintaining the ink-balls (the padded, leather paddles used to press fresh ink onto the movable-type between each operation of the printing press).
This last job required the devil to remove the old, worn-out or cracked leather from the ink balls, and to replace it with fresh leather…which had been treated in urine to soften it!
Eventually, the devil would learn how to do other things like how to apply ink to the type, and how to operate the press. As children’s jobs go, it wasn’t particularly demanding, and could come with a free education.
Pageboy
The occupation of page has existed literally for centuries. The original meaning of a ‘page’ or a pageboy, was of an apprentice knight – as in a knight-in-shining-armour kind of knight. A page was a boy of about seven or eight years old who was destined to one day, become a knight himself. Being a page meant serving an actual knight, and learning the tools of the trade – such as how to ride a horse, how to swing a sword, how to joust, how to deflect, block or parry an attack with a sword or shield, and how to look after plate-armour, such as repairing it, cleaning it and polishing it. It was one of the main jobs of pageboys to ensure that their masters were literally knights in shining armour.
As the age of knights and horses, of shields, plate-armour and heraldry started to die away, the term ‘pageboy’ became synonymous with that of a junior servant-boy. A page typically served a large institution of some kind, such as a grand manor house or townhouse, an ocean-liner, a luxury hotel, a grand railway station, or a fancy gentleman’s club. Their hours might be long, but the work was generally light. It involved things like fetching, carrying, running errands, delivering newspapers and parcels, delivering the mail, making purchases for hotel-guests, and delivering notes. The main difficulty in their job was just walking. Lots, and lots, and lots of walking!
Pageboys were a bit of a status-symbol in their own way – only the largest and wealthiest of households or public institutions had them, and usually more than one. They had their own uniforms and hours of work, and the position lasted well into the 20th century. Some places today (such as hotels) still have the position of pageboy, although the position is now given to older males in their teens or early-adult years.
Newsboys
“Extra! Extra! Read all about it! Newsboy Strike Cripples Millionaires!”
In the 1800s, almost the only way to get reliable news of any kind was to go out and buy a newspaper. Printed in the morning, afternoon and evening, newspapers were sold in their trillions all over the world. Once read, newspapers were used for packing, padding, wrapping, lighting fires and even to serve fish and chips!…until they realised that the grease in fish and chips caused the ink to run in the newspaper…and that newspaper ink contained lead.
Uh…whoops.
But questionable fish and chips aside, newspapers were vital for disseminating information, and then, as now, big media moguls guarded their news-networks jealously.
A major part of these networks fell upon the shoulders of little boys between the ages of seven to twelve, whose job it was to flog the papers printed by these moguls every single day of the week, for as long as they possibly could.
These were the newsboys, or “newsies” as they were also called.
Probably the most famous newsboy in history, Edward Parfett is eternally remembered as the youth standing on the street-corner holding the iconic sign: “TITANIC DISASTER – GREAT LOSS OF LIFE”
Newsboys worked phenomenally long hours. While morning papers were usually delivered door-to-door, afternoon and evening editions were sold on the streets by newsboys – typically as an after-school job. Newsstands, news-agencies and such didn’t really exist back then, and it was easier to have thousands of newsboys selling papers on the street than it was to try and run around town all day, looking for places that would sell your papers for you.
The boys were expected to buy their bundles of newspapers – 100 papers in a bundle – at 50c each (or 1/2-cent a newspaper), and then sell them for at least 1c each. If 1/2-a-cent profit on every newspaper doesn’t sound like much…well…it wasn’t.
Newsboys were a common sight around town, calling out the headlines, waving their papers around, and doing anything to get a sale, even jumping on and off streetcars to try and flog their papers to the passengers. Newsboys worked long, hard hours – emphasis on long – from three or four o’clock until past midnight in some cases!
Like a lot of child-labourers, the newsboys were horribly exploited by their employers, and in 1899, this all came to a head…because of a war.
The Spanish-American War of 1898 caused a spike in newspaper readership, as wars are want to do, and this caused newspaper companies to crank up the prices that newsboys paid for their bundles of papers – not 50c a hundred anymore – oh no – now they would pay the princely sum of…60c a hundred!
Newsboys objected to this exploitation, and once the Spanish-American War was over, the majority of newspapers went back to the pre-war price of 50c per-hundred newspapers.
The majority. But the minority did not.
The Minority being the papers run by William Randolph Hearst, and Joseph Pulitzer, of Pulitzer-Prize fame. Their newspapers, the New York Journal and New York World, continued being sold to newsboys at 60c a hundred, to be sold at just one cent each! If this wasn’t bad enough, any papers they didn’t sell at the end of the day would be taken out of the newsboys’ wages!…Meaning that the pittances that they could earn were being scooped up by the fat cats. The newsboys, already hacked-off about the prices, and who were mostly homeless or from struggling, working-class families, now had to worry about what would happen if they couldn’t sell all their papers!
On top of this, Manhattan newsboys discovered in July, 1899, that a delivery-driver who distributed the paper-bundles that they had to buy for their jobs, was shortchanging the boys by giving them underweight newspaper-bundles. This meant that the newsboys had to pay more money for less papers to sell for lower prices for less profit! Enraged, the newsboys had finally had enough, and went on strike!
Not one or two or half a dozen. Hundreds of them! Thousands of them! The city of New York went into a media blackout the likes of which it had never seen before.
The Striking New York Newsboys of 1899
Between the 20th of July until the 2nd of August of 1899, almost all the newsboys in New York refused to sell so much as a roll of toilet-paper! While they started out by simply protesting unfair working practices, the little newsboys had no idea just how much power they really had: without them, neither Hearst, nor Pulitzer were able to get their papers out to their reading public.
The effect of the newsboy strike was far-reaching, and surprisingly immediate! Readership of the New York Journal and The World plummeted by as much as 65% as people purchased papers from other news-sources. Apart from the loss of physical newspaper sales, Hearst and Pulitzer were also hurting from the steep drop in advertising revenue. When companies and businesses realised that the fees they’d paid were for ads that went into papers that weren’t being sold – well – they stopped paying their advertising fees, causing even more money to stop coming in! Through the simple act of refusing to sell newspapers, the newsies had crippled two of the most powerful men in the country. They had the media moguls by the balls, and the kids were determined to hold on for dear life!
To get back at the media fat-cats who were ripping them off, the newsboys sold their labour to other newspaper companies which provided their papers at more reasonable wholesale prices, and which allowed the newsboys to print their own articles highlighting their struggle. New Yorkers were outraged at the actions of two media moguls bullying a crowd of homeless street-kids, and began boycotting the NY World and NY Journal, siding with the newsboys. The boys and their older teenaged colleagues formed a newsboys’ union, and held rallies and speeches demanding change.
The NYPD were powerless to intervene because, in a further act of petty cunning, the newsboys had planned their strike to coincide with the more publicised New York Streetcar Strike of 1899. Unable to handle the striking trolley-drivers, and round up thousands of conniving kids who were up to no good, the police left the boys alone while they tried to do battle with the much more formidable challenge of the streetcar-drivers. When scab-workers tried to pitch in and sell the newspapers that the boys refused to touch – the newsboys fought back!
As in they literally FOUGHT back – they trashed delivery-wagons, stole newspapers, threw bundles of newspapers into the rivers, soaked them with buckets of water to make them unreadable and tore them to shreds in the streets!
And remember that these were newsboys! Not teenagers, not college students – they were KIDS! – While some were teenagers, the vast majority of them weren’t more than twelve years old!
Their actions were so destructive that in the end, the media moguls had no choice. It was either agree to the demands of the newsboys and mounting public pressure, or else be forever known as the heartless tyrants who drove thousands of children to violence and protesting…over a paltry ten cents. The fact that the strike was over in just under two weeks is proof of just how effective it was, and of how badly the news-publishers relied on the boys to get the news out.
In the end, Pulitzer and Hearst, two of the richest men in America at the time, were forced to start labour-negotiations in an effort to save both their companies…and their reputations …with a bunch of kids!
And the kids won, too.
After two weeks of strike-action, the following resolutions took effect: Newspaper-bundles would remain at 60c a hundred. This was unacceptable, but in a compromise, Hearst and Pulitzer agreed that any papers which remained unsold at the end of each day would be purchased back from the boys by the publishers at retail-price. This way, the boys would no longer be out of pocket and going into debt. It also meant that they no longer had to stay up to 2:00am trying to flog papers that nobody wanted anymore, for fear of losing out on their earnings. The newsboys agreed, and the strike ended on the 2nd of August, 1899.
Newsboys continued selling papers for decades afterwards, and for a long time, being a newsboy was a common occupation for youngsters, although they were free from the shady business-practices which their predecessors had fought so hard to overturn.
A traditional eight-panel tweed flat-cap…better known as a “newsboy” cap
Newsboys were such a common sight in the streets that they even had an article of clothing named after them: Those old-fashioned style six-and-eight-panel flat-caps with the semicircular brims with a button sewn into the middle of the top?
They’re called “newsboy” caps.
Closing Remarks
This has been a hell of a write-up! It was a lot of fun to write, and to research. There are more child-jobs that I’ll be covering in a future posting, but I’ll stop it here, for now.
Information for these jobs came from the Weird History website and YouTube Channel, the documentary film “The Children who Built Victorian Britain”, and the “Worst Jobs in History” series hosted by Sir Tony Robinson.