Globetrotting – The Golden Age of Travel (Pt I)


In this posting, we’ll be looking at the birth of the ‘Golden Age of Travel’, and exploring how the changes and innovations made to transport and communications during the 19th century, gave birth to the first great age of travel and tourism. We’ll be looking at what tourism and travel was like when it first became available to ordinary people, how the tourist experience differed between then and now, and what we might have lost and gained during the journey.

The Golden Age of Travel’ is defined as the era from the second half of the 1800s up to the early 1940s, when cheap international travel and the tourist trade really started taking off, thanks to technological and transport advances made during the Industrial Revolution. It was an age of wonder and excitement, and was the first time that ordinary people were able to travel in style, speed, safety, and comfort. It was also the first time when people could travel strictly for pleasure at reasonable prices.

The Second World War, and the subsequent geographical, technological and political changes which it forced, irreversibly changed the tourist landscape, making the difference in the travel-experience between the first and second half of the 20th century almost as different as night and day.

The changes brought about by the War made it impossible to return to the elegance, excitement, wonder and grandeur of the pre-war travel experience – it’s something which exists only as a ghost, which lingers in old photographs, antique luggage, hotel and steamship-tickets and the stamp marks found in fading passports. So what was it really like? What was travel and tourism like before and after the War? How did pre-war travel differ from post-war travel, and how did post-war travel morph into what we know today? In this issue, we’ll find out together, on our very own tour through history!

So stamp your passport and clip your tickets. Strap down your trunks and hold onto your Baedekers. We’re about to take a trip back into history. Our ancestors may not have been jetsetters, but they were globetrotters, who still managed to explore the world in a haze of smoke, steam and gasoline. A flag waves, a whistle blows. It’s time now to depart! All aboard!

Before the Golden Age of Travel

For much of history, travel was slow, boring, painful, expensive and dangerous. People rarely travelled any great distance unless it was absolutely necessary, and almost never for pleasure. It was not uncommon for people to be born, live, and die all within the confines of the communities of their birth, or within a very few miles thereof. Travel meant days and weeks on the road. It meant needing money to pay for bed and board, it meant having to guard yourself against those who would wish you harm in any number of ways. Thieves and robbers on the public roads also meant that you were restricted in your travel, largely to daylight hours when it was easier to protect yourself. This limited your travel-time each day, and made travel even slower. And this if you were poor. If you were rich, travel was slightly easier, but still not without considerable risks.

Even if you had the money to allow for travels, and even if you did travel for pleasure, the journey was still slow, costly and potentially dangerous. Money had to be paid for coachmen, horses, carriages, food and lodgings, and servants. And there was the constant danger of being attacked during your journey. Travelling ‘in style’ told every highwayman along your route that you were rich, and that attacking and robbing you would likely gain a highwayman rich rewards for his efforts. This put you in just as much danger of assault and even death, as someone who had almost no money at all. And the manner of your travel did not change these odds at all.

For most people, travel meant walking. And walking was slow. Walking made you vulnerable. Walking along a country road, or through a town, city or village left you open to all manner of dangers – cutpurses, footpads, pickpockets, muggers, rapists, beggars, robbers and thieves who would all do their level best to relieve you of your worldly possessions. But for most people, this was the only way to travel from A to B – horses were expensive to keep, feed and maintain. And only the wealthy could afford carriages. And even those were not as safe as one might think.

Travelling in the relative speed and comfort of a private carriage or stagecoach did not guarantee you protection. Coaches or carriages which ran regular routes, and even private carriages running along busy Highways, risked being held up. Highwaymen created roadblocks to hold up coaches and force them to stop. Once a carriage was stopped, they could rob its passengers of their valuables and money, and even kill them if they wished. Famous highwaymen made names for themselves, like Dick Turpin, who was a notorious outlaw in Georgian-era England.

Before railroads, one of the fastest ways to move around was by mail-coach, which ran regular overland routes between major cities, delivering mail.

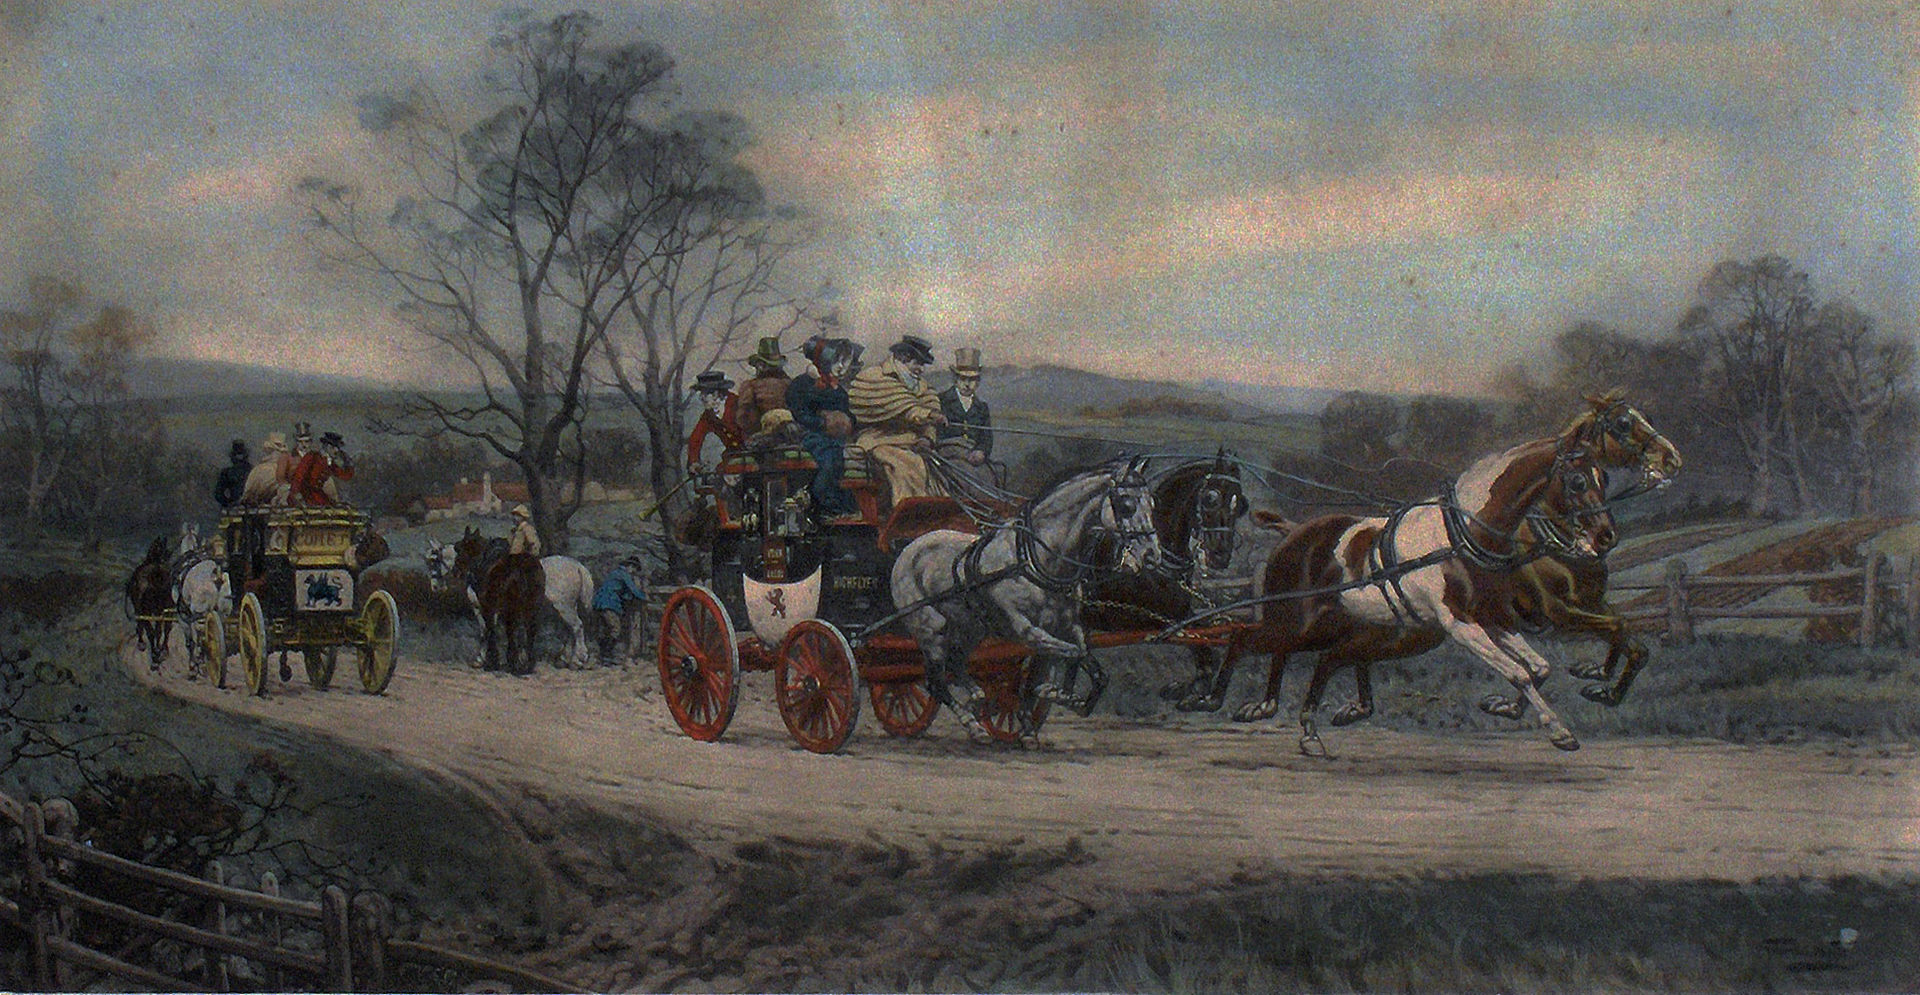
If you wanted protection on long journeys, you had to either bring your own weapons and know how to use them, or else pay for armed coach guards, who protected you with swords and loaded blunderbusses, or later, shotguns. To this day, sitting in the front passenger-seat of a motor-vehicle is still called “riding shotgun” – an allusion to the armed coach guard who would sit next to the driver of a stagecoach, to provide armed protection in the event of a holdup.

For all these reasons and more, for much of history, most people did not travel great distances. And if they did, it was rarely for pleasure, but mostly out of necessity – to escape disease, danger, poverty, a troubled home life, or to find employment or other business related reasons. What were the changes that happened in society and technology that allowed people – ordinary people – to travel for pleasure for the first time in their lives? And what was it like to travel and go on a vacation during this first great age of travel? What allowed this to happen?

The Birth of Mass Transport

Widespread travel for pleasure would not be possible without a corresponding development of means of cost-effective mass transport. Spurred on by the Industrial Revolution, the second half of the 19th century, saw efficient, cheap mass-transport becoming a reality, and for the 19th century, and the first half of the 20th century, efficient, cheap transport was symbolized by two great new inventions of the age: The steam-powered locomotive, and the steam-powered, ocean-going passenger-ship – the ocean liner! Where did these machines come from, and how did they change the world?

Steam Boats & Steam Trains

The two vehicles which would allow for the movement of large numbers of people with ease and economy were both invented in the early 1800s. By the start of the Victorian era, the first passenger ships and locomotives powered entirely by steam were plying trade around the world. Locomotives and steamships both originated in England, and it was this steam-powered transport technology that gave birth to the modern travel industry.

Conflicts during the 19th century such as the Crimean War, the Chinese Opium Wars, the American Civil War, and the Franco-Prussian War of the 1870s were the conflicts that laid the groundwork for the expansion and improvement of steam technology. Expansion of railroad networks caused by the need for rapid troop movements now allowed for swift, efficient movement of civilian passengers.

Advances in steamship technology for wartime uses now allowed for faster, safer and more comfortable ocean travel in peacetime. No more was it about sleeping in hammocks on rocky, creaky, cramped sailing ships that relied on the wind and weather. Now you could steam across the Atlantic or the Pacific in a berth, or a cabin of your own, in comfort and style, lulled to sleep by the throbbing of the powerful steam-pistons deep beneath the ship, that turned paddle-wheels, and later, screw-propellers, which drove great vessels across the ocean at speed.

No more was travelling by train a smoky, dusty, sooty experience, full of coughing and gasping for air in uncomfortable, windswept, open-topped carriages; now you could travel on a train with enclosed, corridor carriages with separate day-compartments, or if the journey was an overnight ride, in the relative comfort of a sleeper-car. If you found yourself hungry or thirsty, dining-cars and kitchen-cars provided you with food. If you wanted somewhere to relax, the lounge-car provided you with comfortable seating and bright lights to read, write, smoke, or chat with friends on the journey.

By the late 1800s, travel was safer, faster, cheaper and far more comfortable than lurching around inside a horse-drawn carriage with little suspension. It was also open to a wider range of people. You paid a ticket according to your means. First Class, Second Class, Third Class, or on ocean crossings – Steerage. ‘Steerage Class’ on ocean liners got its name from the fact that third-class passengers were often housed at the back of the ship, and deep in the hull, in the smallest cabins, the closest to the ship’s engines, power generators and steerage mechanisms. First- and Second-Class passengers got cabins on the upper decks, with the bright sea-views, away from the throb and rumble of the engines.

Motorised Transport

Along with steam-powered transport, the rise of cheap, personal and public motor-vehicles in the early 1900s also contributed to the Golden Age of Travel. Vehicles like motorcars, motorcycles and buses freed people from the restrictions of train and streetcar timetables, allowing them to make the best and most use of their free time. Planning trips and holidays around the country or continent became much easier and faster when each person or family had their own vehicle with which to travel in, which was not dependent on such variables as horses, timetables or weather, and which was much faster and more comfortable than previous methods of transport.

Cheap cars for the ordinary middle-class worker such as the Model T and Model A Fords in the United States, the Austin 7 in England, and the Volkswagen ‘Beetle’ in Germany meant that more people could go more places, and weekend drives to explore locations previously impractically far from home could now be accomplished in a few hours. Trips to the country or to other cities and towns were now easy and simple. And a car was easier to maintain and faster to start than a horse and carriage!

The Birth of the Golden Age of Travel

Along with steam-powered transport, the rise of more personal transport also contributed to the birth of the Golden Age of Travel. Starting in 1885, you had the world’s first modern bicycles, and increasingly as the Victorian era came to an end, the rise of the motorcar. Able to take people places that the railroads could not reach, these two inventions further improved people’s ability to travel and explore. This led to an increase and improvement of road networks.

Travelling around the country and going from city to city – road-trips – became popular. Rest stops, motels and diners popped up around the United States. The famous “Route 66” in the United States stretched from Chicago, Illinois all the way to Los Angeles, California, passing through many cities and states on the way, making it a popular road-trip and an easy way to visit many famous cities and towns along your tour of the American interior.

With the infrastructure for safe, speedy, comfortable and cost-effective mass transport now in place, and social changes such as the rise of the five-day working week, it was now possible for people to take time off, and time away from home and work, and to start travelling and go on holiday for the first time in history. The Golden Age of Travel had begun!

The Cunard Line advertising travel to all parts of the world! The ship illustrated in the poster is the RMS Aquitania.

Now, it was easy to travel to such places as the countryside, the beach, the bay, or to take day trips into town to go window shopping, to buy gifts, necessities for the house, or to explore cities and towns far from home. It was possible to live far from the city in a new, quiet suburb and commute into town. Journeys that might once have taken days or weeks could now be done in hours or minutes. The amount of free time available to people was beginning to grow. Holidays became popular, with more people getting time off work. People with time off work and money to spend wanted to go travelling, and the number of exciting destinations to visit was growing, catering to all levels of tourist, as were the ways to get there, and places to stay, once you arrived.

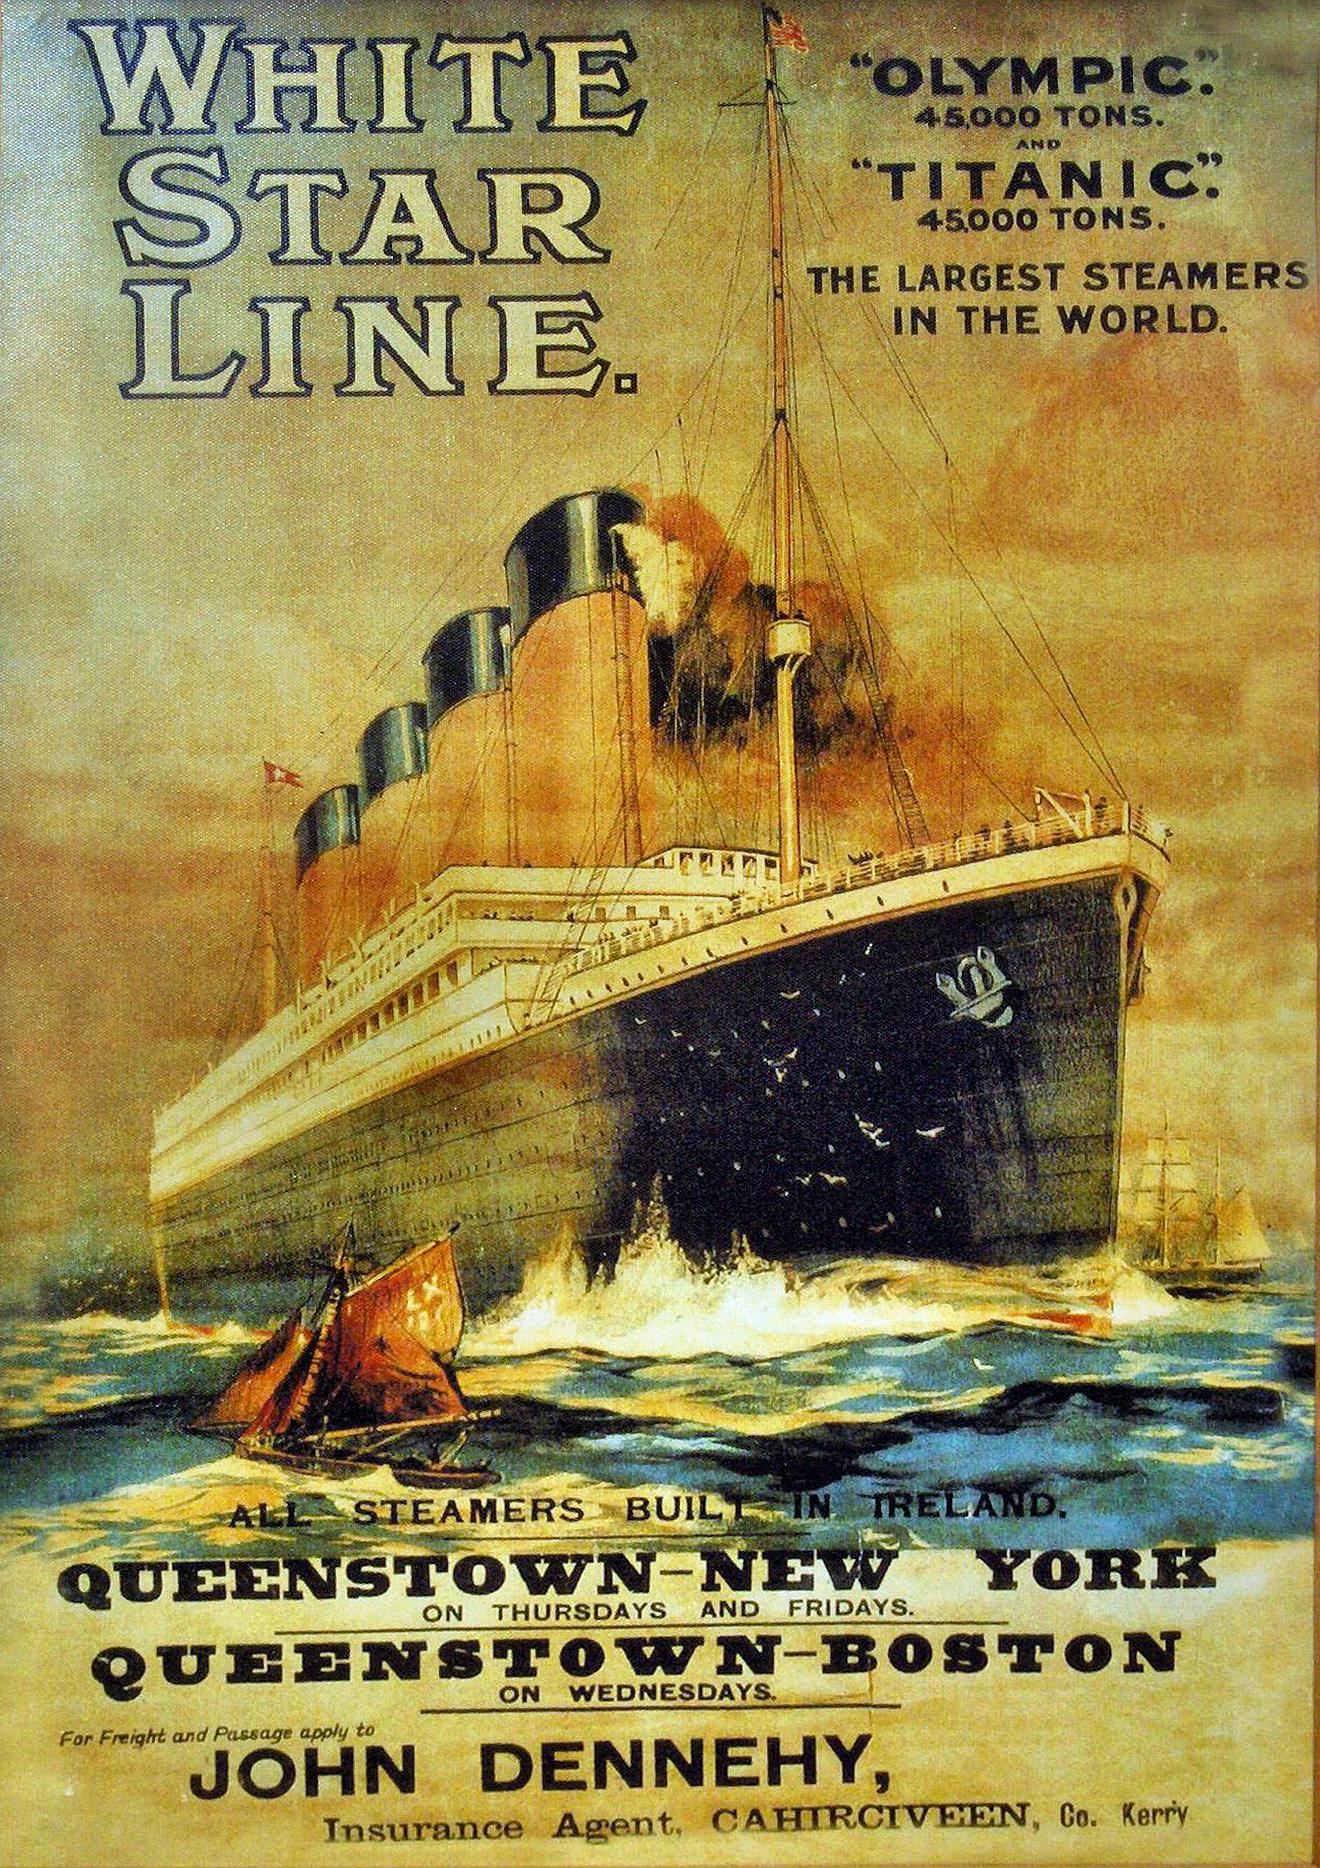
As the 20th century progressed, travel became faster still. With the opening of the Suez (1869) and Panama (1914) Canals, long detours around the horns of Africa and South America were eliminated for all but the largest of ships, slicing days off of voyages to Asia, the Middle East, the Mediterranean and the coastal cities of the United States.

The White Star Line advertising travel to the New World on its two most famous ocean liners, The Olympic and the Titanic, ca. 1911.

To lure people away from their homes to far flung destinations, travel agencies, railroad companies and shipping lines produced vivid, colourful posters advertising luxurious travel to the edges of the world in fast, sumptuously appointed ocean liners and railroad-carriages, fast connecting trains and short crossings; anything to part a potential traveler from his living-room, and the money from his wallet.

Steamships of all sizes now plied the oceans, seas and rivers of the world. No longer was sailing from England to the Continent (Europe) a dangerous, costly endeavor. Now, you could buy a ticket. You could get on a ferry and in steam-powered speed and comfort, take a trip across the English Channel to France. With rail-links around Europe, cities like Paris, Berlin, Rome, Milan, Venice and Pompeii became great tourist attractions which were easily accessible thanks to efficient public transport services from the port cities of France, Denmark, Germany and Italy. People could travel all over Europe, America, and Asia, in speed, comfort and safety for the first time in history. All this was what contributed to the birth of the Golden Age of Travel.

Packing for a New Age

As the 19th century progressed into the 20th century, travel became cheaper still. After the hell of the First World War, the United States of America tightened its once open door policy on immigration. No longer were shiploads of poor European refugees allowed to be dumped on Ellis Island for large-scale processing. The ending of this policy in 1924, and the subsequent introduction of immigration quotas (which allowed only a set number of people from different countries or backgrounds to migrate each year to specific countries) meant that steamship companies, which had once made thousands of pounds and dollars a year in the immigrant trade, suddenly had their main passenger base swept out from under them!

In the new, optimistic age of the “Roaring” 1920s, a solution had to be found! The answer was ‘Tourist Class’. Ships no longer transported human cargo from A to B. They now transported fare-paying passengers, or ‘tourists’ in comfort, from their home ports to destinations far and wide around the world, for a reasonable price. Cheap tickets were snapped up by eager holidaymakers with free time on their hands, and international, ocean going travel began!

Travelling by ocean liner to cities and countries all over the world often meant long sea-voyages! Very long! London to Paris might take half a day by steamer and rail. London to New York might take a week or more. Melbourne to Singapore might take three or four days. But it was for the mammoth, long-haul voyages, such as those from Naples to Shanghai (eight weeks by steamer!) for which a whole new kind of luggage was required!

These days, we have check-in luggage and carry-on luggage, and it’s all weighed and measured and assessed and tagged. You can only have 10kg carry-on and 40kg check-in and if you want more you have to pay for more, and you have to repack, redistribute and reorganize everything over and over again, so that the plane doesn’t crash into the ocean and sometimes you wonder whether going on holiday is even worth it?

Packing for a long voyage during the Golden Age of Travel was just as challenging, although those challenges were of a rather different nature. One benefit of travelling by steamship was that there weren’t really any luggage weight restrictions. So long as it fit in the hold, or in your cabin or suite on board ship, you were fine. But even for short holidays, you often brought mountains of luggage. Remember that you did not go on ‘holiday’ or ‘vacation’, you went on ‘tour’ – hence ‘tourist’.

You expected to be away from home for days and weeks at a time – and that might be just the ocean voyage, before you even reached your destination! And having spent days and weeks at sea, you weren’t going to spend just a couple of weeks at your destination and then sail for days and weeks, all the way back home again! You expected to be away for a long, long time. A month or more, at least! So the kind of luggage that our grandparents and great-grandparents brought with them on their epic journeys was significantly different from what we would pack and carry today. So, exactly what kind of luggage would you expect to bring on a long ocean voyage?

The Steamer Trunk

The mainstay of luggage for most of the 20th century, and indeed, for most of history, was the trunk – large, wooden boxes into which everything you might require for a long voyage was packed. Considering that an ocean voyage to any destination could take anywhere from a few days to a few months, such large personal storage space was deemed necessary to fit in all the clothing, accessories and other related travel paraphernalia that might be required for a long time spent at sea.

Antique steamer trunk, complete with brass hardware and locks

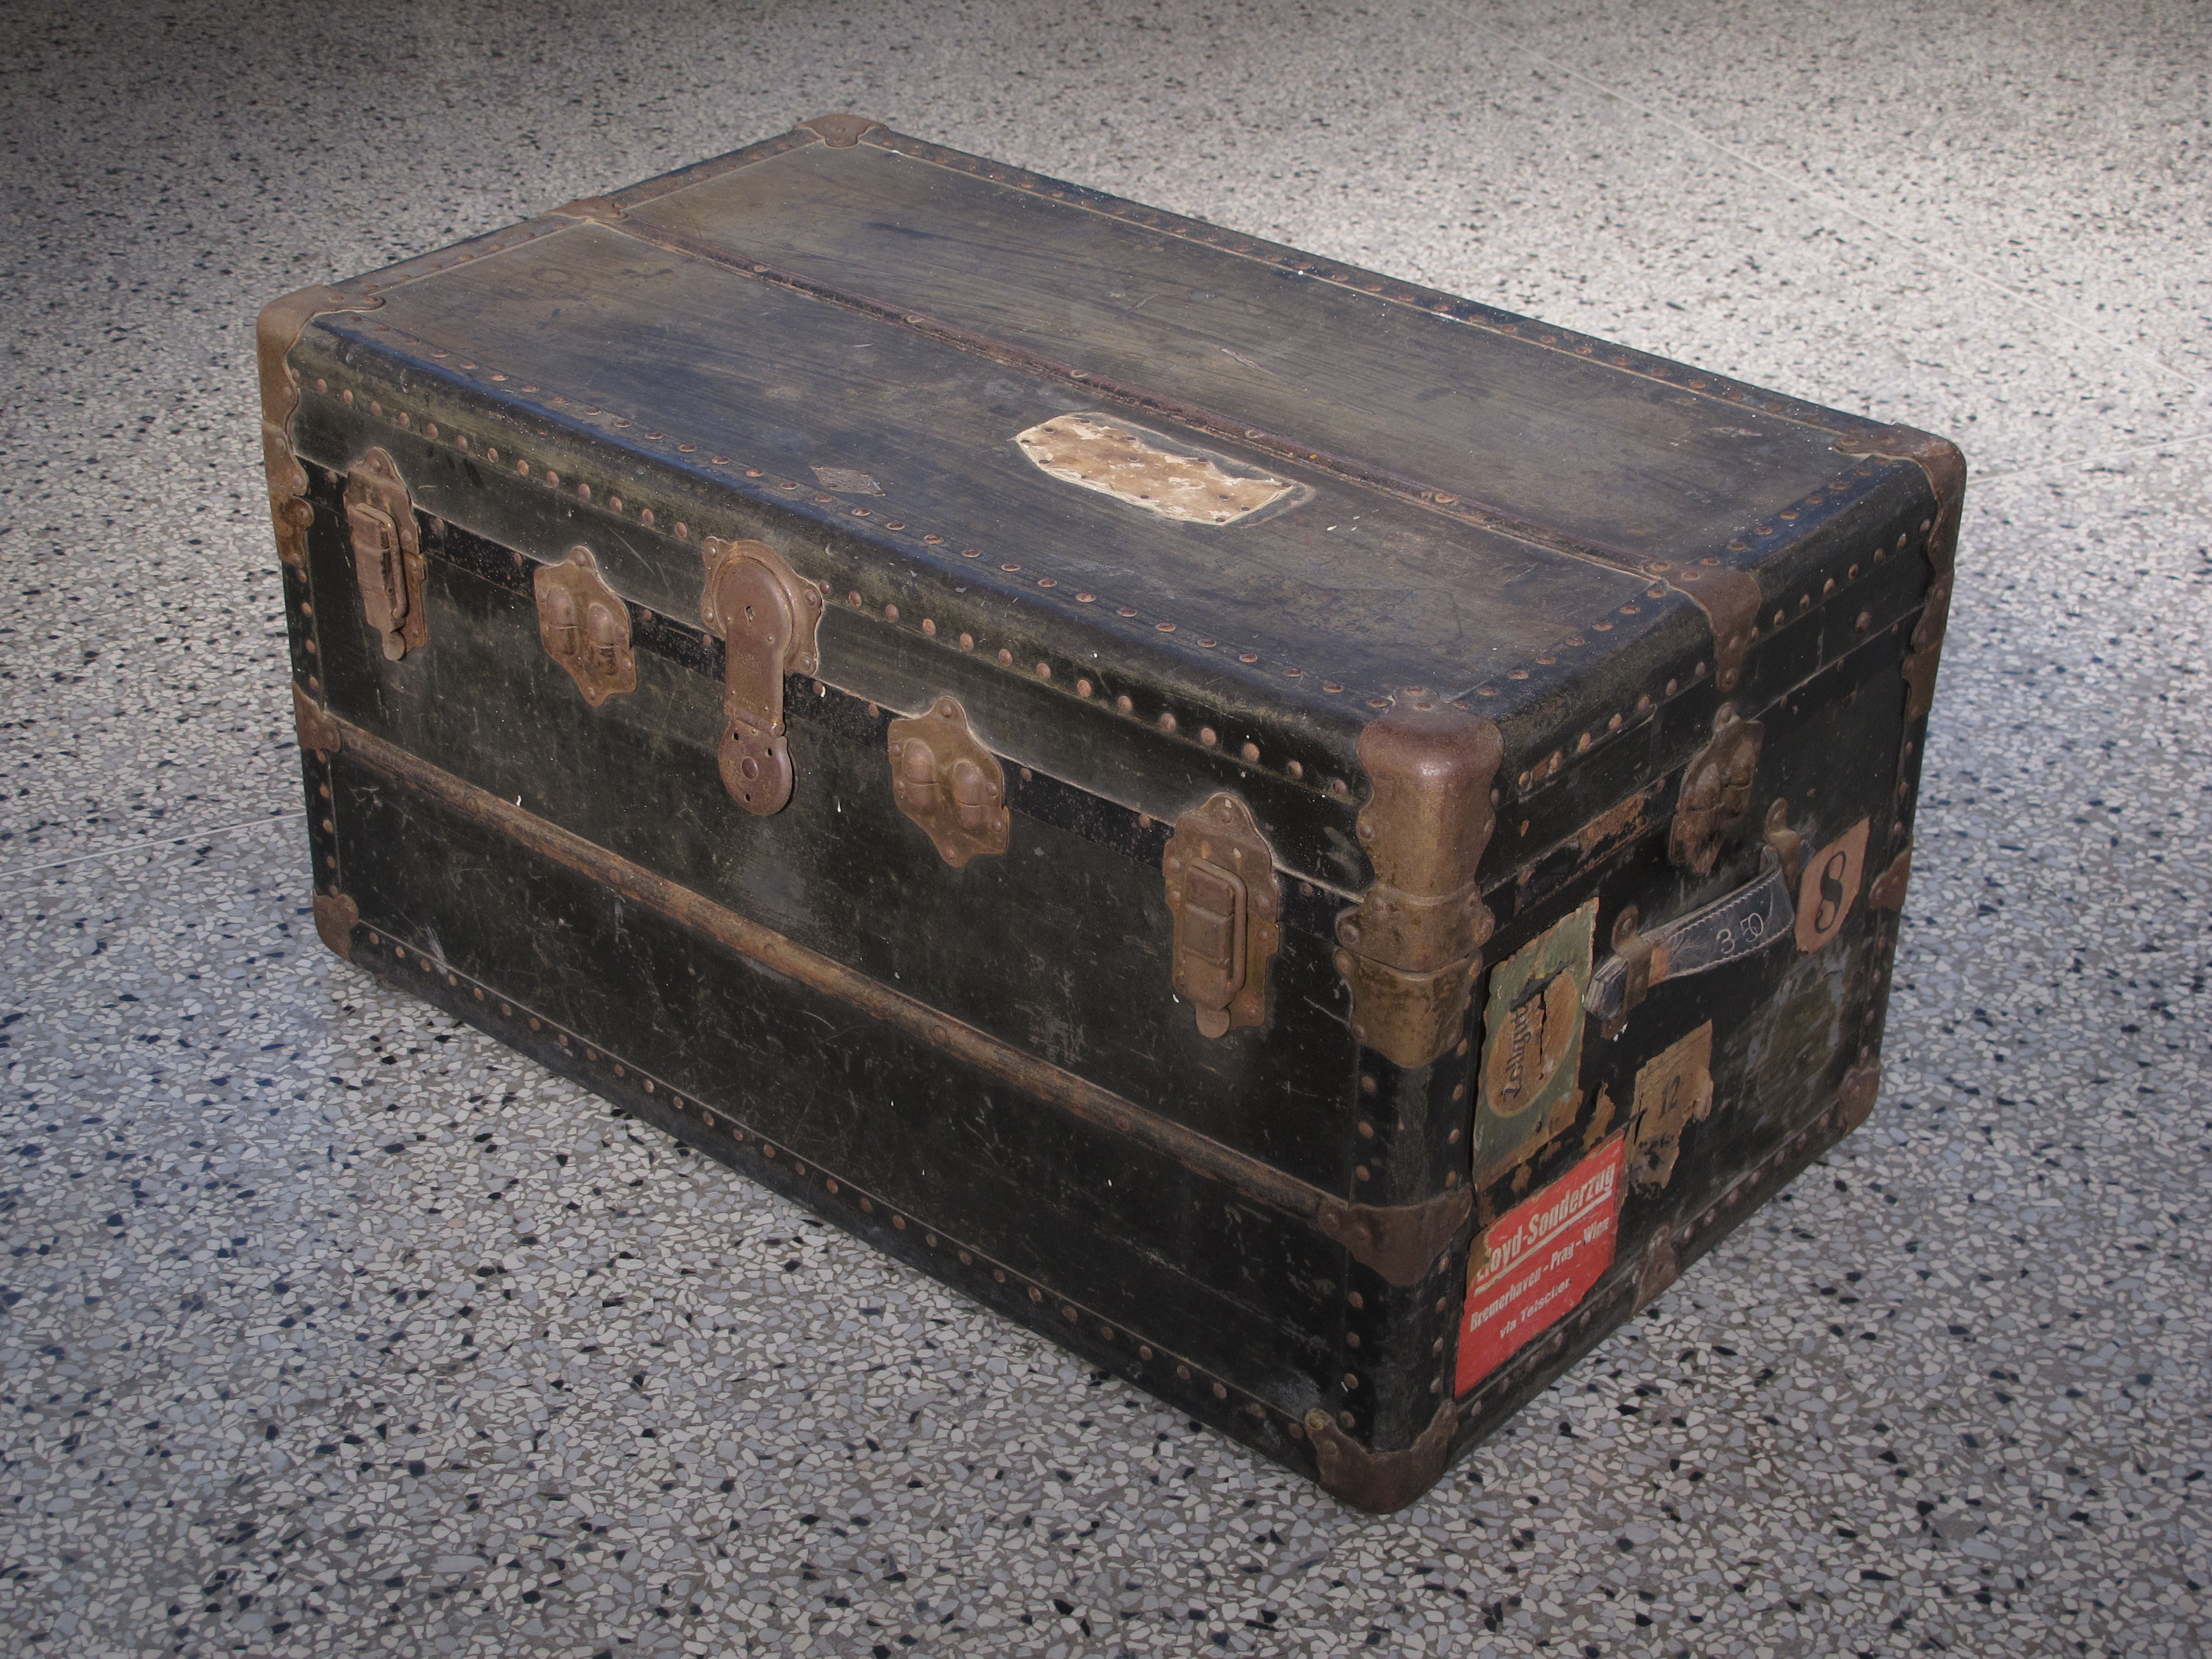
Trunks were designed to be tough. They had to withstand being hoisted by cranes, roped up in nets, and being stacked up, lashed down, and rocked around at sea. They had to put up with rough train rides, carriage journeys, motor trips, being dragged around and shunted from place to place by porters, bellhops and stewards. To protect against damage, they were reinforced with wooden ribs and braces. This was to prevent cracking and warping from the weight of extra luggage stacked on top.

Rivets and studs were hammered into corners and joints to strengthen them. Exposed wooden parts of trunks were varnished to prevent wood-rot, or were lined on their exteriors with leather or canvas to provide a weatherproof finish. Corners were again reinforced with brass plates which were again, riveted on, to prevent damage from abrasion and rough handling. Catches, locks and clasps were made of brass. This made the trunks all pretty and attractive, but it also came with an added bonus – unlike steel, brass does not rust, so provided further protection against the moisture and corrosion of seawater.

The Suitcase

These days, most people pack their clothes and belongings into roll-on cabin-baggage when they go travelling. The days of the actual ‘suitcase’ are steadily disappearing. But there was a time when people who went on holiday carried suitcases, and these cases actually contained the suits which provided them with their names.

A typical suitcase of the Golden Age of Travel, from the late 1800s through the early 20th century was made of leather or canvas. It came with two lockable clasps to hold it shut, and depending on the style, may or may not have come with additional leather belts that were strapped over the suitcase. These belts provided a failsafe mechanism if the clasps were broken, but the belts (which wrapped around the entire suitcase) could also be removed from the belt loops around the suitcase and linked together. They could then be used to strap the suitcase on top of other suitcases or luggage, to keep them together, or to secure them to the roof or luggage-rack of a motorcar or horse-carriage during transport, if other storage space was not available.

The Gladstone Bag

Sturdy, of large capacity, secure and easy to carry, Gladstone bags were the backpacks of their day. Everyone who travelled anywhere on a regular basis was likely to have at least one of these, and like backpacks, the humble Gladstone was used to carry as wide a range of items as you could possibly imagine.

The Gladstone was invented by a London bag-maker in the 1800s and named after globetrotting British prime-minister William Ewart Gladstone. It was immediately popular because of its large capacity, and secure, gate-mouth opening. Reinforced with a metal frame, the bag could be opened, and remain open while it was packed. This made it ideal as an overnight-bag into which anything could be packed with haste.

Vintage leather gladstone bag

Once packed, the bag was closed, locked, and then simply carried away. No consideration had to be given to how the bag’s contents might shift upon movement, since it did not have to be tipped onto its side to grasp the handle, unlike a suitcase.

This was likely the reason why this style of bag was so popular with physicians, who commonly carried sharp, dangerous and breakable objects in their medical-kits, which were likely to be broken if they shifted unexpectedly inside a backpack or other type of luggage. The gate-mouth opening also meant that a doctor’s hands were free to dive in and out of the bag to retrieve whatever instruments and medicines might be required in an emergency, without having to constantly pull the bag open over and over again.

The Portmanteau

‘Portmanteau’ is a French loanword for a type of luggage which has all but disappeared from travel in the 21st century. You never see these things anymore unless they’re in museums or in period movies and TV-shows.

A Louis Vuitton portmanteau, or wardrobe trunk

Literally meaning “Coat-Carrier” (‘porte’ as in ‘portable’, and ‘manteau’ meaning ‘coat’), or also called a ‘wardrobe trunk’, this style of trunk was used for carrying your more expensive clothes – your best dresses, favourite suits, your dinner suit or your white tie and tails. It was stood on one end, and then opened up, looking for all intents and purposes, like a portable closet, complete with hanger-rack and separate drawers and compartments for shoes, shirts, trousers, socks, underwear and space for coats, trousers and jackets so that they wouldn’t get crushed during long journeys.

Portable Word-Processing – Vintage Style

Then, just as now, our globetrotting forebears often wished to keep some sort of record of their travels, or wished to inform others of their travels. Or had a need to communicate and write to others during their travels.

If we had to do this today, we’d bring along an iPad or a laptop computer and seek out the nearest establishment boasting free WIFI. And in their own way, our grandparents and great-grandparents had their own methods for keeping in touch and connected with others.

The Writing Slope

The reservoir pen which could be carried around in your pocket, and used anytime, anyplace, anywhere, at a second’s notice, is a relatively recent invention. If you went travelling any time before 1900 and you needed to write while away from your desk, chances are that you probably had one of these things packed in amongst your trunks, boxes and cases:

Antique writing-slope manufactured by Toulmin & Gale of London, ca. 1863

Writing-slopes were the laptop computers of their day. They carried everything that you required for on-the-move communications: Ink, pens, paper, stamps, sealing-wax, seals, spare nibs, matches, envelopes, pencils, paper-knife, eraser, paper-folder, and storage for money, letters, important documents and valuables. The writing box or writing-slope shown here is typical of the more expensive, up-market writing-slopes of the 1800s. It comes complete with desk accessories in elephant-tusk ivory, inset matchbox and inkwell, and an automatic deadlock security system (and the original key!).

Half-closing the writing-box exposes three, flat ivory panels, or an ‘Aide Memoir’. Here, simple notes and reminders could be scrawled on the ivory slates in graphite pencil. They could be erased using a moist cloth, and the ivory could be reused.

Writing boxes were common travelling companions of the educated globetrotter or travelling businessman of the 19th century. They died out at the turn of the century when they were replaced by fountain pens, and by yet another common piece of luggage which might be brought with you on a long voyage during the early 20th century.

The Portable Typewriter

Invented in the 1870s, early typewriters were bulky, heavy things. Weighing up to 15-20kg (about 30lbs+), they were impractical as portable writing machines. As travel increased towards the end of the 19th century, and as typewriters became better designed and more commonplace, a market was realized: Portable typewriters would surely prove popular with the travelling public, if only such a machine could be produced!

The first portable, laptop typewriters came out in the first decade of the 1900s, but their golden age started in the 1920s. Portable typewriters were manufactured by Remington, Royal, Underwood, Corona and countless other typewriter companies. They were snapped up by reporters, authors, journalists, travel writers and businessmen who often had to travel as part of their jobs, and needed to be able to correspond swiftly and neatly while on the road.

This Underwood Standard Portable from the second half of the 1920s was typical of the portable typewriters carried around the world by tourists and writers during the Golden Age of Travel. Newspaper reports, story drafts, letters home, business reports and magazine articles were all typed up on machines like this and sent home across the seas by untold thousands of writers, eager tourists, journalists and businessmen during the early 20th century.

Oddments and Accessories

Along with large pieces of luggage like suitcases, Gladstone bags, trunks and portmanteaus, our globetrotting predecessors also brought with them all manner of smaller boxes, bags and cases for holding almost everything you could imagine. Shoeshine kits, collar-boxes, handbags, hatboxes, stud-and-link boxes, and toiletry cases carrying everything from straight-razors to talcum-powder.

Such large amounts of such small luggage were often packed inside trunks and suitcases, to separate and organize one’s belongings on long trips, but also to keep the items most commonly used closer to hand. Until the 1930s, men’s shirts came in general ‘one-size fits all’ style with longer sleeves, and without attached collars and cuffs (called ‘tunic shirts’). The separate collars and cuffs were stored in collar-boxes. The studs and links to attach these to the shirts were stored in jewellery cases.

As it would be impossible to store all of one’s belongings into a ship’s cabin or berth, or on a railroad-carriage, only the trunks and cases carrying the most essential items were stored close-at-hand. Clothes and other belongings that would not be required until the ship or train reached its destination would be stored in the hold, or in the luggage vans coupled to the backs of trains.

Classic Luggage Stickers

Hotel chains as we know them today did not exist in the early 20th century. Every hotel in town was owned and operated separately, and competition between them was fierce. Every hotel had to be grand, classy, have a catchy and elegant sounding name, and have everything that the guest might desire. Hotels that wanted to stand out had everything custom made. Everything from the stationery, silverware, glassware, china and towels were emblazoned with the hotel’s monogram or logo. And of course, every hotel had to have its own distinct and immediately recognizable set of stylish and colourful luggage-stickers.

Luggage stickers were once like tattoos – unique, colourful, and evidence of a varied and well-travelled past. Just like how sailors who went to sea came back festooned with ink, a steamer-trunk, set of suitcases or a well-travelled Gladstone bag often returned home plastered from lid to base in stickers. Stickers came from almost anywhere and everywhere: from train stations, stickers from shipping companies, and stickers from hotels.

Stickers contained information such as the name of a trunk’s owner, his room number, the train which he had taken, or the name of the ship he had boarded. And if he had boarded a ship, then the sticker might also have his deck and cabin number. If he was on a long train journey and his luggage was stored in the goods-van at the back of the train, his trunk sticker might have his carriage or compartment number.

Today, luggage-stickers are just ugly, black-and-white barcoded, print-out, rip-off, stick-on-and-done affairs. As soon as you arrive at your destination, it’s immediately your mission to remove these stickers as soon as possible, lest their blandness offend the eyes and sensibilities of the delicate. On the other hand, vintage luggage stickers were works of art. They often had bold letters in artistic fonts and colours which spelt out the hotel name, the ship name, the city or port where the sticker was plastered on, and came with decorative pictures or photographs as part of the design. They were like miniature travel posters in their own right and passengers often kept the stickers on their luggage as proof of their travels, and as proof of the extent of their travel. And also because it gave their luggage ‘character’, with the various stickers creating a rainbow patchwork of paper on the bland leather surfaces of their cases and trunks. 

Hotels During the Golden Age of Travel

The rise in the frequency of travel from the late 1800s to the start of the Second World War saw a corresponding rise in the number of hotels. A number of the world’s most famous hotels trace their roots back to this first great age of tourism. In the United States, the Stanley Hotel (1909) was opened by Freelan O. Stanley, co-owner of the famous Stanley Motor Carriage Co., which produced the well-known Stanley steam-powered automobiles of the 1900s-1920s. Notoriously haunted, it gave Stephen King the inspiration for one of his most famous horror novels: “The Shining”. Its guests included Titanic survivor Margaret Brown, musician J.P. Sousa, and President Theodore Roosevelt.

Raffles Hotel. 1, Beach Road, Singapore (opened 1887)

In New York City, the famous Plaza Hotel was opened in 1907. In London, the Langham and Grosvenor Hotels were opened in 1865 and 1862 respectively. The Ritz (1907) and the Savoy (1889) in London remain two of the most famous hotels in the world. In Singapore, Raffles Hotel opened in 1887. But as grand and famous as all these structures are, they all owe a debt to one hotel which has sadly faded into history, no longer operating, and which has been overshadowed by the fame of all the other hotels that have come after it.

The Plaza Hotel, New York City (opened 1907)

The Tremont Hotel, in Boston (closed 1895), one of several hotels named Tremont House or Tremont Hotel scattered around the United States (there were five in total) was the first hotel in the world as we would know them today, which offered amenities like lockable bedroom doors, indoor plumbing, indoor heated baths, indoor toilets, a proper reception area, and bellhops to carry the mountains of luggage mentioned earlier on. Opened in 1829, it predated many of the most famous hotels in the world which still operate, and paved the way for standards in hotel amenities and services which we take for granted today.

As the numbers of hotel guests started to climb as more people found more time and more spare cash with which to travel, hotels started competing with each other. To lure in more customers, they came up with more and newer amenities, better service and furnishings, and all kinds of features and extras which today are considered standards across the hotel industry. In some respects, the service was also much better than what we might be used to today.

These days, we arrive at the hotel and check in. Then, we’re given our key-cards and told our room numbers and left to it, and that’s basically it. In older times, when hotel competition was fierce, this level of ‘service’ was not always acceptable. Back when even a short journey meant bringing a small cartload of luggage with you, the front-desk clerk would ring the counter-bell (similar to the one shown above) to summon a youth who would take your room key and some or all of your luggage, which he either carried upstairs, or loaded onto a hotel luggage-trolley and took upstairs in an elevator. This boy (they were traditionally young men) got his name from the very bell used to summon him – ‘Bellhop’. Once at your room, he unlocked the door for you, helped you carry in your luggage, handed you your key and then left you to your thoughts.

A luxury hotel of the era would’ve come with such amenities as a lobby, hotel restaurants, lounges, bars, and even a ballroom, where a house orchestra or jazz-band would provide music which you could dance to, if you wished. Hotels which had their own house-bands included the St. Francis Hotel in San Francisco, the Savoy Hotel in London, the Hotel Pennsylvania in New York, and Raffles Hotel in Singapore. Big names like Glenn Miller and Benny Goodman would often broadcast live from the Pennsylvania Hotel at set times each evening, for hotel guests to dance to, and for people at home to listen to via radio.

Popular Tourist Destinations

During the Golden Age of Travel, from the late 1800s through to the mid-20th century, a number of countries became popular, famous, and even infamous destinations for the well-heeled globetrotter of yesteryear. Countries like Canada, the United States, Cuba, Mexico, Germany, Italy, Egypt, Spain, France, Scotland, Ireland, England, Australia, India, the British Straits Settlements, Hong Kong, Japan and China were all popular tourist spots. If you had the time and money, you might take a whole year off, and visit all of them, going on a world tour.

Among the most popular travel destinations were those considered ‘exotic’, such as Egypt, the Middle East, India, the Dutch East Indies, the Straits Settlements, Japan, and one of the most famous of all: The International Settlement of Shanghai.

The Shanghai International Settlement

Shanghai, China’s most famous port city was a free port from 1843-1943, one of several treaty-ports opened and developed by the British after the Opium War of 1839. Anyone could go there and free trade was encouraged, much like Singapore during the same era. Shanghai in the first half of the 20th century, free from the ravages of war in Europe, flourished. It was not only famous, it was notorious.

Tales abounded of gambling, prostitution, drug-trafficking (mostly opium), giddy nightclubs with raucous jazz music, high living, department stores, the Shanghai racetrack, grand ballrooms and luxurious hotels. But Shanghai, for all its glitz and glamour, pulsing nightlife and sheen of neon, also held a seedy underbelly reeking of gangland violence and crime. The police fought riots, stabbings, shootings, kidnappings, rape and an endless battle against the fierce underground opium trade. Shanghai was the original Sin City.

Who wants to go to Shanghai?

Visiting Shanghai in the early 20th century was like visiting Las Vegas today. Its lurid reputation more than anything else, was its biggest draw card. And for the right price, any and all kinds of thrills could be had, if you knew where to look, and who to contact in the crime-infested underworld of the International Settlement.

The Bund of the International Settlement of Shanghai, 1926

One of the first views of Shanghai that you got was The Bund. The Bund, or raised embankment, was the main riverfront thoroughfare of pre-war Shanghai, then called the Shanghai International Settlement. Stretched out along the entire length of the Bund were banking houses, shipping offices, grand hotels, newspaper headquarters, upscale clubs, the Shanghai Customs House, and foreign consulates.

As your ship sailed up the Huangpu River and away from the Yangtze, this was your first view of the city – all its grandeur out on display like some gaudy jewellery-shop window display. The Bund ran the entire width of the British and French Concessions of Shanghai, from Suzhou Creek, and down the west bank of the Huangpu River. And the ships docked right there on the riverside. The moment you got off, you were plunged right into the heart of Old Shanghai. You had your choice of the two best hotels in town: The Palace Hotel, and the Cathay Hotel (which remain there still, along with all the other buildings, which are heritage protected, although the hotels have since been renamed).

The Palace Hotel (left), and the Cathay Hotel (right). Today, they are called the Swatch Art Peace Hotel, and the Fairmont Peace Hotel. In the old days, the Cathay Hotel was also called Sassoon House. Shanghai’s premier retail street, Nanking Road, runs between them.

Shanghai was so popular that in the United States, some young men joined the United States Marine Corps (USMC) hoping to be posted to the 4th Marine Regiment, also called the ‘China Marines’, because they were based in Shanghai, a city of exotic and oriental wonder! Due to the city’s cheap labour and high standards of living, even humble soldiers lived in relative luxury while deployed to Shanghai. Here, their main tasks were protecting the boundaries of the city and the American Concession, and enforcing the laws of the International Settlement, although this second duty was also carried out by the multi-ethnic Shanghai Municipal Police, whose job it was to enforce law and order within the Settlement.

The SMP was originally largely British, but also included Chinese, Indian, French, and American officers as well. In 1917, famous American songwriter, Irving Berlin, wrote a now, almost-forgotten song called ‘From Here to Shanghai’, which spoke of the singer’s longing to experience something more exotic than just a trip to ‘dreamy Chinatown’. 1922 saw the publication of ‘Goodbye, Shanghai’, and in 1924, one of the most famous jazz standards of the day, ‘Shanghai Shuffle’ was published, showing how popular this destination was among travelling Europeans and Americans.

Travelling to Shanghai from Europe, or even America, took several weeks. Most ships did not sail to most of their destinations directly. Even the largest ocean liners didn’t do that. There was far more money to be made by making regular stop-offs along the way, which at any rate, were necessary to re-coal the ship, drop off mail and passengers, pick up more mail and more passengers, restock the ship for the next leg of its voyage, and then carry on. A ship sailing from England to China might stop at Cherbourg, Casablanca, Marseille, Naples, Port Sa’id, Bombay, Singapore, Hong Kong, and Tokyo before finally dropping anchor at its final destination: Shanghai. You can see now, why such a trip would take up to two months to complete! 

The Shanghai International Settlement went by many names. ‘The Paris of the East’, and ‘The Whore of the Orient’ were two of the most common, reflecting both its ritzy, exotic nature, and its Devil-May-Care way of life.

The Peking Legation Quarter

For tourists wanting to visit the old capital of China (it was moved to Nanking in 1927), you either caught a train from Shanghai to Tientsin, and then to Peking, or else sailed to Tientsin directly and caught a train from there. And while in Peking, you stayed at the famous Peking Legation Quarter, at the Grand Hotel de Pekin, or the Grand Hotel Des Wagons Lits. The Legation Quarter, like the International Settlement to the south, was the Western expatriate enclave within a larger, Chinese city.

After the famous Siege of the Legations in 1900, the entire compound was surrounded by walls and gates to protect it against possible future uprisings, making it look like a walled city. The Grand Hotel Des Wagons Lits was operated by the same company which ran the famous Orient Express, the Compagnie Internationale Des Wagons Lits (“International Sleeping-Car Company”). In Peking, just like in modern Beijing, chief tourist destinations were the Great Wall, and the Forbidden City. After the end of the Qing Dynasty in 1911, the Forbidden City was opened to the public as the Palace Museum in 1925, a position it has held ever since.

Singapore: The Crossroads of the East

Another popular tourist stop was Singapore. Called ‘The Crossroads of the East’, Singapore was ideally situated for a quick stopover on your inspection of the South Pacific. A British colony since the 1810s, Singapore was widely considered to be one of the nicest, grandest, most exotic, and safest places in the world to have a holiday. After all, it had one of the finest military airbases in Asia, as well as some of the best coastal fortifications. For this reason, it was also proudly touted as the ‘Gibraltar of the East’, as well.

The place to stay at while in Singapore was of course, Raffles Hotel. Opened in 1887, Raffles has housed all manner of celebrities, from Noel Coward to Rudyard Kipling and even British royalty. Raffles’ main slogan in the early 20th century came from a review given by Kipling in 1887, months after the hotel opened. Glowing with praise, Kipling had said: “When in Singapore, feed at Raffles!” – however, Raffles was careful not to publicise the rest of his review, which continued: “…and sleep at the Hotel De L’Europe!” – The Hotel De L’Europe was Raffles’ main competition in Singapore at the time! Unlike the Hotel De L’Europe, however, Raffles survived the Great Depression. The De L’Europe, by comparison, closed its doors in the mid-1930s due to falling guest numbers.

As a free port and main stopover for ships plying the passenger trade from Europe to Asia, Singapore boasted excellent shopping. A visit to Orchard Road was almost mandatory, to seek out the latest oriental wonders brought to the colony by ships sailing back from China and Japan.

Berlin: Cultural Center of Europe

Despite the scourge of the Franco-Prussian War and the First World War, during the late 1800s and early part of the 20th century, the city of Berlin, Germany, was a popular tourist-spot for the well-to-do. Renowned as a center of culture, art, music and politics, Berlin attracted writers, journalists, politicians and famous actors.

Hotels like the Adlon became famous as haunts for foreign newspaper-reporters and visiting VIPs. As the Hotel Adlon in particular was (and still is) located in the governmental and diplomatic quarter of Berlin, it was the ideal place to stay for journalists wishing to cover German politics. Foreign embassies and the Reichstag were all nearby. Even today, the Russian and British embassies in Berlin are located just a few blocks from this famous hotel, which was rebuilt in the 1990s on its original location.

Before the scourge of Nazism in the mid-1930s, Berlin was famous for its café culture, its jazz-music and its contributions to film and theatre. European cabaret flourished in Germany during this period and developed its own unique, raunchy humor in the nightclubs and taverns of Berlin. The center of commercial and social life in Berlin was Potsdamer Platz, one of the city’s main squares. Originally formed by the intersection of five different roads, this large, open space was an ideal hub in the center town from which almost anything could be reached. Grand hotels were built nearby, the Potsdamer Platz railroad station was built near this location, and in 1897, the Wetheim department-store was opened near the square. By the 1920s, it was the largest department-store in Europe.

The Nazi rise to power spelt the end to almost all of this. Many of the actors and musicians were at least partially Jewish, and they fled Germany in droves to escape persecution. Many of the actors in the famous 1942 film “Casablanca” were German, Austrian or Czech Jewish refugees which had been actors in their home-countries. They fled to America during the 1930s and reestablished themselves in Hollywood, when it became clear that they could no-longer act in Nazi-controlled countries. German cabaret, which had a strong focus on political and social satire, was all but abolished by the Nazis.

Baedeker Guide Books

Any eager tourist heading off to far-flung destinations today might consult TripAdvisor, or read up on their Lonely Planet guidebooks. If you went anywhere during the Golden Age of Travel, most likely, you stopped off at your local bookshop or travel agency, and asked to be shown their current stock of ‘Baedekers’.

‘Baedeker’ was a German publishing house established in 1827. Throughout much of the 19th and the first half of the 20th century, the Baedeker family became famous for printing guidebooks. Published in German and English, ‘Baedekers’ covered everything from countries around the world, to counties or states within countries, to cities and towns within states, and could be remarkably detailed. From the mid-1850s, Baedeker guides, which were regularly updated, covered countries all around the world. They started being printed in English in 1861, when company founder, Karl Baedeker, realized that for their firm to be successful, they had to appeal to as many languages as possible.

Countries which had Baedeker guidebooks written about them included: Germany, Belgium, Switzerland, France, Palestine, Syria, Norway, Sweden, Great Britain, Italy, Greece, Egypt, Mexico, Canada and the United States! And that’s just from 1861-1900! Other countries that were included in editions printed in the 20th century included Spain, Portugal, Austria-Hungary, and Russia. Cities which earned their own guidebooks were numerous, and extended from London, to Paris to Peking, in China!

Stop and consider for a minute what a challenge it would’ve been to amass such a stockpile of information in an age before the internet. Imagine having to write guidebooks on cities and countries thousands of miles away, and having to rely on steam-post and electric telegraph for communications. Imagine the effort and time it took to send people thousands of miles away to far-off countries to research and gather this information. Far-off countries? In 1914, Baedeker published its first guidebook (in German) on the South Pacific, covering the British Straits Settlements (Malaya, Singapore) and the Dutch East Indies (Indonesia). A journey from Germany to Singapore took over a month by steamship!

An Ongoing Journey

The number of things that a person could say and write about this exciting and romanticised element and era of history are almost endless. I’ll be making another posting soon, about the three most famous vehicles of the Golden Age of Travel – the Hindenburg Airship, the Queen Mary, and the Orient Express!

Antique Brass Pen-Cleaner


During the last public holiday long-weekend, I got the chance to visit the Ballarat Antiques Fair. Two hours’ drive outside of town was rewarded with two venues to visit, and dozens of stalls to peruse! A lot of the stuff on offer was fascinating, a great deal of it was extremely expensive ($1,200 for a silver card-case?), and all of it was very beautiful.

The fair had everything. Antique radios, inkwells, pocketwatches, watch chains, rings, silverware, carriage clocks, ceramics, a Victorian-era pudding-basin (why not?), posters, maps, jewelry and even some vintage clothing. But the item that I walked away from the fair with was a tiny little brass antique, small enough to fit into my pocket – and it’s adorable!

A Victorian-era Brass Pen-Cleaner

And here it is!

Made of brass, and filled with…most likely plaster…and topped with a stiff-bristled brush, this Victorian-era paperweight-and-pen-cleaner dates to around 1890-1910. At one time, fuzzy little devices like these could be found on well-appointed desktops all over the world, but while most people today will still know what an inkwell, a pen-tray, a letter-rack or stamp-box are for, and would recognise most of them in sight – the purpose of the pen-cleaner or ‘nib-wiper’, as they’re also called – has been largely lost from the public imagination of what constitutes a well-stocked Victorian-era desk.

What is a Pen Cleaner For?

Along with string-caddies, stamp-moisteners and blotter-pads, pen-cleaners were yet another desktop staple that used to be found on every well-appointed desk back in Victorian times. Their purpose was to remove the excess, or leftover ink from the nib of your pen. This saved you from fishing around for tissues or paper-towels, saving time, and reducing waste.

In the 1800s, the rise of the mass-produced, punch-pressed steel dip-pen made writing much easier and cheaper. Pens could be easily purchased in boxes of dozens each, which would last for weeks between uses. However, to make the pens so cheap, the steel that was used in their manufacture was usually cheap, brittle and prone to rusting. Constant contact with water-based ink caused the nibs to rust easily. In order to prolong the usefulness of their pens, writers had to keep their pens dry and clean between uses.

It’s for this reason that pen-wipers or pen-cleaners were invented. They were a simple, convenient way to remove the ink from the tip of your pen after writing, to stop the pen from rusting, if it had been used hard, and put away wet – since putting away a wet pen would literally cause it to start rusting.

Pen-cleaners ranged from the mundane to the fantastical. Cheap versions could easily be made from scrap cloth, more elaborate ones could be made of brass, or even silver. They came in all kinds of styles – chairs, boxes, animals…they were circular, rectangular…they came as part of desk-sets, along with inkwells and blotters…and their sole function was to remove ink from the tip of your pen.

In the 1890s and 1900s, with the rise of the fountain pen, pen-cleaners remained a popular desktop accessory, since they could still be used to wipe away the excess ink from the nib and feed of a pen, once it had been refilled in an inkwell. Again, this reduced, or even entirely eliminated the need – to find tissues to clean the pen.

Why Did I Buy It?

For one, it was very cheap. For two, it was in good condition, and for three, I’ve always wanted one!

I love collecting weird, whimsical, obscure antiques. Antiques which come with a story, or which require an explanation of some kind. It makes them more interesting if it’s not immediately obvious what they are.

Yet another reason why I bought it was because I’d been chasing after one of these for years, and I was thrilled to finally lay my hands on one. On top of that, I knew that it’d get a lot of good use out of me, and me, out of it, because of my daily use of fountain pens. I still need something to clean my nibs on, after all!

What Happened to Pen-Cleaners?

Pen-cleaners died out in the second half of the 1900s when people started using ballpoint pens. Like rocker-blotters and inkwells, all these other accessories were no-longer required to maintain or use a ballpoint pen, and so the pen-cleaner also saw a decline in use, until they eventually just faded into obscurity. There is a growing community of fountain pen collectors and users in the world today, though, so who knows? Perhaps the pen-cleaner might be due a revival, as a green, and convenient way to clean ink off of pen-nibs, without wasting so much paper?

Learning a Trade: Guilds and Guildhalls


If you visit any major European city – for example – Brussels, or Amsterdam, London, or Paris, and you go to the “old city” or the “ancient quarter” in the very heart of the metropolis, chances are, you’ll stumble across all kinds of amazing, beautiful buildings. Among these buildings – are guildhalls.

Beautifully-faced guildhalls in the Dutch city of Antwerp.

Guildhalls are all over Europe. Almost every major European city was bound to have at least one – usually – several, sometimes all clustered in one place, sometimes, spread out around the city, but they are there, if you know where, and how to find them. During my trips to Europe, I was fortunate enough to see the Guildhall in London, and some of the beautiful ones in the Netherlands when I visited Amsterdam. But then, you might ask – what is a guildhall? What makes it so special? And for that matter – what the hell is a guild?

I am so glad you asked. Let’s find out together!

What exactly is a Guild?

“I say, Jeeves! What an extraordinary talent! Could one inquire as to…”
“I’m not at liberty to divulge the ingredients, sir”.
“No! Of course not! Secrets of the guild, and all that, eh?”
“Precisely, sir!”

– “Jeeves & Wooster”

A guild is defined as an organisation, or group of people, with shared interests, goals, crafts or skills, which is formed in order to protect their mutual interest, provide support to each other, and to further the improvement of their craft or interest – whatever that happens to be.

Using this definition – how far back can guilds be traced?

Believe it or not, but – thousands of years!

The first guilds – of a sort – were established in Ancient Rome, but the system of guilds that most people think about today were largely created in Medieval (476 – 1350) or Renaissance times (1350 – 1600), and they were established all over Europe, to such an extent that almost every major city was bound to have several of them – and believe it or not – guilds are still being established today – the London Worshipful Company of Art Scholars was created…in 2010!

What is a Guild For? What does it Do?

The purpose of a guild is to regulate a trade or profession, to guard and record trade or craft secrets, and to keep the trade alive. Within a particular community (say – a city), guilds regulated and certified the work done by various craftsmen or professionals within the community. In an age when knowledge was passed down from father to son, mother to daughter, master to apprentice, when records were hard to keep, and literacy was minimal – the best way to ensure that the best of the best interests of a trade or skill or profession were being both protected, regulated, and taught – was to consolidate all this knowledge into one organisation – a guild!

And this trade or profession could be literally anything – writers, weavers, tailors, silversmiths, blacksmiths, accountants, barbers…London even has a guild for taxi-drivers! Guilds existed to preserve a craft or profession’s secrets, skills and histories, and to maintain standards of professionalism, as well as to oversee the continued improvement and education of those who wished to participate in that particular craft or profession, regardless of what it actually was. The closest modern equivalent to a medieval guild is like a modern trade union, where paid-up members receive benefits and have a say in how their trade or profession is regulated, and what it will, or will not do.

How Does a Guild Operate?

When a guild was formed, it first required somewhere to call home – a guildhall, or a guildhall stand-in, if a purpose-built guildhall did not yet exist. The next thing it required was a register – a list of all its members – who they were, what their positions and skills were, and what ranks they held. In older times, these registers were laboriously written longhand by a scribe, and every update or addition required that a whole new document be created from scratch.

The next thing that a guild needed was to establish a body and hierarchy of members. Guilds were broadly broken up into craft guilds, and merchant guilds; craft guilds are the most well-known, and to enter a craft guild required a lengthy training process. This is covered below…

The Apprentice

If you wanted to be part of a guild, you needed to have a trade or craft, and join the guild which catered to that trade or craft. To earn the right to be a craftsman or tradesman, you needed to complete the necessary training and education – known as an apprenticeship. An apprentice was a novice, a student, a pupil of the craft or profession which he hoped to make his life’s work. A newbie, as we’d call it today.

Apprentices almost always started as teenagers, usually between 13-15 years of age. To be made an apprentice, or to carry out an apprenticeship, the hopeful craftsman first had to find someone to teach him the tips and tricks of the trade. To do this, he would visit the guildhall of his selected trade, and seek out someone who would be his mentor – a master craftsman who required an apprentice, and who would offer him a position. If the apprentice accepted, then a document – a Certificate of Indenture – was drawn up.

An apprentice’s Certificate of Indenture.
Note the wavy ‘indented’ line at the top of the page.

Depending on the craft or trade that the apprentice wished to enter, he might find the act of finding a master to teach him, to be easier than he might expect. It was very common for the children of master craftsmen to follow in the professions of their fathers. In this instance, the apprentice’s own father would train them in their chosen profession. In this way, generations of craftsmen could all work within a single family, and many famous craftsmen throughout history, entered their professions this way. Paul Revere, of Revolutionary War fame, was apprenticed to his father, who was a silversmith. John Harrison, the famous clockmaker, was apprenticed to his father, who was a carpenter. But just because you got to join the family business didn’t mean that you could escape the strictures of the day – you still had to fill out your certificate, sign it, and agree to it.

The certificate – colloquially known as one’s “indentures” or “indenture papers” – was a contract between the Master Craftsman, and the Apprentice. It stipulated in black and white what the Master owed his apprentice, and likewise, what the Apprentice owed the Master. Both parties would sign the indentures (there was always at least two) and then it was certified by a legal official such as a notary, judge, or a member of the guild.

Silversmith Paul Revere Junior,
holding a silver teapot

The document was then sealed, dated, and finally – torn in half. The wavy, curving lines that were made along the break in the paper was what gave the document its name – the line wasn’t straight – it was never straight – it was always ‘indented’ – wavering, irregular and erratic. This is why the documents were known as ‘indentures’. This was done deliberately so that it would be impossible for either party to create a fake agreement later on, changing any of the terms or conditions previously agreed upon, since both documents had to be presented at the same time, and they both had to match up along the same wavy, indented line when they were put together.

Apprenticeships lasted a very long time – the usual length of time was seven years. In this way, an apprentice completed his apprenticeship when he was in his early twenties. In that seven years, an apprentice was expected to learn, and be taught, all the skills and tips and tricks of his chosen trade or profession. Apprentices typically did all the grunt-work. Looking after tools, doing the simple, unskilled jobs, cleaning the workshop, lighting the fire, understanding how the implements and tools were used, and how various techniques and finishes were applied or carried out.

Near the end of their apprenticeships, to prove that they were paying attention, and actually knew what they were doing, apprentices had to pass, what we would today, call a ‘practical examination’. In this, they had to prove their skills to their master by creating what was called a ‘journeyman piece’ – this piece would incorporate all the various skills, techniques and methods that they had learned throughout their apprenticeships, and the better it was, the more likely they were to progress in their profession. Tailors had to make clothes, carpenters might make furniture, a cabinetmaker might try to build a chest of drawers, a silversmith might try to make a silver beaker or tumbler, and so on.

The point of the journeyman piece was to show that he had attained the necessary skills to move up to the next rank – that of a journeyman craftsman. If he had, then he had successfully completed his apprenticeship, and could move on upwards…

The Journeyman

The next step up for the budding craftsman was to be a journeyman. A journeyman was any craftsman or skilled tradesman who had successfully completed the contract of his indenture, and was now considered to have mastered the basics of his craft. The next thing he had to do was to gain experience. Experience was gained by working as an employee of a master craftsman. Not an apprentice – who was a student – but as an actual paid worker.

The word ‘Journeyman’ comes from the French ‘Journee’ – meaning ‘day’ – a craftsman had now advanced from being an apprentice, to being a day-labourer – someone who was literally paid per-day of work by his employer. Journeymen were more free in their work than apprentices – they could have their own families and private lives, they could own their own property and come and go from work each day as they pleased. This was in contrast with an apprentice, who typically lived with his master in his master’s house, with the master expected to feed, clothe, and house, as well as train and educate his pupil.

While journeymen were apprentices who had successfully completed their apprenticeships, they were not yet considered fully-fledged artisans in the sense that they did not have the right to employ someone else to work under them, however, a journeyman – again, unlike an apprentice – had the right to demand payment for their day’s work.

If, or when, a journeyman decided that he had had enough of working for ‘the man’, then a journeyman could, if he had the skill, apply to become a master craftsman. Just as an apprentice had to complete a journeyman piece to become a journeyman, a journeyman had to complete a masterpiece in order to become a master craftsman. However, while a journeyman piece was judged by a master, a masterpiece was not judged by another master – but by several masters!

See, the only way to actually join a guild was to prove to the master craftsmen of that guild that you deserved the privilege, and had the skills, to make it worthwhile to accept you as a member. So if you wanted to try and become a master craftsman, then your masterpiece was submitted – not to one master – but to several masters! And if they all agreed that your masterpiece really was a masterpiece – and that you had shown that you had exceptional skill – you would be granted the title of master!

The Master Craftsman

As a Master Craftsman, you were now able to carry out your desired trade as you wished. This meant that you could open your own business, hire apprentices, set your own prices, and decide what, when, why, where, and how you worked. However, there were still restrictions.

See, to be a master craftsman, you had to follow a sort of ‘Code of Conduct’, and to ensure that you did follow this code, a lot of cities insisted that any craftsman or skilled labourer working within the bounds of the city had to register themselves with the guildhall of their specific craft. So, you might be a master silversmith, but you couldn’t work as a silversmith in a city without first registering yourself as a silversmith at the city’s silversmithing guildhall.

Registering with your specific guild meant that you had to follow specific rules and regulations. While you were free to do what you wanted, more or less, you were also prevented from doing certain things – for example – you couldn’t talk about your profession – guilds existed to protect the interests of their members – and these interests included any trade or industrial secrets, processes or methods which their members carried out – so you couldn’t divulge secret recipes, or special methods or experiments – to anybody outside the guild. Punishments for doing so were surprisingly severe, and usually included some form of public humiliation.

While this might sound extreme, being a master craftsman or merchant registered with your particular guild also came with a lot of perks – paying your membership fees ensured all kinds of benefits, and guilds operated specifically to benefit their members. The very word “guild” comes from the German word “Gelt” and the Old English word “Gield” – meaning “Payment, or money”.

In this way, guilds were a sort of insurance firm or benevolent society – they provided financial assistance to help master craftsmen start up their own businesses, provided poor relief if they lost their business, shared trade secrets, and regulated working conditions.

Unsurprisingly, guilds could become extremely powerful – so much so that they could, if they desired, not pay, or pay very few – taxes – especially if the guild handled a trade or craft that was particularly important.

The Decline of the Guilds

Guilds and their guildhalls remained prominent through much of the Middle Ages (476AD – ca. 1400), the Renaissance (1400-1600) and much of the Early Modern period (ca. 1600-1800). However, by the time of the Vcitorian era, guilds started losing a lot of the prominence, power and influence that they had once held for over a thousand years. Many factors led to their eventual downfall.

Guilds carried out a lot of functions – they regulated prices, training, education, keeping of records, and countless other things – but they were also – in a sense – monopolies. If you wanted to trade as a particular craftsman or merchant within a particular city – you had to join the city guild dedicated to that craft or area of merchandise – no ifs, no buts – no join, no sell. Simple as that.

A lot of traders and craftsmen started seeing this as being detrimental to their trade – after all – why should a guildhall determine how much you can sell your stuff for? Why should it be a law that you HAD to join the guild just to trade within the city boundaries? Fair enough, they kept records and oversaw apprenticeships, but craftsmen and artisans started feeling that some guilds were simply getting too powerful for their own good, and shifting attitudes in the Victorian era saw guilds gradually decrease in power over the next hundred years.

By the mid-1800s, guilds had lost much of their power. Changing attitudes about work, and how trade and industrial secrets should be protected, sapped the guilds of their authority. Political changes such as the French Revolution of 1789, and the “Year of Revolutions” (1848), caused the guilds in many cities, sovereign states and city-states across Europe to be dissolved, and their functions taken over by modern companies and businesses, with laws enacted to cover the areas once protected or regulated by the guild system.

Guilds Today?

Guilds as we tend to think of them – as in, the Medieval European guilds, do not exist anymore. Guildhalls remain as historical landmarks and heritage protected buildings, but the organisations they housed are largely lost to history. Some organisations call themselves guilds, although this is mostly as a professional courtesy or nostalgic throwback, rather than having any actual resemblance to medieval guilds.

In London, there do still exist a number of “Worshipful Companies”, which operate similar to guilds, but the number of institutions that exist today, which are most like real medieval guilds are fast disappearing, if indeed they still exist.

Antique Tortoiseshell Dining Trousse


Chopsticks have always fascinated me. They’re simple, elegant, portable, robust, and compact. And, once you’ve mastered the use of chopsticks – almost anything can be used as chopsticks – I remember Jackie Chan in one of his early movies, where his character was trying to have lunch in his office – unable to find any actual chopsticks to eat his noodles with, he gave up and used a pair of pencils, instead!

Although these days, it’s common in many Asian households to have an entire drawer-compartment overflowing with chopsticks, and the only problem you face is trying to match them up when you need a pair to eat lunch with, in times past, chopsticks were highly-prized personal possessions, and it was common for people to each have their own pair. In some countries – such as Japan – this is still the case. At a time when chopsticks were hard to come by, once you owned a pair – you carried it with you everywhere!

Such was the case, when this trousse was made!

What is a Chopstick Trousse?

‘Trousse’ is a French word, which variously means “kit”, “case” or a type of compartmentalised container, used for storing implements, tools or utensils required for a specific task. This is a chopstick trousse, and its task is…eating!

Chopstick trousses were created back in the 1700s in northern China. Their use was encouraged after a law was passed by the Qianlong Emperor, which decreed that all Manchu-Chinese had to carry around a pair of chopsticks, and a knife, with which to eat their food. Manchurian and Mongolian dining habits and styles meant that a knife was an essential part of one’s eating utensils, since the knife would be used to slice or cut up one’s meat. The passing of this law was to ensure the preservation of Manchurian culture, since Manchus were a minority elite, ruling over the much larger Han Chinese population at the time.

A lot of people call these things Chinese or Japanese eating trousses. I’m not sure why, because they don’t come from Japan, and while they existed in China, they were never used by the Chinese. Japanese and Chinese dining customs don’t use knives – they didn’t then, they don’t now. Trousses like these were largely used by minorities.

The standard chopstick trousse comes with a single, thin, long-bladed knife, and a pair of chopsticks, which may, or may not be chained at the top (to prevent loss if they fall out). I have seen sets with two knives, and two sets of chopsticks, but the vast majority will have just the one knife, and one set of chopsticks.

The case, with the chopsticks and knife.

How is it Made?

Almost all trousses were made of wood – wood is easy to find, easy to carve and shape, and easy to stick together. This trousse is also made of wood. How trousses differed from each other, however, was in how they were decorated. Trousses could be embellished in any number of ways, from inlaying bone or silver, brass or nickel, leather, sharkskin, stingray, or in the case of my trousse – tortoiseshell.

The tortoiseshell – thin and flexible, would have been steamed – much like how you steam wood – to soften it – and when it was especially soft and flexible, the tortoiseshell was wrapped around the wooden body of the trousse, with a layer of glue in between, to adhere one to the other. A similar process would’ve been carried out to sheath the knife-handle in the same tortoiseshell.

What is it Made Of?

This trousse is made of wood (which makes up the body of the trousse and the handle on the knife), brass (the collar at the top of the trousse), tortoiseshell (the decorative overlay), silver (the chopsticks) and finally – the white collar and pommel on the knife are both made of bone. Bone was a very common material to make trousse accessories from – chopsticks, knife scales, hilts, collars and pommels were all made from bone. It was abundant, cheap, or free, easy to carve, and could be polished to a beautiful whiteness – and much easier to find than ivory!

Are Trousses Common?

Fairly common, yes. I suspect that millions of these things were made over the centuries, and that many were probably brought to the West by expats, explorers, missionaries or tourists traveling in Asia in the 1800s and 1900s. They range in price on eBay from $150.00 to over $300-$500, depending on age, condition, and level of decoration and detail. I don’t know exactly who collects these things, but there does seem to be an interest in them.

Repairing the Trousse

The trousse was pretty cheap when I bought it – this was largely due to the fact that it wasn’t complete at the time. The trousse didn’t come with its original chopsticks, which were probably bone, so I replaced them with my silver chopsticks which I bought about two years ago. On top of that, some of the tortoiseshell was also coming loose. I removed the tortoiseshell and glued it back on. Once it was secured, then I started working on another part of the trousse that needed my attention: the pommel at the top of the knife.

The point of the pommel is to protect the top of the knife handle. In this case, the pommel was missing, but I could tell from the hilt or the collar at the end of the blade next to the handle, that it would originally have been made of bone. I was able to secure some small pieces of bone, and, using a file, some sandpaper, glue and oil, I was able to shape the bone, glue it onto the top of the knife, file and sand it flat, polish it smooth, and shape it to the shape of the top of the handle.

Although it’s a tiny detail, just fixing this one element took several hours of filing, shaping, measuring, sawing, gluing, filing, and more filing, and finally, polishing, to get the new pommel not only to stay on top of the knife, but also fit in with the thickness and shape of the rest of the knife and its bone hilt, as well. It’s not 100% perfect, but at least the knife now looks much more complete than it previously had done.

A Classic of Luxury and Status: The Montblanc Meisterstuck 149 – Part II – Spotting Fake Montblancs


The Montblanc Meisterstuck #149. A pen of legendary, mythical proportions. Much has been said about this pen, and much has been written about this pen…and…much has been written with this pen. I’ve wanted one for years, but was constantly put off buying one because of their massive price-tags ($1,200AUD+, at the time of this posting).

But then, Saint Nibby, Patron Saint of Fountain Pens, decided to throw some luck my way – and I was able to buy a vintage Montblanc Meisterstuck 149 at auction – as part of a box lot of pens – at a price which was about 80% cheaper than its current retail price. You bet I jumped at it!

Before taking that plunge, however, I spent a lot of time examining the pen, before deciding to bid on it. While the pen was vintage, and secondhand…it was still a Montblanc, with everything that comes along with it – including a high price. So you bet I took a bloody long time to examine that pen in detail, before deciding to toss even a bent penny towards it.

Fortunately, the pen I bought was 100% legitimate, and 100% vintage – made in West Germany in the 1980s, and sold out of a jewelry shop in Hong Kong on the 22nd of December, 1989 – I know this, because the Montblanc Instruction Manual that came with the pen had all this information written inside it. So, 30 years ago, someone bought someone else a very expensive Christmas present!

In my case, I got lucky. But there are people out there who are not so lucky. Unfortunately – all famous brands are faked. Louis Vuitton, Rolex, Montblanc and countless others, are often the victims of forgeries and fakes, and every year, hundreds of people pay massive amounts of money for something that isn’t what they were hoping it was.

Now, you might think – what does it really matter, if the fake is good quality, and didn’t break the bank? Is it really an issue?

Yes. For two reasons.

  1. If it’s a fake, it won’t be covered by warranties or return-policies. If the item gets damaged and needs to be repaired or replaced – the company won’t honour its end of the bargain, because you didn’t honour your end of the bargain by buying a genuine item.
  2. If you try and sell the item later on – nobody will want to buy it from you, and you’ll be stuck with something that you can’t get rid of.

Now, I understand that not everybody goes out looking to buy a fake, and that some people do get caught up in nets of deceit and lies. So, how do you spot a fake? Or to be precise – How do you spot a fake Montblanc Meisterstuck 146 or 149 fountain pen?

This guide is going to be written assuming that you don’t have any (or much) experience in buying Montblanc fountain pens. We’re taking simple, easy baby steps here, and will, by and large, be sticking to one or two models: The Meisterstuck 146, and the larger and more famous 149. There’s a lot of things to consider when buying a Montbanc fountain pen, and a LOT of things to be weary of, when dealing with fakes.

Montblanc Fountain Pens – Spotting a Fake

Selling vintage and secondhand pens is a very lucrative business. There are dealers and collectors out there who are able to make a pretty decent living, just from flipping old pens, repairing them, cleaning them, and putting them back out onto the open market. This is great for writers, or pen collectors, because it means that they can get great pens at discount prices, which perhaps they wouldn’t ordinarily be able to afford. But as always in the secondhand market – Caveat Emptor – Buyer Beware.

Whether you’re buying a vintage Montblanc online (eBay, Facebook Groups, secondhand dealer, antiques store) or in-person (auction house, flea-market, pen show, etc), there are certain things you should be aware of, before dropping hundreds, or even thousands, of dollars, on a Montblanc pen. As a pen collector and writer of many years’ experience, I’m going to share a few tips with you – here are some things to look out for…

How Much Does It Cost?

This might sound like a stupid thing to pay attention to, I know – but hear me out. Let’s say you find a Montblanc, secondhand, on eBay, or Facebook, and you want to buy it. Pay attention to the asking price – especially if it’s being sold by an “official distributor” (pfft, yeah right).

Brand-new Montblanc pens cost STUPID CRAZY amounts of money. Hundreds, thousands, even TENS of thousands of dollars EACH. Nobody selling Montblancs – whether they’re brand new, or vintage – is going to let them go for dirt-cheap. If you see someone trying to sell you a Montblanc for under $200…pick up your wallet and RUN AWAY. Real Montblancs are bloody hard to win at auction, and difficult to find secondhand for good money – so anyone who ever bought one to resell it is not going to give it away for nothing. If the person trying to sell you that ‘Montblanc’ is giving you a deal too good to refuse – then you should probably refuse it.

That said, just because a Montblanc online is really expensive doesn’t mean that it’s real, either. You can charge whatever the hell you want for a piece of crap…and it’s still going to be crap…it’s just going to be really expensive – and worthless – crap. So what else can you do to find out whether a pen is real or not? Keep reading, below…

How Many do they Have?

Another way to spot a fake, is to ask the dealer or seller how many Montblancs they have for sale. Make up some bullshit-story like you need six identical 146s, for your groomsmen at your wedding or something – and see what the dealer says. If they automatically say ‘Yes!’…then back away very, very slowly.

Most vintage pen dealers will not be able to afford dozens of Montblancs. If someone suddenly claims to have six identical ones, or more, and they’re going to sell them to you at bargain prices, then they’re either very rich…or very fake. In twenty five years of writing, and twenty years of collecting fountain pens, I’ve only ever owned four Montblancs – and only two of those I bought with my own money, and only because they were absolute bargains secondhand.

Regardless of what the model is, Montblancs are that bloody expensive to buy brand-new, that most people just can’t justify the price. Only someone with hundreds of fakes lying around, will be able to fulfill a request like selling you six or nine or twelve Montblancs all at once.

What’s the Packaging Like?

A NEW Montblanc pen comes in exquisite packaging. Everything is crisp, clean, two-toned black and white, with foam padding and soft, silk-like interiors.

No Montblanc will ever be sold, brand-new, in some cheap, velveteen slip-pouch, or some leather pen-sleeve. All Montblanc pens are sold in-box – sometimes (but not always) with a complimentary bottle of ink, and other trinkets (my 145 Meisterstuck c/c filler came with a CD of Chopin piano music).

Check all Online Photographs

If you’re buying the pen online – ask the dealer for photographs – clear, high resolution photographs – of the clip, the cap-bands, the engravings, the ink-window, the nib and the filling mechanism of the pen.

No seller of fake Montblancs will ever oblige with these photographs. And if they do – then they’re hoping that you’re going to be stupid enough to not-know that they’re selling fake Montblancs. Someone selling a real Montblanc will always do their best to give you the best photographs they possibly can. So, what should you pay attention to?

I am so glad you asked…

Fake Montblanc Fountain Pens – What to Look For

As I said earlier – the Montblanc Meisterstuck 149 has a current retail price of – depending on where you bought it – $900 – $1,200+.

For that kind of money, you expect to buy something that is – in every way possible – the very definition of writing perfection. A Montblanc 149 should be literally flawless in all respects, with absolutely nothing wrong with it at all in any capacity whatsoever.

Fakes always have something wrong with them.

So – what wrong things should you be looking for?

Check the Nib

First thing’s first – check the nib.

A REAL Montblanc fountain pen nib is made of 14 or 18kt gold. They always have been, and always will be. Every Montblanc nib has “4810” on it (the height of Mont Blanc in meters), and the purity of the gold in ’14k’ or ’18k’, with either 585 or 750, underneath. In case you’re wondering – that stands for 58.5% gold, or 75% gold (the rest is copper, to give the nib strength and durability). Gold purity changes on Montblanc nibs across their pen-range. Some pens have 14k, others have 18k. But this isn’t set in stone. My 145 and 149 both have 14k nibs, but I have seen other MB 146s and 149s which have 18k nibs.

Nib porn!

What is consistent is that the nibs are always two-toned – gold, and silver (although it’s actually rhodium). Again, there’s no set system to this and the same model of pen can alternate between 14k and 18k, two-tone with gold exterior and rhodium interior, gold interior and rhodium exterior, gold with a rhodium band…the designs change constantly, to keep things fresh.

With that said – how the hell do you tell what a real Montblanc nib is? Here’s how:

If your ‘Montblanc’ has a nib that says “IPG” or “Iridium Point Germany” on it – run away.

If the engraving on your Montblanc nib isn’t utterly gorgeous and flawless in every way possible – run away.

If your Montblanc nib is engraved AT ALL – run away. Montblanc nibs are formed and molded – NOT engraved.

If the nib is scratchy or otherwise defective – then it’s not a real Montblanc nib. If the pen is secondhand, then it may be a real Montblanc, of which the nib was damaged, which would have to be reformed or replaced – but no Monblanc fresh out of the box, will have a defective nib of any kind – remember – $1,200 pen here. A brand new Montblanc with a defective nib is like a brand-new Rolls Royce with a massive dent in the passenger-door…it does not exist.

If the nib looks like gold-plated steel – then it’s not a real Montblanc. All Montblanc pens, without exception – have solid gold nibs. Even if you dropped the pen and sent it back to the factory to have it repaired – the new nib will be solid gold. There is no such thing as a Montblanc fountain pen with a steel nib. They do not exist. If you see one – it’s a fake.

Check the Cap Bands

Montblanc pens are famous for their cap-bands – the three gold rings near the bottom of the cap.

When fountain pens were first invented in the 1890s – caps did not have bands. They were added in as an afterthought in the 1910s and 20s, to reinforce the cap, and prevent it from cracking and splitting from someone screwing the cap onto the pen too tightly. To a certain extent, cap bands still fulfill this function, although these days, they’re largely decorative in nature.

So – you might as well enjoy the decoration, and take a nice, close look at it.

The seam between the cap-rings and the cap should be flawless. The engravings on the cap-bands with the company name, and the model number or name of the pen, should also be flawless. Remember, you’re paying for a pen which costs hundreds, or even thousands of dollars – it had bloody well better be perfect!

If there’s any flaws at all – it’s not a real Montblanc – put it down, and back away.

Check the Resin Body

Here’s another one you may not be aware of – Montblanc pens are made of a particular type of resin plastic, designed to be scratch resistant, and highly lustrous. Pick up the pen – unscrew the cap and hold it up to the light – or, failing that – shine a light-source through the cap.

A REAL Montblanc cap is not actually completely black – it’s translucent – light shines THROUGH the cap – and it shines through as a very dark, maroon wine red colour.

If your cap doesn’t have that dark red translucency when you shine a light through it – yep – it’s fake!

Check the Filling System

Unless it’s a 144, a 145 (which are cartridge and/or converter fountain pens), or one of Montblanc’s older, lower-tier vintage models, almost without exception – all Montblanc fountain pens are piston-filling fountain pens with striated ink windows above the section threads.

What is a piston-filling fountain pen? Perhaps you don’t know? No problem!

A piston-fill pen is a fountain pen with an IN-BUILT filling mechanism whereby ink is sucked INTO the pen using a piston mechanism. This is operated by turning the piston-knob at the top of the pen, under the blind-cap (in the case of Montblanc pens, the blind-cap and the piston-knob are one-and-the-same).

No Montblanc fountain pen larger than a 145 will ever have a separate – removable – piston-converter – inside it. The way to fill a pen such as a 146, or a 149, is to:

  1. Uncap the pen.
  2. Insert the pen into a bottle of ink.
  3. Unscrew the blind cap at the top of the pen, as far as it will comfortably go (DO NOT FORCE IT).
  4. Screw the blind cap back down until it’s secure.
  5. Remove the pen from the bottle of ink, and wipe down the nib.

If someone is trying to sell you a Montblanc 149 or 146, or any other Montblanc pen which has a piston-filler mechanism inside it – and says that they have “extra refills” for sale – or spare converters, or something – run away.

Nobody who is selling a 146 or the larger 149, and knows what it is – will say that it takes ‘refills’ – there is NO SUCH THING as a ‘refill’ for a Montblanc 149 fountain pen – the only ‘refill’ that exists is a bottle of fountain pen ink, and that is the only thing they take. If someone shows you photographs of their Montblanc Meisterstuck 149, which they have for sale, and the pen has been pulled apart at the section, just above the nib – then either the pen is fake, or they’ve just snapped a $1,200 pen in half.

Look for the Ink Window

While we’re on the subject of filling up the pen – another thing that usually differentiates a real Montblanc from a fake one is the presence of the ink-window on all Montblanc Meisterstuck 146 and 149 piston-fill fountain pens.

The ink window is that little striped clear area on the pen barrel, just above the section threads. The point of the ink window is so that you can see the ink inside the pen…duh! Real Meisterstucks have ink windows…fake ones do not. If your Meisterstuck 149 or 146 does not have an ink window, it’s not real. While we’re on it, the 145 doesn’t have an ink window because it’s a converter pen, and therefore doesn’t need one.

Check the Clip

When buying a suspect Montblanc, check the clip at the top of the cap. Since about 1990, every Montblanc fountain pen has been sold with a SERIAL NUMBER engraved into the clip-band at the top of the cap. The number is ALWAYS on the ring to the RIGHT of the clip and every serial number is unique. No two pens ever have the same number.

Montblanc Meisterstucks – made in the decadent and extravagant capitalist bastion of West Germany!

While we’re looking at the clip – check for the word “PIX”. This is usually underneath the clip itself and is part of the clip – so if it’s been engraved in separately, then it’s not real.

Check the Paperwork

If the pen comes with any type of paperwork, or extras like cartridges or a converter or something – look at the text on them. In particular, check the spelling of “Montblanc”.

Yes, I’m serious.

The company name is MONTBLANC – Not Monblanc, not Mont Blanc, not Mount Blanc. It is – MONTBLANC – one word. There is a “Mont Blanc” – which is the name of a mountain in France – after which the company is named. But the actual company itself has always been called MONTBLANC. If it isn’t – then it ain’t real.

Fake? Or Just Old?

All the information posted above, relates, by and large, to modern Montblanc fountain pens, manufactured, and sold, right now.

It does not necessarily relate to vintage, or antique Montblanc pens.

Because Montblanc pens are so expensive, it can be tempting to buy a secondhand one, vintage, online, or at a flea-market or something like that. And there is nothing wrong with that. The problem arises when you have to decide if the pen you’re buying is a fake…or just old?

Older Montblanc pens (Pre-1990, generally) will not have “PIX” on them anywhere. They will not have serial numbers, and the packaging may appear rather simplistic by modern standards – but that doesn’t mean that they are not Montblancs. For example – vintage Montblanc 149s had “149” actually stamped into the blind-cap at the back of the pen – did you know that? Did you also know that they used to be made of celluloid, not resin plastic?

And let’s not forget that the Montblanc 149 was introduced in 1952. This means that the pen is very much a product of its time – and that time was the Cold War.

So what does this mean for Montblanc? Well, it means that the clip-ring at the top of the pen says “W-GERMANY”, not just “GERMANY”. Why? Because it was produced in West Germany, during the Cold War. This is just one of the many subtle changes to Montblanc pens that you should be aware of, if you decide to go out and buy a secondhand or vintage model.

Closing Statements

Well, there you have it! How to spot a fake Montblanc 149 Meisterstuck (or any of its little brothers). I tried to make this as succinct a guide as possible, but the fact is that fakes are getting so much better these days that you really can’t leave anything out.

If you’re buying a Montblanc online or secondhand from anyone who isn’t a registered Montblanc distributor, or from the company itself, you really do have to be very careful. Fakes are certainly out there, and you can end up buying one, if you’re not careful – a friend of mine did that a few years ago at a pen show. It was a hard pill to swallow.

A Classic of Luxury and Status: The Montblanc Meisterstuck “149” – Part I


My first love has always been the art of writing. I love just being able to relax, and let my mind run free. I love being able to let thoughts flow and form as they will, and transcribe them into something strange and wonderful, weird and whimsical.

For this reason, the right type of writing instrument has always been very important to me. Just as a concert pianist will insist on a Steinway, or a violinist will insist on a Stradivarius, or a chef will insist on Wusthoff, writers who want to use quality writing instruments also insist on certain brands of pens. In America, names like Parker, Sheaffer, Waterman, and Wahl-Eversharp spring to mind. In Japan, companies like Pilot or Namiki, or Sailor are most prominent. In Europe, you have Visconti, Conway-Stewart, and Pelikan.

But of all these dozens of pen-companies from all over the world, one particular company – and one particular model – has always stood out. That company is Montblanc, and the pen, is the Meisterstuck 149.

Much has been said, written and filmed, about the Meisterstuck 149, and in this posting, I’ll be going into a bit of the pen’s history, and why it has attained such a position as it has, among the world of not only writing, but of luxury products in general.

What is ‘Montblanc’?

Montblanc is a luxury retail company founded in Germany in 1906. The name comes from “Mont Blanc”, the tallest mountain in Europe. Mont Blanc, which is located in France, was taken as the company’s name to symbolise the fact that this company was the pinnacle of excellence in every way possible. The white star on the cap of every Montblanc pen is meant to represent the white snowcap of Mont Blanc, and the “4810” on every nib represents the mountain’s height in meters.

While today, Montblanc make all kinds of products, from leathergoods to watches and a wide range of writing instruments – originally – Montblanc was simply a pen company – and its goal was to make simple, good-quality, no-nonsense pens that worked.

What is a ‘Meisterstuck’?

In 1924, Montblanc introduced a new line of pens: The Meisterstuck (“Masterpiece”) Line (“Mys-ter-stook”), which was intended to be the company’s first-tier, first-class, top-quality range of luxury writing instruments! Between 1924 through the 1930s and 40s, Montblanc experimented with various models and styles, partially inspired by streamline styling which was highly fashionable in the late 20s and early 30s and 40s.

My West-German Montblanc Meisterstuck 149 (Ca. 1980)

Based in Hamburg, a major German port-town, Montblanc’s facilities were flattened by the Allies during World War Two as the British and Americans aimed to cripple as much as possible, Germany’s manufacturing (and therefore, war-making) capabilities. When the war was over, however, Montblanc and Hamburg found itself in the new West German republic. Eager to turn over a new leaf and bring prosperity back, Montblanc rebuilt itself and went back to manufacturing their fabled Meisterstuck line, complete with the white star logo, and lifetime guarantees on all its pens.

What is a ‘149’?

The Montblanc Meisterstuck #149 is the company’s most famous pen-model BY FAR. It is instantly recognisible to any collector of fountain pens, or follower of pop culture, or connoisseur of luxury products.

But…why? Why this pen? Why this particular model? What makes it so special? And for that matter – what does ‘149’ even mean?

‘149’ refers to the original coding system used by Montblanc, when this particular model was introduced in 1952. “1” refers to the product-line. In this case – the Meisterstuck Line. “4” referred to the filling mechanism (pens with ‘4’ were piston-fillers), and the “9” referred to the size of the nib. So a Model 149 was a Meisterstuck piston-filler with a #9 nib.

MB 149 (left) next to the much smaller MB 145

From the 1950s to the 60s and 70s, Meisterstuck 149s were made of celluloid plastic – the same substance used to make similar fountain pens in the 1920s and 30s. Celluloid plastic is very strong (Parker used to chuck their pens out of office windows to prove their durability!), but it has one drawback – it discolours. Blues darken, reds fade, greens turn brown and black can fade to brown. In the case of Montblanc 149s, the striated ink-window, just above the section would discolour to a unsightly yellow-brown colour.

This is why, in the 80s and 90s (and still today), Montbanc pens started being made out of a more stable resin plastic, which was smoother, more colour-fast, was more resistant to scratching and staining, and held a high-gloss finish better than celluloid did.

Montblanc and Status

Like Tiffany & Company, Rolex, Louis Vuitton and Moet & Chandon, the name ‘Montblanc’ has, for over 100 years, been a hallmark of quality, and a status-symbol. But what was it that earned Montblanc pens, and particularly, the 149, this particular status?

One of the main reasons why Montblanc has attained the position that it has was because of the state of American manufacturing.

Between the 1850s to the 1950s, America, Germany and Britain really competed in the market of consumer-goods. Duesenberg, Rolls Royce, Parker, Sheaffer, Singer, Siedel & Naumann, Saville Row, Rolex, Royal, Remington-Rand, Ball, Hamilton, Waltham, Elgin…at one point, all these companies were household names. But how many of them do you actually recognise?

Up until about 1960, American manufacturing was among the best in the world. American watch companies like Waltham, Ball, Elgin, Gruen and Hampden, made the best watches in the world, comparable with anything made in Europe. The same was true of American pen companies like Parker, Sheaffer, and Waterman. But American manufacturing of high-quality consumer-goods took a BIG hit post-WWII, so much so that by the late 1950s, almost all these companies had either died off, or were bought out or moved manufacturing offshore – for example, Parker ended up in England and Waterman ended up in France…where they still are today.

The collapse of the American pen manfacturing industry meant that other companies – mostly European ones, started taking over. Brands like Pelikan, or Conway Stewart, Onoto, Swan and…Montblanc…started replacing Parker, Sheaffer and Waterman while these companies were in transition between new owners…or in the case of companies like Wahl-Eversharp – dying a slow and quiet death.

But why did Montblanc, of all companies, rise to fore? Why not some other company?

Part of it had to do with marketing. Companies like Conway Stewart, Onoto or Platignum (yes, there is a ‘g’ in there) did not make ‘luxury’ pens – they made solid second-tier everyday writing pens. They were not interested in making luxury products – they merely wanted to make nice products which were attractive, and worked, and which were affordable to the everyperson in the street.

Montblanc, on the other hand, was really aiming for that high-end market. With American pen manufacturing companies in limbo in the 1950s, companies like Montblanc surged forwards to fill in the luxury market once held by Parker and Sheaffer, and the company’s list of customers and clients started to grow.

The rise of the 149

As Montblanc started taking over in the 1950s, replacing or outselling other pen companies, people started taking notice – especially when it brought out the 149.

It’s fair to say that in the 1940s, 50s and 60s – most companies were not producing huge pens. Parker made a few Oversized English Duofolds, but the vast majority of pens made during this time were rather standard-sized – so this would’ve made an oversized luxury pen, such as the 149 – stand out even more. And because it stood out so much more, people started taking notice of it. People like President John F. Kennedy, and English writer Iris Murdoch. Kennedy’s use of the Montblanc 149 is particularly notable because it was used during a major televised event, which did much to boost the pen’s popularity and notoriety.

Ever since, the Montblanc 149 has been a status symbol. Rightly or wrongly, it’s a pen that everybody recognises, and which most people have heard of. Its classic black and gold profile has been imitated by countless manufacturers, both expensive and cheap, and has appeared in countless magazines, movies and television shows for decades now. It has been used by famous actors, world leaders and celebrities the world over, and continues to enjoy the reputation that it has held for nearly seventy years!

The Montblanc Meisterstuck 149 – A Pen Review

In closing off this article, I thought I’d write an actual review of the pen. So, here goes…

Value for Money

There is no denying that the Montblanc 149 is a very expensive pen. Where I’m at, they currently retail for about $1,250.00. In an age when most people would struggle to justify spending $50.00 on a fountain pen, and when most collectors would struggle to spend $250.00 on a fountain pen, it is by far, one of the most expensive models out there.

Good thing I did’t pay that much. I got mine secondhand at auction, and paid just over $200 for it, which is about 80% cheaper than the RRP!!

But, the actual price aside – is the pen value for money?

In my opinion – yes. Status and branding aside, the 149 is a solidly constructed pen. While some say that a lot of the price goes into the status and the branding and the image, I would also argue that a lot of the price goes into the quality of the manufacturing – after all, you’re buying something from a company with a big reputation, and with a big reputation to lose, if what you buy isn’t absolutely first-class, for the money you just spent on it.

The 149 is a very robust pen. It’s well-made, it’s elegant, and they last for decades with minimal maintenance. Occasional cleaning to prevent buildup of dried ink, and the odd nib-polishing will keep the pen fresh, clean and functional for many decades – the model I bought was made back in the 80s, and I didn’t have to do a single thing to it, to get it to work.

Ease of Use

Is the Montblanc 149 comfortable to use? Yes, it is. The plastic resin is smooth to the hand, and the nib writes like ice on glass. For such a large pen, it is actually surprisingly light in the hand, which means that your wrist and fingers won’t feel weighed down or unbalanced while writing – very important for a pen which you might spend a lot of time using!

The only slight issue is the pen’s size. While it isn’t heavy, it is long. And this may cause discomfort for some people in the sense that the pen may be unbalanced if you try and write with it, with the cap posted. If you have larger hands, then this might not be a problem (in fact, it may be an advantage), but in general, writing with this pen posted isn’t my idea of comfortable.

The Filling Mechanism

The 149 has a built-in piston filling mechanism. Unscrewing the end-cap forces the plunger down, expelling ink, and screwing the cap back down draws ink up, as the plunger is pulled back up. On my pen, this action is smooth and without issue. On some vintage MB 149s, the piston may become stiff from years of use.

To repair this, the piston-unit itself must be removed from the pen, and a fresh layer of silicone grease must be applied to the piston, before the unit is screwed back into the pen. To avoid damaging the screw-threads, a special piston wrench should be used, to remove the unit from the pen, and to reinstall it after fresh lubricant has been applied.

Any potential faults aside, though, I found the filling mechanism to be smooth and easy to use, and the ink window was clear and easy to use to gauge the amount of ink inside the pen. One advantage of a piston-filler over, say, a converter-filler pen or a cartridge pen, is that they do hold considerably more ink than a pen of similar size which is not a piston-filler. If you do a lot of writing, or if you’re planning on traveling a lot, and need a pen with high ink capacity, then this is certainly an area where the 149 has a distinct advantage.

The Nib

This pen has a 14kt gold nib, which is a sort of…wet, Medium-Fine. Wet nibs are better in the sense that they write smoother, with the ink lubricating the pen-point, but at the same time, overly wet nibs can be a struggle on cheaper paper, with the excess ink soaking through the page, and causing bleed-through and feathering.

In my experience, even FINE Montblanc nibs are quite wet, though. If you like wet nibs, then this isn’t going to be a problem for you, but you may need to upgrade your paper-game a bit, to find something that doesn’t feather like mad. Rhodia paper seems to be quite compatible in this regard.

Size of the Pen

The Montblanc 149 is one of the largest pens out there. While it’s light, and this makes it easier to write with, it’s also very chunky and quite long. It is sold as an “oversized” pen, after all, and certainly lives up to that! If you have especially Trumpian hands, then the MB 149 might not be for you, because of just how thick and chunky the section is. Trying to get your fingers around something so large might be awkward.

However, people with average and larger-sized hands should have no problem gripping the pen. In fact, larger sections can sometimes be an advantage in writing, because they spread the fingers out more, and make for a more relaxed, comfortable writing experience, rather than forcing all the fingers to cramp up around a small section.

Should you Buy a 149?

That can be a tricky question to answer. Is it worth the money? I think yes. Is it easy to use? Yes, unless you have particularly small hands (so for example, if you’re a smaller lady, or if you have particularly small hands, I would reconsider it and choose something else). Is it easy to fill and operate? Yes. It is lightweight and balanced? Yes. Is it going to get you noticed?

Oh Hell yes!

About the only caveat I would put on buying a Montblanc 149, is the price. As I said right at the start – the Montblanc 149 is a VERY expensive pen. Just the base model costs over $1,000 already. That being the case, I would suggest (unless money is really no object), that you buy a vintage or secondhand Monblanc 149, in good condition, instead.

If you like the piston-filling style of the 149, but not the price and the size – try the Montblanc 146 – which is everything that the 149 is – but one size down. If you want the Meisterstuck style without the piston-filling capability, then the MB 145 (next size down again) is also an option – that’s a cartridge/converter pen, which is both smaller, and lighter.

A Beginner’s Guide to Buying & Fixing Vintage Clothing


If you’ve been a reader of my blog for any decent length of time, then you’ll know that I love fixing stuff. Usually, that ‘stuff’ is some variety of antique or vintage item. I find it very satisfying to breathe life and rejuvenation into old objects, and items and make them useful, or at least functional, again. If I can repair something instead of throwing it out, I’d rather have it repaired.

For about seven years, I worked as a volunteer in a local charity thrift shop. It was only one shift a week, but it got me out of the house, and I met some really fun and interesting people, who I still hang out with from time to time (if they’re reading this, they know who they are! Hey guys!).

One thing that working in a charity shop made me realise is just how much stuff people really throw out, and how many things people buy that they really don’t need. But sometimes, that’s good, because then we can actually find all kinds of things, which are really nice, for really cheap prices. And sometimes, you can find it even cheaper, if you know what to do with it.

And this brings me to the purpose of today’s posting – buying and repairing old clothing.

Now, first thing’s first – this isn’t going to be a full-on style posting. There’s a million excellent menswear styling sites out there (if you want to find a few, I suggest looking up the Gentlemen’s Gazette, Real Men Real Style, etc) – but this blog, right here – ain’t one of them. I’ll give a couple of pointers and tips, but that’s it.

Finding Stuff at Thrift Shops

These days, bargain-hunting at thrift-shops is very popular. Usually, the amount of stuff being dumped on these places is so high that they HAVE to price it dirt cheap, just to get a high enough turnover rate, so that the stores aren’t snowed under all the time. But this gives you an excellent opportunity to find great stuff at bargain prices. Usually, it’s clothing, but you can find other stuff like antiques, books, homewares and kitchenwares that you didn’t even know existed, and all kinds of other stuff. For the purpose of this posting, however, we’ll be concentrating mostly on clothing, since that’s what most people buy at charity shops.

Always Inspect Everything!

Before you carry your latest prized garment to the front counter to buy it, always check the ENTIRE garment. This goes without saying. Try it on. Make sure it fits. A jacket or coat should always fit in two key areas: The shoulders, and the sleeves.

A jacket or coat shoulder should stop where your shoulder stops. You might get away with it being a finger’s width too wide, or half a finger too narrow, but anymore than that, and it won’t fit properly. Make sure you’re comfortable putting it on and taking it off. Try this a few times to be sure.

With coats and jackets, make sure the sleeves are the right length. What’s the right length?

Stick your arms out to the front and then to the side. A jacket sleeve never goes beyond your wrist-bones. A coat sleeve never goes past the knuckle of your thumb closest to your palm.

What’s the difference? A coat goes over a jacket, but a jacket never goes over a coat. They’re called “overcoats” for a reason, you know.

How long a coat hangs is up to you. A jacket should never drop below your butt. A coat can go all the way down to the ground, if you can find one long enough. Generally, an overcoat will drop to anywhere from mid-thigh to knee-length. Sometimes you can find some which drop even further, but they can be tricky to obtain.

Once you’ve found something you like and have decided that it fits you, make sure that you check everything about the garment! And I mean everything – check for holes, check for moth, check for rips, missing buttons, tears, wear-patches, staining…absolutely everything. Examine every square inch of fabric, and take as long as you have to, to be absolutely sure.

Once you’ve summed up the item’s imperfections, decide whether or not you can live with them. Can you repair them? Can you ignore them? Is anyone going to care about that wine stain on the jacket lining, when nobody’s ever going to see it? Does it matter that you patch the back of your coat, since it’s on the inside and only you’ll know it’s there? Does it matter that that ONE button is SLIGHTLY off, because you had to replace it?

Similarly, do the same thing with shirts, and trousers. Is the rise too high? Too low? Are the jeans pinching your balls? (hey, it had to be asked, OK?), and probably most importantly – that crotch stitching is still holding up, right?

On top of that, the main thing to check with trousers of any kind, apart from the waist, of course, is the inside leg. The inside-leg measurement is taken from the groin down to the ankle. I’m about 5’7″, and my inside-leg is 29 inches, while my waistline measurement is 32 inches. You should always remember stats like this if you intend to go thrift-shopping, and of course, bring a measuring tape with you. That way, you’ll save time by measuring the clothes before you even try them on.

Buying clothes at thrift-shops is always a gamble and always a compromise. You have to decide:

What can you accept? What can you excuse? What can you let slide or get away with, or not worry about?

Certain things should never be compromised on. Never buy anything that doesn’t fit, never buy anything that can’t be repaired, never buy anything that you’re not comfortable wearing (either physically or mentally), and never buy anything that cannot be cleaned properly. There’s no point buying something if you can’t get the stains out or can’t repair it. Moth holes, for example – forget it.

On the other hand, some things you can get away with. Oh it’s missing buttons? Whatever. Buy some new ones and replace them. Oh, it’s got a hole in the lining? If it doesn’t bother you, then don’t be bothered by it. Nobody’s going to see it anyway. Likewise, holes in pockets can be sewn up, and so on.

What Can You Repair?

That really depends on what your skills are. My grandmother was a dressmaker for forty years. When I was a child, she taught me all kinds of basic sewing skills. How to thread a needle, how to sew on a button, how to measure, how to chalk cloth, how to cut, how to leave seam-allowances, how to stitch, cut and sew buttonholes, and all kinds of other things. These are all things which are useful skills, if you want to buy vintage clothing or secondhand stuff at thrift-shops. So, if you do intend to buy clothes from thrift-shops, what basic sewing skills should you know, to try and repair and revive clothes to bring them back to life?

Below is a short list of a few skills that you might need to know, but first…

What Stuff Do you Need?

My 1930s Singer vibrating shuttle machine. It only does one thing, but it does it very well!

If you intend to repair clothes that you bought at a thrift-shop, you should have the following: Needles, thread, pin-cushion with pins, tailors’ chalk, a measuring tape or ruler, an iron, a thimble, a seam-cutter, a needle-threader, scissors, and ideally – a functioning sewing machine that you know how to use.

Sewing on a Button – Difficulty – EASY

Let’s start dead simple – everyone should know how to sew on a button. To determine where the button should be sewn, either use the existing buttons on the garment as a measuring guide, or else use the opposing buttonhole as a guide. Mark this with chalk, and then thread and knot your needle. Feed the needle through the cloth from the INSIDE of the shirt, going out. And then feed the button through the needle and down onto the shirt.

How many times you sew the button up against the shirt is up to you, but be sure that you do it evenly and use all the available threading-holes. Your button threading can either look like an “X”, an “O”, or an “H”, but keep the threading consistent – either do it twice, four times, six times or eight times. Don’t do it an odd number of times, because then it looks sloppy. Above all, make sure that the stitches are tight and even. When you’re done, stitch the needle through one of the stitches behind the button, tie a knot and cut the thread. Done!

Not all buttons are created equal, however. Due to the thicker fabrics, coat and jacket-buttons should not be stitched TOO tightly against the garment. If they are, then you’ll find them harder to button due to the thicker fabrics and the chunkier, larger buttons used to hold your garment closed. So long as the button is firmly anchored to the jacket or coat, you can leave a TINY amount of slackness in the stitching, maybe an eighth of an inch, or even less, but certainly not more.

If you’re trying to find buttons for a garment because some are missing, and you think it’d be easier just to replace ALL the buttons at once, one way to do this is to find a coat or jacket of a similar colour and style, but which is unwearable (because it’s filled with holes, or has massive stains on it, etc), and cut off all the buttons (if it has a full set) and simply use those to re-button your better-condition garment. Keep the original buttons from your first garment in a button-box or tin for use in other emergencies.

Tip: If you’re sewing through particularly thick fabric (heavy wool, for example, or several layers of fabric at once), then make sure you have a thimble! It’ll save you from being pricked and poked as you try and yank and push that needle through. It may only be a few milimeters thick, but there’s a lot of friction between the fabric and the needle when you’re sewing something. I have a few antique silver thimbles that I keep in my sewing box, but whatever you can find is probably suitable enough – just make sure it’s nothing smooth, like those kitschy little porcelain ones – it needs to have dimples on it, to catch the point of the needle and to stop it sliding around everywhere!

Pinning Clothes – Difficulty – EASY

One of the most important things that you’ll need to know when repairing clothes is how to pin fabric. Is a sleeve coming off? Is the lining coming undone? Did you tear your waistcoat shoulder and need to sew it back together? (That happened to me once, and it was a frustrating repair!). For all these applications and more, you need to know how to pin stuff.

For this, you’ll need a bunch of tailor’s pins. They’re easily purchased in-bulk from any fabric and craft store, sometimes even at supermarkets. Best to buy two or three packets – they don’t always last very long.

The point of these pins (no pun intended!…OK not much of one, anyway…) is to hold two or more pieces of fabric together, and to stop it from sliding or coming apart when you’re trying to sew them back together.

After positioning the two pieces of fabric how you want them to be sewn together – take your pins – which should be housed in a pin-cushion – and feed them through the fabric, one at a time – parallel to the seam that you’ll be sewing. This is to allow the two pieces of fabric to lie flat and straight – if you pin perpendicular to the seam, the fabric may bunch up or pull out of alignment while sewing – and you certainly don’t want that!

While pinning, make sure that the pins go straight through both layers of fabric, and then back out through both layers of fabric. Make sure that the pin goes all the way through, and all the way out, but also, that the pin goes in and out through the fabric over the shortest distance possible – this gives you enough leeway for the pin to move (which it may do, while you’re sewing) without sliding out of the fabric entirely (which is a possibility) and ruining the end effect!

Hemming Trousers – Difficulty – MEDIUM

This is something that I reckon every well-dressed guy, and any girl who wears trousers or jeans – should know – HOW TO HEM YOUR TROUSERS! I’m constantly amazed at how many of my friends have no idea how to do this.

Finding a pair of jeans or trousers that fit you great in the waist, but which are too long, is a problem for a lot of people. Chances are that nothing will fit you perfectly off the rack, no matter how much weight you lose or sit-ups you try to do. That’s just the reality of life. Some shops (such as Uni Qlo, for example) do offer an in-store alteration-service for a nominal fee, and if you want to, you can do that, if you buy something from a store, brand-new. But if you’re buying from a thrift-shop, you don’t have that option. So you either have to pay someone to do it (which I would never bother doing), or you do it yourself.

First, you gotta figure out your inside-leg. To figure that out, get a pair of trousers that already fit you really well, and measure the inside-leg. That’s taken from the middle of the crotch-seam, down the INSIDE of the trouser-leg to the bottom of the hem – by inside, I mean the inner-side of the trouser leg, as opposed to the outer-side, not the literal inside of the trousers where the seams are hidden. Am I making sense here??

That measurement is your inside-leg. For most people, it’ll be between 26 – 40 inches, depending on how tall you are. If you’re really tall, then it could be as much as 50 inches. Either way, remember that length and then measure it out on the pair of trousers you want to hem. Mark that point on the trouser-leg with chalk and then rule a line along the bottom of the trouser-leg at that mark. Make sure the trouser-leg is flat and your ruler is straight!

Depending on how much fabric is below this line, you can either hem straight away, or you might want to cut off some of the excess fabric. If you have more than an inch and a half of fabric, I’d suggest trimming it off.

Once you’ve made your measurement and it’s ready to hem – fold the excess fabric UP inside the trouser leg. Here, you might want to iron it, to set a crease so it doesn’t flop around. Next step is to pin the hem. Using tailor’s pins, pin the hem so that the fabric stays in place while you sew it in your new hemline using a sewing machine. Make sure that you sew the hem so that the new line of stitches is as close to the edge of the folded-up fabric as possible, and not the new hemline – otherwise all the loose, unsupported fabric inside your trouser-leg will flop back down and you’ll have a bitch of a time trying to put your trousers on later. This is also why I suggest removing excess fabric – it just gets in the way.

Cutting buttonholes – Difficulty – MEDIUM

I don’t know anybody who cuts their own buttonholes, but I have done, on occasion. It’s not strictly always necessary, but in some instances, it may be.

About a week ago, I was at my local flea market, looking for a new winter overcoat. I lucked out and found a lovely 60-40 wool-poly blended navy blue peacoat. It fit decently in the shoulders and arms, and it was a longer cut, going down to almost my knees, which I liked, because I believe overcoats should be as long as possible without looking awkward.

The thing about peacoats is that they’re double-breasted – they are ALWAYS double-breasted. There is no such thing as a single-breasted peacoat. I don’t own anything that’s double-breasted (apart from one grey jacket) and I thought it’d be fun to buy a double-breasted overcoat. It’s different, it was in a colour I liked, a style that suited me, a size that fit me, and had features which I liked – namely that it buttoned right up to the throat, which is great in freezing winter weather!!

But – it only buttons up on one side – left over right.

I’m a firm believer that if you’re going to do something, you should do it as right as you can – what’s the point of having a double-breasted overcoat which only buttons up on one side? So, I took it home and made extra buttons on the other side, so that I could overlap the coat either direction.

To make new buttonholes, you will need:

A sewing machine, thread, a needle and thread, tailor’s chalk, and a pair of very sharp, pointed-tip scissors.

First thing’s first – mark where the buttonhole is going to be, and how long it’s going to be, compared to the diameter of the button that’s going to go through it. If you have the button handy – use that as a guide. Use tailor’s chalk to mark the boundaries of the buttonhole that you wish to make.

Next step is to sew a rectangle using your sewing machine – bordering around the chalk-marks you made.

After that, you need to make the actual hole itself. Always sew the boundaries of the buttonhole before doing this – the point of the stitching is to ARREST and PREVENT any unwanted tearing or fraying in the fabric. If you don’t do the reinforcing rectangle first, then all you’ll get is a huge bloody hole in your coat that’s of no use to anybody.

To cut the hole, use sharp, pointed-tip scissors. If you can get them, there are specific buttonhole scissors that exist – but if you can’t get them, then any scissors like what I described, will do. Pierce the fabric and feed the blade of the scissors through, and then cut along the chalk-mark inside the stitched border. Make sure that the button slips through comfortably, but not too loosely.

The final step is to reinforce the buttonhole. If you do not do this, then the fraying edges of the buttonhole will cause the entire thing to fall apart. Get your needle and thread, and sew around the edge of the buttonhole using a whipstitch, or overcast stitch – these are designed to furl over the edge of the fabric, and therefore prevent it from wearing out and unwraveling. Make the stitches as tight and as close together as possible to produce a neat, even appearance. Once it’s done, tie off the thread, snip the excess, and you’re done!

Of course, if you want to use a sewing machine, you can do that too – and use a buttonhole attachment, but if you’re not confident with using one, or don’t have one, then this is the most traditional way of doing it. It’s an easy way of adding buttonholes to garments that you find secondhand and want to alter to your own tastes or uses.

Blind Stitching – Difficulty – EASY

Blind stitching the name given to the method by which two pieces of fabric are sewn together, without there being a visible seam or stitches. The stitching is done in such a way that it is ‘blind’, or invisible.

Blind stitching is useful if you’re trying to sew seams back together that have come apart, but you don’t want it to be obvious that you’ve done a homemade repair – you want it to look like it was never damaged in the first place!

Blind stitching is easily accomplished with a simple needle and thread. It involves sewing the two pieces of fabric together in such a way that the thread holding the two pieces together cannot be seen from one side (usually, the outside!). So, how is this done?

To successfully carry out a blind stitching operation, you sew the two pieces of fabric together by passing the needle through the fabric, without poking all the way through. Basically, you catch threads or fibres of the fabric, pull your needle through, catch the fibres or threads of the other fabric, and pull the needle through that. On the other side of the two pieces of fabric – there shouldn’t be any hole or any thread visible.

Blind stitching is relatively easy – but it has to be done slowly, and carefully if you want a neat and presentable finish. Best to do it when you’re bored, and lonely, sitting down watching TV or YouTube videos, because you won’t want anybody trying to actively steal your attention while you’re doing this. The only slight disadvantage with blind stitching is that since the stitches don’t pass all the way through the two pieces of fabric, it may not be as strong as conventional stitching. You can remedy this by making the stitches more numerous or tighter, to give the seam some extra strength!

Darn it! – Difficulty – MEDIUM

You might’ve heard of darning from reading old books, or watching period movies, old TV shows, or possibly, from speaking to your grandparents. It’s that thing that grandma did late at night when there was nothing else going on. But what is it?

Darning is a process whereby clothes are repaired. To be specific, it’s a method for repairing, filling in or patching holes, usually in thick, knitted or woven fabrics and garments such as scarves, jumpers, cardigans, beanies, mittens etc. It doesn’t really work that well with thinner fabrics or fabrics with a tight weave, like cotton.

Darning is a process whereby you fill in the hole created by the loose, or missing threads, by weaving in fresh thread to replace it. First, you identify the hole that needs darning. Then, you get your needle and thread. Ideally, you want a thread that matches the colour of the fabric as closely as possible.

Prepare your needle and thread as you usually do, and then tuck the point of the needle through the weave in the fabric, near the edge of the hole that you’re trying to darn. For a neater finished appearance – darn from the INSIDE of the garment, so that none of the fiddly bits – like that knot you tied in the end of your thread – are visible when the darning is completed.

Pull the thread across the hole and through a weave in the fabric at the other edge. Then repeat the process going back the other way. And back the other away again. And again. And again. Until the entire hole is covered.

Now you’ve done half the process. The next step is to go from top to bottom, weaving your needle in and out of the threads you just created, while also doing the anchoring stitches that you did earlier. Keep your stitches as dense as possible to create an even, solid mass of thread which will eventually build up, and cover the hole. Yay! You’re darning!

A wooden darning egg. Darning eggs can be made out of almost anything – metal, glass, wood, even stone. It just has to be something sufficiently hard that the needle doesn’t break it. The curved shape helps to stretch out the fabric, and stops it from bunching up and kinking.

One way to make darning easier is to place something inside the garment, so that you have a solid surface to rest against while you darn. This stops the fabric from flopping around anywhere. Traditionally, this ‘something’ was a hard, round object made of wood, known as a “darning egg”, or a “darning mushroom”, depending on the shape.

Darning is usually done on thick, woven wool clothes and fabrics. Stuff like sweaters, dressing gowns, socks, sweater-vests, etc. The thick, fluffy weave of the fabric hides (or makes less noticeable) the repair-job of darning. Darning will never make a garment look like new, but it will stop it from getting worse and falling apart. For this reason, darning is a repair technique usually reserved for things which won’t be seen publicly – dressing gowns, socks, or sweaters which might be covered by a jacket or overcoat. Of course – the neater and more densely packed your darning stitches are, the less noticeable the repair will be overall, especially if you use a colour-matched thread.

Conclusion

Well, that brings this posting to an end. For anyone who loves bargain-hunting and seeking out secondhand or vintage clothes, hopefully this posting has given you a bit more confidence to be a bit more adventurous in your hunter-gathering, and given you a bit more confidence in repairing your own secondhand scores!