I’ll String Along With You – My Victorian-era Brass String-Caddy

Because why wouldn’t you have one??

One of my main areas of collecting has always been antique writing equipment, antique writing instruments, accessories, nicknacks and associated paraphernalia. And that also extends to pieces of desktop accessory. Inkstands, inkwells, desk-sets, candleholders, writing slopes…the list of things that mankind has invented purely to fill up his desk so that he had a suitable excuse as to why he couldn’t get any work done, is truly astounding.

And one of those pieces is this:

At first glance, you’d imagine that this is something wonderful, something amazing, something meant to hold…chocolates…peppermints…tobacco?…Face-powder…spices…it’s solid brass…it’s got beautiful, Art Nouveau decorations on it with flowers and loops and swirls, dragonflies and tulip-bulbs. And yet, its actual function is so much more banal than that!

Indeed, if it wasn’t for the small, but rather obvious hole right in the middle of the lid, you could imagine that this little brass jar held almost anything…coffee? Tea? Sugar? Powdered cinnamon? Quills of rarest saffron, perhaps?

But no…this adorably and excessively over-decorated brass tin is actually nothing more glamorous than…

…a string-caddy!

WHY does this thing Exist!?

No seriously…WHY? What the hell is wrong with just…I dunno…a ball of string!? I mean really, c’mon, right? Who the hell woke up one morning and said: “I know how we can improve on a large amount of intertwined threads coagulated into a spherical mass! What we need is something to put it in! Huzzah!

Why on earth is this even a thing?

Well, it’s a thing because of the age in which it was created.

By the 1870s and 1880s…which is approximately when an item such as this is likely to date from, the industrial revolution was in full swing. For the first time in history it was truly possible to mass-manufacture a whole wide crazy range of all kinds of products. Products that people wanted. Products that people didn’t want. Products that people needed. Products that people didn’t need. Products that people didn’t KNOW they needed!

…Like string-caddies!

By the last quarter of the 19th century, business and commerce are really taking off. For the first time, you have reliable postal systems, you have telephones, typewriters, electric telegraphs, telegrams, cheap steel dip-pens, the first reservoir fountain-pens, cheap, wood-cased pencils and…no email.

This meant that there were enormous amounts of paperwork flying all around the world. People did a lot of writing every single day. Business letters, social letters, essays, short stories, novels, business reports, newspaper columns, telegrams, postcards, love-letters…and since writing was such a preoccupation, people in Victorian times took the whole act and ritual of writing far more seriously than we do. The number of accessories that they came up with to improve, streamline and make more pleasurable, the act of writing, is truly staggering.

Inkstands, blotters, pen-wipers, wax-jacks…hell, you can even find Victorian-era stamp-moisteners, if you look hard enough! And no I didn’t make that up – stamp-moisteners really were a thing.

The Victorian era was also when people were accustomed to receiving packages done up in brown paper and string. It was ludicrously common to wrap up almost anything in brown paper. Books, food, gifts, purchases at a shop, clothing, shoes, everyday items…hell, even other types of paper! And in an age before sellotape became common, string was needed to tie all these parcels together.

Now if all you did was one or two parcels every now and then, how you stored your string probably didn’t matter. But if you were in the habit of wrapping and posting several parcels a day – perhaps you had a home-business, or maybe you worked in the giftwrapping area of a department-store, or perhaps in the mailroom of a mail-order business – then constantly hunting for your ball, or spool of string would become extremely annoying, extremely swiftly!

So, to prevent your ball of string rolling away off your desk, bouncing along the floor, hitting buttons and levers along the way, jamming up the machinery and forcing two brothers to work together to…oh wait, that’s the opening to the movie ‘Mouse Hunt‘…

…great movie, by the way – one of my favourites as a child.

…But I digress. You can probably see where this is going.

String caddies like these were invented to make it easier and neater to access string on a regular basis, which in an age when everything was done by hand, would been practically every working day of your life. And string caddies weren’t just reserved for working stiffs, either! Caddies were made of all kinds of materials. Wood or papier-mache were common for cheaper caddies, but for more refined desktops, or the counters of smartly-dressed shopfronts, or sleek hotels or office-buildings, something more refined was required.

Because of this, string caddies were commonly made of brass to blend in with the brassy tones commonly found in buildings in those days – brass lamps, brass candleholders, brass doorknobs, brass bells…or, they could even be made of solid sterling silver! Now exactly what the demand for a sterling silver string-caddy might’ve been in say, 1885, I’d have no idea, but apparently people were buying them, because they certainly did exist!

Why did you BUY this crazy thing!?

Alright, whatever, fine. We know what the hell it is!

So why on earth did you buy it?

…would you believe, I thought it was cute?

Actually, I bought this for a number of reasons. First, it was cheap. Only a few bucks. And that’s always a good thing.

Second, I like antique brassware. If it was made of anything else, I probably wouldn’t have bothered buying it!

Third, it’s an antique desk accessory, and like I said, that’s one of the areas I collect!

Fourthly, I thought it’d be something unusual. If nothing else, it was certainly very beautiful.

Fifthly…because I figured I’d get good use out of it. I sell antiques online, and whenever I post something, I always tie the package up with string (I don’t trust the postal system not to rip the parcel open, deliberately or accidentally, so it’s an extra safeguard!), so in that respect, I’m always hunting for balls of string. And this seemed as good a reason as any, to buy it!

And sixthly, and finally, and last-of-all-ly…(I swear to God, this is my last reason!), I was struck by the sheer fact that all this ridiculously over-decorated thing ever did, or was ever intended to do, was to hold, and dispense…string!

There was absolutely no reason for this thing to be as elaborate, or as highly decorated as it was, and yet, someone took the time to make it so. It’s this quality, quite above and apart from any other, which makes me love and want to collect antiques – the fact that something so simple could be so amazingly embellished – and the fact that this wasn’t a one-off thing – they did this with ALL of their string-caddies! They saw a need, or wanted to believe that they saw a need, or a desire, to create something far more beautiful than what it ever, ever needed to be!

You try buying something like this today, and see how far you get!

What’s with the Title?

For those of you who are wondering about the title for this posting, it’s taken from the 1934 song, “I’ll String Along With You”


WERTHEIM Manual Sewing Machine. Made in Germany! Ca. 1920.

“Made in Germany! Y’know the Germans always make good stuff! Y’followin’ me, camera-guy? It sews, it patches, it fixes, it goes forwards and backwards! It can even sit on your shelf and look a darn sight more decorative than the modern junk you could buy today! Ain’t that right, Charlie!? Charlie says ‘Yes indeed, folks!'” 

Wilkommen, mein damen und herren!

This post is all about…this:

I picked up this beauty at my local auction-house. I also picked up a mini-hernia trying to lug it home afterwards! Isn’t it a beauty?

What we have here, my curious compadres, is a German-made sewing machine, manufactured sometime in the 1920s. It was produced by the Wertheim company, which was one of the major European competitors to big-name American brands like…I dunno…SINGER. Or WHITE. Or NEW HOME.

Along with big names like Frister & Rossmann, and Seidel & Naumann, Wertheim was one of the most popular manufacturers, during the 1800s and early 1900s, of German-made sewing machines. While many people would swear by Singer, the Germans were giving the Americans a serious run for their money in the sewing machine department! And in cars! Radios…typewriters…hey, you just can’t beat German engineering, guys…

Unlike American companies, where sewing machine manufacturers made…sewing machines (Duuuuuuuuuuuh!)…German manufacturers made much more! Seidel & Naumann, for example, also made bicycles…and typewriters! Wertheim made sewing machines…and pianos! Wertheim pianos were extremely popular in Australia, where a factory was set up to manufacture them. This machine may not sound like a piano, but certainly is as sleek as one!

What Made German Sewing Machines Different?

German-made machines differed from their American cousins in a number of ways, both good, and bad. German machines had gears which were more precisely cut and fitted, than their American counterparts. This made the machines smoother, quieter and easier to operate for longer periods of time. They also had features which most American machines wouldn’t have for a good long while!

The back of the machine, revealing the detail of the decorations and gold-leaf applications.

Features like an auto-stop bobbin-winder, or a forward-reverse lever (something which SINGER didn’t have until WELL after the Second World War, but which German machines had back in the Edwardian era!), or even built-in measuring tapes on the bases of the machine-beds, for convenience in measuring, or even – built-in pin-cushions!

Another feature common to German sewing machines, and seen only occasionally on American ones, was what I like to call the ‘shuttle-launcher’. After advancing the shuttle through the race to the point of extraction, sliding back the plate to take out the shuttle would catch a lever inside the race. This would flick the shuttle out of the machine to make it easier to extract, to refill the bobbin. Depending on the machine, the extraction lever might just nudge the shuttle up, or it might flick it up into the air!

It was little touches like this which made German machines popular, and American machines seem…I dunno…’adequate’…by comparison. I mean in theory, they’d all do the same thing – they all sewed, but like those ads for ‘V’ energy-drink, the German ones had that massive hit, which improved them a bit.

What Do We Know about This Machine?

Not a gigantically-enormous amount, but we do know a bit. First: it was marketed for the English-speaking market. Secondly, it would’ve been one of the company’s later machines. We know this, because it’s a vibrating-shuttle machine, and not an older transverse-shuttle machine (which were still being made in the 1930s in Germany!).

Although German machines were highly innovative in some areas, in other areas, they rather tended to lag behind the competition.

In the 1920s and 30s, companies like White, or Singer, in America, were producing compact, easy-to-use, round-bobbin machines, very similar to the types of domestic sewing machines still manufactured today. They were easy to operate, easy to load, easy to understand.

By comparison, even in the 20s and 30s, German companies like Wertheim, or Frister & Rossmann, were still manufacturing machines like this – vibrating shuttle machines.

Now don’t get me wrong, it’s a great machine. But when you consider that the invention of the vibrating-shuttle mechanism PRE-DATES the American Civil War…you’ll get some idea of just HOW outdated this technology WAS by say, 1925. On top of that, the Germans were still making transverse-shuttle machines, as well! Now the technology behind that is even more ancient! It gets its roots from the shuttles which rolled back and forth between the warp-and-weft layers of threads which made up old cloth-looms…which dated back CENTURIES! All the way to the Middle Ages!

By comparison with this, the Americans surged ahead with the latest and greatest – electric machines, more compact designs, built-in electric lights, attachable electric motors! The Germans, on the other hand, tended to stick with more traditional, dare-I-say, antiquated designs, and then over-engineer and over-develop them until they were absolutely the very best that they could be…and then just keep on making them! Germany was still producing machines like this when the Second World War broke out, at the end of the 1930s.

Where Does This Machine Come From?

The lands across the oceans, where rain sings and clouds mourn and flowers dance in the sand…

…I dunno! I was the only bidder on this machine at the local auction-house, and managed to get it dirt cheap (or as close to dirt as I was able to, given the setting)! I packed it up, paid for it, and then lugged it home by hand, almost putting my back out in the process! They didn’t do things by halves in those days! This thing weighs a ton!

What did the machine come with?

A bad attitude, a drinking problem, and a string of angry ex-wives.

Probably, but not this machine. No, it came with four bobbins, one shuttle, the original green-and-gold (how Australian!) tin machine-box, the original lid, key, and a beautiful set of intact decals and decorations! It really is a beauty!

What’s wrong with the machine?

Not too much. The bobbin-winder needs a minor repair, but apart from that, the machine works perfectly. Or it did, once I’d lubricated it, and adjusted all the relevant thread-tensions. This machine comes with a forward-back lever on it, which I was eager to test – I’d never had a vintage sewing machine with this feature on it before. I’m pleased to report that it works perfectly! In my eagerness to test the machine, I completely forgot all about thread-tension and as a result, of course, it wouldn’t sew! I adjusted the tension-nut on the side of the machine, and then adjusted the tension-screw on the shuttle as well, to get it working right.

Once I’ve repaired the bobbin winder itself, it’ll work wonderfully!

What Type of Machine is This?

Machines using this type of technology, involving a bullet-shaped shuttle with long, barbell-shaped bobbins, which swings back and forth, is called a ‘vibrating shuttle’ sewing machine (usually just called a ‘VS machine’ in collector circles).

In sewing machine evolution, it’s the second stage in sewing machine design, one step up from the older ‘Transverse shuttle’ machine (‘TS’).

VS machines were made from the late 1800s (about 1860s and 1870s), right up to the 1960s, although they were already outdated by about 1910. VS machines are popular because they hold large amounts of thread, and are fun to operate.

What is the ‘Wertheim’ Company?

The Wertheim company was established in 1868, by Joseph Wertheim. By the turn of the century, the machines were being sold in England, Spain, Germany, and even Australia! This last, was made possible by Hugo Wertheim (Joseph’s nephew), who migrated to Australia in 1875.

To say that young Hugo (and he was young, in his early 20s at the time), had buckets of money, is putting it mildly. As with any family which delved successfully into sewing machines in the 1800s, the Wertheim family, just like the Singer family, made an absolute fortune in manufacturing, distributing, exporting and selling these beautiful machines. This advertisement is all the proof you need!

Determined to make a name for himself, young Hugo became an importer of his family’s sewing machines, and made a deal with his Uncle Joseph to be the family’s representative in the colonies! Hugo started with an emporium in the Australian city of Melbourne, with his shopfront opening onto Flinders Lane, in the middle of the Melbourne Central Business District. In time, he would also expand into Bourke Street, William Street, and Collins Street, nearby.

Apart from sewing machines, Hugo, and his growing Australian branch of the wealthy House of Wertheim, also sold anything else with the Wertheim name on it, including bicycles, laundry-mangles, infant perambulators, and most famously of all – Pianos! And you can still buy Wertheim pianos easily in Australia today. They even had a factory manufacturing them in Richmond, a suburb east of the Melbourne CBD.

So what does this say about my Wertheim sewing machine? It proves that it was imported by a family which came to Australia, and made it big, in a big way! It’s a part of Australian, and Melbournian history, and I for one, am very glad to be its latest owner!


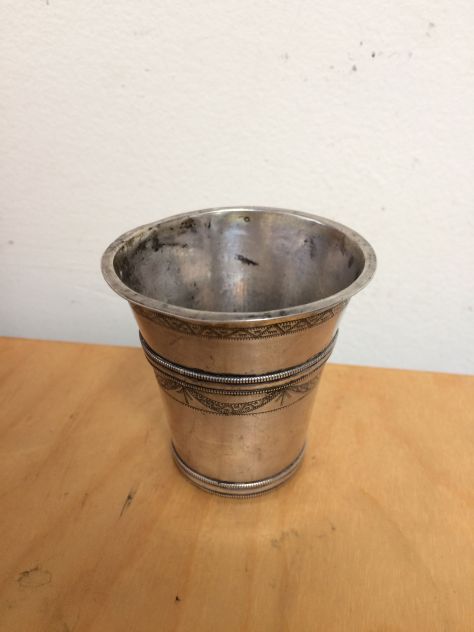
Antique Norwegian Silver Shot Glass (1871)

I’m not sure what happened in Norway in the early 1870s, but whatever it was, someone felt the need to commemorate it.

I picked up this little silver shot-glass or beaker while I was at the local flea-market last week. It was in reasonable condition, it was cheap, and it had a lot of pretty engraving on it. It had a series of hallmarks struck to the base, but beyond the fact that it was silver, the seller couldn’t tell me a thing about it.

Decoding antiques can be a real challenge, and this shot-glass is a classic example of that. Even without the label on the item declaring it to be silver, I had already guessed, given the tarnishing, but also, the symbols stamped on the base:

Given the layout, the number of them, and the inconsistencies in the stampings, I deduced that they were hand-struck hallmarks, but not of any kind which I recognised. On a hunch, I bought the shot-glass, took it home, cleaned it up a bit and pressed out the dents, and then started researching the marks.

The cup came with a hand-engraved inscription on the rim, and translating this was my first clue. It read:

Erindring af mine Brodre“. Typing this into Google Search revealed it to be Norwegian: “In Remembrance of my Brothers“. After that, I started researching Norwegian hallmarks.

European hallmarks have a very distinct pattern. They typically come in groups of four, or five. A set of marks on a piece of silver will normally consist of an assay mark, a date letter, a maker’s mark, and a purity or fineness mark. Depending on where the piece was made and marked, it might also include import or export marks, taxation marks, etc.

The first mark to be uncovered was the seven dots in an oval (on the right). This was the assay mark for the town of Bergen, in Norway.

The second mark I deciphered was the ’13 1/3′. This was a reference to 13.3/16 LOTH.

In the 1700s and 1800s, European silver was divided into grades called lothiges (commonly shortened to just ‘loth’). Silver was graded according to purity on a sixteen-point scale. It started at 16, then went down to 15, 14, 13, 12, 11, and finally, 10 loth. Apart from Norway, the loth system was also commonly used by Germany, Austria and Prussia.

From top to bottom, these grades were:

1000/1000 (16),
937/1000 (15),
875/1000 (14),
812/1000 (13),
750/1000 (12),
687/1000 (11),
650/1000 (10). 

So, I had a roughly 81% purity, silver shot glass made in Bergen, in Norway. But how old was it? Here I turned to two more marks. One was ‘6M’, and the other ’71’. These stood for June (the sixth month) of 1871.

The last mark were the initials PD, which made up the maker’s mark. The trail of research ran cold here, but I had enough to know all the basic facts about the shot glass. It might be small, and old, and battered, but I think it’s beautiful. After all, it’s not every day you can claim to own a piece of antique Norwegian silver!


Having A Ball: My Swiss Railroad Pocketwatch from 1950

In looking back over my blog, it kind of shocks me that in eight years almost, of writing this crazy thing, I have not once, ever made a blog-posting about one of my favourite and most prized possessions – which I think is pretty ridiculous, considering it’s one that I carry almost every single day, and have done for the past seven years.

I have mentioned it in passing in one or two of my other blog posts, probably, but I never went into detail about it, so that’s what I’m going to do now.

My Swiss-made Ball Railroad Pocketwatch

One of my most prized possessions for nearly 10 years is this pocketwatch, manufactured in Switzerland by the Record Watch Company, for the famous Ball Watch Company of Cleveland, Ohio, in the United States. In this posting, I’ll be going into detail about what this watch is, and what makes it unique, or different. So, let’s get started.

It’s Swiss but it’s American but it’s…wah…??

Yeah it can get pretty confusing, I know! The lettering on the dial quite clearly says “BALL OFFICIAL RR STANDARD / CLEVELAND”. This was the decal used by the Ball Watch Company of Cleveland, Ohio, a company which distributed watches to various American and Canadian railroad companies from the 1890s up to the end of about the 1950s. While the Ball name became famous for accuracy, ruggedness and high quality, one thing that Ball was not famous for was…making watches!

I know, crazy isn’t it? One of the most important watch companies in the world made no watches! Nope! In fact, the vast majority of Ball-branded watches were actually made by other companies, sold to Ball, and were then re-branded as Ball watches and then sold to the public (or to people working on the railroads). Companies included Elgin, Illinois, and Waltham, to name just a few.

…So why was this made in Switzerland?

Well after the Second World War, the American watchmaking industry really started to fall apart. It wasn’t able to effectively compete against European watchmakers and bad management and marketing decisions made by various company executives meant that the output and quality of watches made in the United States in the 50s and 60s started to falter. By the 1970s, almost none of the traditional American watchmaking firms was still in operation. More and more work, and eventually, whole companies, were sent out to Europe to fulfill orders and keep up with manufacturing, rather than do it in America.

That is why an American watch ended up being made in Switzerland.

Blued-steel hands on the dial were a common feature of antique pocketwatches. The heat-treatment applied to the hands to prevent rusting tinted the steel a dark, navy-blue/purple colour.

What is this Watch?

This watch is a Swiss-made Ball-Record Model 435c. In terms of the railroad pocketwatch – a specially designed pocketwatch used by people who worked on railroads between about 1890-1960, this watch represented not only the pinnacle of the style, but also the end of it. It was one of the last major-production railroad pocketwatches still produced in the 1940s and 50s after the Second World War.

Who Used This Watch?

The Ball-Record 435-series of Swiss-made pocketwatches were manufactured as railroad-standard, meaning that they could be used, theoretically, on any railroad operating on the North American continent. This particular watch, however, was likely used in Canada, and specifically, on the Canadian Pacific Railroad.  I think this for two reasons:

1). The watch has a 24-hour dial. This was a feature which was only mandatory on Canadian-use railroad pocketwatches. America, for whatever reason, never had this as part of their railroad watch regulations.

2). The Ball-Record 435-series is actually listed in Canadian Pacific Railroad documentation as being an officially-approved timepiece. In the 1957 listings of approved CPR timepieces, it’s entered as: “BALL – 16s [16-size], 435C, 21j [21 jewels]”. And that’s how I know!

What is a Railroad Pocketwatch?

Alright, so that’s the watch. What is a railroad pocketwatch, and what makes such a watch what it is?

I covered this in much greater detail in the blog posting I did years and years ago, which is also the first, last and until now, only time I’d ever mentioned the watch which is the focus of this article. If you want to read that posting, it’s here. 

But to sum up really fast:

The railroad chronometer, or railroad-standard pocketwatch was a specialised timepiece developed in the late 1800s to combat the very serious issue at the time, of railroad punctuality, and by extension – safety. Remember that this was a time before radio, before telephones, before GPS tracking and electronic sensors. The only way to know where a train was, at least in theory, supposed to be, was to know what time it was. And the only way you could do that was if everyone had the same time. And the only way you could do THAT was to ensure that everybody working on the railroads had the most accurate watches available.

After a series of disastrous train-wrecks in the United States in the second half of the 1800s, safety was ramped up, and in 1891, Webster C. Ball was made the Time Inspector for railroads in the United States. A jeweler and watchmaker of renown, Ball established the watch company which now bears his name, and was the first person to try and set nationally-recognised standards for railroad watches. Every watch had to have these features in it. They were updated and changed throughout time, but by the early 1900s, they were pretty much standardised. These criteria were numerous, but they were:

  • A large watch. 16 or 18 size. (18 size was later considered too large, and railroaders could trade them in for a smaller, more comfortable 16, if they wanted to. 18s were jokingly called ‘woodburners’ since only the old-timer railroad men, who operated wood-burning locomotives held onto them!)
  • Open-faced. No hunter-case lid to cover the dial.
  • Crown-wind, lever set. For ease of maintenance and safety in time-setting.
  • At least 17 jewels. This was raised to 19, 21 and 23 jewels as time went by. But basically, 17-23 was considered RR-grade.
  • Bimetallic balance-wheel for coping with temperature-extremes.
  • Six position adjustments so that the watch kept time in all possible orientations.
  • Temperature-variance adjustments, so that the watch kept time no matter how hot or cold it was (34-100’F, in case you’re wondering).
  • Isochronism (mainspring-tension variance and the ability of the watch to keep time regardless thereof).
  • Bold, easily read numbers, and easily-read minute-markers.
  • Bold, easily read hands.
  • Micro-regulator for precise calibration.
  • American-made watches ONLY (some leeway was given for European-made watches, so long as parts were commonly available).

That is the list of basic regulations. As time went by, more were added, but those were the starter-points. Along with all the regulations about the watches, there were loads of regulations about how they were to be used, and how they were to be serviced! Among other things…

  • The owner, a railroad employee, could not set the time himself. He was responsible for winding his watch and nothing else. Time-setting in the event of letting the watch run down, or from inaccuracy, was only done by the time-inspector for that railroad.
  • The watch had to keep time to +/-30sec a week, or about +/-4sec a day.
  • The owner was not allowed to tinker, repair, adjust or regulate the watch in any way whatsoever.

As you can imagine, with all these regulations, railroads, and the men who operated them, became famous for their punctuality and accuracy of timekeeping. From the late 1800s up to the 1950s, if you needed to know THE time, you asked an engineer, a station-master, or a railroad conductor. Almost certainly, he’d have the right time in his pocket, down to the minute, perhaps even the second!

Railroad watches died out after the Second World War. Improved wristwatches and improved signaling systems meant that railroad pocketwatches were no longer needed as much as before. By the 1960s, they had almost all gone.

Do you use this watch every day?

Um…Yeah, most days, yes! When I’m not using it, it hangs on a little brass stand on my desk. When I do use it, it’s on the end of a chain in my waistcoat pocket or inside the watch-pocket on my jeans or trousers. It’s big, it’s easy to read, and it’s also a great conversation-piece! I don’t think I’d ever trade it for anything else in the world…except for a nicer railroad watch! But I don’t think that’d be happening anytime soon.


Georgian-Era Brass Telescope with ‘guillotine-style’ Shutters. Ca. 1825-1835 (?)

As far as functional telescopes go, this is probably the oldest one that I’m ever likely to get my grubby little mitts on! I have no idea how old this thing is – it was sold as being early Victorian (1840s). However, research suggests anywhere from 1800-1850, with the style becoming increasingly uncommon from the 1850s onwards. What I do know is that this telescope is definitely of a much, much older style than I’m used to, and which hasn’t been seen in at least a hundred and forty years.

The way it’s constructed, the way it operates, and its various component pieces, and features, screams just how different it is from any other telescope which I’ve ever had the privilege of handling.

So, what do I know about it?

This particular type of telescope is pretty freakin’ old. That much I do know. In some respects it’s not too different from the others I have, in other respects, it is very different!

It’s a two-draw wooden-barreled naval telescope with brass fittings, with an eyepiece cartridge, erector cartridge, and two-piece objective lens, which were all common features of antique telescopes of the 1800s. Where it differs is in how these pieces are assembled and fitted.

For a start, let’s look at the eyepiece mount. It’s much larger and more elaborate than most such mounts, and the eyepiece lens which it protects is also fitted differently into the cartridge which holds it.

The eyepiece cartridge has two lenses which magnify the image seen by the big objective lens at the front of the telescope. On later telescopes, both these eyepiece lenses are fitted into rims of roughly the same shape and size, and are screwed into either side of the cartridge which holds them.

On this telescope, the eyepiece lenses are not only of dramatically different sizes, but how they’re mounted into the cartridge is also markedly different. This style of fixture is something you just don’t see in telescopes which come from the second half of the 1800s.

The second major difference between this telescope and others which I’ve handled, and which points it out as being an older style, is how the lens-caps are mounted and operate on the telescope.

Most telescopes have one big round objective lens-cap, which just covers the front of the telescope, to stop the big, light-catching lens from getting dirty, gritty, scratched or damaged, and a smaller cap at the other end, for the same purpose. To use the telescope, it’s necessary to remove the lens-cap at the front, and to slide the lens-cap built into the eyepiece mount, to one side. The cap or shutter pivots on a screw-post into the side of the telescope’s eyepiece and is hidden neatly away.

Here, you can see the two ‘guillotine’ shutters raised into their open positions.

By comparison, this telescope has rectangular, sliding lens-shutters on both the front, and back end. They slide open and shut and they stick out the sides of the telescope instead of tucking neatly away. I’ve seen some people call these ‘guillotine-style’ shutters, on account of how their operation resembles that of everyone’s favourite full-sized vegetable-chopper – so, I’ll call them guillotine-style shutters too!

The lens-cap removed, with its shutter raised.

They really are a very whimsical piece of telescopic history. They’re a feature that you simply do not see on modern telescopes – and not on many antique ones, unless they’re really old, like this one! I’m pretty sure I’ll never find another one like this – at least not at any price which I could comfortably afford!

Another feature which I like about this telescope is the fact that the lens-cap that protects the objective lens at the front of the wooden barrel has two purposes. First, it acts as a lens-cap, to keep the lens free from dust, scratches and breakage – second, it acts as a rain and glare-shield! It’s not actually necessary to remove the lens-cap from the front of the telescope, in order to use it. You simply slide up the shutter on the front of it!

This feature would’ve been common on telescopes designed for naval use at sea, where sea-spray or rain could easily have obscured the view of the telescope’s user. Protecting the telescope’s lens from the full force of the rain or sea would’ve allowed for clear vision even during inclement weather.

Given all these factors, how old is it?

I honestly don’t know. My guess is the 1820s or 1830s. I have no evidence to back this up beyond what I’ve seen from similar telescopes which were dated to this era, and which match the design elements which I’ve seen here. But that said, that would make this about 180 years old…which is impressive, any way that you slice it!

This has certainly been a fascinating piece to tinker with and pull apart, fix and clean. Hopefully I’ll have a video about this coming soon on my YouTube channel, so watch out for that! 🙂


New Video: The Kyneton Lost Trades Fair – SewWhat Maryborough

This weekend just gone, I went to the Kyneton Lost Trades Fair in Kyneton, country Victoria, where I got the chance to see all kinds of ‘lost trades’. Blacksmiths, cobblers, bell-makers, potters, glass-blowers, knife-makers, carvers, carpenters, chandlers, weavers, spinners…the list goes on and on and on.

Anyway, while I was there I ran into some friends and got the chance to film them. This is the result!


My First Vintage Pocketknife

When I was attending university a few years ago, for the first time in my life, I found myself doing a lot of travelling and walking around every day. Going to the campus, going to lecture halls, going to classes, the library, the store, the cafeteria for lunch, all kinds of places. And it was during this time in my life that I started to realise just how many things I needed to cut open. Lunch packets, sauce packets, that super-annoying skin-tight plastic wrap that adorns almost every single type of manufactured product these days, from POST-IT notes to writing supplies, and I began to wish more and more that I had some sort of pocketknife on me.

I never had a pocketknife as a child. I never saw the point, I never saw the need, and for almost every cutting job around, I used a pair of scissors. But as I got older, and started moving around more, I began to realise just how handy it would be to have a portable blade on me with which I could do things. And so I started hunting.

At first I really didn’t know much about knives, but with my historical bent, I knew that I’d like a pretty, antique one. The good news was that antique pocketknives are really common. The bad news is that finding a decent pocketknife that you like enough to buy, refurbish, maintain and use can be a bit tricky. There are loads of different styles, models or patterns out there, each one suited for different purposes. After a lot of hunting around, I bought a knife at the local flea-market. As I said, vintage pocketknives are really easy to find, the trick is finding one you like. The good thing is that most of them really don’t cost much at all.

What Did I Buy?

I ended up with a neat, medium-sized ‘Barlow’-pattern knife. It’s rounded off at one end of the knife (designed this way so that it’s easy to slip into the pocket), and has a pair of bolsters at the other end. The scales (decorative panels) on the sides of the knife are covered in panels of polished bone. Would be nice if it was ivory, but we can’t all be that lucky!

The Barlow knife is one of the oldest knife-patterns still manufactured today. And I mean really old! The first Barlow knives were invented back in the 1600s and were owned by such people as George Washington, and mentioned in the works of Mark Twain. Although it was actually invented in England, the Barlow became an icon of Americana by the middle-1800s, and was liable to be owned by thousands of people.

The classic Barlow has a handle with a rounded end, and two folding blades which both pop out of the same end. The style of the blades changes from manufacturer to manufacturer, but in the end, they comprise of one larger main blade, for general use, and one smaller blade, about half the size. This smaller blade was originally intended as a pen-knife, used for sharpening, cutting and shaping pens and pencils, in the days when writing was done with either quills, steel dip-pens or pencils (before the widespread availability of pencil-sharpeners).

The reason the Barlow was so popular was because it was effective, simple and cheap. The two blades did just about everything that most people in the 1600s, 1700s and 1800s needed of their knives, and it was also small enough, and cheap enough for most men, boys and probably women too, to own one. It’s qualities like this which have seen it last into the 21st century.

Cleaning the Knife

Any antique pocketknife that you pick up at an antiques shop or at a flea-market is bound to need cleaning. In most cases, the knife won’t have been properly maintained in decades. Cleaning the knife is important for a number of reasons.

First, it makes it easier, and therefore, safer to operate – an essential importance when anything with sharp blades is concerned.

Second, it improves the look of the knife and keeps your clothes clean. Nobody wants to carry a pocketknife in their pocket when it’s full of grime, and liable to transfer that to your jeans or slacks. And for something so small, a pocketknife can come with a whole heap of crap packed into it, and I’m not talking about the blades!

The first thing you’ll want to do, if you can, is to open all the knife-blades and toss it into an ultrasonic bath, ideally with warm water and liquid soap to blast out all the gunk inside the knife. Turn the machine on and watch all the dust and grime and crud come shaking out. You may need to do this two or three times, and change the water in between washes. This should clean out most of the grit inside the knife. Anything extra you can pick or scrape or wipe out with tissues, cotton-buds, or pins (useful for getting into the tiny cracks).

Once you’re removed all the grime, it’s time to remove all the tarnish and rust. This can be done using either hard abrasives like extra-fine sandpaper or steel-wool, or liquid polishes like Brasso, depending on how bad the the tarnishing is. Like the cleaning, polishing and rust-removal may take a few applications to get the look that you’re most comfortable with.

Sharpening Your Pocketknife

Once you’re done cleaning your pocketknife, the last thing to do is to sharpen it. There’s a million ways of sharpening a knife and half a billion ways of testing how sharp it is, so I won’t be going into this in great detail. YouTube is always a great place to find more, if you need it.

But to cover the basics – I sharpen my knives using stones of three different grits – coarse, then fine, then extra-fine, staring with the roughest, and progressing to the finest, with about 20-30 strokes of the blade across each surface on both sides. It’s important to keep the stones lubricated while you sharpen them. If you’re the sort of person who sharpens blades regularly, it might be useful to keep your stones soaking in a bucket of water somewhere, so that they’re always ready for use. If not, you’ll need to soak them for a few hours before you start using them.

Once you’ve given each blade of your pocketknife a thorough sharpening on both sides, now is the time to test it. The classic way is to see how cleanly it slices through a sheet of paper. A well-sharpened knife will produce a clean, straight cut and the paper will have sharp, clean lines either side of it. A knife which hasn’t been sharpened properly will simply tear the paper, or fail to cut it at all. As you cut, make sure that you pull the blade along so that you can test that its entire length has been properly sharpened. If it cuts cleanly, then congratulations, you’ve sharpened your first vintage pocketknife!


PUBLIC NOTICE: Antiques For Sale!

Hey folks!

As of today, throughouthistory.com will be listing all the antiques which I currently have for sale. If you want to see what’s available for purchase at the moment, please visit the ANTIQUES SALES page here! It may also be accessed through the ‘PAGES’ menu, down the left side of this blog.

Please note that all prices are listed in AUSTRALIAN DOLLARS, and that the final price to be paid on each item is the price of the item itself, plus postage! 

The flag of the Commonwealth of Australia, in case people have forgotten what it looks like.

Reasonable offers are accepted on all items, and questions are welcome. If you wish to buy an item, make an offer, or ask questions about something which I’ve got for sale, please email me at contact@throughouthistory.com. Thank you!

All payments for purchases and postage will be carried out through PAYPAL.

All photographs featured in the ANTIQUES SALES page are of the items themselves, and have been taken by me, your friendly blogger!