Buried Treasure: Four Spanish Pieces of Eight!

Digging through albums, boxes and cases of old, crusted-up, grimy, forgotten coins from defunct entities from all around the world can often be a thankless and pointless task. You find all kinds of coins which are not particularly rare, or particularly interesting, or particularly valuable. You find all kinds of coins which are grubby, sticky, grimy, tarnished, chipped, dented and otherwise distinctly unappealing in one way or another.

But occasionally – just occasionally – you do find gems!

Finding the Coin of Destiny

This post is inspired by some coins which I found in the past month or so, while digging around at the local market.

It was on a cold, blustery morning, when I trudged through my local flea-market looking for…stuff. I stopped at the table of a regular stallholder and started burrowing through the cases and trays of coins on offer. Admittedly I don’t do this as a matter of habit – I rarely look for coins at flea-markets, and rarely bother looking through huge swathes of the things, since nine times out of ten, the coins I’m interested in are nowhere to be found, except for specialist coin-collecting stores.

But as I rummaged, I found something, buried under all the offerings of British shillings, Dutch 2 Guilder coins, Indian Rupees, grimy copper pennies and American half-dollars. Inside some simple cardboard coin-holders, crudely stapled together and with near-illegible biro-markings on the border, were three silver coins.

LARGE silver coins!

Out of sheer curiosity, I picked them up and felt them in my hand. They were heavy. Substantial pieces of silver. I examined them closely and spotted a coat of arms between two pillars with banners coiled around them, beneath a crown. Around the edges were Latin inscriptions. One of them read:

“HISPAN. ET. IND. REX. M. 8R. I. I.”

With a stupid little grin on my face, I flipped the little packet over and on the other side was:

“FERDIN. VII. DEI GRATIA” and four numbers: “1820”.

Oh boy.

Oh Boy!

OH BOY!!

A (nearly) 200-year-old silver coin. And not just any silver coin. I looked back at the other side. Sure enough, clear for everyone to see:

“8R”

As in ‘Eight Reales’ (pronounced ‘Ree-ahlz‘)

Out of all that crud and junk, I’d just picked up one of the most famous coins in the world.

A Spanish Dollar. Better known as a Piece of Eight. Fought, squabbled, traded and passed from hand to hand between pirates, traders, merchants, sailors, kings, queens, soldiers and colonials since the end of the 15th century, it is a coin of almost legendary history. A coin, rare variations of which, can fetch literally thousands of dollars – for a piece of silver no bigger than the dial of a man’s wristwatch.

I picked up another one.

“1790”

Ooooh boy!!

I picked up the third one!

“1779”

Hot dawg, we got us a winner!

I flipped the coins back and forth to check the prices and their conditions. When I saw the prices, my heart skipped a beat. They were going cheap! Real cheap!

The three Pieces of Eight (top, bottom and left) which have joined my antique coin collection, together with their brother on the right.

That was when all the alarm-bells started going off in my head. This is either the bargain of a lifetime…or it’s a very clever forgery – and yes, these coins ARE faked. I know that for a fact because I’ve bought (but managed to return) a fake, once in the past (that was a close call!).

Now, as an aside, you might ask, what does it matter? If it’s a nice one, and you can’t afford a real one, then, why not buy a fake? It doesn’t really matter, right?

Yeah, but the problem is – a fake may not matter to you, now – but it’ll matter in 50 years when your grandsons take it to the Antiques Roadshow and their five minutes of fame on international television becomes an international embarrassment when they find out that grandpa got duped with a fake coin. Nobody wants fakes. And if you just coughed up $200 for one, and can’t get it back…you’re screwed!

Anyway. Back to the coins!

Very politely, I asked to examine them. I carefully teased back the staples using a precision instrument – better known as a fingernail – and slipped them out. I popped the three coins from their covers – the three pieces of eight…and then asked to borrow the dealer’s jewelry scale.

If you’re going to be any kind of antiques collector, or dealer – I highly recommend getting one of these little pocket scales. They don’t cost much and their highly precise measurements are specifically for measuring precious metals. I turned the scale on and popped the coins on, one at a time.

A piece of eight should weigh NO MORE than 27.07g. NO LESS than 26g, unless it’s REALLY, REALLY, REALLY worn out.

Coin #1: 26g. Exactly.
Coin #2: 26.52g.
Coin #3: 26.69g.

Alright! Looks like we’re in the clear. It’s a cheap and dirty field-test, but it’s generally quite trustworthy. It’s based on the fact that specific metals have specific densities. A specific size of silver coin will always weigh a specific weight, as opposed to one made of say, nickel-silver, or steel, or some other cheap, imitation-metal like that. A nickel-silver or pewter coin won’t weigh the same amount for the same size of metal.

At first, the weight of the first coin (at only 26g) worried me. But then, that coin was the oldest, and by far the most worn-out. I figured the weight of 26g was acceptable given its condition.

The backs of the coins, showing their ages. 1779, 1790, 1802, and 1820.

Satisfied that the coins were indeed the real deal, next came the haggling. This is where visiting the same flea-market every week for 20 years, so often that people recognise you on sight, comes in handy. When you’re a friendly, regular, weekly face to the long-term dealers, they know who you are, they know what you buy, they know what you pay, they know that eventually, you will buy something from them sooner or later. This helps grease the gears of generosity.

In the end, I toddled off with the coins in my pocket. They were already dirt-cheap and I got them even better than that! Very excited! This now brings my collection (it can now be called a collection, right?) up to the giddy heights of FOUR coins! Oh my, oh my…

The History of the Piece of Eight

So, enough about buying the coins. What about the coins themselves? What exactly makes a Piece of Eight so special? Why is it called a Piece of Eight? What is it about this coin that has made it so famous for so long? Where did it come from? Where did it go? How long did it last?

The official Spanish name for the Piece of Eight was the Reale De a Ocho – Eight Reales. The Real (without the second ‘e’) was the Spanish currency from the 1300s all the way up to the middle of the 19th century! That said, the Piece of Eight or ‘Spanish Dollar’ as it’s also called, doesn’t date back that far. It shows up on the scene about 100-200 years later.

To make the Real easier to count and manage, when Ferdinand and Isabella conquered Spain in the 1490s, returning it to the realms of Christendom, they also reorganised Spain’s pre-existing monetary system. The basis for the new system was to be the 8 Reales coin.

Together, the Escudo (introduced later, in the mid-1500s) and the Real (one gold, one silver) formed the bedrock of this new currency system of the steadily-growing Kingdom (later, Empire) of Spain. They were minted in denominations of 1/2 Real, 1 Real, 2, Reales, 4 Reales, 8 Reales (the ‘Piece of Eight’), 1/2 Escudo (which was equal to one Piece of Eight), 1 Escudo (equal to two Pieces of Eight), 2 Escudo, 4 Escudo, and 8 Escudo (equal to 16 Pieces of Eight!). The 8 Escudo coin (the largest denomination coin manufactured by Spain) was also called a Doubloon.

Of all these coins, the Doubloon and the Piece of Eight became the most famous, the Doubloon for its large size and high gold content, the Piece of Eight for its near universal usage, large size, and impact on world history, which I’ll get to, further down…

Where did Pieces of Eight Come From?

Pieces of Eight were largely manufactured in the Spanish New World colonies such as Mexico, Peru, and Bolivia. The vast majority of the silver used to make Pieces of Eight was mined out of Potosi, a mountain in modern-day Bolivia which was almost completely solid silver. Thousands of tons of silver was mined out of Potosi and this silver was refined, melted and then stamped and shaped into Pieces of Eight (and their smaller denomination coins) to be shipped back to Spain in their millions.

As European powers started colonising North and South America in the 1500s and 1600s, a readily-available system of currency needed to be adopted so that transactions and trade could take place.

The 8 Reales coin, already available in abundance in South America, Mexico, and various parts of North America, became the ideal coin (and by extension, currency) for colonials to trade with. Some countries (such as Britain) actively tried to dissuade the colonists from using British (or other European-power) currency, and so foreign coins (ie: the Piece of Eight) were used instead. The Piece of Eight was almost universally accepted as currency because it was a known quantity. People knew that it was a large coin of proven silver content, and this made it ideal for trade.

Why is the Piece of Eight so Famous?

The Piece of Eight is famous for a number of reasons. The first reason is that the Piece of Eight is widely considered to be the world’s first global or international currency. From the date of its first minting until it finally went out of circulation (Ca. 1865), the Piece of Eight was accepted as currency almost all over the world. And I mean ALL over the world. Canada, America, Mexico, the Caribbean, Britain, Europe, Asia, Australia, Africa and China ALL used the Piece of Eight as a form of currency in one way or another at some point during the coin’s official run as legal tender.

Its large size, heavy weight, high silver content and easily-recognisable design, made the Piece of Eight easily accepted around the world, when no other currency was available. Even in China, where the locals probably couldn’t read (let alone understand) the Latin inscriptions around the coin’s edge, they knew silver when they saw it, and they accepted it as payment for their goods such as porcelain, tea and silk. To ensure that the coin was the real deal, Chinese merchants would test the coin by hammering a seal into the coin to check its silver content. These seals were (and still are) called ‘chops’, and the dents they left in the coins are called ‘chop-marks’. It’s not uncommon to find Pieces of Eight used in the China trade festooned with chop-marks as the coins moved from merchant-to-merchant, each one striking the coin to ensure that it was solid silver.

Pirates and Pieces of Eight

The second reason why Pieces of Eight are so famous is because of their indelible link to the Golden Age of Piracy, the Age of Colonisation, the Age of Exploration, the Age of Sail, and the Enlightenment movements of the 1600s, 1700s and early 1800s.

As I said, Pieces of Eight were largely manufactured in South America and Mexico. To get Pieces of Eight back to Spain, the Spanish government organised a system of treasure-convoys. Basically, what happened was that every few months (say, two or three times a year), a fleet of ships was sent from Spain to the Caribbean and South America. This fleet of ships carried food, water, essential supplies, trade-goods and other necessities and materials required by the colonists living in Spanish holdings in and around the Caribbean Sea.

Once the ships had been offloaded of their cargo, their holds were reloaded with thousands, millions of gold and silver coins – usually escudos, doubloons, Pieces of Eight, and their various smaller denominations – along with tons of gold and silver in the form of bars (ingots).

Thus-loaded, the ships, in convoy, would sail for home.

It was these treasure-bearing Spanish convoys that were a prime target for nominally enemy nations, such as the Netherlands, France, and especially – protestant England.

So, did pirates and privateers really attack Spanish treasure galleons or even entire fleets? Were fleets lost in storms and hurricanes during the voyage back to Spain?

Oh, you bet.

Spanish treasure fleets were lost to storms or hurricanes with surprising frequency. Fleets sank in 1622, 1708, 1715, 1733 and 1750, to name but a few! One ship which sank in the 1622 storm was the Nuestra Señora de Atocha (“Our Lady of Atocha”). The Atocha is in the Guinness Book of World Records as the most valuable shipwreck ever found – probably because it was loaded with 40 tons of gold and silver!

OK, but what about ships lost to epic sea-battles? Did those ever happen?

They certainly did. On the 8th of June, 1708, the Spanish treasure galleon the San Jose was blasted to kingdom come by English cannons during a battle during the War of the Spanish Succession (1701-1714). Eager to stop the treasure-loaded fleet from reaching Spain (and therefore funding the enemy) English warships under the command of Admiral Sir Charles Wager, attacked the Spanish off the coast of Colombia.

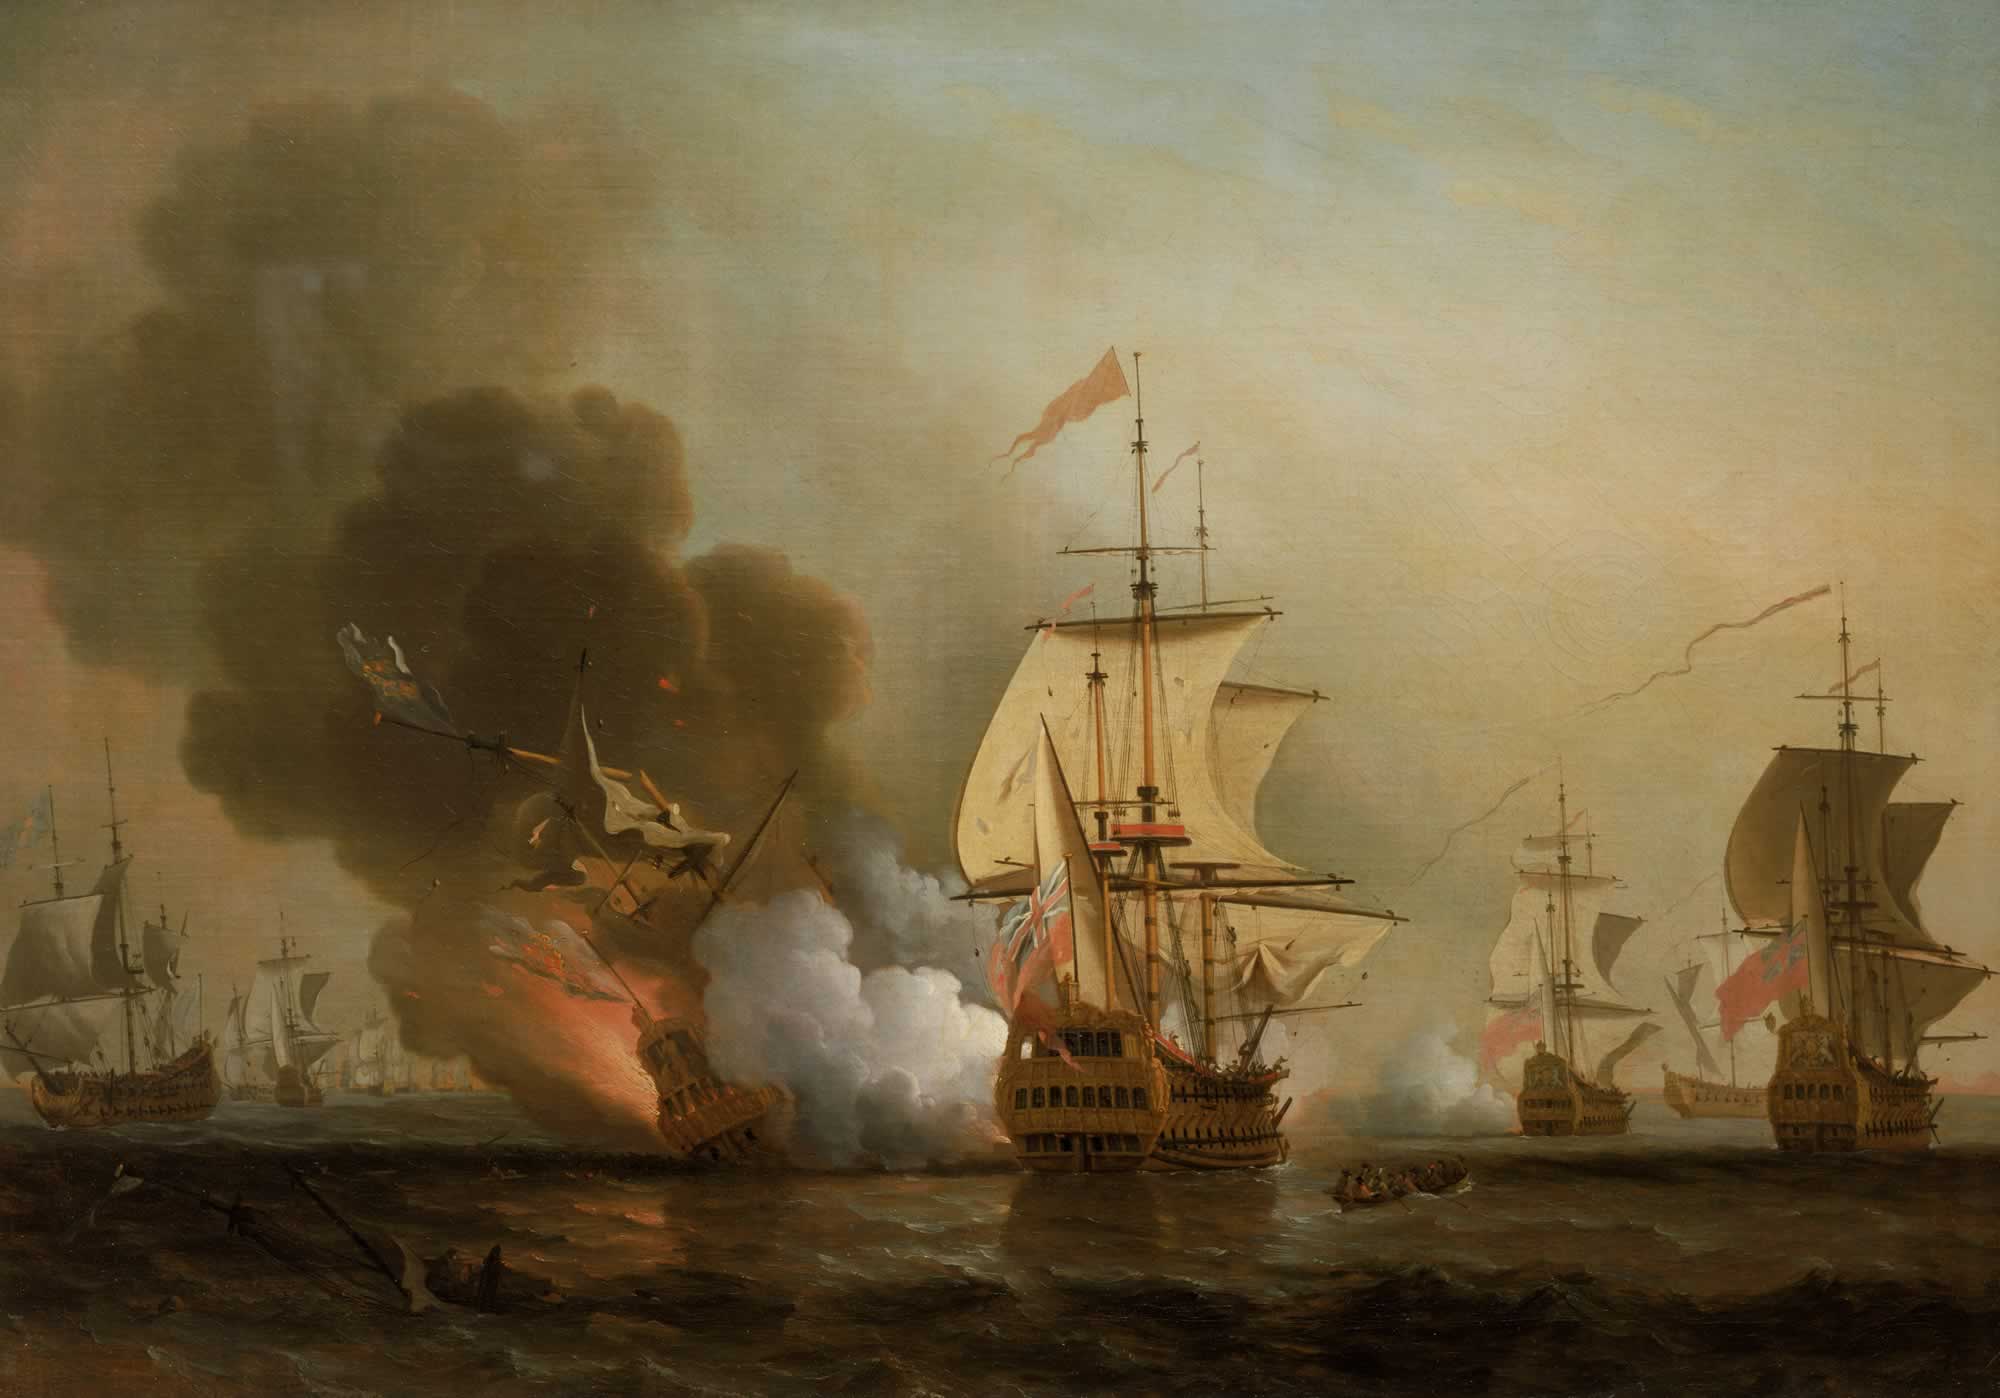
The San Jose (center-left) being blown to pieces by British cannonfire during the War of the Spanish Succession.

Three Spanish ships were destroyed in the engagement. One of them was the San Jose. It sank with hundreds of of gold and silver coins on board, as well as several pounds of jewels (mostly emeralds). It was discovered a few years ago, and as of 2017, salvage-operations are underway to retrieve the wreck’s vast fortune (calculated at being $17,000,000,000 – or $17 BILLION in American dollars, as of 2018).

So, that covers treasure lost in shipwrecks and to enemy action on the high seas, but were Pieces of Eight ever handled and used by actual, real-life pirates?

Absolutely.

Despite their ravenous, bloodthirsty image from popular culture such as television, films and books, pirates from the Golden Age of Piracy (roughly the 1620-1800) were surprisingly democratic and socially progressive creatures for ruthless, armed thugs. Surviving documents and books, written during the Golden Age of Piracy (largely during the late 1600s and early 1700s) state that pirates would vote and debate on almost anything and everything. To maintain order and efficiency and comfort at sea, pirate ships had lists of rules, and codes of conduct, which all pirates were expected to obey – and no, unlike in the ‘Pirates of the Caribbean’, they weren’t ‘more like guidelines’ – they were strictly adhered to!

One such regulation was the payment of health insurance! Pirates were entitled to a monetary payout (‘recompense’ as it says in the original documents) if they were injured in the course of a battle, but survived the engagement. Insurance levels varied, and depended on where you were injured, with different payouts stipulated for the loss of hands, arms, legs, fingers, or eyes.

So, how were these payments made? In Pieces of Eight, of course! And these could be very, very, VERY substantial payments. Loss of an eye was equal to 100 Pieces of Eight. Loss of an arm or leg could be up to 500 or 600 Pieces of Eight!

The Piece of Eight: The First Global Currency

Spain had colonies in Mexico, North America, South America, and the Far East. Spanish trade dominated the world from the late 1400s right up to the end of the 18th century. Because of this, the Piece of Eight was a coin that was used all over the world. Every continent permanently settled by mankind up to the start of the 19th century was touched by this coin in one way or another. It was the only coin which saw near-universal acceptance, being used as currency in Canada, America, Australia, Britain, much of South America and the Caribbean, Mexico, China, Africa and across Europe.

In America, the Piece of Eight was legal tender until 1857, when the first, truly American-made coins had been made in sufficient-enough quantities to replace it. In Australia, the Piece of Eight was legal tender until 1825. in China, the Piece of Eight was used as money up until roughly the time of the Opium Wars (1840s and 50s). In 1864, the Reale was finally retired as the Spanish unit of currency, to be replaced by the Peseta – the currency of Spain from 1869 until the country adopted the Euro, in 2001.

In China, merchants refused to trade with Europeans in anything except silver coinage. In this respect, the Piece of Eight was ideal as a system of currency. Its large size and high silver content made it highly attractive to the Chinese. But of course, the Chinese, not trusting these strange, white devils, would always test any silver coins given to them, before they accepted them as payment.

The 1779 dollar. Observe the areas circled in blue. The symbols hammered into the silver are chop marks made by Chinese merchants.

This was done by hammering a punch into the face of the coin to test its silver content, and also to mark that the coin had been independently assayed by a Chinese merchants to attest its authenticity. A coin with loads of chop-marks hammered all over it was taken to be a coin of proven silver-content, and was therefore acceptable for use as payment.

In Australia, the Piece of Eight was the nation’s first official currency after the island was colonised in the 1780s. Early in Australia’s history, rum, tobacco and other foodstuffs were used as barter, but when this became unsustainable, the governor of the day decided that foreign coins of known value would be appropriate for use as currency within the colony and a list of foreign coins was compiled. Only the coins on the list could be used as currency within Australia. These coins became known as Proclamation Coins, since they were the coins mentioned specifically in the proclamation from Government House.

The problem with these coins is that they could still be used OUTSIDE of Australia. This meant that loads of these coins were leaving the island on merchant ships which sailed to Australia to do trade with the colony. They sold their stuff to the colonists, who paid them in the valuable coinage, and then the sailors sailed off, leaving even fewer coins in the settlement.

To stop this, the next governor down the line decided that ONE type of coin would be used: The Spanish Silver Dollar or the Piece of Eight. He bought a whole heap of these coins (thousands of them) from Britain and had them shipped to Australia.

To make the coins worthless outside of Australia, he had them punched out. The larger ‘donut’ on the outside was called the “Holey Dollar” and the punched out nugget in the center became known as the ‘Dump’. The Holey Dollar was worth 5/- (five shillings), and the dump was worth 15d (fifteen pence).

In 1825, this practice was discontinued when a law was passed stipulating that ONLY British currency would be used within Australia. As a result, all the Holey Dollars and Dumps were swept up and tossed into the melter’s pot. Today, a Piece of Eight can be easily purchased online, although prices can vary wildly. By comparison, a Holey Dollar and Dump are worth THOUSANDS OF DOLLARS each, because so few of them survive today.

How Was a Piece of Eight Made?

The earliest Pieces of Eight were simply made by hacking off chunks of silver from cast bars (ingots) of silver, shaving them down until they were the prerequisite weight, and then punching the pre-carved designs (engraved into metal die-punches) into the coins, using a punch (like a stamp) and a hammer to apply the force. In this way, coins were quite literally ‘hand-struck’, and handmade, one after the other, piecemeal. Once one side of the coin had been struck, it was simply flipped over and the opposing die-punch was struck to the other side.

Coins such as these are called ‘cob’ coins and their crude methods of manufacture meant that they were often open to forgery. To have any faith in the money, even if it was solid gold or silver, merchants would routinely weigh coins to ensure that the cob in question was of the correct weight, since it wasn’t unknown for unscrupulous dealers to hack off the corners of silver coins and pass them off as whole ones, and then use the scavenged silver for something else (this practice was called ‘clipping’ the coin, since you clipped a bit off the edge each time).

The milled edges of the Pieces of Eight, an anti-clipping measure. The worn rim on the 1779 coin (left) explains why it’s a whole gram lighter than what a perfect coin would weigh.

By the 1700s, more advanced methods of coin-manufacture, similar to how coins are made today, started being devised, and anti-tampering measures such as decorated, milled edges started being introduced. With a milled or decorated edge to the coin, it was immediately obvious if it had been tampered with, thereby reducing the risk of someone wanting to ‘clip’ the coin for its silver-content.

Unless the Piece of Eight you own is EXTREMELY old (pre-1700s), it’s likely to be a milled coin rather than a cob coin.

The Anatomy of a Piece of Eight

By the 1700s, the general design of the Piece of Eight started becoming more or less standardised, with a few minor changes as the years progressed.

A typical Piece of Eight from the 1700s up through to the 1820s and 30s consisted of, on one side, the name of the reigning Spanish monarch of the day, the year of minting, and the Latin phrase “Dei Gratia” (“God’s Grace”, or “By the Grace of God”).

the other side of the coin had a crown at the top, and beneath that, a coat of arms. These consisted of castles and lion rampants set into the quarters, The Fleur de Lys of the House of Bourbon, in the middle, and beneath, a pomegranate. To either side are pillars, signifying the Pillars of Hercules, which corresponded to the Rock of Gibraltar (northern pillar) and the northwestern-most point of the African continent. Since antiquity, the Pillars of Hercules symbolised the entrance to the Mediterranean Sea.

For centuries, the Pillars of Hercules, guarding the entrance to the mighty Atlantic Ocean, were seen as the gateway to the unknown. What existed beyond them was pure conjecture. The Latin phrase “Non Plus Ultra” (“Nothing Further Beyond“) became widely associated with the pillars.

The Spanish coat of arms and the Pillars of Hercules on the coin.

This all changed in the 1490s when Christopher Columbus discovered the New World! Suddenly, there WAS something beyond the Pillars of Hercules, and with daring and tenacity, that something could be reached, colonised, explored, and exploited!

To this end, the old motto of “Non Plus Ultra” was changed to “Plus Ultra” (“Further Beyond“). It became the national motto of the Kingdom of Spain, and was added in swirling scrolls around the Pillars of Hercules on the Piece of Eight, to indicate that the wealth, power and influence of the Spanish started in Spain, and spread “Plus Ultra” – “Further Beyond” than the eyes of man could possibly see!

You will need an extremely powerful magnifying glass (and a Piece of Eight of the right vintage in good condition) but the microscopic letters are visible on the scrolls around the pillars.

Finally, around the coat of arms and the Pillars of Hercules are the words:

HISPAN. ET. IND. REX.” (“King of Spain and the Indies“), the mint-marks (in my case, an LM for Lima, and an M for Mexico City), the monetary designation of ‘8R‘ (8 Reales), and finally, the initials of the assay master overseeing production of the coins.

The Influence of the Piece of Eight

Not for nothing is the Piece of Eight, arguably the most famous coin in the world. The Chinese Yuan, the American Dollar, the Mexican Peso and countless other currencies around the world, all owe SOMETHING to the Piece of Eight. For example, when the Piece of Eight was finally pulled from circulation in the ‘States in 1857, its official replacement was the American Silver Dollar. This was a coin which was 38mm across, weighed 27g, and which was 90% solid silver.

Do those measurements sound familiar? They should – they’re the EXACT same ones used by the Piece of Eight, on which the silver dollar was based!

An American Silver Dollar (left, from 1891) next to the stack of Pieces of Eight (right). Observe the size. Not only that, they’re almost exactly the same thickness and weight. They’re also almost the same silver content.

The American system of quarters, nickels and dimes are also directly descended from the Piece of Eight. The idea of the Half Dollar and Quarter Dollar come from the original practice of quite literally – chopping up a Piece of Eight into halves, and quarters – and sometimes – even eighths! You could literally have an eighth of a Piece of Eight! These cut up silver coins were part of the basis of loose change today.

If you want more proof that the Piece of Eight is indeed, the most famous and influential coin in the world, then have you ever considered the dollar-sign? You know. This thing: “$”.

Look closely at a Piece of Eight. Here…

Notice the scrolls wrapped around the pillars of Hercules? See anything familiar there? The scrolls around the pillars was what led to the symbol for the dollar – the S with the two lines through it. Such is the influence of the Piece of Eight that MILLIONS of people use that symbol every day without even realising where it comes from.

Fake Reales – How to Tell Fake Coins from Real Coins

I openly admit to being a novice and casual coin-collector. I’ve only been doing this for two or three years at most. I like collecting coins with some sort of historical significance, either personal, or global. It was for this reason that I was attracted to seeking out Spanish Reale coins. The problem is, reales are (or can be) very expensive. Very, very, VERY expensive. Prices of $2,000-$3,000+, isn’t unheard of, for exceptionally rare or old examples. That’s why when I saw the price for this coin (which was far, far, FAR less than $2,000), I immediately became both interested, and wary of it.

So, if something seems too good to be true, and you want to make sure it IS true, how do you safeguard yourself against buying a dud coin?

There are a few quick-and-dirty ways.

Magnet Test

The first and easiest way to figure out if a coin is fake is to do a magnet-test. A steel coin purporting to be silver will snap to a magnet like flies to a cowpat. By comparison, a silver coin will not (or will not as readily) stick to a magnet. Some might, due to impurities in the metal, but it should be a slow or weak adherence.

A pair of rare-earth magnets (which are EXTREMELY POWERFUL) will do the trick. Easily purchased at your local car-supplies, or boating/fishing stores. BE SURE TO STORE THESE MAGNETS CAREFULLY – do NOT put them near electronics, mechanical watches, computers, phones or anything else like that – the extremely powerful magnetic field will damage them. Store them somewhere far away from other items, ideally in a padded cardboard or wooden box.

However, super-powerful magnets alone are not enough. You can get coins which are made of cheap, silver-like alloys (nickel-silver, for example) which will react the same way as real coins. So, what else can you do?

Weight and See!

The next test is to weigh the coin. A small (but highly-accurate) digital pocket jeweler’s scale costs very little. A few tens of dollars at your local jewelry-supply shop (where I bought mine) or online. Take it with you if you go bargain-hunting or antiquing regularly. Of course, for this to work – you need to know what the coin is SUPPOSED to weigh, in the first place. Perhaps keep a note of the coins you’re after, and their correct weights (easily found online from numismatic websites) with the scale for when you take it out with you. Then, simply weigh the coin. A coin which is SIGNIFICANTLY over-or-underweight is likely to be a fake. A coin which is exactly the correct weight, or slightly under (within one gram) is likely to be real.

For example, a Spanish Piece of Eight weighs 27.07g. That’s if you can find a PERFECT one. Very few Spanish reales are perfect. That being the case, expect SOME loss in weight. Instead of 27.07, it might be 27.00. Or 26.3, or 26.7, or 26.5, or 26.25. Unless the coin is missing a LOT of metal, it shouldn’t ever dip down into the 25g-range. If it does, approach with caution.

Unless you are absolutely certain that you can spot a fake – stay well away from any suspect coins like that. A fake Piece of Eight will weigh significantly less than 27, or even 26 grams. They can drop all the way down to 22, 25, 23 grams, etc. Any coin registering that sort of weight is a HUGE red-flag. Put it down, and walk away slowly.

Wear and Tear

Last but not least, check the physical condition of a coin. Any coin that is too perfect or too imperfect may be suspect. The exceptions to this are if the coin is really, really old, or if it’s shipwreck-salvage (yes, you can buy shipwreck coins, and it’s perfectly legal to do so). A genuine antique coin will have genuine antique wear and flaws and damage on it. Rubbed lettering, faded imagery, dents, cracks, dings – in some cases, they’ll even have chunks taken out of them. Some will have their corners or edges completely rubbed-off from decades and centuries of handling. Details like shields, facial-features like eyes, noses, mouths, hair, clothing, lettering, etc, should all show even wear. Milling or edge-decorations should show consistency.

While antique coins were handmade (or made with crude machinery) they nonetheless had to be perfect – or as near-perfect as the assayer and mint could make them. That being the case, any obvious flaws (like half the date falling off the bottom of the coin, when you can clearly see the edge-milling being intact) should serve as red flags for fake coins.

On the Edge

Another way to check whether a coin is fake or not, is to check the edging around the coin’s rim. A Piece of Eight has very distinctive circle-and-square patterning around its edge. This edging – properly called milling – was invented centuries ago as an anti-fraud device. By decorating the edges of coins, it became possible to see whether the coin had been defaced or cut up or been the victim of ‘clipping’ (where minute fragments of the coin’s precious silver had been scraped or filed off).

Fake Spanish dollars will sometimes (but not always) have markedly fake milling around the sides. If you ever see a Spanish dollar with modern corrugated milling on it – run away! Because they never did them like that! Ever!

Fine Details

Another way to figure out if a coin is fake is to compare it against a real coin. Obviously this isn’t always possible to do, but there are certain things you can look out for. Check things like character-spacing and sizing in letters, evenness of stamping, the crispness or clarity of the imagery used on the coin, and the fineness of the edges and rims.

Fake coins won’t bother with things like creases in robes, curls or strands of hair, detail to eyes and mouths on faces, and things like that. Some do, but most fraudsters are just banking on the fact that someone will be too excited by the prospect of getting a rare or famous coin, and will buy the coin too fast to examine it properly, allowing the forger to make a quick buck on a scam. Take as much time as you need to look at suspect coins.

The End of an Era

The Piece of Eight, the coin that ruled the world for three and a half CENTURIES finally came to an end in the 1860s, when in 1869, the Spanish Peseta replaced it as Spain’s official currency. By this point in time the Piece of Eight was already being phased out in other countries around the world anyway, and within a few years, its use had ended completely.

The coin was taken out of circulation and a piece of silver that once ruled the world and had circumnavigated it countless times and had visited every continent permanently settled by man, was suddenly made obsolete, to survive now only in antiques shops, private collections and in the fantasy of books, films and pirate lore…


Whistlin’ Dixey: Two-Draw Georgian-era Guillotine Pocket Telescope

Yarr-harr!! Avast, landlubbers! Belay thy squabblin’ and take heed:

This telescope was one of about half a dozen things I bought at the local flea-market this weekend. And ain’t she gorgeous!?

She is a Georgian, or very-early-Victorian two-draw pocket guillotine spyglass or telescope, with brass fittings and a wooden barrel. ‘Two-draw’ comes from the two, brass draw-tubes that comprise the telescope’s focusing mechanism. The ‘guillotine’ refers to the built-in lens-shutter that protects the glass from grit, rain and damage. It is a beautiful example of an early telescope, made in London by one of the best manufacturers of the age.

How do you KNOW it’s Georgian?

Good question, 99!

I know it’s Georgian, because of the way it’s constructed.

Most telescopes these days are solid metal. This one has a wooden barrel – a feature common to antique telescopes made during the 1700s and 1800s. By the later 1800s, telescope barrels were made more, and more out of brass (which was more expensive), rather than wood (which was plentiful, and cheap!), than wood. By the last decades of the 1800s, leading into the early 1900s, wooden barrels had almost entirely disappeared, replaced by brass barrels (sometimes clad in leather, to provide grip).

Secondly, I know that it is exceptionally old because of the built-in, sliding lens-shutters.

This French naval telescope, from the 1840s or 50s, has a removable, spun brass lens-cap, common to telescopes made from the second half of the 1800s, to the modern day…

Most telescopes you buy today – and most antique telescopes – have removable, round lens-caps. Some of the older ones also have swing-open, kidney-shaped lens-shutters over the eyepieces, to keep out dust. But only the really old telescopes have what some people have called ‘guillotine’ shutters. That means that the lens-shutters are built into the body of the telescope itself, and when the telescope is in operation, they simply slide up, out of the way, and then snap back down again (like a guillotine, hence the name), when the telescope isn’t being used.

I don’t know why that particular aspect of telescope design died out…I think it’s a pretty cool feature, actually. But that’s how it is. At least it’s a useful dating tool.

…however, this other telescope has a different type of sliding, ‘guillotine’-style lens shutter, which is only found on much older models.

The third reason I know that it’s Georgian is because of what’s engraved on the draw-tubes, the maker’s mark of “DIXEY / LONDON”, a company that was established in Georgian times, and which is still going today (more about them in a minute).

The fourth reason I give for saying that this telescope is Georgian is how the lenses are fitted into the telescope.

Most lenses these days are either screwed in, with washers to hold them tight, or are glued in with clear adhesive (as was the case, starting from the Victorian era). However this telescope’s lenses are neither. They’re turned in.

By that, I mean that someone fitted the lenses into the telescope, an then secured them in place by spinning a brass rim directly against the glass. This would’ve been an easier construction technique than having to cut threads and grooves to make the lenses drop and pop and screw in with washers, but it also meant that if the lenses BREAK…you can’t replace them. A bit of a problem…

Fortunately, the lenses on this telescope are in great condition, so I’m not worrying!

So how do I know it’s Georgian? That’s it! How it’s made, what it’s made from, and what features were included in the telescope during construction.

These are the sorts of things you need to learn, if you’re going to date antiques, even if it’s only a general ballpark number.

‘C.W. Dixey & Son – LONDON’

Telescopes were extremely common during the Georgian and Victorian eras. At a time when all international travel was done by sailing ship, or steam-powered ocean-liner, it was vital for members of the crew to own telescopes of quality. And at any rate, passengers who frequented the seas with any regularity, would likely have one as well, if only for sightseeing. Telescopes, although larger and bulkier, had a much further range than most binoculars of the day, and had much greater magnification.

The first draw-tube, with the maker’s mark of C.W. Dixey & Son.

Before the days of accurate maritime navigation (in the late 1700s), sailors found their way by ‘line-of-sight’ navigation – telescopes were used to sight landmarks such as buildings, cliffs, land-formations and rocky outcrops. Telescopes were therefore vital for safe navigation, when sailors ‘hugged the coasts’ of continents, to prevent their ships from being wrecked on reefs and rocks.

Engraved on this telescope are the words “DIXEY” and “LONDON”.

‘Dixey’ refers to C.W. Dixey & Son, an 18th century family firm of opticians, established in London in 1777. Although they don’t make telescopes anymore, the company still exists, as a manufacturer of eyeglasses. Among others, C.W. Dixey & Son made optical gear for the Qianlong Emperor of China (a telescope), Winston Churchill (a pair of spectacles), famous author Ian Fleming, Napoleon Bonaparte, and several British monarchs. It’s rather thrilling to own a telescope made by such a famous manufacturer!

Restoring the Telescope

The telescope required very little work to make it function properly, which is surprising, given its age. A good general polishing, blowing out dust, cleaning the lenses, and wiping down the draw-tubes with oil to remove interior grime, was all that was required to fix it and make it function like new! The sight down the barrel is clean and crisp, and the lens-shutters open and close smoothly and firmly, and the draw-tubes open and close without problems.

Cleaning off all the grime on the telescope of course wasn’t really possible – it would’ve required far more disassembly than I wanted to endeavour, but the end-result is pleasing enough. Now, it works, and it looks nice, and that’s really all you could hope for!

The finished telescope with its brass all polished and clean!


Victorian Writing Slope with Green Velvet Skiver (Ca. 18–?)

Anybody who’s known me for any length of time (and for that you have my sincere condolences!), you’ll know that one of my pet passions in collecting and restoring antiques is the refurbishment of antique writing slopes.

Slopes and Me

I got into writing slopes, writing boxes, stationery-boxes, writing-cases…whatever the hell you wanna call them – analogue laptops…when I was very, very young. As a child, I lived very close to two antiques shops, and I used to go in there every weekend as a five, six, and seven-year-old boy and drool over the antiques, wishing that I had the money to own even a quarter of the amazing things they had for sale.

But of all the things I saw, one in particular, grabbed my attention. I would’ve been seven or eight years old when I first beheld a Victorian writing slope – complete with its gorgeous, tooled leather skiver, bright green in colour, with gold leaf inlaid into the edges. Oh how badly I wanted it! Ever since the age of six or seven, I’d had a mad passion for antique writing equipment – dip-pens, quills, inkwells, the list goes on…and to me, to own a writing slope was a dream come true, ever since that fateful day.

Unfortunately, writing slopes are extremely expensive, and as employment opportunities for prepubescent boys are limited, my dream remained a dream for twenty years, until I finally started buying, collecting, and restoring my own writing boxes, starting in about 2010. Ever since, I’d like to think I’ve become a bit of an expert on them. I genuinely feel that they are an underappreciated and forgotten antique, and too few people bother to save them or understand the historical significance they once held.

The Velvet Box

I purchased this particular box, the box on which this posting will be focusing, at my local auction-house. I’d never actually won one of these things before. I’d bought a few, and fixed them, but I’d never won any – mostly because the prices they go for – even in appalling condition – can be prohibitively expensive for a budding antiques dealer such as myself.

Anyway, this particular trip to the auction-house, I got lucky. Nobody wanted it, and I managed to catch it at a good price.

The box was essentially intact. It had no key and no inkwell…which is pretty common with these old boxes…and the writing slope was a bit wonky…and the security-catch didn’t work right. But I was convinced that I could repair it. I’d refurbished boxes in worse condition than this, after all, so I was sure it wouldn’t be an issue.

Cutting a Key for the Lock

The closed box, with the new key on top.

How easy it is to cut a key for an antique lock, I think, largely depends on two or three different factors:

1). Complexity of the lock.
2). Accessibility to the lock.
3). Materials and equipment that you have available to you. 

If the lock you’re dealing with is a simple, one-lever dealie, then finding, or making a key to fit the lock is pretty easy (although it may take a while). If the lock you’re dealing with is open (as in, you’re not trying to pick a lock that’s already locked and shut and tight!), then cutting or finding a new key for it will be much easier – especially if you can actually remove the lock, pull it apart and then put it back together again to see exactly what type of key it needs.

Lastly, comes the rather fiddly process of actually cutting the key – should this be necessary – for your lock. If you’re lucky, you’ll find a key that fits perfectly and you won’t need to cut it. But if for whatever reason, you need to (to fit the lock, to fit the wards, etc), then having the right stuff will determine how easy, or how difficult, this is going to be.

First, you won’t actually be ‘cutting’ anything. You’ll more likely be filing. Get yourself a set of small, fine-grained metal files. Find a standard, flat, rectangular one, and start there. Make sure the files are fine – if they’re coarse, you could scrape off too much metal on the key and be left with something useless.

Second, you need access to the lock. This is why it’s so much easier to work on a lock when whatever it’s locking, is open. That way you can see more easily how the lock works (or even better, remove the lock entirely). If you can’t, then cutting a new key will be much more difficult, probably even impossible. It can be done (I’ve done it!), but it will take a lot of trial and error.

Once you’ve successfully found, or cut a key for the lock, the next step is to lubricate the lock, just to be sure that everything works exactly as it should, and to prevent the lock from seizing up on you unexpectedly.

Repairing the Skiver

The trickiest part of restoring this box was repairing the skiver.

The skiver is that thin sheet glued over the writing-leaves which holds them together. They’re usually made of leather, but this one was made of velvet. Velvet skivers were a thing, and they certainly were popular, but as with anything that’s over a hundred years old, they wear out.

The skiver on this box was starting to come apart. The glue used to hold it down had deteriorated long ago. Fortunately not to any great extent, but it still put the future of the box in a precarious position. All it would take was one careless tug or rip, for the entire thing to come apart. Re-gluing the skiver and pressing it down to stop the rot, was the first restorative action which I took on this box. Everything else could take time and patience. This could not. It had to be tackled right away if keeping the box in one piece was going to be a reality.

The skiver is the dark green velvet rectangle in the middle of the box, which makes up the writing surface.

Antique writing boxes were made in such a way that the writing-slope panels were held together not with nails, screws, rivets or hinges, but…glue. Glue, and fabric. And only glue and fabric. The two wooden panels that make up the writing-surface are held onto the box only by the velvet panel going across them, and the sheer grace of God.

And a bit of glue.

You can see the implications here. Once the fabric rips – the ENTIRE PIECE has to be replaced. And it’s a very fiddly, irritating, messy, long, drawn out process.

I should know. I’ve done it before. And it’s not a pleasant operation.

That was why, to save the skiver and glue down the loose fabric as fast and as effectively as possible, was the first thing I did. Once that was done, I re-enforced the hinge with some extra-strong adhesive tape from the inside, underneath the wooden panels, to ensure that the box’s writing-slope panels really could be opened and closed without incident. The skiver and its beautiful border-decorations had been saved.

Cutting a New Notch

The next step in restoring this box was to rebuild the notch in the lower writing-leaf.

All boxes of this kind had a notch chiseled or carved into the lower writing-leaf. This was to accept a little brass catch which held the leaf closed when you opened and shut the box. If you didn’t have it, then the lower writing leaf would drop open the moment you closed the box, spilling whatever was inside it, all over the place.

As is fairly common with these old boxes, the notch in question had worn away from decades of the little brass catch rubbing and rubbing and rubbing and rubbing on it, over and over again, from the countless times the lid was opened and shut. Because of this, it simply didn’t work anymore. The writing-leaf would pop open, or fall open or rattle around inside the box, and it’s probably how the skiver got damaged in the first place. With a spare piece of wood, a hammer, a chisel and some extremely strong glue, I was able to chisel out the old notch and replace the worn out wood with a fresh piece of wood large enough to catch the brass tab, without damaging the box.

How Old is this Box?

Uh…

…Um…

Eh…

*clears throat…scratches head*

…Very?

The truth is that dating antique writing boxes is very, very hard. They were manufactured for a very long time (approximately three hundred years), and once established designs had been formalised, they rarely altered. Unless the box is of a particular style, or from a particular maker, they can be extremely hard to date. Most boxes of this type were generic, and were made in their thousands. My roughest guess would be mid-Victorian, probably around the 1850s or 60s, and I’d just as likely be wrong as right. At any rate, it’s certainly been around the block a few times, although whoever did own it at one point certainly seemed to have taken good care of it, since it’s not in anywhere near as bad a condition as some boxes I’ve seen!

Anyway, that concludes this little foray into restoring yet another Victorian writing-box. This one was easier than most, but it was still a challenge to get everything right. That said, I am extremely pleased with the end results!


Stopping to Smell The Roses: A George III Silver Vinaigrette

I am a firm believer that products made in the 1700s and 1800s, and during the first half of the 20th century, were, and are, of far better quality and were held to much higher standards of manufacture, than anything made today.

It is the chief reason why I love antiques.

Today, I’m here to talk about this:

This tiny little object (tiny? You could fit two of them in a matchbox!) is one of the half-dozen or so things which I purchased during my latest antiques-bargain-hunting scrounge-fest. It is a vinaigrette.

“…it’s a what??”

It is a vinaigrette.

A what…?”

A vinaigrette! It would’ve originally held a tiny sponge impregnated with perfume (to provide sweetness), and vinegar (for pungency), in order to mask offensive or unpleasant smells and odours – hence ‘vinaigrette’ – it has nothing to do with that salad you’re munching on!

Vinaigrettes were invented in the 1600s, but were not really made out of silver until the 1700s. They are largely considered an artifact of the Georgian era (1714-1837), although they were also made during the Victorian era, albeit in increasingly…uh…decreasing…numbers.

Why are you writing about it?

Chiefly because to me, vinaigrettes are one of the best examples (apart from watches) of the capabilities of mankind.

This thing is microscopically small – almost literally! It blows my mind that something as intricate as this was made BY HAND. The silver sheeting was pressed, shaped, punched, cast and filed by hand. The tiny, tiny hinges were rolled and folded by hand. The grille was measured and pierced by hand, with amazing precision, enough to include little flowers in it!

The flowers-and-leaves engraved decoration on the lid is eye-wateringly detailed, in a space smaller than a modern postage-stamp!

The skill, the patience, the experience, the steady-handedness, and the phenomenal artistry that went into something so unbelievably small, really takes my breath away.

“The inside’s gold!…I thought you said this thing was silver!?”

It is! But the inside is gilt (basically – gold-plated). This was to prevent the acid in the vinegar or perfume, from corroding the silver. For all its luster and glory, silver has surprising weak-points: it’s very susceptible to acid and salt, and various foodstuffs like meat, seafood, and certain vegetables. It’s one of the reasons why silver was gilt, or had glass liners inserted in various pieces of silver dinnerware – to protect the silver and prolong its life.

It’s also, by the way, why in those period drama TV shows, the servants are forever polishing silver – because the use it was put to 100, 200 years ago, meant that it tarnished very easily, especially when it was exposed to the heat and smoke and dust of gas-mantles, candles, and oil-fired table-lamps.

“Who Used Vinaigrettes?”

Everyone! Both men and women used vinaigrettes, although some models or sizes of vinaigrettes were aimed more, or less, at each gender. For example, a vinaigrette which had a built-in snuffbox would more likely have been used by a man. A vinaigrette with a heavy floral motif, or which was extremely small (yes, they do get even SMALLER than this, believe it or not!), would’ve been used by a woman.

They existed at a time when the world…and the people which inhabited it…smelled very different to how we do today. Standards of personal hygiene were questionable at best, and although the streets did not reek of petrol-fumes and exhaust smoke, they were nonetheless polluted with the stench emanating from a rather different kind of horsepower. In many ways, the story of the vinaigrette is the story of human hygiene.

As hot water became more readily available with coal-fired boilers, piped, running water, cast-iron cookstoves and soap became increasingly cheap (it had previously been taxed to the hilt in Georgian times), men and women found themselves much more able to bathe in comfort, and take bathing as a pleasure rather than as an unpleasant and shameful chore. As more and more people bathed, the need to mask unpleasant smells with your own personal scent-box declined, leading to the eventual end of vinaigrette-manufacturing at the turn of the 20th century.

“So really…how small are they?”

Well, this’ll give you some idea…

…here we’ve got two vinaigrettes on top of a standard box of matches. They were made bigger than this, but most were designed to be small, pocket-sized things, just large enough to hold under your nose and take a whiff from.


Popping Pills: Restoring an Apothecary’s Pill-Rolling Machine

This gorgeous artifact and fascinating piece of medical history is the latest addition to my collection of antique brassware, and is also the latest thing I won at the local auction-house…

“Ooooooh!” I hear you say.

“Wussit do?” I hear you say.

“Can I have one??” I hear you say.

Well…uh…no, you can’t have one! I’ve been chasing one of these for five years, and I finally got one!

“Awww…okay fine!…But…w-whassit do?”

Well, it’s a pill-rolling machine, from the Victorian era! Ain’t it neat?

No, seriously dude…what does it actually, like…really, do?

…I just told you. It’s a pill-rolling machine!

I know, I know, it looks like some sort of antique cheese-grater, but yes, this is actually a pill-making machine, and back in the mid-1800s, no self-respecting apothecary would’ve been without one of these proudly on display on his shop counter!

“So how does it work?” I hear you ask, “And I mean…why does it exist? I thought pills were made in factories and stuff?”

Uh, yes…they are…now. But 150 years ago, they weren’t. In this post I’ll be talking about what this device is, how it works and what it does, I’ll also be going into a few of the differences between pharmacies today, and how they were, a hundred and fifty-odd years ago, in the middle of the 19th century, when this pill-rolling machine was invented…

Your Friendly Village Apothecary

This machine dates back to the days when your local pharmacist or apothecary bought, sold, and manufactured all his own drugs, medicines and curatives to everybody who lived within the bounds of a given community, and when the dispensing, manufacturing and purchasing of medicine was very different to how it’s done today.

These days, we get sick, we go to the doctor, he’ll give us a script, we’ll take it to the pharmacist, he’ll read it off, get the medicine, give it to us and we’ll walk out of his shop with a bottle of pills, a tube of paste, a jar of ointment, and a bag of diabetic jellybeans.

Back in the 1850s and 1860s, when machines like this were invented, how you got your medicine was very different.

For one thing, you likely didn’t even go to the doctor! Back in Victorian times, physicians were usually far beyond the reach, financially, of most people. Your average, workaday schmoe likely never met a doctor professionally, unless it was a real emergency. On a day-to-day basis, most poor and middle-class people would visit the pharmacist or apothecary for the majority of their healthcare needs.

Even if you did go to the doctor, he’d write out a prescription, and the instructions he generally gave you were to take the script to the apothecary and have the chap behind the counter make up the medicine for you, which the apothecary would’ve done anyway, even if you hadn’t gone to the doctor. And that’s the key difference between a Victorian pharmacist, and one which trades and deals today: Victorian pharmacists and apothecaries MADE their drugs, whereas modern pharmacists just sell them.

Let’s make some drugs… 

Back in Victorian times, there was no such thing as off-the-shelf medicine. Every tablet, pill, suppository, ointment, potion, lotion, tincture and syrup to treat everything from a sore throat to fever, headaches to constipation, was made laboriously by hand, by the pharmacist. There was no such thing 150 years ago, of medicine-making factories like what we have today.

“So where’d they get their drugs from, then?” I hear you ask.

Well, what used to happen was that pharmacists would draw on the centuries of accumulated knowledge passed down from master to apprentice, over countless generations. This knowledge foretold of which plants, herbs, roots, leaves, barks, piths, saps, syrups, foodstuffs and various animal parts, had healing properties. It was knowing how to find these ingredients, how to identify them, how to use them and what they did, that was the biggest part of being a pharmacist or apothecary back in the Victorian era. Indeed, a lot of ancient and past medicine had far less to do with pills and potions, and more to do with herbs, roots, leaves and saps. A lot of the medicine was plant-based (it still is, we just don’t realise it, that’s all!), and because of this, a pharmacist 150 years ago did not have packets and jars and bottles of medicine – he would’ve had jars, and jars, and jars, and row after row after row of drawers, all filled with these plant extracts and component-parts.

Old apothecary shops were famous for having dozens, hundreds of jars, bottles and drawers, all filled with plant and animal components, all of which were used for treating illnesses. Stuff like willow-bark, opium, cannabis, cocaine, smelling-salts, essential oils, cold-creams, arsenic, cyanide, moisturizers, lip-balms and all other manner of countless ingredients!

What used to happen is that you’d go into your apothecary, and he would diagnose you, and then recommend a treatment based on that diagnosis, or based on the symptoms which you told him of. After making his diagnosis or recommended course of treatment, the apothecary would then make the medicine for you – on the spot, there and then. This might take a few minutes, it might take hours! You might be told to come back later to pick it up, or you might just take a seat in the corner and read the newspaper in the meantime.

Victorian-era Medicine

Medicine for most of the Victorian-era varied little from medicine in previous centuries. All medicinal plant-and-herb components were bought, sold, and used in their raw form. No aspirin – just willowbark. No sleeping-pills – just opium. No laxatives, just rhubarb!

So what happened when you had to take your medicine?

Well, to make it easier to digest, and to make the active components easier to absorb, the plant material had to be broken down. This was most often accomplished by grinding, crushing, pounding and muddling, using an apothecary’s mortar and pestle, like this one:

A lathe-spun Victorian apothecary’s mortar and pestle, made of brass to make it easier to clean, more resilient to constant daily use, and to prevent medicine or poison from absorbing into the body of the mortar (which might cause poisoning!) This one’s from my personal collection of antique brassware.

Once the medicine had been crushed, ground and pulverised into dust, it could then be either dispensed into a jar, wrapped up in sachets, sealed inside capsules, or mixed with syrup in order to form a paste, which could then be rolled, or pressed into pills or tablets. As tablets were tricky to make by hand, some medicines were simply sold as the powder they ended up as – put inside a folded piece of paper and put inside a box along with a whole heap of others. One folded piece of paper meant one dose. The medicine was unfolded, tipped into a glass of water or other convenient beverage, and then consumed. It’s the origin of the expression ‘to take a powder‘. My dad remembers having to do this when he was a child for things like painkillers when he had a fever or headache – he said it always tasted horrible!

The Victorian Pill-Roller – How Does it Work?

Hard tablets were tricky to make. The powder had to be poured into a mold, the mold was closed and then hammered to compress the powder. The mold was broken open and a single tablet would drop out. This was slow, fiddly, and imprecise. Making pills on the other hand, which didn’t require this fiddly process, was much easier. And that’s where my Victorian pill-roller comes in.

Once the necessary ingredients for the pills had been measured, crushed, ground and pulverised, a final ingredient was poured into the mortar – syrup. The syrup wasn’t there to sweeten the mixture, it was there to act as a binding-agent. You mixed the syrup into the powder until the entire thing coagulated into a paste or doughy mixture. Then you could scoop out the entire mass, and roll it into a snake or sausage – one long, continuous worm of medicine!

Obviously, nobody wants to take an entire worm of medicine, no matter how sick they are. So to make it easier, the whole mass had to be cut up and shaped into pills.

This used to be done by hand. And there’s nothing wrong with that, except that no two pills were then ever exactly alike – which could be dangerous if the medicine was exceptionally potent!

To even the odds, and to make pills more uniform, the pill-roller was invented, around the 1850s.

So, how does it work?

Well it’s very simple. It has two parts (well three, but the third one is missing – I’ll get to that later on).

The largest piece is the board. This is set at an angle and is comprised of the rolling surface, the cutting grooves, and the collection-tray. The large flat surface is for rolling out the pill-paste into the sausage that I mentioned earlier. This is then rolled towards the brass cutting-grooves. The paddle (the second piece) is flipped over so that the grooves there line up with the grooves on the board.

Rollers on the ends of the paddle roll against the brass edges of the board, and they guide the paddle straight across the grooves, taking the pill-mass with it. The grooves on the paddle and the board slice up the pill-mass and, after rolling the thing back and forth a couple of times like a rolling-pin, the circular pills – each one exactly the same size now (wow!) – roll off the grooves and into the tray at the bottom. And there you have it – two dozen pills all done in less than a minute! Talk about mass production, huh? This process could be repeated countless times and the results would always be the same – perfectly shaped pills, which were all the right size, and the right dosage.

Now, remember I said that the board was on an angle? That’s to ensure that the pills only roll one way – across the grooves from one end, to the other, turning from lumps of clumpiness on one end, to emerge as recognisable pills on the other. Now this presents a problem: Pills are round. And if you studied university-grade physics like I didn’t, then you might or might not know that round things on a sloping surface…roll. A simple application of gravity overcoming friction.

To prevent your newly-formed pills from rolling off the board, onto the table, and then all over the floor, the pill-roller came with a third component, which on this one, is missing – a removable, wooden collection-drawer. At the end of a session of rolling, the pills would land inside the drawer and remain there while you made more. When the drawer was full, you could slide it out and empty its contents into a jar or bottle, easily, and cleanly.

That said, simply rolling the pills wasn’t always sufficient. To improve their look, or to change their shape, each pill was then placed inside a highly sophisticated pill-rounding device, which is different from a pill-rolling device, in that it doesn’t roll the pills, it rounds them.

What’s the difference? One device makes the pills, the other one pretties them up for the camera.

The pill-rounder is basically a flat wooden disc or cup. You stick it over the pill (one pill at a time) and slide it back and forth and all around. This rolls the pill inside all over the place, smoothing out any lumps and bumps, so that it’s a perfect sphere. Shaking the rounder back and forth flattens out the sides so that it looks more oval than circular – one trick to differentiate pills from each other if they’re the same size or colour, but have different functions – was to make different pills a different shape. You don’t want to confuse a laxative with a sleeping-tablet…

Restoring the Pill-Roller

Anyway, so much for the pill-roller and how it works. What about fixing it up?

Well, this is what it looked like when I bought it…

As you can see, worn out, and rather dry. The wood was supposed to be a beautiful dark mahogany colour and the brass is supposed to be a gleaming gold…instead both elements look rather dusty. In that photograph it’s almost impossible to tell them apart! It took a lot of polishing with Brasso and ultrafine steel-wool to restore the brass back to its previous luster…

The brass grooves and rails after my first concentrated polishing effort. It would take a lot more to finish it off.

Apart from polishing and cleaning the brass, I also had to tighten screws, fix dents in the brass rails (which fortunately were few and easily remedied), and clean out the grit and dust stuck inside the cracks.

The biggest repair I had to do was to rebuild the one missing piece from this device: The pill-collection drawer. This involved a lot of careful measuring, tracing, cutting, and research.

Rebuilding the Drawer!

I didn’t know that this thing was missing something when I bought it. I was so excited at the possibility of owning it that this had never crossed my mind! It was only after I’d started researching it, that I’d realised that something was missing. In researching the history of these things and trying to dig out photos of them online, I started to realise that mine was incomplete. Fortunately, rebuilding the drawer looked like a relative cakewalk, so I headed out, purchased the necessary materials, and started.

The first step was to measure and mark all the pieces that I’d need, after looking at loads of photos to determine the general style and shape of the thing. The next step was to cut them out and figure out how they’d all fit together. Due to the shape of the board and the grooves which the drawer had to slide in, each piece had to be carefully sanded, chiseled, cut, measured and oriented a specific way, otherwise it wouldn’t work.

Sanding and chiseling took up the most time. The first and easiest step was to measure, cut and sand the baseboard for the drawer. This had to fit perfectly, because everything else would be measured and cut in relation to how it moved inside the pill-roller. Once its size was perfected and it could slide in and out comfortably, I started on the side-pieces. These were harder because to fit inside the drawer-space, they actually needed quite a lot of wood taken off. I accomplished this with a ruler, pencil, hammer and chisel to carefully score, chip and split off as much wood as I needed, before sanding the chiseled area smooth.

The next step was to cut the curved, quarter-circle rails that would be at either end of the drawer. One end had to be lower than the other, so that the pills would roll into the drawer easily. The other end had to be higher, so that the pills wouldn’t then be encouraged to roll out the other side! The challenge here was to cut and sand these rails to the right length. Too short and they’d fall out and be the wrong size. Too long and if I forced them between the sides of the drawer, I risked splitting the pill-rolling board in half – which would be a disaster!

The next step was to fit all the pieces together, and ensure that they would slide in and out smoothly, without jamming…

All the pieces fitted together, before final assembly.

Once I was satisfied with how they fit together, I started gluing them together. This was the easiest bit. I started with the end-stop rail first, then the rail closest to the pill-grooves. And then I glued the side-panels onto the sides of the rails and the top of the baseboard. Then I slid the whole thing into the drawer-space to compress it a bit while the glue dried. This was the result:

Drawer goes in…

…drawer comes out!

I had to be very careful with these last few steps. The drawer had to be just the right size. If it was even a fraction too small, then it would just fall out. If it was a fraction too big, then it would jam, and quite possibly damage the board. But patience paid off and the results speak for themselves. The final step was to nail the pieces together here and there, just to provide some extra strength and peace of mind, and then to stain everything with oil to bring out the grain and colour, but the project was essentially finished at this point – all the other things that still had to be done were purely cosmetic. The main ‘reconstructive surgery’ as it were, was now completed.

BEFORE:

AFTER:

And there you have it. The finished product. Next comes staining, and perhaps a demonstration of how this thing actually operates, but that’ll be for another posting! Stay tuned!


Four-Draw French Naval Telescope w/Sliding Lens Shield (Ca. 1845)

This was the last antiques purchase I made before it became necessary for me to pack up all my treasures, in preparation for a big move that I had to make. I haven’t written about it yet because I’ve been sick in bed for the past few days struck down by allergies! (damn cats…!)

Anyway, now that I am sufficiently recovered, and no longer rashy and puffy (yeah it wasn’t fun…), I have decided to take some time to write about what has to be one of the finest purchases I’ve made so far, and which was partially funded by the selling-off of some of my other antiques.

I bought this from a chap at the local flea-market who went on buying trips in Europe. He’d picked this up during a visit to France, he told me. It had to be by far the most complete and perfect example I’d ever seen, and after a lot of haggling and playing of the ‘repeat-purchaser’ card, we struck a deal.

The telescope, as you can see, is a large, four-draw naval telescope, with a wooden barrel, brass fixings, and a sliding brass lens-shield, complete with the original lens-caps and shutters. Its full length is 38.5in. Engraved on the eyepiece draw-tube are the words:

Maison de
L’Ing. Chevallier, Opt’n.
Place du Pont Neuf, 15
Paris.

Roughly translated, it reads:

House of Chevallier. Optician. 
Place du Pont Neuf, 15,
Paris. 

I have researched this, and it appears that Monsieur Chevallier was a very noted French optician, producing not only telescopes, but from what I’ve seen, a lot of microscopes, as well! He was also an optician to French royalty, according to one advertisement I came across. The address, 15, Place du Pont Neuf, is in central Paris, near the River Seine (‘pont’ is ‘bridge’ in French), near to the famous Cathedral of Notre Dame!

Just picking the telescope up and moving it around in my hands told me that this was a very high-quality piece, although like a lot of antiques, it had not been restored or overhauled in decades, which meant of course, that it was jammed up with gunk, grime, and dust, and therefore, entirely seized up. There was also a significant dimple on the lens-shield, which was causing it to jam.

Restoring the Telescope

Once I got it home, I started on the usual tedious, but necessary restoration process, to prevent the telescope from being damaged any further. This included blowing out all the dust, wiping down the lenses inside and out, disassembling the entire piece and cleaning and lubricating the threads, and flushing out all the grime and grit accumulated inside the focusing mechanism and draw-tubes – which is by far the most tedious part of this whole rigmarole!

One of the more fiddly parts of fixing this telescope was removing the dent in the sliding lens-shield at the front of the barrel. The dent was not large, but it was sufficiently concentrated, and deep enough, that it kept rubbing on the protective end-stop at the end of the barrel, thereby causing the entire mechanism to jam. No amount of oil would solve this, so the dent had to be removed.

Of course, removing the entire dent was not likely to be possible, but removing enough of it to stop the jamming would be sufficient. To do this, I unscrewed the lens-shield from its coupling ring, and then slid it off the barrel over the objective lens, past the end-stop which usually held it in place. The next step was to lay the shield on a flat surface without damaging the rim on the edge (which serves as a stop-point for the lens-cap).

Once I’d done this, I needed to locate the dent. Once found, I rolled the shield so that the dent was bottom-most, and pressing against my flat surface (a solid, wooden benchtop). Then I slipped a wooden rolling pin (like what you use to make cookies with) inside the shield to act as a mandrill. Next came the tedious process of rolling, pressing, rolling, pressing, rolling and pressing, using the smooth surface of the benchtop, and the smooth, round surface of the rolling-pin to pop the dent back out.

This had to be done carefully. Too much force and I’d end up with a nice OVAL-shaped lens-shield, which wouldn’t fit back onto my telescope. Not enough force, and I’d never get rid of the dent! However, diligence paid off, and I was able to remove enough of the dimple to achieve the desired result. Rather than tempt fate, I stopped there and reassembled the telescope.

Removing, or rather reducing, the dent was the only major repair I did to this piece. The rest of it was largely just cleaning, or small cosmetic things like light polishing, cleaning the lenses and tightening up loose couplings.

What’s the point of the sliding shield?

OK, so you cleaned it, you removed the dent, you oiled it, you washed out the grime and wiped it down…but what’s the whole point of that sliding cylinder, anyway?

It’s called a lens-shield. They were pretty common on antique telescopes, both of the pocket-sized terrestrial variety, and the larger, handheld maritime variety (like this one). Their purpose was to protect the lens while the telescope was in-use. They were slid out ahead of the objective-lens, and they provided protection to the glass from things like rain, snow, and excessive sun-glare. Having the shield extended meant that when looking in the direction of the sun, the rays of light hit the shield before they would hit the lens, preventing reflective glare.

In inclement weather, the shield kept rain, condensation and snow off of the lens, so that you didn’t have to keep wiping the glass every few seconds, thereby providing you with an unobstructed view – very important when you might be on the deck of a ship in the middle of a heavy storm!

Interesting Notes on Construction

I’ve seen a fair few antique telescopes in my time, ever since I started getting interested in antique optical stuff, about eight to ten years ago. While most telescopes from the 1840s-1850s up to the 1930s, 40s and 50s were all basically made the same way, with the same components and methods of construction, there were elements of this telescope which the manufacturer included which just make me love it just that little bit more.

The first element was the way the lens-shield was attached to the barrel of the telescope. On all other telescopes of this type that I’ve seen, to remove the shield, you need to pull apart the barrel and slide the shield backwards off of the body of the telescope. It’s fiddly and annoying. With this telescope, the shield is screwed onto a threaded coupling-ring that slides up and down the barrel. You simply unscrew the shield from the ring, and then you can slide the whole thing off the telescope, without having to disassemble anything!…You don’t even have to take off the lens-cap, if you don’t want to! This makes cleaning and overhauling this particular telescope much easier!

The second element about this telescope’s construction that I really liked was the inclusion of tiny holes which were drilled into each draw-tube, at the points where their coupling-rings screw together. I’d never seen anything like this on other telescopes before, and this confused me at first. It wasn’t until after I’d cleaned, polished, and de-grimed the entire instrument that their purpose was revealed to me, since only then would their function be fully understood!

So why on earth would you have tiny pinholes drilled into the draw-tubes of a telescope? The simple answer is air-pressure!

Telescopes, for all their simplicity of construction, actually have components that fit together with remarkable precision. Every lens, every rim, every coupling-ring, every tube and cartridge, slips, slides and screws together in a very precise, tight-fitting way. To ensure smooth action, and to ensure that the telescope will not pull apart accidentally, the tubes and the coupling-rings, lenses and everything else, are fitted together with almost microscopic tolerances, so much so that the whole thing is virtually airtight!

The result of these tight-fitting parts is that when the telescope is collapsed for storage, there’s a lot of air trapped inside the draw-tubes which despite their snug fits, are obviously, not airtight. On small telescopes, this air can easily be forced out of the microscopic gaps between the draw-tubes, but on larger telescopes where this might not be possible, collapsing the telescope in the sharp, brisk, business-like manner that most people might’ve seen in TV shows or movies, just wouldn’t be practical, or probably, possible!

Here, you can see the three holes (on the left) drilled into the draw-tubes, with the maker’s details engraved on the right.

The holes in the draw-tubes therefore serve as air-pressure valves. The give the air somewhere to go when the tubes collapse into each other and force the air inside them out of the telescope. They make the process of opening and closing the telescope much smoother and easier. Without them, the resistance caused by the trapped air would likely make the draw-tubes jam or stick, both in opening, and closing the telescope.

Concluding Remarks

This concludes this latest posting, and my examinations of this latest addition to my collection. While other pieces may come and go, I’m pretty certain that this one will be a lifelong keeper. It really is an excellent piece and in such fantastic condition. There are a few minor blemishes that’s true, but you’d have a few yourself if you were nearly 200 years old!

Now all I need is a round-the-world cruise on which to bring it, so that I can do a spot of touristy sightseeing through its lenses, from the high, clear vantage point of the boat-deck of some grand ocean-liner… Eh…one day!


Georgian Scent-Box – My Antique Silver Vinaigrette

In going back over the hundreds of posts I’ve made in this blog since I started it in 2009, which is coming onto eight years ago (yikes!), I suddenly realised that I’d never done one about one of my most-prized antiques. My teeny little vinaigrette box. So that’s what we’re covering today! Here it is:

This thing is really small. I mean really, really, really small! You could pack four or five of these into a standard matchbox without much trouble at all. That’s how tiny it is! The entire thing is solid sterling silver, and it is indeed, very old. It is the oldest piece of antique silver which I currently own, and almost certainly the smallest. So, what is it?

Antique Vinaigrettes

Vinaigrette-boxes, or simply just vinaigrettes were very popular during the 17-and-1800s, from the early Georgian era up through the end of the Victorian era. They were almost always little silver boxes, with gilt interiors, with pierced grilles and little sponges inside.

The sponges held a mixture of perfume or essential oils mixed with a drop or two of vinegar. This mixture created a sweet-smelling but also pungent aroma, designed to mask the stench of unwashed bodies, horse-manure, coal-smoke and other nasal assaults common during the 18th and 19th centuries. Since vinegar is acidic, vinaigrettes were always gilt (gold-lined or gold-plated) to prevent the acid from burning through the silver with which the boxes were made.

Vinaigrettes came in various sizes, from minuscule ones like this, to much larger ones about the size of a matchbox. They also came in a wide array of shapes, styles and designs. Those with strange, interesting, rare or novel designs are especially collectible.

The Hallmarks

This particular vinaigrette has the hallmarks of Thomas Spicer, for Birmingham, in 1823, and the duty mark of George IV, who reigned from 1820-1830. It also has its original sponge inside it! It’s a bit dry and crusty, but I didn’t want to throw it out.

Hallmarks on silverware change over time. Not just in style, size and shape, but also in the number of hallmarks. Knowing when different hallmarks were introduced and when they were discontinued is one way of dating a piece. This can be important when the item is particularly old, and the original set of hallmarks might have been polished out or unreadable. The duty mark for British silver was introduced in the 1700s and discontinued in 1890.

And here’s the vinaigrette fully-opened, with the sponge removed. You can see the full set of hallmarks here. Five in total: Maker’s mark of TS (Thomas Spicer), assay mark of an anchor (Birmingham), fineness mark of a Lion Passant (Sterling Silver), the date-letter (Z) for 1823, and finally – a duty mark of a monarch’s head (George IV). The TS maker’s mark has been repeated on both sides of the box.

The Fall of the Vinaigrette

Vinaigrettes died out in the Victorian era. When the soap-tax was repealed in the…1850s, I believe it was…it suddenly became much easier to wash onself, and one’s clothing. This moderate improvement in personal hygiene and laundry meant that for once, people didn’t stink so much. And if they did, cologne, scent of perfume was used to mask the smell. By the end of the century, the vinaigrette had pretty much become a museum piece.


Late Victorian Dentifrice Pot (Ca. 1890)

“Why Did You Buy a Toothpaste Pot!?”

No, I mean…really! Like…y’know…um…why?

I like antiques which are quirky, interesting, unusual and useful. Emphasis on useful. I don’t like buying anything – even an antique – if I don’t either like it, or can use it, in one way or another. And ever since I discovered that they existed, I decided that I couldn’t wait to have a beautiful antique toothpaste jar on my bathroom counter.

Getting to see such an exquisitely decorated little vessel, which was only put on this earth to serve us toothpaste!…makes the act of brushing one’s teeth twice a day just so much more pleasant – brightened by the fact that you get to scoop your toothpaste out of such a cute little container. And even when you’re not using it, that decorated little pot just looks just so decorative and pretty, sitting there on the shelf, and doing what it does. This is why I wanted one!

Well, that, and I’d been selling a lot of things online lately and I decided to treat myself a bit. I found this at the local flea-market, and thought it’d look good siting on my bathroom counter…

I’ve seen a few of these in my time. Square, round…even rectangular! But this was the first one I’ve ever seen with the gold paint on it…and it just jumped out at me, all shiny in the sunlight. It just looked like such a happy, cheerful little toothpaste pot! I had to have it. Once I got it home, I cleaned it, washed it out, and filled it with fresh toothpaste. Just getting to look at this charming, Victorian antique every morning would be all the motivation that I’d need to brush my teeth every day!

The toothpaste pots of Victorian England were undoubtedly, the most elegant and refined solution ever created, to the answer the age-old problem of how to package effective dental hygiene products to a public plagued by halitosis. In this posting, I’ll take a brief look at the history of dental hygiene, and how mankind arrived at the manufacture of these little toothpaste pots, and the contents they once held.

“Taking a Powder…”

These days, we’re so used to things coming in liquid form.

Liquid soap. Liquid toothpaste. Liquid medicines. Liquid deodorants…the list goes on, and on, and on.

And yet, this obsession with all kinds of liquid products is actually a pretty recent one. It wasn’t that long ago that most products that people bought for themselves for private consumption were not sold in liquid form. Medicines were not sold in pill-form or even in syrup-form. They were sold in powder-form, with each dose in folded paper sachets. To ‘take a powder’ was to take a dose of medicine – usually by tipping the powder into a glass of water and stirring it. The resultant diluted powder was gulped down and the dose taken. All kinds of medicines were administered this way, including painkillers or settlers for joint-pain, fever, headaches and upset stomachs.

Soap was sold in soap-powder form or in a hard, chunky block, which you either lathered as-was, or shaved or cut off with a knife. Deodorants were limited to whatever talcum-powder you could smack onto your body to absorb the perspiration from your skin.

And last, but not least – the subject of this posting: Toothpaste!

A Biting History of Dental Care

Throughout history, people have known that if you don’t look after your teeth, all kinds of nasty things can happen to them. They turn black, they crust over, they get infected, they fall out, you get abscesses, and if you get really unlucky like my brother did – you get a root-canal operation (yikes!).

I’ve always been pretty fortunate with my teeth. Like most kids I never took very good care of them (who can ever claim they did?) but after one particularly nasty visit to the dentist, as a teenager, got fed up with the whole debacle, and started methodically scrubbing my teeth twice a day. Since then (apart from one very unpleasant incident a few years ago which I still don’t understand how it happened…), I’ve had pretty good teeth. Not perfect (nobody will have perfect teeth without outside help from a dentist), but pretty good. No major damage or problems in years, apart from the odd hiccup.

Our ancestors were just as aware of the importance of, and the dangers of the neglect of – cleaning one’s teeth properly and regularly. And to combat this problem, they devised a truly staggering array of methods and materials to clean their teeth, from brushing it with ash or fireplace soot, to gargling their mouths with stale urine (delicious!). This last one was a favourite of the Ancient Romans. Urine contains ammonia, which bleaches things white. Basically – piss was the world’s first extra-whitening mouthwash! Also, piss was used to clean linens back in the old days, too – bedsheets and clothing were all soaked in stale piss to let the raw ammonia remove and lift the stains out.

Aren’t you glad we have washing-detergents now?

Anyway, by the Victorian times, mankind had moved on from brushing his teeth with soot and gargling it out with stale urine. The effects of dental neglect were by now very well known, and the effects of dental neglect were not improved by the sudden availability to the public at large, of a large and cheap quantity of sugar!

Previous to the 1800s, all sugar came from sugar-canes – these only grow in tropical regions, which meant that for centuries, sugar was a priceless luxury – indulged in only by the richest people, who could afford the prices of sugar which had been processed, packed and shipped from thousands and thousands of miles away.

When it became known that sugar could be extracted from sugar-beets, which grow in more temperate climates, the price of sugar collapsed, and suddenly what once cost a king’s ransom, the average, workaday man could go out and buy.

The rise in sugar, and an increasing access to more food meant that for the first time in history, people’s teeth were under serious attack. And Victorian dentists and pharmacists came to the rescue – with specially-invented cleaning products!

Victorian Tooth Powders

Despite the labels on the tins (or in this case – pots!) – tooth-paste as we would recognise it, did not actually exist in Victorian times. The technology and science of the era did not permit the consistent manufacture of a paste or gel-like substance which kept well enough and which could be produced to a high-enough quality to clean the teeth on a regular basis. So what happened?

Pharmacists, apothecaries and dentists fell back on their old standby – powders!

The first commercially-produced tooth-cleaners, of a sort, were not tooth-pastes, they were tooth-powders. Often, these concoctions were homemade, using whatever materials could be found. The pharmacist would be constantly mixing, changing and testing, until the right combination of ingredients was reached. The recipe was written down and then repeated whenever a new order for tooth-powder came in.

Common ingredients in Victorian tooth-powders included crushed soap-flakes (for the lathering effect), baking soda, powdered plant-extracts of various kinds (for disinfection), and usually at least one abrasive – brick dust or even powdered china (you know, from broken plates? These were used to scrub off tartar and teeth-stains). All these ingredients were all crushed up in a mortar and pestle, ground up until they were as fine as talcum-powder. A flavouring (for example – oil of peppermint) was then added and mixed in, to give it a pleasant flavour. Then, the finished product was packed up and sold to the public!

For the apothecary or pharmacist, a solid brass mortar and pestle such as this one would’ve been indispensable in their work. Easily cleaned, and nigh indestructible, it would ensure the end product was pure and without contamination. 

Such tooth-powders, or ‘dentifrices’ as they’re called (a ‘dentifrice’ is something that cleans the teeth – it’s not necessarily a powder), while originally made by pharmacists and doctors doing their own, homemade experiments – but once a winning recipe had been discovered, they might well go into fullscale production!

The thing is – how do you sell something like this to the teeth-conscious public? You couldn’t very well sell tooth-powder in paper sachets, and since ‘toothpaste’ wasn’t actually a paste, you couldn’t sell it in a tube, either! And even if it was – the ability to make cheap, throwaway squeeze-tubes (of the kind we buy today) was not possible in Victorian times. The first ones were made of lead!

Because of this, the Victorians instead sold their tooth powders in little ceramic pots…

Victorian Dentifrice Pots

Exactly WHEN people started selling toothpaste in cute little pots is unknown. The earliest dates I can find seem to be the 1870s and 1880s, although this isn’t based on any really solid evidence.

These pots were pretty small – about the size of a modern tin of shoe-polish. They were very simple, too. A base, the sides, the hollow inside to hold the powder, an indented lip, and a lid, which simply sat on top – and that was it! They didn’t screw, latch or lock down like modern toothpaste tubes, or even modern screw-top jars! The lid simply sat on top of the pot – if you tipped it the wrong way, the lid would be in danger of falling off!

Tooth powders were simply dumped into these pots until they were full, and then the full pots were sold to the customers. The pots were likely secured either in throwaway paper boxes, to stop them rattling around, or were just taped shut.

Either way, these pots would’ve graced the dressing-tables, wash-stands and bathroom counters of thousands of people in the late Victorian era, when cost-effective and easy dental-care came into the reach of the masses. And as ever, the claims on the packaging were always the same. Over a century later and nothing has changed! They promised to whiten teeth, remove tartar, and freshen the breath!

I got interested in Victorian toothpaste jars from the moment I realised what they were, mostly because of the sort of novelty aspect of them – they’re so different from how we get our toothpaste today! I mean yes, we get them in nice, brightly-coloured tubes – but there’s something just so satisfying about storing it in a decorated little ceramic pot on the shelf, which you buy once, but clean and refill countless times!

And they look SO much more elegant than those tubes of AIM, PEPSODENT, COLGATE and McCLEANS!

That said, for all their elegance of presentation, and reusability of packaging, brushing your teeth with a tooth-powder was a bit more involved than squirting something onto a brush and stuffing it in your mouth!

To get the powder to stick to the toothbrush, it was necessary to moisten it first. Either by sticking it in your mouth, or by dipping it in water. This allowed the powder to stick to the bristles of the toothbrush (which in Victorian times, were made of wood, and bristled with pig-hair!) so that it wouldn’t fall off and go absolutely everywhere, when you lifted the brush from the pot to your mouth. It was only after you mixed the powder with water that it really ecame ‘tooth-paste’.

Thereafter, the process of cleaning is exactly the same today – except that the Victorians didn’t have fancy-schmancy battery-powered electric toothbrushes like we do!

Victorian toothpaste pots are highly collectible. Numerous manufacturers produced all kinds of styles and patterns, pictures and lettering on the lids of their toothpaste pots. I’ve even seen one or two with words like “Patronised by the Queen” printed on them!

Almost all the decorations, maker’s names, company addresses and printed advertising material on the lids of these pots was applied through a process called transfer-printing. Ceramics with this type of decoration are known as ‘transfer-ware’.

Transfer-Printing

Before the invention of transfer-printing – all the pretty pictures, the flowers, the idyllic scenes, the writing, the company-information…everything that went on every ceramic item ever sold – had to be laboriously painted onto it by hand, by some poor bastard sitting at a table with a brush in his hand! One mistake and the item would be rejected. And it took ages just to paint one tiny little cup, pot or bowl.

This all changed when the labour-intensive, but relatively-speaking – much faster – transfer-printing process was invented in the 1750s. It took a while, but by the 1800s, transfer-printed ceramics was a way of life for many people.

Transfer-printing works pretty simply – You get a copper plate. You engrave the design of whatever it is you want, onto the plate. You warm up the plate and paint on a special mixture of ink. You then laid down a sheet of paper over the inked plate and ran it through a press. This printed the image engraved on the copper onto the sheet of paper. The paper was then trimmed and cut to gain access to the various parts of the design, and then the paper was pressed onto the ceramic object being decorated.

In this way, the print was transferred from the copper to the ceramic. Transfer-printing!

To make it last, the printed ceramic item was then fired in a kiln to set the colours and inks; this dried them permanently and stopped them fading or running. It was a fiddly process, but it was a lot faster than painting or drawing on each individual pot by hand, and then sitting around all day waiting for it to dry! On top of all this, the results were far more consistent – important, when a company’s reputation was at stake!

Yes, you had to engrave the plate, yes you had to print each cup or bowl or plate or saucer one at a time – but in the time it used to take to paint one plate or bowl, dozens of such items could be transfer-printed! It was a fast, cheap, effective way of decorating ceramics, and it made actual sets of ceramics, all featuring the same pattern – a possibility. It was this process which printed all the pretty details on antique pots, like the ones used to sell tooth-powders in. It finally died out in the 1910s and 20s, when faster decoration processes were invented, such as premade decals which could simply be pressed on and then made permanent by painting them in with a clear-coat glaze.

The End of Transfer-Printed Tooth-Powder Pots

Pots like these for all their beauty, did not last especially long. By the early 20th century, they were already dying out. The First World War really saw their end. It wasn’t practical to send thousands of little ceramic jars to the front lines for the troops, all filled with powder. Advances in medicine meant that proper toothpastes were now available, and these could be stored in thin, metal tubes which could be squeezed to release the paste onto a brush in a measured amount. And the tooth-powder pot was relegated to the bathroom of history…

Where Can I Buy a Dentifrice Pot? 

Dentifrice pots are pretty common as far as antiques go. They’re usually dug out of old rubbish-tips and stuff. Complete pots with their lids and bases, without damage or loss of artwork on the lid can go for a pretty penny, especially if the pot is of an odd shape, size, or from a famous company, or if the artwork is particularly fantastic. Most bog-standard toothpaste pots are pretty cheap, though.

You can probably find them easily at most flea-markets and antiques shops (although they’ll cost more in antiques shops). But they are small, common, and pretty – and that does make them highly desirable as a collectible – some people even collect the lids on their own, without looking for the entire pot!