In glancing over my blog, I noticed that my posting on straight razors seems to be one of the most popular ones that I’ve written so far. If you want to read it, it may be found here.
I’m writing this as a sort of follow-up, or companion-post to my previous one. This won’t go into all the nitty gritty details of every little bit of everything, but it will cover in-depth, how to buy a straight-razor (and associated gear) for far below retail price.
The Appeal of Straight Razor Shaving
In our money-conscious, green-guilt world that we live in today, where everything must be eco-friendly and reusable and everything else, more and more men are turning to the way their fathers and grandfathers shaved, and are moving back to using a straight-razor to shave with. Some like the challenge, the skill and the patience that it takes. Some reckon that every whisker shaved off their chin grows three on their chest. Others like the nostalgia of it. Some people do it because they reckon they can save money.
On that last score, however, some would begin to wonder. A brand-new strop, razor, mug, brush and soap can cost over $200-$300!
Suddenly it’s not looking so cheap and money-saving. And this is when most men, turned on by the idea of a good, old-fashioned shave, turn away, and go back to using their vibrating Mach 5.
This is a little guide about how to get all the things you need, on the cheap.
Buying a Second-Hand Straight Razor
Straight-razors come in a dizzying array of styles and types, and it can be tricky to know exactly what kind of razor you should buy. Keep the following things in mind when looking for a second-hand straight-razor:
– Always pick quality. Buy a razor that was made by a reputable company, or from a reputable country or city. In England, the best straight-razors all came from Sheffield, and for centuries, Sheffield was the center of the English cutlery trade. Anything that cut anything, came from Sheffield. Kitchen-knives, tailors’ shears, the finest silverware, and the best, barber-quality straight-razors were all made here.
While any razor from Sheffield is almost certainly a winner, keep an eye out for the name Joseph Rodgers & Sons. For well over two hundred years, J. Rodgers & Sons has produced quality cutlery, since it was founded in 1764! Everything from paper-knives to silverware and straight-razors. You can date a J. Rodgers knife by examining what is engraved on the shank of the blade.
A Victorian-era Rodgers blade will have “Cutlers to Her Majesty” (Queen Victoria). A razor made after 1901, will have “Cutlers to Their Majesties”, (King Edward & Queen Alexandra, George V).
Other respected Sheffield razor-manufacturers were Bengall, and Wade & Butcher. Keep an eye out for them, as well. But in general, any Sheffield-made razor will be of assured quality.
Any razor marked “Thiers“, will have been made in the French town of Thiers, and is another sign of quality. The company of Thiers-Issard still makes straight-razors to this day.
One of the most recognised names in cutlery is that of “Solingen“. A town in Germany, Solingen is arguably the cutlery capital of the Western world. Everything from razors to kitchen-knives and scissors of all kinds are produced in Solingen. Even surgical blades are made there. Almost without exception, any razor made in Solingen will be a winner. The German company of Dovo still makes razors there to this day.
– Check for Defects in the Razor. This goes without saying, but bears mentioning. Keep an eye out for such things as cracks, chips, uneven wear (from improper or overenthusiastic sharpening), water-spots, pitting and rusting.Light rust may be removed with fine-grit sandpaper and light steel wool. The razor will then be serviceable again after sharpening and stropping. Heavy rusting, cracks, chips and uneven metal-wear are all irreversible damage to a razor, and cannot be fixed. Discard any finds in such a condition.
Some razors have cracked or damaged scales (the handle part which the blade folds into). There are repairmen out there who craft and replace broken scales with new ones. So all is not lost on this front. You could even do it yourself. All you need are the pins (the little rivets), and the right materials and skills. Razor-pin sets may be purchased online. Try eBay.
Tarnishing, water-spotting and pitting are generally cosmetic issues, and should not affect a razor’s ability to function. Light rusting, once removed, will not affect a razor’s overall quality of function. As mentioned previously, heavy rusting cannot be safely removed, and it can seriously weaken a razor. Do not attempt to resurrect a razor with extensive rust-damage. It’s not worth your while.
– Features of a Razor. Not all razors have all of these features. Some might have all. Some might have some. Some might have none at all. It’s all up to you, to decide what you want in the razor that you buy.
Some razors will have ‘jimps’. Jimps are the corrugations ground into the shank of the razor-blade (the part of the blade you’ll hold in your fingers). They are there to provide you with extra grip during shaving. Some razors don’t have them at all. Some have single jimps (corrugations on the bottom side of the shank), and some have double jimps (corrugations on the upper and lower sides of the shank).
Some razors have ‘transverse stablisers’. These are found at the end of the razor-blade (opposite to the point), next to the shank. They’re sets of slots or grooves, which were punched into the razor-blade when it was being formed. They serve to provide strength to the blade, and prevent cracking from blade-warp and metal-fatigue. Like jimps, not all razors have them. Some razors only have one pair of stablisers. Others might have two.
Most razors will have a ‘shoulder‘. The ‘shoulder’ is the definitive ‘break-off’ point between the end of the blade, and the shank, which you hold in your fingers. It serves as a barrier to stop your wet fingers sliding onto the blade (and getting cut!). The shoulder meets the shank at right-angles, to provide a safe ‘slot’ to place your fingers in, to stop them getting in contact with the blade. This is also where you’ll find the stabilisers.
– Make a note of what the Scales are made of. The vast majority of vintage razors will have scales made of some variety of plastic; usually celluloid. Be warned that celluloid can degrade over time. This is rare, but it can happen. So keep an eye out for any razors with warped, cracked or otherwise damaged scales. You can buy the razor for the blade, and have it re-scaled, or you can disregard it altogether.
Straight-razors with pretty ivory scales are iconic. But also rare and expensive. Most white/cream-scaled razors will be made out of “French Ivory”…a fancy term for celluloid plastic which is coloured to look like ivory. Don’t be fooled. An easy way to tell the difference is to just feel the scales with your fingers. Ivory, especially old ivory, is never perfectly smooth, and should have a grainy touch. It’s a natural product, after all. Plastic will almost always be perfectly smooth.
– How Much do I Pay for a Straight Razor? Most vintage straight-razors can be bought for peanuts. In most cases, below $25.00, in good condition. Some razors which are a bit more interesting/rare etc, might cost more. But a good, serviceable, second-hand razor, which will work wonderfully after a light refurbishment, should not cost the earth. One of my razors was just five bucks, made in Germany. Never fails to give an excellent shave. The more expensive razors are typically the ones with fancy scales, the ones made of ivory, tortoise-shell, bone, etc.
– Care & Maintenance of your Vintage Razor. So. You’ve bought a nice, vintage razor. It’s nothing fancy, but it was cheap, good quality, and will get the job done. Now what?
Apart from the obvious – keep the razor sharp and the edge smooth – especially with vintage razors, it’s important to keep the blade DRY BETWEEN USES. After each shave, dry the blade COMPLETELY with a towel, and make sure that there’s no water trapped inside the scales. Vintage razors were made of carbon steel. There’s nothing wrong with that, apart from the fact that carbon steel rusts. Very easily. A few drops of water left on a razor overnight, is enough to start rust going. Also, it can lead to water-spots, unsightly corrosion left by water-droplets on the blade. So to prevent that, dry the razor thoroughly after each use.
Buying Secondhand Accessories
Now that you have your razor, from the local flea-market, antiques shop or off of eBay, let’s have a look at buying other things second-hand.
The Strop
– Every good razor needs a good strop. And a good strop need not cost the earth. I bought a top-quality strop for about $25.00 at the flea-market. So, what should you look for?
There are a whole heap of shortcuts around this. You can make a strop out of an old belt, out of a pair of jeans. Even out of newspaper. And they’ll all work. So if you’re trying to save a lot of money, you could try that. An old belt will have to be smooth and without patterns or embossing. A strop made out of the legs of an old pair of jeans will have to be free of seams and stitching; this would interrupt the draw of the blade, and damage the edge of the razor. A strop made of newspaper (I’m not kidding. Yes, newspaper), will need to be thick, and strong, to stop it from ripping when you pull on it, in preparation for stropping.
Every time you strop, you remove a small amount of leather from the strop. So if you’re using a belt, make sure it’s not a belt that you’re going to wear anytime soon…or at all.
In buying an actual second-hand strop, you should keep an eye out for the following:
– The Condition of the Leather. Every good strop is made of leather. Sometimes, you’ll have double-sided strops, which are both leather and canvas. But sticking to leather for the time-being, ensure that it is smooth, and free of cuts, scratches and cracking (from being overly dry). Some leather can be softened using additives which you can buy at your local hardware shop. That’s fine, and should not damage the strop or the leather (it better not!). But steer clear of any strop which has serious cracks and/or cuts in the main part of the strop. These will do no good for your razor when you run it along there.
– The Condition of the Connections. A typical hanging-strop has two ends (I think…). The handle, and the hook. The hook can be a simple…hook…a ring, claw-fastener, or a clip. This is used to affix the strop to the wall of your bathroom (on a towel-hook/ring, or towel-rail). At the other end, is the handle which you pull tight while stropping. Make sure that any stitching or rivets which hold these connections to the strop, are in good condition. The last thing you want is for the stitching to rip, or for the rivets to break during stropping. You’ve got three inches of lethally sharp steel in your hand and you don’t want to chance cutting yourself in an accident if the strop breaks.
– The Size of the Strop. You want a strop of a decent size. At least three inches wide, and at least a foot long, if not more. If you don’t, then you won’t be able to strop the entire length of the razor-blade when it comes to using the strop.
The Brush
To use a straight-razor, you need to wet-shave. And to wet-shave, you need a brush. A badger-hair brush is best. It holds water and retains heat. And that’s what you want.
You can buy brushes second-hand, although if you do, any purchase should be THOROUGHLY cleaned first, with hot water and soap. Or you could buy a modern brush instead, if you’re a little worried about contamination. A quality badger-hair brush, purchased brand-new, might cost a bit more, but properly maintained, it will last a lifetime.
N.B.: A brand-new badger-hair brush *may* smell a bit wonky when you first open it. That’s because well…it is animal hair. You can clean it up a bit using shampoo, to remove the smell. Or you could leave it as it is…regular use and contact with shaving soap/cream will remove the smell in time.
The Stone
Every straight-razor user needs to have a decent sharpening-stone. There are people who go crazy with this stuff, and buy pastes and solutions and three, four, five or six different stones, to get their razors sharp enough to cut glass. But enough of that. This posting is about how to get started in straight-razors on a budget. So, what you want is one good razor stone which you can use easily, and which gives reliable, consistent results.
If you want to really cheap it out, you can just use a regular, rectangular knife-stone, such as what you might sharpen your kitchen-knives on. And there’s nothing wrong with that, but there are specific stones which are made just for straight-razors. Most of them are vintage/antique stones, since not many people use straight-razors anymore. You can find them at flea-markets and antiques shops and, provided they’re not cracked really badly, or worn out, they should work just fine. Razor-stones are generally a lot smaller than a regular knife-stone, for the simple fact that…razors are smaller! Always remember to keep the stone wet with water while sharpening, to reduce friction and heat, and to keep the sharpening process smooth.
Mugs, etc
The cheapest solution for something like this is to just take a cereal-bowl, or an old coffee-mug that you don’t want to use anymore, and use it as a lathering-bowl or cup for when you want to whip up lather for your shave, and there’s nothing wrong with that. But some people find it tricky to use a bowl with no handle on it (which can be important when your hands are wet with soap and hot water), and shavers who own big bushy shaving-brushes can’t always fit them inside a regular coffee-mug.
To get you out of this mess, you might want to invest in a shaving-mug or bowl, or a shaving-scuttle. Scuttles (little jug-shaped affairs with a soap-dish on top) can be found in almost any decent flea-market or antiques shop. Unless it’s something really fancy, though, I wouldn’t pay any more than about $20-$30.00 for one.
When you buy a mug or a scuttle, make sure that the base of it is smooth and level. This is so that it won’t shake, slide or rattle on your bathroom counter while you mix up your lather. Not only is it really annoying, but it can throw off your mixing arm, because the mug, bowl or scuttle is always sliding around everywhere.
Tips, Tricks, etc.
Here’s a few things to keep in mind when buying or using second-hand shaving equipment. A few parting words:
– The majority of vintage razors, even the ones from quality companies, are rarely worth a great deal of money. Most of their value comes either from their uniqueness, rarity and/or scale-materials. Unless there’s something that really draws you towards a razor (it’s a cased pair, or it’s a seven-day set, it’s really pretty, it’s really old, or any other reasons), don’t pay more than about $20.00. It’s not worth more than that.
– Assume that any second-hand razor will require thorough cleaning before use. You don’t know where it’s been or what it’s been used for, or what it’s had on its blade. They weren’t nicknamed ‘cut-throats‘ for nothing. Same goes for any brushes that you should purchase second-hand.
– This bears repeating…again: After each use, dry your razor-blade thoroughly. Especially with older razors, rust can start on a wet blade literally overnight. And if it gets really bad, you’ll have no choice but to throw the razor out.
– Light rusting can be removed with fine-grit sandpaper, and this will not affect the operation of the blade. Heavy rusting compromises the structural integrity of the blade. So throw it out. You don’t want a razor-blade cracking or breaking in half (and yes, that can happen in extreme circumstances) during stropping or shaving. Especially with extra-hollow-ground blades, which are very thin and bendy.
– Until you’ve learnt from experience how much is enough, always sharpen and strop your razor more than you think is necessary, just in case. In general, fifty strokes on the hone, and fifty on the strop, should be enough. It may sound like a lot, but once you’re up to speed, you’ll have it done in about five minutes.
One of the chief causes of razor-burn and cuts is shaving with a dull, unsharpened/unstropped razor. A properly sharpened and stropped razor, used correctly, will not cut you or cause razor-burn.
I have wanted one of these things for years, to keep my clothes organised, instead of hanging them on hooks or draping them over the backs of chairs. Ever seen one? It’s called a clothes valet, or a valet stand…
Valet stands were once common in households of the well-to-do, typically, the Middle Class and upwards, who could afford nicer clothes, and could spend the money required for a stand to keep them neat and tidy.
Such stands were common from the 1800s up to the mid-20th century. When men’s daily fashion steered away from trousers, jackets, suits, sport-coats and blazers in the decades after the Second World War, valet stands became less and less useful, and eventually people stopped buying them, and making them. But they are handy pieces of kit for those who still tend to dress in a more conservative or traditional, vintage style.
Valet stands can range from the incredibly simple, to the amazingly elaborate. A really simple stand might just have a coat-hanger on top of a pair of legs with three connector-bars at the base to serve as a coat and shoe-stand. A really elaborate valet-stand can come with a coat-hanger, trouser-bar, shoe-rests, compartmentalised jewellery-caddy, tie-bar, hat-stand…even a chair with built-in nick-nack drawer!
The Backstory
A stand like this would’ve been typical of the style popular from the last quarter of the 1800s up to the postwar period, up to around the 1960s, when men’s fashion took a serious turn. I bought the stand featured in these photographs, today, at an antiques fair, for $5.00!
The clothes valet was standing outside one of the tent-stalls at the antiques fair, with some sort of advertising poster or sign clipped onto it, and it was obviously being used as a sandwich-board or an advertising-stand. And initially, I didn’t think it was for sale. But when I got right up close to it, I noticed a white price-tag hanging from it, which said: “$5.00”.
And my heart just went pitty-patter. I tracked down the stallholder and inquired about this amazing and under-appreciated piece of woodwork standing, unloved and ignored, outside her tent. She said that the price was indeed correct. $5.00. Once she’d removed the clips and the poster, I was welcome to take it, she said. So I coughed up a fiver and walked off with the stand.
The best five bucks I’ve ever spent. You’ll never find one of this vintage, of this style, in this condition, for that kind of money, not even if you tried. This was a real vintage score :D.
The Features of the Stand
So, let’s show you around the stand, such as it is…
Up the top here, we have the tie-bar, then below it, the shoulder-width coat-hanger. Underneath that is the recessed tray for things like watches, cufflinks, collar-bars, tie-bars and other such masculine jewellery.
Beneath the jewellery-tray is the trouser-bar, for hanging your trousers on. And right at the bottom is the…
…shoe-rest.
You simply can’t find beautiful vintage household pieces like this anymore, and I consider myself very lucky to have this, for such a super-low price. It’s in perfect condition, barring a few dings and scratches. Apart from that, it looks almost brand-new.
A valet-stand made today, brand-new out of the workshop, would probably cost you hundreds of dollars, even for a simple bog-standard one. A mid-range stand, looking something like this…I don’t even want to guess! Even antique ones aren’t cheap. I got this for a song, and I couldn’t be happier.
In retrospect, the song should probably be: “Top Hat, White Tie and Tails“. Hahaha!!
It’s absolutely beautiful, it’s been something I’ve chased after for at least five years, and I finally have one, for possibly the lowest price that one of these has ever sold for, barring one that was given away for free. And I don’t ever see something like that happening!
Clothes Valets Today
You can still buy clothes valets today. You can order them online and such. But nothing beats one that was built back in the days when they were an essential for any well-dressed man about town, and might’ve been found in almost any man’s bedroom. The quality, the style and the sturdiness comes as standard, and you can be assured that whoever used this thing before you was just as snappy a dresser as you are.
These days, everyone has a camera. A digital camera, a mechanical camera, an electronic camera, a film-camera, even a camera-phone. Today, taking a photograph is easy. It’s literally done in a flash. You can take hundreds and thousands of photos and store them away, you can edit them, caption them, delete them, enlarge them, reduce them, photoshop them, you can have them black and white, colour, sepia-toned, panoramic and almost any other effect or result that we desire. And most of the time, we just don’t think about how far photography has come.
There was a time not too long ago, when photography of any kind was impossible. When the only way to take a picture of something was with paints, canvas, a pen, a pencil, or a stick of charcoal. When everything had to be sketched, drawn or painted by hand, a process that took hours, and even days or weeks to complete. Today, a photograph takes no more than a second. But what was it like when photography was new?
This posting will look at a history of photography, from its invention and earliest beginnings, to the introduction of the first portable, compact film-camera, in the late 1800s.
The Birth of Photography and the First Cameras
The word “photography” comes from the Greek language, from ‘Photos’ meaning ‘Light’, as in “photosynthesis”, and “Graphos”, meaning “writing”, or “drawing”, as in “Graphics”. So literally: “Drawing with Light”.
However, here we are, jumping the gun. To take a photograph, you first need a device for taking pictures. A camera! Where do we go to find the history of cameras?
The first camera was called the “Camera Obscura”. Taken from Latin, it literally means “Chamber of Darkness”, or “Chamber of Obscurity”, or…a darkroom! One of the most important pieces of equipment in all photography!
The Camera Obscura was a chamber which was completely dark inside, except for a single opening or window, which let in light. Think of it as a lens. The light from outside entered the lens, and whatever was outside the chamber was projected onto a wall, or screen, inside the chamber. Without any other sources of light apart from what came through the lens, anything outside the chamber would be clearly seen on the wall, or screen inside the chamber. Clear enough for someone, if they wanted to, to trace the outline of whatever was projected onto the screen, such as a tree, or a building, or even a person! This…was the first camera. And the tracings that it enabled, were the first-ever photographs.
Hardly faster than having your portrait painted, but hey, you have to start somewhere.
And there we have the camera in its essence. A dark chamber with an opening for light and images to enter, and a medium upon which to record the images.
Obviously, having a camera the size of a closet, being moved around on a horsedrawn cart with your own, live-in artist to trace everything that you wanted to capture was hardly practical. Could you imagine trying to take something that bulky on your next holiday to the South Pacific? You’d never fit it in your pocket…
What was needed was something that took all those principles, and made them…SMALLER! Enter a Frenchman named Louis-Jacques-Mandre Daguerre (1787-1851)!
Daguerre and the Daguerrotype!
The Camera Obscura proved that it was possible to sketch life-accurate pictures of something. Not some fluffy artist’s impression of what something could look like. But the problem with the Camera Obscura is that it’s literally the size of a house. You’d never be able to take it anywhere with you! At least, not with any degree of practicality.
The man who changed this was a Frenchman named Louis-Jacques-Mandre Daguerre….Man that’s a mouthful.
Daguerre did not invent the photograph. That credit goes to another Frenchman, Nicephore Niepce (1765-1833). Niepce had been experimenting with how to use light to imprint an image onto a medium that could record it, if the medium was coated with a material that was affected by light. He’d had some success, and had been experimenting in the 1820s. He made small steps in 1822, but the world’s first real photograph was taken by Niepce in 1826!
Entitled “View from the Window, at Le Gras”, in this grainy snapshot, you can see trees in the distance, and the walls, rooves and windows of surrounding buildings.
Niepce achieved groundbreaking shots like this by a simple replacing of materials.
While a larger Camera-Obscura used paper as a tracing-medium for a projected image, his smaller camera used a sheet of metal impregnated with light-sensitive chemicals. The metal sheeting was made of pewter (alloy of tin & copper, mixed in a ratio of 9-1), which was then coated with a variety of light-sensitive chemicals.
Niepce originally used silver nitrate, which darkens when exposed to sunlight, but also experimented with lavender-oil mixed with bitumen.
In 1829, Niepce started experimenting with Louis Daguerre, and the two scientists attempted to create something that would reliably produce permanent photographs. sadly, Niepce never lived to see the finished product, and died in 1833. Daguerre continued their work, eventually developing a process using lavender oil, which he named the “Daguerrotype”, after himself. Lavender-oil…must’ve had some lovely-scented photographs.
Daguerrotype photography was the first, commercially successful photography in the world, making its debut in the 1830s. Although capable of producing permanent photos that wouldn’t be damaged by extra exposure to light, the process had one serious drawback: It took forever to develop it!
To take just ONE photograph, the camera would have to be set up, and the shutter in front of the camera-lens would have to be opened (to let the light in, to affect the chemicals on the copper-silver photographic-plate inside) for at least TEN MINUTES before a half-decent photograph was taken! Obviously, this was fine for things that don’t move…buildings, trees, woodland scenes…but it was impossible to capture moving objects, such as horse-drawn transport, or people, unless they were standing or sitting somewhere for a very long time!…like in this photograph, one of the first ever taken using this method…
Taken by Daguerre himself in 1838, this photograph is the first EVER to depict humans.
Found them yet? Try the bottom left corner of the photograph, at the street-intersection. There, you can see a man having his shoes shined. The shoeshine customer and the bootblack were the only two people in the entire street who were standing still (or at least, holding a general pose) long enough for their outlines to be captured on this early photographic process with the ridiculously long exposure-time!
Taking A Faster Photo
Early photography was rather hit-and-miss. Frenchman Louis Daguerre creates the first “practical” photography in the 1830s. But there’s a big problem. The process takes ages to work. Hardly practical for holiday snapshots, or even family portraits! Photography would never become a thriving industry if a married couple on their wedding-day had to stand around lifeless for 10 minutes just to have their wedding photograph taken! The process had to be sped up!
To do this, they had to change two things about the photography process.
1. MORE LIGHT!
Photography worked because light affected the chemicals placed on metal plates stored inside cameras. The light entered the camera-box through the lens at the front, imprinting whatever image was in front of the camera onto the chemical metal plate inside.
To speed up this process, it was easy…make a bigger lens! Bigger lens, more light, faster development! Brilliant!
2. BETTER CHEMICALS!
Along with better and larger lenses for capturing more light, photographic plates were treated with chemicals which were more light-sensitive, and more reactive. Faster reactions would make the exposure-time shorter and the whole process that much faster. To produce better photos, plates were treated with a variety of silver and chlorine compounds.
Ever wondered why in Victorian-era photographs, people being photographed tend to look rather bored, sleepy and tired with it all? Like this?
It’s not because of that famous Victorian prudishness or morality…it’s because it took so damn long to have their photographs taken! Exposure-times which lasted up to five or ten minutes were not uncommon, and it just wasn’t possible to take photos any other way!
Could you imagine sitting in a chair, looking at a box on a stand with a window in it, and smiling all happily and holding that pose…for ten minutes?
Go ahead. Try it. I’ll wait…
…Your neck gets pretty sore after a while, doesn’t it? And you don’t feel much like smiling and holding it for ten whole minutes while someone takes a shot, do you?
It’s because it took so long, that you got photographs and poses like the one you see above. In fact, it took SO long to take photographs that early photography-studios actually employed metal bracing-stands to hold people’s heads up, so that they wouldn’t lop over and fall asleep during the photoshoot! Don’t believe me? Have a look…
Called ‘posing stands’, such as in this illustration, these apparatus would allow a photographed subject a certain degree of comfort during the taking of his photograph. The subject wouldn’t be able to LEAN against the stand, but he could rest his back, shoulders and head on it if he wanted to, to take some of the strain of the long wait, off of his feet. It was hardly comfortable, but it was the best that they could do at the time.
Alternative Means of Photography
Louis Daguerre had shown that permanent, practical photography was possible. But the big drawback to his method was that the long exposure-times made photography a rather unattractive artform. If photography was going to survive, you needed a way to take faster, better photographs.
The first of these methods was the Ambrotype.
Developed in the 1850s, the Ambrotype used wet-plate technology. Called the “collodion process”, the photographic medium, which by now had advanced from tracing-paper, to copper-silver sheeting, to a sheet of glass coated with a solution of silver-bromide and chloride, was inserted into the camera. To prevent light getting into the shot and damaging the results, a black cloth hood was held over the camera (like what you might see in those old movies).
The lens-cap on the camera is removed and light is allowed to filter through the camera onto the wet, glass plate. As usual, the image in front of the camera is marked onto the chemicals on the glass. Now, you can take that image and go and develop it!
There was just ONE problem.
Whereas the Daguerrotype was too slow, the Ambrotype was too fast! Why? Because of the very method that the photos were taken! Remember, it’s called ‘wet plate’ technology.
The photograph would only last as long as the glass-plate negative was moist and covered with the silver-compound chemicals. The very moment that the chemicals dried up, the photograph would be lost! To transfer the image to a medium that would record it for posterity (such as paper), the photographer had to work really fast! From soaking the plate in the solution, to loading it into the camera, to taking the shot, to unloading the glass plate and developing the image, the whole process had to be done in under 15 minutes!
Not easy when you’re rushing around with sheets of delicate glass, dangerous chemicals, and heavy, bulky, tripod cameras!
Unsurprisingly, people kept experimenting.
The next method was the Tintype.
‘Tintype’ is a misnomer. There is no actual TIN used anywhere in the photographic process.
The difference here is that tintype used sheets of metal (in this case, iron, instead of copper as with the Daguerrotype) instead of glass.
The process was similar, you still had to soak the iron in silver-solutions to prepare them for photography, but it had the advantage that it was a much faster method of photography. Unlike with the Daguerrotype or the Ambrotype, a Tintype photograph could be taken in just a few seconds or a couple of minutes, since the reaction-time between the silver-compounds and the exposed light is much faster. For the first time in history, it was possible to take several photos in a matter of minutes!
With this improvement in technology, photography really took off for the first time. By the 1860s, tintypes were becoming more and more popular. Remember all those black and white photographs that you see in your history books, from the American Civil War?
A lot of those were tintypes. The quick exposure-time meant that for the first time in history, it was possible for newspaper-photographers to actually go out onto a battlefield and take several photographs, without having to wait all day for the image to impress itself onto the recording-medium! More photographs could be taken in a shorter period of time, with a greater degree of sharpness and quality!
How to take a Tintype Photograph:
Flip the Shot!
Tintype photography was popular because it was fast, easy and relatively practical. For the first time in history, you could have something resembling modern snapshot photography. For portrait photography and family snapshots, wedding-photos and other projects likely to be handled by professional photography studios, the tintype remained the standard for nearly 100 years, from the 1850s up until just before the Second World War.
The ONE…small issue…with tintypes is that you never got EXACTLY what you wanted.
From the earliest days of camera photography, be it a camera-obscura, a daguerrotype, ambrotype or even a tintype, there was always one little compromise that you had to put up with:
What you saw through the camera-lens, was never exactly what you would see printed on paper when the shot was finished and developed. For example, in really early cameras, shots were often projected upside-down. So when the photo was done, you’d have to flip it over to get it right side up.
But there was one other thing. Remember that all these early photographic processes used silver-compounds as the chemical for capturing the light and imprinting the image onto glass or metal. And what is silver used for?
That’s right, making mirrors!
Every tintype photograph EVER taken, was always a MIRROR IMAGE. Don’t believe me? Have a look at this:
This rather grainy photograph was taken in 1879. Two years later, the person in this photograph was killed by the local sheriff.
Who is he? William Bonny AKA William McCarty AKA…Billy the Kid.
This is the ONLY known photograph of Billy the Kid, one of the most famous outlaws of the Wild West. But that’s not why it’s in this posting.
Have a look at the gun with its shoulder-stock resting on the ground by Billy’s feet.
This is a Winchester Rifle, a popular long-arm of the latter half of the 1800s. But notice that, in this photograph, the left side of the gun is exposed to the viewer, and that the loading-slot is clearly visible, above the trigger.
There’s just one problem. Winchester rifles, without exception, had the loading-gate on the RIGHT side of the gun.
Flip the image over, and we have…
…the rifle with its loading-gate on the right side of the gun, which is where it always was.
This photograph was a tintype. And all tintypes, just like this one, came out as mirror-images when they were developed.
Portable Photography
Photography had come a long way from simply tracing an outline of a projected image onto a piece of paper. It was now clearer, faster, and cheaper! But there was still one problem.
Portability.
For cameras of the period to work, they had to be very still, so that the light wouldn’t be interrupted during its interaction with the photographic medium inside the camera. And the medium-materials used, such as copper, glass and iron plates, were heavy and cumbersome to carry around, to say nothing of the cameras themselves, with their bulky wooden tripods. Along with all his kit, a photographer would need a horse and cart to move around town! Hardly practical. What people needed was a smaller, lighter, more portable camera.
Going Dry
The big obstacle to portability, quite apart from the size of the cameras, was the whole photography process. Up until the 1870s, all cameras used “wet plate” technology, where the chemicals were added to glass or metallic photographic-plates before they were inserted into the camera. And after the photo had been taken, the plate’s image had to be transferred to paper-stock before the liquids dried up, destroying the photograph. Daguerrotype and Ambrotype photographs made this process messy, tricky, cumbersome and frustrating. To take a picture, you had to have EVERYTHING you needed, right there, right now, on the table. The photographic-solutions, the plates, the paper-stock, the developing-fluids. And as the name suggests, the whole process relied on liquids. The moment everything dried up, it was useless.
This meant that a photographer had to work fast, to capture an image before the photographic solutions dried up, and the image was lost before it could be imprinted onto paper. But it also meant that you couldn’t keep a whole heap of photographic-plates in a case and carry them around with you at will, to photograph whatever you wanted…the plates would dry out…and you’d be left with nothing but lots of sheets of dirty window-glass in your suitcase.
The tintype process was better, if only in the fact that you could take faster photographs, but there were still serious limitations.
It was to speed up the whole photography process that the much more convenient “dry plate” process was developed.
Dry photographic plate technology, the immediate predecessor to film technology, was developed in 1871, by Dr. Richard Leach Maddox, an English physician and photographer.
Dr. Maddox was engaged in the science of photomicrography; or translated from Greek, the visual recording of microscopic entities. In other words, he photographed microbes, and other things which he was able to observe through the lenses of his microscope.
The good doctor loved his work, but he was constantly frustrated by the limitations of wet-plate photographic processes. Quite apart from everything else, he was allergic to the chemicals, and they irritated him when he had to take photographs.
In trying to find a solution, Maddox wondered why it wasn’t possible to condense the liquids used in photography, into a sort of gel or paste? Such a product could be spread onto a glass or metallic photographic-plate just like butter onto a slice of bread. It would be faster, cleaner, and there wouldn’t be any vapors, or chances of spillages. Surely, such a process was possible?
It was. But it took Maddox nearly ten years to figure out how to do it.
Eventually, Maddox figured out how to do it. He layered a standard glass photographic-plate with the usual cocktail of silver-based solutions which were necessary for photography to take place. Then, to protect the solution from evaporation, he coated the whole thing in…gelatin.
The same stuff used to make children’s candies and fruit jellies!
Once the gelatin (which is transparent in its purest form) was set on the glass, it sealed in the photographic solution, which now would never dry out. But it could still be exposed to strong light, so that a photograph could be taken. Brilliance!
It took a while, but by 1879, Maddox’s ingenuity had led to the mass-production of the world’s first dry photographic camera-plates!
Kodak Moments
In the 1870s, English physician Richard Maddox pioneered a way for photographic plates to be more easily handled and made more portable. When the process for manufacturing these plates was perfected in 1878-79, a young man stepped in to start producing these plates on a grand scale.
His name was George Eastman. In his twenties at the time, Eastman set up a factory which could mass-produce these dry photographic plates, making photography faster and cheaper. In 1889, Eastman established his own photography company: Eastman Kodak, one of the most famous in the world.
The word “Kodak” was invented by Eastman himself, after asking for suggestions from his mother. George wanted something that was easy to pronounce, unique, short, and which would not sound similar to any other product, brand or company-name then in existence. After twisting a few letters around, George and his mother, Maria, came up with…”KODAK”.
Young Georgie Eastman had entered the world of photography at a critical moment in history. In 1887, the world’s first photographic FILM had been developed! Building on Dr. Maddox’s dry-plate technology, it was a simple process of changing the photographic medium from heavy, fragile and delicate glass plates, to light, flexible celluloid sheeting, or ‘film’. Film was more compact, much lighter, and far easier to transport.
By now, it was possible to have photography on the move! You had faster exposure-times, cleaner, lighter materials…and more compact cameras!…which were yet to be invented…but improved technology had paved the way for their eventual development.
A Little Black Box
This doesn’t look like much, but it is the great-granddaddy of the fancy, compact digital camera sitting on your desk right now.
This, is the Kodak Box Camera.
Invented by Eastman using the latest film-technology, the Kodak box-camera was the world’s first-ever “point-and-shoot” camera, designed to be idiotproof. You simply wound up the film, aimed the camera, peeked through the viewing-window, and pressed the lever to actuate the shutter and get a snapshot! Easy as pie!…although the exposure-time was still a few seconds, so…hold that pose!
This was the camera that launched the Eastman Kodak Company, and it was the first commercially-produced snapshot camera that anyone could use. Designed to be cheap, simple and functional, it could bring photography; previously an expensive and time-consuming hobby of the rich, to the hands of ordinary people.
With the Kodak camera, it was now possible to photograph rooms, houses, parks, family-outings, one’s children, famous events, significant occasions and almost anything else. Now, everyone could stand together and have a group-shot where-ever they wanted to!
Kodak advertised its new cameras as being super-easy to use. The popular slogan was: “You Press the Button…we do the rest!”
“The rest”, included the development of the film and photographs, and the loading of the camera. You simply used up the film in the roll, and then you sent the film, along with your camera, to the Kodak offices in America…So long as you lived in America, this might be convenient. For people living in Europe, perhaps not. It was for this reason that the Kodak company didn’t kick it off right away with the Box Camera, but things would improve, once they’d set up branch-offices in other locations.
So what happened when you sent your camera back to Kodak?
The developers at Kodak would open your camera, retrieve the film, develop the pictures, put them into an envelope for you, reload your camera with a fresh roll of film, and then send back your camera, your new film, and your photographs, all in one neat little package! And your camera was all ready for another round of shooting!
The End of Eastman
I’d like to say that George Eastman, the man who brought us the snapshot camera, and founded one of the most famous photographic-equipment companies on earth, lived to a ripe old age and died rich and happy.
Sadly, I can’t.
He did live to a ripe old age…77, and he was rich, but he was hardly happy.
In later life, Eastman was struck down by crippling back-pains. These spinal problems made it impossible for him to stand upright, walk, or even move to any great extent, without serious pain. He was essentially crippled, and confined to sitting in a wheelchair. He suspected that he had inherited the same condition from his mother, who had also had back problems later in life, and who had died in agonizing pain in a wheelchair of her own.
Guessing that he would be in for a long, slow, painful death, Eastman took his own life. He left a brief suicide-note, and then shot himself in the chest. Once. Killing himself instantly. The note which he left to be found, read:
“TO MY FRIENDS: ‘My work is done. Why wait?‘”.
George Eastman died on the 14th of March, 1932 at the age of 77.
But while Eastman was dead, the camera was not!
The Kodak box camera, later reborn with the enchantingly cute name of the “Brownie”, was the mainstay of point-and-shoot cameras for years. Decades! Even in the 1960s, you could go out and buy a brand new Kodak Box Brownie!
Shooting for the Masses
It was thanks to portable, film-using cameras such as the Brownie, that gave birth to photography as a real and practical hobby. For the first time in history, shutterbugs were everywhere, snapping everything that moved, and even more things that didn’t. EVERYONE used a Box Brownie. Everyone. Even royalty! Queen Mary; grandmother of the current Queen of England, photographed the royal family on holiday, using her own Box Brownie!
In the late Victorian era and from then onwards, photography as a serious and practical hobby really took off. Now, it really was possible to photograph anything, almost anywhere! Photographs of things previously impossible, due to the size and impracticality of Victorian-era photographic technology, were now commonplace. Picture-postcards became popular. And professional photographers could make a lot of money going around snapping exotic sights and selling them to companies to print off postcards.
In the 1920s and 30s, there was a boom in international travel. Now, with fast steamships, automobile ownership and extensive railway networks, families, couples and singles could flit off on a jolly holiday. And they could photograph everything that they wanted, and bring their memories home with them. A hundred years ago, such things were almost impossible, unless you knew how to draw or paint!
Cameras captured some of the most famous events of the 20th century, now. The Crash of the Hindenburg, the Attack on Pearl Harbor, the launching of the Titanic. Some intrepid photographers even risked life and limb (but mostly life) climbing the unfinished scaffolds of famous Manhattan skyscrapers, to photograph the construction-workers at their job.
Flash Photography
A Flash in the Stand
Especially with early cameras and photographic technology, light was essential for the capturing of images. Exposure took a long time, and bright light was needed to capture an image.
As photographic technology improved and photographs could be taken faster, there remained the issue of getting enough light to successfully take a clear shot of something where light was insufficient. To do this, flash-photography was invented.
The earliest flash-photography used a stand loaded with “flash-powder”, which was ignited by an ignition-switch held in the photographer’s hand at the moment of exposure. The stands, called ‘flash-stands’, and the powder with which they were filled, are iconic pieces of early photographic equipment. They were invented in the 1890s by a man named Joshua Lionel Cowen (last name also spelt ‘Cohen’, because he was Jewish).
Does the name sound familiar? Probably because it’s also the name of a popular line of children’s model trains. No co-incidence…Cowen invented those, too.
Early flash-photography was a bit of a hit-and-miss affair. The stands were loaded by hand with a measure of flash-powder, which was ignited with a spark at the moment of the photograph. If too much powder had been loaded into the stand, you were more likely to get an explosion rather than a flash! And if you didn’t have enough powder, you were likely to get a rather dark, useless photo that nobody could see! Getting the balance right was a real skill.
A Victorian-era camera with separate flash-stand and powder. Note how close the photographer’s right hand is to the igniting flash-powder
The flash-stand and powder produced dramatic, loud explosions when the flashes went off. This allowed for photos to be taken at night, and in dark rooms where there might not be enough natural sunlight. But there was one serious drawback. The imprecision of loading the powder into the stand was a serious fire-risk. Incorrect loading of the powder could result in a real explosion when the camera went off, and a photographer could have his hand burnt, or even blown off by the blast of the flash if he had overloaded the stand with powder! Nasty stuff…
The dangers of early flash-photography are dramatically shown in this 1939 Mickey Mouse cartoon; “Society Dog Show“. The results are rather exaggerated for purposes of comedy, but improper loading of the flash-stand really could start a fire.
Flashbulb Photography
Early flash-photography using a stand and powder allowed photographs to be taken at night, in dark places, or in places without sufficient natural sunlight. But it had one serious drawback. Because everything was done manually, there was a significant risk of mishap. Too much powder could result in injurious explosions which were not only life-threatening, but also a major fire-risk!
To try and improve the safety and uniformity of flash-photography, the flash-bulb was invented.
Remember those scenes from those period movies of reporters and photographers in the 1930s with their three-piece suits and fedora hats with their “PRESS” cards in them? How they’re waving around their portable cameras with the flash-holders attached? They take a shot and POOF! There’s a loud, distinctive “Pshink!” as the flashbulb goes off, and a dazzling white light blinds you for the rest of the film?
“Take your picture, mister?”
That’s a flashbulb-camera in action.
In fact, they say the flashes were so bright, Hollywood movie-stars in the 1920s and 30s pioneered the wearing of sunglasses so that they wouldn’t be blinded by the constant camera-flashes at important social or industry events.
Flash-bulbs made night, or low-light photography safer, faster and more portable. However, it was still dangerous.
The bulbs worked in the following manner: The flashbulb-holder was attached to the camera which would use it. The bulb was screwed into the socket in the holder. When the shutter was actuated, the flashbulb was ignited and went off!
The famous blinding white light is the result of the ignition of oxygen and magnesium inside the flash-bulbs. Anyone who’s done highschool science will probably know that when you put a match to magnesium, it burns bright, dazzling white. It’s the exact same thing in old-fashioned camera-bulbs.
The big drawback to this was that the intense flash let off a lot of heat. Once one photograph had been taken, you would have to wait for the flash-bulb to cool down, first! If you tried to unscrew it right away and set in a new bulb for another flash, you’d burn your fingers! You could probably overcome this using gloves, of course, but the white hot flash-bulb was still a fire-risk. Throw it carelessly into a waste-paper basket and you could set a whole building on fire!
Improving Things in a Flash!
Edwardian flash-photography allowed photographs to be taken at night, or in low-light conditions. But it was dangerous and prone to mishap. The flash-bulb invented shortly after, made the process faster and safer, but the intense heat generated by burning magnesium flashbulbs made it impossible to take more than one good flash-photograph at a time, unless you could safely remove the used bulb and insert a fresh one without burning your fingers!
In the 1960s, companies like Kodak, with its Instamatic Camera, invented the flash-cube! A fantastic little detachable light-cube that you stuck on the top of your camera. Now, you didn’t have to change the bulb every time you wanted to take a shot, and you didn’t even have to wait for it to cool down! You simply snapped it on the top of the camera, and flash-flash-flash-flash! Four flash-shots in one! Huzzah!
Although expensive, (early cameras of this type went for hundreds of dollars in the 1960s and 70s), they were the next step in flash-technology, until eventually at the end of the 20th century, the flash had been incorporated entirely into the body of the camera; just as it is today, with no bulbs to change, or flip, or replace, or pans to fill with exploding powder. Simplicity…and choice! Now you can choose to turn the flash on, or off, and you don’t have to carry anything extra around with you, to make that choice with.
Sepia-Tone Selections
Almost any digital camera worth its salt today, will have a sepia-tone option on it. It allows you to take photographs in that famous yellowy-browny tinge reminiscent of old-fashioned photographs, which have yellowed and faded in their frames…without having to wait 50 years for it to happen!
But what is this famous tint called ‘sepia’?
The word ‘sepia’ is actually a…FISH.
That’s right. A fish. That swims in water. Specifically, the cuttlefish.
In older times, photographs were inked using the ink taken from the cuttlefish. As photographs aged and the ink was exposed to sunlight, the darker pigments in the ink would fade, and the natural brown colour of cuttlefish-ink became more pronounced as the darker colours faded away, leaving us with the famous golden-brown tinge on old photographs that everyone loves to try and recreate today.
Shake it like a Polaroid Picture!
Aaaah, instant cameras. Magical boxes of incredibleness that seem to defy the laws of physics!
The most famous instant camera, capable of producing instantly-developed film, was of course, the Polaroid camera. What could be simpler? Aim, shoot, print, shake…voila!
The concept of the instant camera dates back to the Roaring Twenties, a time of great technological change and wonder!…but things were not to be. Although the idea for the instant camera goes back to 1923, it wasn’t until the 1940s that something practical was invented.
The man who invented the modern instant camera was a fellow named Edwin Herbert Land (1909-1991). He unveiled his new creation in 1948, and ever since, we’ve been enjoying the benefits of instant photography, which would probably not be surpassed until the coming of digital cameras in the 1970s and 80s.
Land’s invention of the instant camera, and the foundation of the company that would make them (Polaroid), was born out of a nagging request from his daughter, Jennifer, who constantly asked her father why, after taking a photograph, it was not possible to view it straight away. Of course, the photograph had to be taken to be developed, and this lengthy process between taking photographs, and actually getting to see what they looked like, annoyed Land, leading to the invention of his instant camera and instant photographs!
The phrase ‘shake it like a Polaroid picture’, came out with the song “Hey Ya”, in 2003!, and it refers to the fact that some people would shake Polaroid photographs in order to try and develop them even faster. But it doesn’t actually do anything at all.
Shaking the pictures was once done by early instant-photographers, in order to dry the pigments used in the development of their photographs. But shaking doesn’t actually help the photograph develop any faster! In fact, it probably screws it up!
What happens when you take the photograph is that the light enters the camera and reacts with the photo-sensitive chemicals on the photographic card, which begin to develop. Shaking the card actually separates the chemicals, and more importantly, the colour-pigments, distorting and damaging the resulting image!
Risks of Early Photography
Especially Victorian and Edwardian photography, was full of risks and hazards, mishaps and dangers. A few have already been highlighted – Exploding flash-powder, scalding-hot flash-bulbs, but one which hasn’t been mentioned is the dangers of developing fluid.
For ages, photographs had to be developed the old-fashioned way, by dipping the photographic cards into solutions, to make the photosensitive chemicals in the paper take on their proper shades and/or colours, to show the image in its fullest clarity.
Although this sounds dangerous enough with chemicals and solutions everywhere, it was made even more dangerous because of the use of cyanide, one of the most poisonous chemicals known to man. Cyanide was used in early photography, when wet-plate processes were still the main form of capturing images. Excessive exposure to cyanide, even in the small amounts used in photography, could lead to poisoning and even death. That’s one way to suffer for your art.
A Clearer Picture?
This is about where my posting on this subject ends. But if you want to know more, here are some of the links I used…
In 1862, French writer, Victor Hugo, published one of his most famous novels. Along with “The Hunchback of Notre Dame“, the world-famous “Les Miserables” remains one of the most famous books ever written. It has been made into at least half a dozen films or TV series, a world-famous, globally successful musical theater production, and a musical film, released last year.
The novel’s title, (pronounced “Le’ Miser’abe“), translates into English as “The Miserable“. The book chronicles the seventeen-year struggle of French convict, Jean Valjean, jailed for stealing bread to feed his dying nephew. His original sentence is five years, but his sentence is extended over and over due to repeated attempts to escape, until he eventually spends nineteen years in chains, finally gaining his freedom, of a sorts, in 1815, the year that Napoleon is defeated at Waterloo.
“Les Miserables” was written over a century and a half ago, and many of the cultural references are lost to history. This posting will look at the various historical events and persons mentioned in the novel, the films, and the play, so that the overall story of the book can be better understood.
“Toulon, 1815”
The Bagne of Toulon
The story opens in 1815. Jean Valjean, convict #24601, has been imprisoned at Toulon, in France, since his arrest for theft in 1796. But what is Toulon, and where is it?
‘Toulon’ itself, is a city, located in southeastern France, on the Mediterranean coastline. The ‘Toulon’ of the story is actually the Bagne of Toulon.
The Bagne of Toulon (1748-1873) was an enormous, and infamous French prison.
Previously, Frenchmen who had been convicted of crimes had been drafted into the French navy. They were used as rowers to power the enormous French naval galleys. When galleys became obsolete, to be replaced by wind-powered sailing-ships, all the prisoners who were once sent to sea were instead sent to the Bagne of Toulon, where they were sentenced to years of hard labour.
Toulon was also a naval base and harbour during this time. The prisoners sent to the Bagne of Toulon were made to serve their sentences doing hard labour, carrying out tasks such as digging foundations for buildings, splitting stones, building fortifications and other structures, and to operate the machinery and treadmills and wheels which ran the rope-making factory nearby. Prisoners were branded with letters that showed the extent of their imprisonment at Toulon. They were either branded as having to serve hard labour (for a specific number of years), or were branded as having to serve hard labour for life, which of course meant that they would most likely die in prison.
The Yellow Passport
When he’s granted parole, Jean Valjean is forced to carry around his parole-documents, comprised of identification information and a passport, printed on yellow paper. The paper is colour-coded so that anyone who looks at it knows at once that he is a convict on parole, and a dangerous man (even though all he did was steal a loaf of bread for his nephew). The paper makes it impossible for Valjean to find work, food, or even a bed for the night, as he tries to make his way to his parole-officer where his papers are to be checked.
The yellow French passport shouldn’t be confused with the yellow card mentioned in the book “Crime and Punishment”, which serves a different purpose. During the time of imperial Russia, to prove that they had the right to practice their profession, prostitutes had to carry around a yellow I.D. card, to show that they were prostituting themselves legally, and had a license that allowed this.
The Bishop of Digne
Although the good Bishop Myriel is a fictional character, the town of Digne (“Deen”) is not. In the early 21st century, the town enjoys a population of some 17,000-odd people. In the 1820s at the time of ‘Les Miserables‘, its population was a much smaller 3,500 people.
“Montreuil, 1823”
Fantine Sells Her Hair and Teeth
After being kicked out of Valjean’s factory by the foreman, the young woman named Fantine is forced to sell her hair, and even her teeth, to survive, and to send money to the innkeeper who houses her daughter, Cosette.
Selling hair was a common practice among the people who were down on their luck during the 19th century. Hair was used in wigmaking, hair-jewellery (where it would be braided into ropes and bracelets), and even in dollmaking. Hair was laboriously inserted into the heads of dolls using needles and tweezers, a few strands a a time. Excess hair was used to stuff the insides of dolls and fill out their forms!
Although hair might grow back, and its loss would only be temporary, Fantine goes so far as to even sell her teeth! And yes, you could sell your teeth…if you were really desperate.
Dentistry during this time was crude, and people often had their rotten teeth yanked out by the dentist, the barber, the doctor, or even the village blacksmith with a pair of his smithing-tongs!
To replace missing teeth, it was necessary to manufacture replacements. Dentures and such other dental add-ons were variously made of everything from metal (if there was just one or two teeth missing, you might get them replaced with gold!), wood, bone, and ivory! Sometimes, animal teeth were used to manufacture replacement dentures.
During the time of Les Miserables, replacement teeth were even taken from dead bodies! Especially, during those years, from the bodies of dead soldiers! “Waterloo Teeth”, literally from the bodies of dead soldiers killed during the final battle of Waterloo, were especially common. After all…lots of dead, healthy young men with nice, white teeth…and lots of people living, who want them. Why waste them? Surgeons, barbers and anyone else out to make a quick franc, went through the battlefield with a jar and a pair of pliers, yanking teeth out of corpses to sell them to denture-manufacturers!
But apart from all these avenues of dental delivery, you could still sell your own teeth, if you were brave enough to have them ripped out of your mouth without anesthetics! But you would have to really need the money, and be really desperate to do this!
“Paris, 1832”
By the 1830s, Jean Valjean has fled the town where he held a factory and the office of mayor. He has become Cosette’s guardian and father-figure, and he lives as a wealthy gentleman of means, but with a private life which he does his best to keep from his adopted daughter.
Jean Valjean
Although Valjean is fictional, the author, Victor Hugo, almost certainly based him on the real-life convict Eugene Francois Vidocq. Vidocq (1775-1857) is one of the most famous figures in the history, both of crime, and of criminal investigation.
Vidocq’s childhood was spent during the crumbling days of the French monarchy. As a boy, he was wild and untamed. To get money, he stole the family silverware and sold it. He was arrested and thrown in prison. The arrest was orchestrated by Vidocq’s own father, who had hoped that this spell behind bars might scare his son straight.
As a young man, Vidocq enlisted in the army and fought during the French revolutionary war. Between 1795-1800, Vidocq spent his life in and out of various French prisons, disguising, escaping, running, and being recaptured over and over again. Eventually, he was sent to the infamous Bagne of Toulon, just like his fictional counterpart, Valjean.
In 1800, Vidocq escaped from Toulon and went on the run. He hid at his mother’s house, but before long, the authorities caught up with him once again, and he was arrested…again. And he escaped…again.
Sick of running around, Vidocq attempted to create a new life for himself as a merchant, but his extensive criminal past made this impossible, with everyone knowing who he was, what he had done and his enemies around him everywhere. In 1809, he was arrested…AGAIN.
Finally fed up, Vidocq approached French criminal authorities and offered them a deal. His freedom in exchange for information on other criminals. The police liked the idea, but not enough to let him just run wild. He would be imprisoned again, but this time, he would have more freedom within the prison to spy on inmates and report their goings-on to the guards and police-officials. He proved to be a capable spy, and eventually, Jean Henry, the chief of the Paris Police, agreed to Vidocq’s formal release from prison.
So that it didn’t look like Vidocq was being given favourable treatment, which might tip off other inmates about his spying activities, Henry arranged for the release to look like another one of Vidocq’s famous escapes. Now outside of prison for the last time, Vidocq became a secret agent for the Paris police-force.
Originally, Vidocq was part of the newly-formed “Security Brigade”, of the Paris police-force in 1811. This organisation of detectives and secret-agents was originally just an experiment. Nobody knew if it would really work. But Vidocq’s long life as a criminal meant that he was able to get into minds of the criminal classes and solve crimes in ways that other police officers could not. The brigade was so successful that in 1813, the brigade was formed into its own formal organisation, the French “Surete Nationale“. ‘Surete’ means ‘Surety’, as in ‘assurance’, or ‘security’. Literally, the National Security Force, or in more plain language, the French State Police.
The agents of the Surete Nationale were small in number; even by 1824, the agency had only 28 members. But each agent was trained by Vidocq in criminal detection. How to disguise oneself, how to think ‘outside the box’, and see things from a criminal perspective. The agency also kept a roll of spies and informants who would infiltrate French criminal organisations.
Through the turbulent changes of French history during this time, Vidocq’s roles and his influence on French government officials wavered constantly. Once more, Vidocq spent his life in and out of prison, mostly because he was branded as an enemy of the state for various reasons. But by now, Vidocq’s new position and fame meant that he had powerful friends. Thanks to a little string-pulling, Vidocq never spent more than a few months in prison at any one time.
In 1843, Vidocq was once again thrown in prison. Even though his prominent friends managed to get retrials and shorter sentences for him, when Vidocq was released from prison a year later, his reputation had been destroyed.
Vidocq became something of a recluse, and in 1849, was imprisoned yet again, for eleven months. When he was released, he lived the rest of his life in general seclusion. His career as a detective was not what it once was, although he did occasionally take on cases, to earn himself extra money.
Vidocq died in 1857, at the age of 82, after surviving a bout of cholera.
Despite his shaky life, Vidocq is famous today as being the father of modern criminology. He was the first person to use techniques such as undercover agents, plaster-casts and moulds, and even very early ballistics, to solve crimes. He even developed the science of criminology, and early crime-scene investigation to aid in the solving of crimes and the gathering of clues and evidence, techniques that most police-forces wouldn’t use until the late 1800s.
Since 1990, the Vidocq Society, named after him, has been solving cases presented to them by various police forces. The Society is an elite club of criminologists who assist police in solving ‘cold case’ homicides which regular police-forces are unable to solve.
Based in Philadelphia, Pennsylvania, in the U.S.A., the Vidocq Society is comprised of experts ranging from criminologists, FBI agents, scientists, coroners, psychologists and homicide detectives.
Members can be currently-serving professionals, or former, and retired professionals, but membership of this exclusive crime-solving club is strictly by invitation only, and membership is limited to only 82 members (the number of years in Vidocq’s life) at any one time.
The Society does not go out looking for work. It only solves cases which police-forces bring to them for review, and even then, they’ll only work on the hardest and most challenging of cases which meet a strict set of criteria.
It’s been suggested by articles on the internet that Eugene Vidocq was Hugo’s inspiration, not only of the character of Jean Valjean, but also of Inspector Javert. Vidocq’s troubled youth and repentance is represented by Valjean’s character, whereas Javert represents Vidocq’s later life as a relentless law-enforcement officer who will go to any lengths to see that justice is done.
General LaMarque
During the second half of the play, the members of the student rebellion mention ‘General LaMarque’ as the last living champion of the oppressed and poor people of Paris.
LaMarque was a real person, and his death in 1832, really did spark a rebellion in the streets!
‘General LaMarque’ is Jean Maximillien LaMarque, (1770-1832). A famous revolutionary war army officer, LaMarque was famous for his republican views. He opposed the French monarchy and complained that the royalist government did not see to the needs and wants of ordinary French citizens. It trampled human rights, and did not support political liberty of the people.
LaMarque became ill in 1832, contracting cholera. He died on the 1st of June, 1832. Within a week, riots had erupted in the streets of Paris. The champion of the people was dead!
The June Rebellion, 1832
There really was a June Rebellion in 1832 Paris, although it did not involve an organisation called the Friends of the A.B.C. (which was a fictional group created by Hugo for the story). The Friends of the A.B.C., (in French, “Les Amis de l’ABC“) is actually a pun. In French, ‘A.B.C.’ is a homophone for the French word “Abaisse” (“The Oppressed”), so literally, “The Friends of the Oppressed”.
It’s a joke about the fact that the rebellion was sparked mostly by students and schoolboys, youngsters still learning how to read and write their A.B.C.s, and the fact that they were trying to win rights for the downtrodden citizens of Paris, the abaisse, or ‘oppressed’.
The Rebellion was short-lived. It lasted only three days! It started on the 5th of June, 1832, during the funeral procession for the late, great General LaMarque.
Spurred on by the waving of red and black flags (such as those mentioned in the musical), students began rioting and chanting.
The famous Marquis de Lafayette, the famous French aristocratic army-officer who had helped the Americans win their Revolutionary War back in the 1780s, attempted to calm the riot. He was one of General LaMarque’s many supporters and fans, but even the marquis’ presence and calls for calm did not help. The marquis was an old man by then (over seventy!) and close to death himself, but that didn’t stop him from trying to quell the violence.
The Barricades
Government soldiers moved into Paris, attempting to crush the rebellion, and the students and their supporters fell back to their barricaded strongholds.
The rebellion lasted from the 5th of June, the date of General LaMarque’s funeral, to the 7th of June. During that time, fierce gun-battles raged across Paris, and at several intersections and streets, government soldiers opened fire on the rebels, and the rebels only fired back!
But the rebels were never going to win. Outnumbered literally 10-to-1, before long, they were forced to put down their arms and surrender.
Victor Hugo himself was involved in the rebellion. To be precise, he was caught in the crossfire between government troops and rebellious Parisian citizens, and had to take cover in the street.
I thought France was a Republic?
France has gone through many revolutions and rebellions, and the June Rebellion of 1832 was just one of many, many, MANY such events in French history.
From the 1400s until the 1780s, France was a kingdom. In 1789, the French Revolution (the famous one that everyone knows, with the guillotine and the storming of the Bastille and all that) took place.
In 1791, the monarchy was restored as a constitutional monarchy.
Perhaps unsurprisingly, this monarchy was not popular. It only lasted a couple of years.
From 1792 until 1804, France was a republic. For a decade between 1805-1815, France entered the period of the “First Empire”, which centered around the rule of Napoleon Bonaparte. It ended with Napoleon’s defeat and exile in the 1810s.
With the defeat of Napoleon, the House of Bourbon, which had ruled France up until the 1780s, returned to power in the Bourbon Restoration. This lasts from 1815 until 1830.
In 1830, yet another revolution changes everything, and we have the July Monarchy (so-called because it was established in July of 1830), a constitutional monarchy, much like the one of the 1790s. The king on the throne of France is Louis-Philippe I, cousin to the abdicated King Charles X.
It is Louis-Philippe who is the king of France in the 1832, when the June Rebellion mentioned in Les Miserables takes place. But even this monarchy wouldn’t last. It would be overthrown in 1848, to be replaced by the Second Republic, which would be replaced by the Second Empire, which would be replaced by the THIRD Republic, which would last until the Fall of France during the Second World War.
Right now, France is on Republic #5.
And there you have it. A little glimpse at just some of the historical realities behind one of the most famous novels, plays, musicals and films in the history of western literature.
They must do, otherwise there wouldn’t be anyone buying them anymore. And there wouldn’t be anyone fixing them. Or selling them anymore.
And they are.
In the 21st Century, there is a growing number of typewriter collectors, and users who are returning to, or changing over from a computer to, a typewriter. This posting is here to serve as a guide for the novice typewriter-collector, the first-time buyer, the aspiring writer or the antiques bargain-hunter.
You want to buy a typewriter. What do you need to know? Keep reading, and you’ll find out.
Who Uses a Typewriter Anymore?
No, seriously…who?
You’d be surprised.
There’s still a large number of professional writers who use typewriters. There’s still an active repair-community. There’s still an active collecting community. One of the most famous typewriter-collectors and users on earth is Tom Hanks. He’s well-known for it.
I use a typewriter. Hell. I used a typewriter before I used a computer. Not because computers didn’t exist when I was born…they did…but because a typewriter was what my parents could afford when I was growing up. I learnt to touch-type on a typewriter before I ever learnt how to do it on a computer.
What do I DO with it?
What do you DO with your typewriter?? No seriously, what??
A lot of people who own typewriters today use them for writing short stories, novels, books, letters…much like typewriters were always used for. But in the 21st century, some people even use typewriters for blogging.
Called “typecasting”, bloggers will type up an entire blog-posting on a typewriter. Then, they will scan the typed copy, and load it onto their blog.
Why?
Because typing on a typewriter produces something more interesting than simply using “Courier New” in your blog-composition window. Because typing on a typewriter produces text variants which not even the most intricate downloadable typewriter-font can produce. An electronic font can’t reproduce things like strikeouts, type-overs, floating capitals, dropped letters, and faded or misformed print, which some bloggers enjoy, because it makes their posts more interesting and personal.
Perhaps…that’s why YOU want a typewriter…eh?
Deciding on What You Want
When buying a typewriter, as with buying anything, it’s important to know exactly what you want to buy and own. You don’t need to know precisely, right off the bat, but you should at least have a general idea of your tastes and desires. Different typewriters have different issues. Different things that could go wrong. Different prices. The variables are almost endless. So before you head off hunting, you need to know what you want, and the issues or restrictions that might come with your choices.
Typewriters – Style & Design Points
When selecting a typewriter, or drawing up a list of potential purchases, keep in mind a few things…
Do you want a Desktop? Or a Portable?
Desktop typewriters are NOT named-so for nothing. Models such as the Remington 12, Remington 16, L.C. Smith Bros. No. 8, Royal 10 and Underwoods 1, 2, 3, 4, 5, and 6, weigh a LOT. The Royal 10 starts at about 30lbs. Something like a Remington 16 or a desktop Underwood goes up to about 50 pounds or more. Can you cart that home from the flea-market? Or ship it across the ocean on your flight back from your overseas holiday? Can you carry that back from the antiques shop halfway across town?
Do you want a portable? How old? Portables are much lighter than desktops, obviously, but they come with their own issues. For example, portables did not become really practical until the 1920s. Portables did not have all the features of a larger desktop typewriter. And portables manufactured during the Depression years of the 1930s were likely to be super-duper cheap, with only basic features. A fascinating look at the impact of the Depression on the American typewriter industry, but as practical typing-machines, you’d have more options with a sharpened pencil!
Do you want pretty glass keys?
Black-letters-on-white, or white-letters-on-black keys, capped with glass, and edged with pretty chrome rings are the signature of the typewriter. They’re pretty, shiny, stylish, artistic…and rare.
Typewriters with glass-topped keys were only made for a relatively short period of time. From the 1890s up to the 1940s. If you want a typewriter with those classic glass keys that you see in movies and on TV shows, then expect your machine to be at least 70 years old. When WWII ended in 1945, glass-key typewriters went out the window. They were considered oldschool and boring. By 1950, there were almost none left in production, and all typewriter-manufacturers had switched over to machines with plastic keys.
Metal or Plastic Body?
More modern typewriters were made with cheaper, moulded plastic bodies that can warp and bend and crack. These are usually the budget typewriters from the 1960s and 70s. A typewriter with an all-steel body is something that would’ve been made before, or during the 1950s. Metal bodies may be slightly heavier, but they offer the strength, durability and assurance that a flimsier plastic body cannot.
Missing Keys?
Until the 1960s and 70s, the vast majority of typewriters did not have 1-keys, !-keys or 0-keys. Instead, lower-case l’s, apostrophes, full-stops, and capital ‘O’ keys did double-duty for these numbers and symbols. So if your typewriter doesn’t have these keys…relax. They never did. And most other typewriters didn’t, either, until the 1960s and 70s.
It was a common practice, to save money, space, and weight on the manufacture of typewriters. It may make for an interesting and new typing experience, but it’s only a minor adjustment to worry about. If your typewriter MUST have those symbols on its keyboard as stand-alone keys, then you’ll need to buy one made in the 1950s-1980s. With only a few exceptions, all pre-1950s typewriters did not have them.
Ribbons and Spools
The vast majority of typewriters use ribbons. But it’s important to know WHAT TYPE of ribbon your machine uses.
Most typewriters from major manufacturers (Olivetti, Royal, Remington, Underwood, Brother, L.C. Smith, Corona and so-forth) will use a standard, 1/2-inch typewriter ribbon. Today, such ribbons are made of nylon. Ribbons come in either solid red, solid black, or two-tone red-black. Buying an all-black, or a red-black ribbon are the best options for regular typing.
While your typewriter ribbon-size might be 1/2-inch, which is more or less standard across the board (some older typewriters, or typewriters from more obscure manufacturers may use different ribbon-sizes which are harder to find), not every typewriter uses a standard ribbon-spool size.
Most typewriters accept what is called a “Universal Spool”. A universal spool is one that will fit most typewriters, and which sports a 1/2-inch ribbon. These are manufactured in their thousands and you can buy them brand-new online (eBay has dozens of them), or from a stationer’s shop which stocks them.
But…what if your typewriter does NOT take universal-spools?
If it doesn’t, don’t despair. So long as you have your typewriter’s original ribbon-spools, all is not lost.
Simply remove the old ribbon from the spools and throw it out. Now, wind the new ribbon from the new spools, onto the old spools, which were original to your machine. So long as the ribbon and the spools are same size (which is more than likely), you should be able to use the new ribbon in the old spools with no problems at all!
Alternatively, if the original typewriter ribbon is in good condition, you could simply re-ink it and reuse it. To do this, you’ll need a bottle of stamp-pad ink (available at any good stationer’s shop), and my instructions about how to re-ink ribbons.
Where do I Find Typewriters?
eBay, Etsy, Gumtree, Craigslist, and the surprisingly large number of online typewriter-dealers, are all excellent internet sources for typewriters of various vintages and styles. They all come with their ups and downs, of course. With eBay and other online seller-sites, you have to deal with how much, or how little the seller knows about the machine, and what they’re willing to sell it for, and whether or not they’re willing to haggle and negotiate.
With professional dealers, the typewriter you buy may be more expensive, but this is countered with the assurance of a professional restoration which will keep the machine running for years to come.
How much do you Pay for a Typewriter?
Postwar models, ca. 1950-1980s are cheap as old chips. You can find these at any flea-market or junk-shop. Don’t pay more than about $25. They’re really common and to spend more money than that on a functioning postwar machine is just wasting your money.
The machines which cost more are typically the older machines. Those from the 1940s, 30s, 20s and the 1910s and the 1900s. These, in working condition, can go for a couple of hundred dollars. If they’re not in working condition, then the price obviously drops. Don’t pay more than about $200 for something in working condition from this vintage, and don’t pay more than about $50 for something that isn’t working.
As you may have guessed from all this, typewriters are not worth a great deal of money. Don’t forget that until about 30 years ago, every office, every study, every desk in the world had a typewriter on it. They’re super-duper common. So the value just isn’t there. It doesn’t exist. But this is good news if you’re looking for a functional machine on the cheap. Just don’t expect to retire on it if you sell it in the future.
Testing your Typewriter – What to Check For
You want to buy a typewriter. You want to buy it at a good price, and you want to buy it in working condition. Or perhaps you don’t. Maybe you want to buy a typewriter as a fixer-upper restoration project? Perhaps fixing typewriters is your hobby? Or perhaps you want to go on a little desktop restoration-adventure?
But if you do want to buy a typewriter that works, you need to know what constitutes a working typewriter, and what you need to check, to ensure that it does, actually, work.
In particular, pay attention to the following areas:
Rubber
Roughly 20% of the stuff on a typewriter is rubber. The platen, the feet, the feed-rollers, and in some cases, the paper-bales (although not always, in this last instance).
Rubber is there to act as a cushion, and to provide grip for the paper when you type. The issue with rubber is that it’s a natural product, and is therefore prone to degrading. When buying a typewriter, you want to check the condition of the rubber.
Checking the rubber on the feet is easy. Just lift the typewriter up. You can buy replacement feet pretty easily online, or even at your local hardware shop, if they need replacing.
Next, check the rubber on the platen. Platen-rubber should be firm, but not solid. Tap it with your fingers. If it feels firm, then it’s fine. If it feels like tapping glass or the side of a bowl, then it’s too hard. This can be remedied by sanding the platen with fine sandpaper (to remove hard rubber and expose fresh, softer rubber, and therefore improve grip), or by rubbing the platen lightly with a rubber-solvent to soften up the platen. If the rubber on the platen is in good condition, then you can just leave it as it is, and not worry about it.
Then you need to check the condition of the feed-rollers. This is a little harder to do. Feed-rollers are the two, or four, depending on the typewriter, free-spinning rubber rollers inside the carriage, underneath the platen. They grip the paper when you crank it into the machine, and roll it under the platen, and feed it up the front of the carriage. Feed-rollers. See?
Feed-rollers are also covered in rubber, much like the platen. To find out if your feed-rollers are in good condition, simply roll a couple of sheets of paper into the typewriter.
Does the paper get pulled easily into the machine? Or does it just not go at all? Does the paper come out evenly on the other side? Does it advance evenly when you hit the carriage-lever?
If the answer to all these questions is “Yes”, then the feed-rollers are in good condition. If the answer to even one of them is “No”, then the rollers are not in good condition.
To try and rejuvenate the feed-rollers, you need to remove the platen from the carriage, fish out the rollers (they just sit there) and sand them, or treat them to rubber-solvent.
If the rubber on your rollers or platen is dry, hard and cracked then you should either PASS on the typewriter, or buy it with a view to REPLACING THE RUBBER ENTIRELY. Cracked rubber is completely unsalvageable, and no treatment with paper or chemicals is going to save it.
Rubber that feels like rubber, and rubber that is somewhat pliable, is rubber that’s in good quality. Rubber that is hard, dry, cracking, and which feels like plastic, is rubber that needs to be replaced.
Carriage
Does the carriage of your prospective typewriter advance smoothly as you type? Yes? Fine. Does the bell ring? Yes? Great! Do the margin-stops work? Yes? Wonderful.
IF the carriage does NOT advance when you type, that means that either the mainspring is kaput (possible), or that the draw-band has had it, and is toast (much more likely). Replacing a drawband is finicky, but possible. Most drawbands are nothing but a shoelace tied around the carriage-drum, and a hook or ring, at the right side of the carriage. This is a repair you could do at home with the right string, a pair of tweezers, and a bit of patience.
Suggested carriage-string materials include fishing-wire, and shoelaces. Keep the original carriage-string just in case you need it as a measurement-guide.
On most portable typewriters, there is a CARRIAGE-LOCK feature. The carriage-lock jams the carriage in-place, so that it does NOT move when the typewriter has been placed in it’s carry-case for transport. When testing a prospective portable typewriter, if the carriage doesn’t move when you type, the carriage-lock may be engaged. Ask the seller to unlock the carriage for you, if you don’t know how. If anything breaks…it’s their fault, not yours!
Keys
This probably goes without saying, but keys are important. But there’s a lot more to checking typewriter keys than finding out if they’re made of glass.
For your potential typewriter to be a practical typing machine when you get it home, you need to make sure that ALL the keys work. Typing “The Quick Brown Fox Jumps over the Lazy Dog” will be useless if the shift-key is broken, if the backspace doesn’t work, if the tab-keys are jammed or if the spacebar is broken.
You want to check every single key. You want to check all the switches,, knobs, levers, bells and whistles. Even the keys you don’t think you’ll ever use…check them. Do they press down? Do they pop up again? Do the hammers work? Do the levers work? If you press the backspace, does the carriage move to the right? If you press the shift-lock, does the shift-key actually LOCK? And if you hit the shift-key afterwards, does the key then UNLOCK like it should?
Do the margin-stops work? Does the margin-clear button work? Does the paper-release lever work? Does the carriage-release lever work? Does the carriage-return lever work? Do the tab-stop, clear and set keys all work?
Depending on your typewriter, there can be all that, and more, to check. Does the ribbon-reverser work? Does the ribbon-selector work?
Some things, you can probably do without. For example, it doesn’t matter if the shift-lock doesn’t work, so long as the actual shift-keys work. The typewriter will still function perfectly fine. Just that typing in capitals for long periods of time might be a bit harder.
Do NOT be worried if keys stick or if hammers jam up. That’s just a sign that the typewriter requires cleaning. You can do that easily at home. Here’s my guide to cleaning jammed-up typebars. You can do it with stuff you can buy at your local supermarket.
Buying a Typewriter “in the Wild”
In collecting circles of most objects (pens, watches, books, guns and typewriters, for example), to buy something “in the wild”, is a term used for making a collectible purchase at an establishment such as an antiques shop, junk-shop, thrift-shop, garage-sale, or flea-market. They’re called “Wild” finds because they are purchased outside of the established channels of collectibles dealing, such as fairs, shows, club-meetings, or from online dealers.
When buying a typewriter ‘in the wild’, there are a few things you should know.
You’ve done your research. You see a typewriter in the local flea-market that you REALLY WANT. It’s your dream machine. It’s the Mary Poppins typewriter. Practically Perfect in Every Way. The price looks fairly reasonable, and you wanted it YESTERDAY! How can you buy it so that things work out in your favour?
– Be DISCREET. Don’t ever show your cards. Keep a poker-face. If you mouth off and act like you know everything and then some, the seller’s gonna clam up, and the price is probably gonna go up like a rocket. Play dumb and pretend you know as much about typewriters as a toad.
– Examine the machine THOROUGHLY. Point out any issues to the seller, and ask if he might be willing to lower the price slightly on their account.
– Not many people use typewriters anymore. So the buying-pool may be rather small. If you don’t buy it, chances are that it may be, nobody ever will. This may make the seller anxious to get rid of it. This may be another bargaining-chip in your pocket.
– Typewriters are HEAVY. And BIG. A small portable is 5-10kg. A desktop model is 20-30kg! Imagine this:
You’re a flea-market stallholder. You lugged your damn Remington 16…
…all the way from home, to the market, in your car. It’s taking up space at home. Nobody uses it. It’s getting dusty and rusty and you just want to get it the hell out of your life. It’s dislocating your shoulders every time you have to move it, and you’re just sick of it! Then along comes sumgai* who wants to buy it. You have $150.00 on it. He offers you $100.00. You’re desperate to get rid of it. So you accept it.
That’s what you, as the buyer, should be hoping for. Typewriters, especially the big, chunky desktop models like that Remington 16, are heavy enough to break your leg if you drop it on there. Most likely, a seller who bothered to lug the thing to the market, doesn’t want to lug it back home again! Use this as leverage, and ask for a smaller price. If he really wants to get rid of it, he’ll take it, or at least haggle a bit, just to get it out of his life.
– Perhaps you walked to the market? Or caught a bus? Or a train? Or a tram? If you find a typewriter that you really like, but you can’t get it home, and the price is reasonable and it’s in good condition…have a few words with the buyer. Offer to pay full price if he might be inclined to deliver it to your house. It’s a little more work for him, but he gets his money, and he gets rid of it in the end. You get your machine, and you get delivery thrown in, to boot!
*”Sumgai” is another collecting-term, much like buying stuff “in the wild”. It’s a corruption of the words “some guy”. As in, you show up at the flea-market, ask a stallholder about a particular item that he may or may not have, and the seller replies: “Oh sorry. Some guy just bought it and walked off with it”.
A ‘sumgai’ is someone who got there first and pinched all the good stuff, leaving you with all the shit that nobody wants. To be a sumgai yourself (ie, to get first pick at all the goodies at the market), you should arrive early and have a keen eye. That way, you won’t have to hear the famous speech from the seller about that “sumgai” who bought the pretty 1929 Remington Model 3 Portable for $25 just ten minutes ago and walked off down the street with it.
Remington Model 3 Portable…
Knowing Your Machine
When it comes to buying your typewriter, it’s important that you know what all the parts are, what they do, and how they work. This will help you pick a good machine from a bad one, and it’ll make you a more savvy buyer, which is always good and important.
When you roll the paper into the typewriter, you rest it on the paper-table. This is the back panel of the typewriter. It usually has the make of the machine painted on there as decoration, such as “UNDERWOOD”, “ROYAL”, “REMINGTON” or “L.C. SMITH & Bros”.
Rolling the paper into the typewriter is done by turning on the two platen-knobs, attached to the platen, the central, rubber-covered drum in the middle of the carriage. The carriage is the part of the typewriter that moves to the left as you type. As you turn the platen-knobs and pull the paper into the machine, two, three, or four feed-rollers grip the paper and pull the paper around the platen.
When the paper comes up the front, you raise the bale-rail at the front of the carriage and slip the paper underneath it. The rail has two (or more) paper-bales on it. These are sometimes made of metal, but some are coated in rubber. The paper-bales are there to hold the paper in place when you type, so that the paper doesn’t flap around everywhere. They can be adjusted to whatever position you like on the rail. If you have two bales, then you want them 1/3 in from the left, and 1/3 in from the right, so that they divide the bale-rail into thirds, and hold the paper evenly.
Along with the paper-bales and the rail which holds them are the paper-fingers. They slide along the front rule of your typewriter, in line with the ribbon-vibrator. They serve much the same purpose as the paper-bales, to hold the paper in-place on the platen.
A typical mechanical typewriter has three or four rows or banks of keys. The keys are attached via levers and linkages to the typebars. On the head of each typebar is the type-slug. Pressing a key pulls the linkages which pulls the typebar up, forcing the slug forwards and down, to strike the ribbon.
The ribbon is held in the ribbon-guides and the central ribbon-vibrator. The vibrator is the central ribbon-guide that jumps up and down as you type.
When you reach the end of the line, the warning-bell goes off, to tell you that you have (usually) six keystrokes left, before the key-lock mechanism kicks in. This deliberately locks the keys so that you can’t keep typing. To unlock them, you push the carriage back to the right, using the carriage-return lever. Pressing this lever hard enough also pushes the platen back, bringing up a fresh line, so it is also called the line-advance lever.
Next to the carriage-lever is the line-spacing lever. The line-space lever adjusted the operation of the line-advance lever. By adjusting this lever, you could affect the line-advance lever to advance the page 1, 2, or on larger machines, even 3 lines, to produce double and triple-spaced documents if you needed to.
As you type, the carriage moves along the carriage-race. This is the toothed rail which the carriage rides on. Each tooth is one keystroke. Typing releases the power stored in the mainspring, which is inside the mainspring-drum. As the spring unwinds, it rotates the drum, which has a drawcord or drawstring attached to it. As the drum turns, it winds up the drawstring, pulling the carriage along with it.
When you push the carriage back, the drawcord is pulled out again, and the mainspring is wound up at the same time, ready for the next line.
As you type, the inked typewriter ribbon, stored in two ribbon-spools, moves along, to provide fresh ink. Ribbon-spools are held in a pair of spool-cups. Typewriters made before the 1930s did not generally have spool-cup covers. So if your antique typewriter doesn’t have these covers, don’t despair.
This is a 1926 Royal Portable Typewriter, Model 1:
And this is a 1930 Royal Portable Typewriter, Model 2:
As you can see, the 20s, 1st-model typewriter doesn’t come with spool-covers. The second, 30s model typewriter, does. This was common with many typewriter manufacturers of the period. Companies like Underwood and Corona did the same thing.
Back to the parts of your typewriter…
Most, but not all, typewriters came with something called a “Ribbon-Reverser“. The ribbon-reverser determined which spool-cup would rotate as the machine typed, and therefore, which spool would wind up with used ribbon while the machine was in-use. Switching the reverser-switch back and forth changed the receiving spool from left to right, and vice-versa, as the user of the typewriter required. A handy feature.
Along with the ribbon-reverse switch is the bichrome ribbon-selector. The bichrome ribbon-selector typically had three settings: Black, for black-ribbon. Red, for red-ribbon. And Stencil.
Stencil-mode disengaged the ribbon-vibrator altogether. This allowed you to type out clear stencil-masters on your typewriter. The completed stencil-documents were inserted into duplicating machines…
…and as many duplicate copies of the original could be printed as you needed or desired. They were the Victorian equivalent of the photo-copier.
To set left and right margins on your machine, you have the margin-stops, which are usually (but not always) situated behind the typewriter, on the margin-rail. You shift and move the margin-stops along the rail to where-ever you want your margins to be. Setting the left margin determines where the carriage stops when you push it back. Setting the right margin determines when the bell rings at the end of each line. Once that bell rings, you have six keystrokes left before you need to return the carriage all over again.
Located on the carriage are two more levers or switches. These are the paper-release lever, and the carriage-release lever (there seem to be an awfully large number of levers on these old typewriters, huh?).
Lifting the paper-release lever eases up the pressure on the platen and feed-rollers.
Remember those films about frustrated writers who stop typing, grab their paper and rip it out of the machine, scrunch it up and toss it over their shoulders?
To do that, you need to flip the paper-lever. It allows you to just pull the paper right out of the typewriter, without damaging the mechanism.
The carriage-release lever, or switch, disengages the ratchet-mechanism between the carriage and the toothed carriage-rail. You can now slide the carriage left or right along the carriage-rail to set up your typing start-point wherever you want on the page. Pressing this button will cause the mainspring to unwind super-fast. It will grab the drawcord and yank the carriage all the way to the left. If you’re not prepared for this, expect an almighty bang when the carriage hits the end of the line! That may damage the mainspring or the drawcord (if they’re old and original to the machine), so don’t do it too often, or you may wear them out prematurely. Or if you need to use this switch, hold tight to the carriage, first!
Care and Placement of your Typewriter
You have read about where to buy a typewriter, what to look out for, and how much you should pay. You have purchased the machine of your dreams! Perhaps it’s a 1930s Imperial…
…or an Underwood from the 20s…
Perhaps it’s a sleek, postwar model like the Royal Royalite “El Dorado”…
or a more common Olivetti Lettera 32?
Perhaps you bought yourself a desktop or “Standard” typewriter? A Royal 10…
Or an Underwood No. 5?
Perhaps it’s none of these, and many more, historic and stylish machines? But whatever you bought, it’s important that you know how to look after it now that you have it. Here are some things to consider:
Keep Your Typewriter out of Direct Sunlight
A good typewriter is like a vampire. It’ll last forever, but it’s allergic to strong sunlight. And, for that matter, heat. Keep your machine away from windows that receive full sunlight, or anywhere where it might be exposed to heavy rays or high levels of heat for a long period of time. Remember all that rubber on the platen and the rollers? That stuff can dry up and crack if you expose it to heat and light like that. So try and avoid it.
Keep Your Typewriter Free of Dust
Back when they were the only method of rapid word-processing, a typewriter was an essential piece of equipment in the office, and in the home. For reports, essays, homework, letters and stories and plays and novels. Because typewriters were so important, they were built to last. Any company that produced machines that broke down or were outdated as soon as they were introduced (much like the stuff today), would never have lasted in this highly competitive market.
To make their machines last, typewriters were made almost entirely of steel. There’s very few things that can break on a typewriter. And most of the issues with typewriters (sticky keys, wriggly carriages and so-forth) are usually caused by neglect rather than damage.
Keep your typewriter FREE OF DUST. Dust and debris gets into the mechanism and jams up the machine. And you’ll have a hell of a time trying to get it out of there.
To keep your machine running smoothly, when you’re not using it, cover it. If it’s just a temporary pause in usage (like overnight), you can just cover it with a sheet of paper, to stop dust getting into the typing-mechanism. But if it’s for longer periods of time (up to a week or more), then cover your typewriter with its dust-cover, or its protective case.
Typing on your Machine
A typewriter is not a computer. EVERYTHING is mechanical. To type, you need to exert more force on the keys than you would with a modern keyboard. But don’t smash the keys with your fingers. If you’re not used to typing on a typewriter, even half a page of continuous typing can seem exhausting, but as you do it more often, your fingers will get used to it. Use more force than you usually would, but don’t bear down on it.
Use More Paper
Traditionally, you typed with two sheets of paper inside your machine. One, the actual page of text, the other to act as padding. This provides cushioning against the typebars and the platen, ensuring that they will last longer.
Place Your Typewriter Somewhere STURDY
Typewriters are BIG, FAT, CHUNKY MACHINES.
Or at least, some of them can be. When you get your machine home, make sure that you place it somewhere that’s suitable for it. I probably don’t need to tell you now that typewriters are heavy. A desktop Underwood, Royal or Remington weighs in excess of 30-50 pounds.
Make sure that you put your typewriter on a table, or a desk, that is strong enough to take it. Nothing flimsy that’s going to shake around, or that’s going to warp and bend under the weight of the machine. Something that’s sturdy and which won’t shift and wobble.
Typewriters are totally mechanical. The typing, the shifting of the carriage, the clunking of the levers. Everything produces motion and vibration. You need a desk that can cope with the vibrations and jolting produced by the typewriter in regular operation. If you don’t believe how much vibration a typewriter produces, just watch this:
The typewriter in that video is an Underwood Model 3. But those kinds of vibrations (like what shorted out the desk-lamp) can be produced by almost any typewriter, especially the older, heavier ones. Having a desk that can absorb the shocks produced by the typewriter is important. It makes for a smoother typing experience.
If you want to keep your desktop clean, or if you want to try and muffle the sounds of the typewriter somewhat, you can buy a typewriter-pad online. Typewriter-pads were used in the old days, to cushion typewriters and to muffle the sound of the keys. You simply slip the pad (made of thick felt) underneath the typewriter, to deaden the sound. A cheaper alternative is to use a small towel, folded over and slid under the machine.
Don’t Move your Typewriter Unnecessarily
Unless it’s a portable, and therefore, designed to be moved around, don’t shift your typewriter all over the place unnecessarily. This will prevent potential damage. If you must move your typewriter around, make sure that you have its next destination cleared for landing before you dump the typewriter on top of it.
When moving your portable typewriter around, use the carrying-case. It’s not only easier, it protects the machine from jolts and bumping.
Typewriter Desks
Back when typewriters were more common, large office-buildings would invest in specially-designed “typewriter desks”. These desks had special, drop-down platforms which a typist’s machine could sit in. It was at a comfortable height for typing, and the desks featured a pull-over tabletop which would cover the typewriter from dust at the end of the workday, and which would double as a writing-surface on top of the typewriter, when the cover was pulled over.
These desks are ideal for typewriters, because they are specially designed to deal with the weight and vibrations of these machines. They are obviously no-longer made brand-new, and if you want one for your machine, you’ll have to go out and buy one second-hand.
A typical vintage typewriter-desk, with an Underwood No. 5 desktop typewriter. The desktop cover (behind the typewriter) is pulled up, and forwards, covering the typewriter when it’s not in use, and can double as a writing-surface. The desktop is lifted up, and pushed back and down when the typewriter needs to be used.
Desk opened…and closed…
This is what the same style of desk looks like, when the desktop cover has been pulled up and back over the typewriter.
Cleaning Your Typewriter
The majority of typewriter issues (faded text, stuck and jammed keys, sluggish movement, etc) are caused not by age, but by neglect. To keep your typewriter in working condition, you should keep it clean. This can be as simple as keeping it covered when you’re not using it…even if it’s just with a sheet of paper overnight. But sometimes, cleaning your typewriter is necessary.
Cleaning your typewriter can vary from level to level, from a light scrubbing and polishing, to partial or even complete disassembly, to clean out the gunk inside your machine. To do all this, you’ll most likely need some, or all, of the following bits and pieces:
– Cotton Buds/Q-Tips – To clean out the dust and gunk inside the typewriter carriage.
– Methylated Spirits/Denatured Alcohol – To clean the typing mechanism (see my guide on cleaning typebars on how to do this in-depth). Do NOT use anything else other than this, for this purpose. Meths washes out the dust, and then just evaporates, leaving everything clean and dry.
– A watchmaker’s squeeze-bulb puffer – To blow out loose dust and lint. Handy things, when blowing with your mouth simply won’t do.
– Needle-nose Tweezers – For any restoration, cleaning and repairs of machines, these are ESSENTIAL. I said the same thing in my guide on how to restore sewing-machines, and i say the same thing here. Without these, you may as well give up. You need them to fish out gunk, to scrape away crud, to hold tiny screws while you screw them in, to guide thread, or loose cables and straps, and to hold parts in-place while you fix them back on. They are ESSENTIAL.
– Pliers – These are handy (in conjunction with screwdrivers) for unscrewing stuck and stubborn screws.
– A set of small, jeweller’s screwdrivers – Handy for the tiny screws that you find in old typewriters. You can buy these things cheaply at those convenience stores that sell almost everything in the world, from blue Ethernet cables to toilet-plungers. They cost like $5.00 a set and they’ll last forever.
– Sewing-Machine oil – Yeah I know it’s a typewriter…but sewing-machine oil is a really high-quality, thin, runny, extremely slippery machine-oil. It’s ideal for lubricating all those squeaks and squeals inside your typewriter. But do not use more than the smallest amount possible. ONE drop on any affected area is more than enough. This stuff can be bought at any big supermarket. Or if not, then your local sewing-machine shop or arts-and-crafts shop will most likely have it.
– Tissues/Toilet-paper – Always gotta have these.
– Paper-towels – For when you clean any sticking keys (again, for the reason why, read the guide dedicated to this).
– Small, soft, clean paintbrush (for cleaning keys).
– Small bowls (for holding screws, knobs, plates etc as you pull apart the typewriter).
– Windex – Or a similar product. Typewriters, especially the really old ones, were smoked around…a LOT. A typewriter that’s 50, 70, 90, 100 years old, will have been smoked around for at least 20-30 years, if not its entire life. The nicotine and the tobacco gets ALL over the typewriter and it sticks and clings to the metal surface of the machine. Remember how those antique typewriters have really shiny, high-gloss metal finishes on their bodies? All that gets covered up by the smoke. To remove it, you need Windex, some tissues, and a lot of elbow-grease, to scrub off the smoke and nicotine stains. This can take a LONG time; it took me two days to clean all the crap off my typewriter, and it’s just a little portable number!
Paper, Ink and Ribbons
Almost every typewriter on earth will use standard A4 copy-paper without any issues, easily purchased at any stationer’s shop, or even your local supermarket. Most big stationery/office-supply franchise stores will still sell carbon-paper if you feel the need to have it, or use it.
Typewriter ribbons may be purchased easily on eBay, or from online dealers who repair and/or sell typewriters. As per my instructions regarding ribbons, further up, it’s best NOT to throw out your old ribbon and spools until you’ve purchased a brand-new ribbon for the typewriter, and made sure that everything fits properly.
For Melbournians reading this, standard-size, 1/2-inch typewriter ribbons may be purchased brand-new from INDUSTRIAL STATIONERS: 53-57 Queen St., in the Melbourne C.B.D. The ribbons will fit almost every major-brand typewriter. Even my 80-year-old antique Underwood!
Part of the fun of owning antiques and second-hand nick-nacks is the challenge of pulling them apart, seeing how they work, cleaning them up, and putting them back together. Today, I had such an event with my Underwood…
I bought this typewriter a few months back to fulfill a lifelong obsession with these machines. And since buying it, I’d been exploring the intricacies of old mechanical typewriters. By poking around with my machine, cleaning it and diagnosing problems, I found out how various functions worked, why sometimes they didn’t work, and how they were fixed.
Amazingly, after all that…the typewriter still works.
Despite its seeming complexity, a mechanical typewriter is really quite a simple machine.
You slot paper in the back. You turn the platen-knobs. The knobs turn the platen, which pulls the paper in, and grips it against the feed-rollers inside the carriage. This creates the friction which pulls the paper into the typewriter. As you type, the ratchet system on the typewriter causes the mainspring to release energy, which unwinds the spring, which pulls on the draw-band, which pulls the carriage, which advances the carriage along the race, which actuates a lever to flip a hammer to strike the bell and signal end-of-line.
Smacking the return-lever kicks the platen back a notch (or two, or three, depending on line-setting), and shoving the carriage back winds up the mainspring, and resets the machine all over again. A stopper bar at the back of the carriage blocks the left-and-right movement of the carriage by arresting the two margin-stops at user-set margins. Pressing the margin-release drops the bar and allows the carriage to move freely. Pushing the bar up resets the margins to their previous settings.
All done mechanically with no electronics at all.
The majority of a typewriter is made of metal. Steel. But some parts of a typewriter are made of wood, paper, glass, and rubber. And these may occasionally need attention.
When buying a second-hand typewriter, one of the most common things that may need attention are the feed-rollers.
The feed-rollers are two (or more, depending on the size of the typewriter) invisible rubber rollers or cylinders hiding inside the typewriter-carriage. When you turn the platen-knobs, the platen rubs against the feed-rollers, trapping any paper fed into the machine, and pulling it through the typewriter, ready for use.
Feed-rollers and platens are coated with rubber to provide grip and cushioning. If a platen or rollers are hard or cracked, they need to be recovered, or treated, to improve grip. To do this, it’s necessary to remove the platen.
That’s what I was doing today.
An Exploration
In a recent typing-episode, one of the feed-rollers became dislodged for reasons I couldn’t figure out. I managed to re-lodge it, but I decided that I wanted to have a closer look at the insides of the machine. To do that, I would have to remove the platen to gain access to the rollers.
Because typewriters were so common back in the old days, and there was an active repair-industry going on, access to parts of a typewriter that needed periodic attention was usually easy to get. Such as the feed-rollers.
To get to the rollers, I had to remove the platen, the big, black, long, rubber-sheathed…yeah, get your minds out of the gutter…cylinder that makes up most of the carriage.
The platen is held onto the carriage by a surprisingly simple method. Two screws, one knob and a long hard shaft. Somewhere in there is a joke.
Most typewriter-carriages are assembled the same way, and these directions (or a variation of them) are going to be the likely method of platen-removal, if you ever have to do it to your own machine. Here’s a small tutorial about how to do it.
You will need…
– Small-head screwdrivers (flat-head, most probably).
– Q-tips/cotton bud-sticks.
– Methylated Spirits/Denatured Alcohol.
– Air-puffer, vacuum-cleaner, or a pair of good lungs.
– Needle-nose tweezers.
– Optional: A pair of pliers.
1. Remove platen-knob.
On my typewriter, the Underwood Standard Portable, you first have to take off the left platen-knob. To do this, twist the platen around until you see a small screw in the gap between the platen-knob, and the endplate of the left side of the carriage. Put your screwdriver on the screw and unscrew it.
You don’t have to take the screw off completely, just loosen it. The left platen knob will now just slide right off.
(On some typewriters, the knob is simply screwed in place. If so, just unscrew it. But check for exterior screws on BOTH knobs, first).
2. Unscrew right-side platen-screw.
Hidden on the platen-shaft is a small screw on the right side, between the platen-rubber, and the right carriage end-plate. Loosen this screw. Again, full removal of the screw is not necessary.
(This applies to my Underwood portable, your typewriter may be slightly different).
3. Grab right-hand platen-knob. Pull!
Removing the left platen-knob, and loosening the platen-screw (step 2), has released the pressure on the platen-rod INSIDE the platen-shaft, which is attached to the right platen-knob.
Pull the right-hand platen-knob. A long, steel shaft will come sliding out. Don’t bend it, or it’ll never go back in again!
4. Remove the Platen!
And that is IT. Two screws, one knob, and a steel shaft, are the only things holding the platen onto the carriage! With those removed, you can now wriggle the platen out! Start with the side of the platen which has the ratchet-teeth on it, first (usually, this is the LEFT side of the platen). You may have to wriggle it a bit, and ease it out CAREFULLY. You don’t want to bend or break anything. Press the paper-release lever on your carriage (usually found on the right side of the carriage) to give yourself a few extra milimeters of wriggle-space, and to get the paper-bale rail out of the way.
To make things just a little bit easier, adjust the line-space lever so that it’s at its maximum (double, or triple-spaced). This will get the line-space lever ratchet-system out of the way, and make it easier to get the platen out (and in, later).
And after swearing, grumbling and wriggling, you’ll end up with something like this:
Here, we have the typewriter, with the platen, knobs and rod removed! The ratcheted, left side of the platen is bottom-most in this photograph.
With the platen removed, you now have full access to the well where the platen was resting. You can flush out dust, wipe away cobwebs and clean it out really good inside! While you’re in there, check on the feed-rollers. They look like this:
Feed-rollers are not attached to the typewriter in any way whatsoever. Their name directly reflects their purpose. They feed paper, and they roll freely. Feed-rollers.
You should pick the rollers out of their well, and check them for ‘flats’, where the rubber has hardened and flattened out, due to years of pressing against the platen, and for excessive wear-down due to constant rubbing. If the rollers are hard (like you see in my photo), you can rejuvenate them by rubbing them with fine-grit sandpaper, or by rubbing them carefully with rubber-reconditioner, which will soften them up, and improve their grip. While you have the platen lying around, you might wanna do the same to it, as well, if it’s necessary.
With the well open, you should clean out all the dust and gunk that’s built up in the previously inaccessible parts of the typewriter. Like…um…this:
…and this…
Once you’ve cleaned as much as you can, drop the feed-rollers back into their slots, and then wriggle the platen back down into the carriage. Thread the platen-rod through the holes provided (you may need to do extra wriggling to achieve this), smack the left-hand platen-knob back on the end, and tighten up the screws.
Special Note:
Screws on typewriters and other old machines can be rather stiff. You can use a pair of pliers to add leverage to your screwdriver to unscrew them with greater ease. But be sure to use the pliers to add more leverage to the screwdriver when you screw the screws BACK, as well, so as to provide enough friction for the screws to grip the rod, and rotate the platen. If you don’t, then the screws won’t grip the platen-rod, and you’ll have free-spinning knobs without the platen moving at all.
Some time back, I wrote a piece about the “Golden Age of Travel“; the period from the third quarter of the 1800s, to the late 1930s, when for the first time in history, it was possible for ordinary people of moderate means, to travel cross-country, and around the world. Social changes and technological improvements in transport and communications meant that for the first time in history, it was really practical for the middle-class couple, single, or family, to go on a holiday!
This posting will look at the various bits and pieces of luggage which people brought with them on their whirlwind tours of the Continent, the American interior, the Dominion of Canada, the Far East, the Mediterranean, or the South Pacific. The kinds of bags and cases which would’ve been checked onto trains, steamships, taxi-cabs, and in and out of hotel-lobbies in cities ranging from Melbourne, London, San Francisco, New York, Chicago, Toronto, Shanghai, Singapore, Paris, Madrid, Berlin, Rome, Nanking, Saigon and Hong Kong. The sort of luggage which is plastered with those old steamship-tickets, hotel-room numbers, claim-tags and name-tags. The kind of luggage that went around the world and back again in a haze of smoke, steam and gasoline.
The Appeal of Vintage Luggage
There are people out there who collect vintage luggage. Some people use it when they travel, some people use them as coffee-tables, storage-spaces, decorative items or as photography-props. But what is their appeal?
Vintage luggage was made with care and attention. Back before the days of excessively widespread travel, and before the days of airplanes and jetliners, luggage was made to be pretty and attractive. Because back then, it was unlikely that somebody would throw around a 500-pound steamer-trunk.
The luggage of the Golden Age of Travel reflected very much, the types of transport available at the time, together with the fashions of the period. It’s this, being-of-its-time, its style and the “stories it could tell”, that makes vintage luggage so appealing to collectors and nicknack-snatchers. Here is a typical vintage luggage setup which you might find on someone’s bed, or strapped to the back of an old car:
These are actually my own vintage luggage-pieces. From left to right, we have an old hatbox, a gladstone bag, a typewriter-case, and a suitcase (underneath). I’ll break them down, piece by piece and look into their history and their significance, but I’ll also be discussing other pieces of luggage which aren’t shown here.
Hat-Box
Back in the 20s and 30s, it was almost taken for granted that a man owned at least one hat. Either a Panama, a trilby, a fedora, a homburg, or a bowler. On instances where a man traveled and took more than one hat with him, the hat not worn on his noggin would be stored in the hat-box.
The boxes were made rigid and circular, so that any hats (typically felt hats) could be stored inside without fear of being crushed, misshapen or otherwise damaged during travel. If you’re looking for one, hat-boxes are very distinctly shaped, with a circular profile to hold their contents. Some hat-boxes even came with their own hat-brushes for keeping the hats stored within clean during travel.
Typewriter-Case
With the rise of travel during the early 20th century came a corresponding rise in communications. Companies such as Underwood, Corona, Royal and Remington, were among the first manufacturers of typewriters to produce portable, carry-anywhere machines. Granted, they could still weigh as much as 10lbs (about 5-6kg), but they were considered a damn sight more portable than the enormous desktop typewriters of the period (weighing up to 30-50lbs).
Portable typewriters took a while in coming. While the basic form of the typewriter was pretty-much agreed-on by all the major manufacturers by ca. 1900, the portable didn’t really show up until the early 20th century.
There were a few false starts in the 1890s, but it wasn’t until after World War One that portables became truly practical. The issue was trying to shrink down all the major elements of a larger desktop typewriter into a small enough, but also practical enough, size and form so that it could be used reliably.
Starting in 1919, companies such as Underwood, Remington, Corona and Royal produced the first practical portable typewriters. They advertised that their new machines could be used ANYWHERE on earth! One Remington advertisement from the late 1920s said that their machines could even be carried up to the top of Mount Everest, where they would still function perfectly!
The public were quick to grab onto these new portables, and soon, there was fierce competition among typewriter-companies to produce better, stronger, smaller, more stylish, more feature-filled machines. Just as larger typewriters were variously called “Office”, “Standard” or “Desktop” machines, smaller typewriters were called “Juniors”, “Travel” typewriters, “portable” and even “Household” typewriters, to differentiate them from their larger cousins.
The case which you see there belongs to my 1920s Underwood Standard Portable. Here’s the case, opened, with the typewriter inside:
Gladstone Bag
The humble “Gladstone” has been a fixture of luggage for over a century. It was invented by English leather-worker and bag-manufacturer J.G. Beard in the late 1800s. Beard was a strong supporter of the British Prime Minister; at the time, one William Ewart GLADSTONE (1809-1898). Gladstone was a prolific politician. He was elected to the office of P.M. not once, nor twice, but FOUR TIMES during his long life.
Mr. Gladstone was obviously a popular man, but he didn’t hang around much. He was famous for charging off all over Europe at a moment’s notice, and was one of the most-traveled politicians of his age. Putting two-and-two together, Mr. Beard named his new creation after the long-serving P.M., and his love of travel.
The Gladstone Bag, in its various permutations – Strapped, strapless, square-profiled or curved, was a constant companion to the tourist of the Golden Age of Travel. Everyone from Dorian Gray, to Sherlock Holmes, and countless actual, real-life people, carried one of these bags around with them where-ever they went!
Gladstone bags were used for everything! They were tool-bags for tradesmen, briefcases for lawyers, overnight-bags and weekend-cases for travelling salesmen, and sample-cases for company-representatives.
Undoubtedly, however, the Gladstone is most famously remembered in the 21st Century, as the kind of bag which old-time family physicians carried around with them. Back in the days when doctors still made house-calls, you could count on him to show up at your front door in a three-piece suit, homburg hat and his trusty Gladstone bag.
It’s become so common for these bags to be associated with physicians that sometimes, an eBay or Google search under “Gladstone bag” will yield nothing, whereas a search for “Doctor’s bag” will bring up everything, and then some.
Why was it that Gladstones were so popular with doctors? What was it that made them stick so firmly to this particular profession? And why, decades after most family practitioners stopped making house-calls, are they still called doctor’s bags?
The Gladstone bag is unique among bags and cases in the sense that it is both hard, and soft-sided.
A Gladstone bag is held shut by a combination of catches, hooks, straps and buckles (not all Gladstones have straps and buckles, but some do). When these fastenings are released and the bag is pulled open, the steel frame around the mouth snaps rigid, (or it should, if your bag’s in working order!).
With the mouth reinforced and held in-place with the steel frame, it would be easy for a doctor to shove his hand into the bag and grab whatever necessary and essential piece of equipment he would need in the event of an emergency. Much more easily than if he had to fumble with the soft, sagging, floppy sides of a knapsack, a backpack, a messenger-bag or other type of hold-all.
Also, because the bag closes smoothly in the center, over the top of the storage compartment, and not down one side like with a conventional briefcase, there’s no danger of the contents, which might include glass bottles and needles, spilling everywhere and smashing to pieces when the bag was carried for transport.
Don’t forget that in the early 1900s, it was still common for many operations to be carried out in the home, by your doctor. He could show up after a telegram, a telephone-call or a private message, to perform anything from stitches to dressing, to removing your appendix. And he’d do it right there on your dining-room table. Having a bag which he could easily access in an emergency was essential for his job to run smoothly.
Vintage Suitcase
This suitcase is not an antique. But it is representative of the style of suitcase carried by almost every traveler and tourist during the early 20th century, when steamships and railways were in their prime.
Back when men still wore suits on a regular basis, and suits were stored in suit-cases, travel-bags of this style were common around the world. Not all of them featured expandable tops and reinforcing straps such as this one, but in almost every railway-station, bus-depot and on every dockside in the world, suitcases like these could be found in abundance. Made of leather, lined in cotton and reinforced with rivets and studs as seen here, suitcases like these are highly popular today among vintage luggage collectors. They have an enduring charm and style that transcends time.
Several months back, a cousin of mine was over for a visit. He was hunting for antiques as gifts for his girlfriend. When he saw the suitcase, he was instantly attracted to it. But I couldn’t bring myself to part with it. I’ve owned it for longer than I care to admit, and don’t use it nearly as often as I might, but it is certainly a conversation-starter.
Suitcases of this style were sometimes part of an entire suite or set of luggage. Such a suite might include a set of matching suitcases, and a variety of smaller suitcases, all of the same style, which went together as one big set. Such as shown here by this beautiful set of Louis Vuitton cases:
Larger cases stored clothes such as jackets, coats and suits. Smaller cases stored shirts, shoes, collars, cuffs, scarves, gloves and undergarments. Still smaller cases might be used to store important items such as jewellery. The smallest cases were used to store toiletries and grooming-supplies, such as shoe-polish kits, brushes, combs, razors, and tooth-brushing supplies.
Steamer Trunk
Oh, for the days before luggage-weight restrictions, when you could carry a whole piano onto a ship, and the only thing the load-master would say was: “That better not rock around when the ship’s underway”.
Enormous carriage trunks and steamer-trunks, similar to the one shown above, were common sights on railway platforms and steamship docks around the world during the Interwar Period of the 20s and 30s. When going from one place to another meant a long sea-voyage, you had to pack into a steamer-trunk absolutely everything that you needed when you traveled.
Did I say long?
Southampton to New York = 7 Days by steamer.
Naples to Shanghai = 8 Weeks by steamer.
Melbourne to San Francisco = 2 Weeks by steamer.
San Francisco to Chicago = 7 Days by train.
Southampton to Sydney = 9 weeks by steamer.
A round-the-world cruise (not an uncommon event back then), could take the better part of a year. On a long voyage, a steamer-trunk was an absolute must-have!
Don’t forget that you weren’t going from A-to-B directly, in most cases. On a trip from Italy to China, you might leave Naples. But then you’d dock in Cairo, drop off passengers and mail, pick up more passenger and mail, take on coal and provisions. Then you’d sail through to the Indian Ocean, drop anchor at Bombay, drop off and pick up passengers, mail, coal and provisions, then sail to Singapore. The process was repeated. Then to Hong Kong, where it was repeated again. Until you finally reached Shanghai, in China.
It would be a very long time at sea.
Portmanteau
A portmanteau is a really rare bit of travel-kit these days. You don’t see them very often. Back in the days of steamship travel in the early 1900s, a portmanteau was used for storing shoes, coats, suits and other items which were too bulky or oddly-shaped or delicate to be just thrown into a suitcase or stuffed into a steamer-trunk. They were basically portable wardrobes, into which you could hang your clothes without fear of them being creased, crushed or otherwise damaged. In the closing scenes of the movie: “Harry Potter and Prisoner of Azkaban“, Professor Remus Lupin is seen packing his luggage at the end of the school year. One of his travelling-trunks is a portmanteau. Portmanteaus are mentioned at least once in Bram Stoker’s novel: “Dracula”, in which there is a lot of travelling, as Dr. Van Helsing and his friends attempt to destroy the evil vampire lord, Count Dracula.
Luggage like this is either impractical or quaint today. Sometimes both! Certainly, you couldn’t get a steamer-trunk or a portmanteau onto an airplane these days! At least, not as carry-on baggage! Some people who dash around from place to place, such as pilots, still use gladstone bags as handy and compact overnight bags to store basic supplies in, when they might only be staying a night or two, in any one location.
Largely, though, luggage like this is relegated to storage, display or to film and TV sets, museum exhibits and photography-props. But there was a time, not too long ago, when they steamed off around the world on ocean-liners and steam-trains, faithfully accompanying their masters on their travels around the world.
It’s alright. Don’t panic…It’s just a sewing-machine.
A while back, I wrote this article about a Singer 128 handcrank sewing-machine that I bought in London for a song.
Well, the machine arrived home today, and I spent the last few hours cleaning it, oiling it and lubricating it. It sews, it runs, it works!
And I even found a replacement slide-plate for it. This is before:
And this is After:
Ain’t it purdy?
The eagle-eyed among you will notice that the two slide-plates do not match…
I could purchase an ORIGINAL Singer 28-series slide-plate. I could even buy a brand-new reproduction one. But I found that one in a box of sewing-machine nicknacks which I purchased for the heady price of $10 at the flea-market. One piece out of probably a hundred attachments, nuts, bolts, springs, feet and god knows what else…it cost me probably one cent!
Not bad!
Going against my own advice in my sewing-machine posts, I actually went ahead with my needle-nosed tweezers and ripped out the old, red felt wick which, as you’ll recall, is inside every bobbin-mechanism, to stop friction and abrasion, and to keep the mechanism lubricated.
I did this for two reasons:
1. The old felt was completely TRASHED!
2. It’s very easy to replace the felt wick on old Singer 28-series machines like this.
All you need is a TEENSY scrap of fabric, or some cotton wool. Roll it into a little ball or sausage, and then just stuff it into the hole where the felt wick goes. You may need to use your needle-nose tweezers or a chopstick or something, to shove it down the hole properly, but it’s not that hard.
So long as the replacement wick (made out of whatever material it was you chose) is sufficiently absorbent, you can replace the old one with no problems at all!
The only thing I need to do now, is to buy a new case-lid for it. If I can find one anywhere!
A staggering 98% of typewriters survive on ribbons. The other 2% use ink-rollers, or a variation of the stamp-pad.
Depending on how lucky or resourceful you are, finding ribbons for your typewriter is not very difficult. You might be as lucky as I am, to find them at your local shop in town, brand-new, in the box. Or you may have to buy them online (eBay sells dozens of them, you can take your pick!).
But supposing…supposing that you can’t buy your ribbons locally and support a neighbourhood business? Perhaps you cannot buy the ribbons online for whatever number of reasons?
How do you make your ribbon last for as long as possible?
Typewriter Features
The typewriter itself should be able to help you.
Most typewriters have what’s called a “bichrome ribbon switch”. It’s a switch that moves from left to right (or up and down, as the case may be) on the side of your machine. Can’t find it? Look for two, or three coloured dots or squares. Typically, red, blue and white (or red, black and white, again, as the case may be).
The ribbon-selector determines which half of the 1/2in.-wide ribbon, the typebars will strike when you use your machine, either the top 1/4in, or bottom 1/4in., of the ribbon.
Simply type until the ribbon is finished. Take it out, reverse it, slot it into the machine again and resume typing on the unused half of the ribbon.
You can also use the “Ribbon Reverser”. Combined with the ribbon-switch (not all machines have both functions, some do, some don’t. Mine does), it’s possible to run the ribbon back and forth through the machine in opposite directions without even taking it out of the machine to flip it over!
Doing this, you can make one ribbon last for up to four passages through the typewriter.
Re-Inking a Ribbon
It is possible to re-ink a ribbon, if you so desire (or are unable to purchase a new ribbon).
To do so, you will require the following:
1). A dried, used typewriter ribbon, all wound onto one spool.
The ribbon must be in good condition. Either a freshly-used one, or an old used one that is structurally sound. It’s no good using a ribbon that’s frayed, ripped, trashed or otherwise nonfunctional.
2). A small plate.
This is to catch any dripping ink. Don’t worry! It’s washable. Your China won’t be permanently stained…
3). Tissues.
Just in case!
4). A bottle of stamp-pad ink.
Any stationery chain worth its salt will sell little bottles of stamp-pad ink (typically, 50ml sizes). Purchase one or two bottles of the ink of your choice (red, black, blue, etc).
Got all those things? Let’s begin.
How to Re-Ink your Ribbon
Why are we using stamp-pad ink? Why not fountain pen ink?
Let me explain. The ink in a typewriter ribbon must remain wet and usable for a long period of time. If it dried out overnight, you’d be left with yards of really pretty black ribbon…and nothing else. Completely useless.
Guess what? Stamp pads must also remain wet and usable for a long period of time, otherwise you can’t press rubber stamps into it!
Beginning to see the similarities here?
Good!
Because stamp-pad ink shares the same properties as typewriter ink, it’s a perfect re-inking tool for spent ribbons. Apply the ink in the following manner:
Having ensured that the ribbon is rolled up onto one spool (but that the tail is still attached to the other!), open the bottle of stamp-ink. The mouth of the bottle should be a small slit, like this: –
If it was a regular bottle-opening, the ink would just come rushing out and you’d have a huge mess on your hands.
Holding the ribbon-spool in one hand and the bottle in the other, press the mouth of the bottle to the ribbon and GENTLY squeeze the bottle to encourage the ink onto the ribbon. In most cases, gravity alone will cause the ink to dribble out.
As the ink dribbles out, use the tip of the bottle to spread it evenly along the whole 1/2in. width of the ribbon. Do one section, then rotate the spool, and do another section, then rotate, do another section, and so-forth, until all 360 degrees of the ribbon have been inked in this manner.
DO NOT OVERDO IT! One drop of ink has to seep right through the ribbon to the bottom of the spool. Use the ink as sparingly as possible. No more than two drops for each section, spread out along the ribbon. anymore than that, and the ribbon will be too heavily saturated to be of any practical use.
It is NOT necessary to unroll the entire ribbon and do every single inch of it. Simply roll it up and drip and spread ink onto it as I described. The ink will seep through the layers of ribbon, saturating the entire length of the ribbon until the whole thing has been re-inked. Fast, easy, a bit messy, but over and done with in 5 minutes.
Once the ribbon has been re-inked, set it back into the typewriter and position it for use. You’re done!
I recently purchased an Underwood Standard Portable four-bank mechanical typewriter, from the mid-1920s. It’s a beautiful machine…
Ain’t it purdy?
…which is everything a classic, vintage typewriter ought to be. White glass keys, black steel body, a delightful little bell at the back which goes ‘Ding!’ and all the rest of it. But it frustrated me that the typewriter’s KEYS would stick and jam constantly.
Now in all fairness, I purchased this machine KNOWING that the keys would stick. But I was prepared to take the risk and buy it anyway. I might not get another chance to find a nice machine like this. But having bought it, I needed to get the keys working.
Do you have an old mechanical typewriter like this, with sticking keys? This is what you do to clean them up and stop them from jamming and sticking…
You Will Need…
1). Bottle of METHYLATED SPIRITS. Preferably a large one.
N.B.: Methylated Spirits is called different things in different places. In America, it’s ‘Denatured Alcohol’.
2). A soft brush. Like a small paintbrush. Not a toothbrush, that’s too stiff.
3). A small bowl or cup. This is to decant the meths into, during cleaning.
4). A roll of paper-towels.
5). Patience. Care. Attentiveness.
Preparing the Machine
To start unjamming the sticking keys, you need to rip off about 3-4 sheets of paper-towel. Fold them up along the perforations so that you have a nice, thick square of paper. Lift up the machine and shove the paper underneath. If your typewriter is an open-bottom machine like mine, that’s all you have to do.
If it’s a closed-bottom machine (for example, the Royal No. 10 desktop typewriter), then you must remove the bottom first (just unscrew it).
Having placed the wadding of paper underneath, fill your little bowl or cup, with meths. Fill it UP. You might be here for a long time.
Remove the ribbon from the typewriter. If you’re not already familiar with it, then double-check how the ribbon is installed into the machine FIRST, before you remove it.
Roll two or three sheets of regular A4 paper into the typewriter. This is to act as padding against the constant pounding of the keys against the platen and roller.
If your machine has one, open or take off the dust-cover that covers the type-basket.
You are now ready to start cleaning.
Cleaning the Type-Basket
Assuming that the machine is NOT damaged, and there are no bent hammers, broken linkages or other defects, but the machine’s keys still jam and stick, your next step is to clean the machine. Specifically, you want to focus on the type-basket. The type-basket is that big, smiley face in front of your keyboard.
A typewriter works in the following way:
You press on a key. The key depresses, and it pulls on a lever. That lever is attached to a typebar. When the lever drops, it pulls the typebar up with force, and the head of the bar strikes the ribbon, imprinting ink onto the paper. Releasing the key causes the typebar to gravity-drop back into place, resetting it for the next strike.
Jamming is caused by gunk and debris (dust, white-out crumbs, lint, etc) which gets into the fine, inaccessible areas of the typewriter-basket. This debris creates friction which stops the typebars from working naturally, through gravity and mechanical force, as they should.
This is what you’re trying to remove from the machine. It’s done in the following manner:
1). Dip your brush into the cup or bowl of methylated spirits. Remove it, and shake off any excess meths.
2). Brush the meths into the ends of the typebars, right at the back of the basket, into all the little grooves where the typebars attach to their key-levers. Brush from side to side, along the ‘smile’, and also, up and down in short strokes, to force the methylated spirits and the brush-bristles, between the grooves and gaps of the typebars.
3). Repeat this. Over. And over. And over. And over. Just keep brushing and probing, scrubbing, brushing, and probing and washing and flushing.
— — — —
What happens is that the methylated spirits dissolves the gunk stuck to the type-bars. It then just drips out of the bottom of the machine and collects on the paper-towels below. Any excess spirits just evaporates into the air, leaving a clean, and dry typing mechanism behind.
— — — —
Keep brushing and cleaning and flushing like this. Every few minutes, press the offending keys, along with all the others, to check for jamming, or improvement of function. This process can take a few minutes, or it can take days. If you want proof that the methylated spirits is cleaning your machine, then simply lift up the typewriter. You will have to change the paper-towels underneath the machine throughout the cleaning process, as they eventually become saturated with spirits and require replacing.
In removing the sheets of paper-towels, take note of their condition. A really dirty, jammed up machine will be dribbling oodles of black, grey dust and crud onto the paper, and you’ll be able to see it really really clearly. It’ll look almost like fireplace soot. This is the rubbish you’re trying to get out of your machine.
You must repeat this process until the paper removed from under the typewriter is COMPLETELY CLEAN and has NO debris on it AT ALL. This is the sign that it has all been flushed out and that the mechanism is cleaned and ready for proper use.
To give your typewriter a fighting chance, you might also want to clean under the machine at all the points where the typewriter-keys connect with the type-bars. Removing as much dust and crud as you can will ensure that the machine runs as best as possible. You can do this by brushing methylated spirits along the linkage-points, and then carefully wiping them clean with paper-towels or tissues. You may have to do this several times as well.
How long does it take to clean a typewriter? It really depends on its age, when it was last used, when it was last cleaned, how it’s been treated, its size and how thorough your cleaning is. It could take half an hour. It could take two hours. For me, I was cleaning it, on and off, for half a day, letting the meths soak through the machine to do its job, coming back, adding more, and changing the paper periodically to check the progress.
Important Note
As tempting as it may be, do NOT USE OIL on your TYPEWRITER. EVER.
As every person who repairs typewriters will probably tell you, and as all the period instruction-manuals (including my own) will also tell you, oil is a typewriter’s worst enemy. Do not use WD-40, olive-oil, melted butter, pig’s fat, sewing-machine oil or lard, in the hopes of getting your machine running.
Oil will lubricate the machine, yes. But it will also become a dust-trap as particles settle on the oil (which just sits there, it doesn’t evaporate and dry up) and create a disgusting sludge over time, that will…you guessed it…jam the machine. And you’re back to Square One.
Using meths is the ONLY way to clean your machine, as methylated spirits will just evaporate once the job is done, and leave no residue behind which dust can cling to.
If you MUST have lubricant (which is unlikely, as the whole machine should work on gravity alone), then make sure it is one that is non-greasy, and which does NOT attract dust. Otherwise, you’re in strife.
Is it Really That Easy?
Yes! Following this process, I successfully unjammed about a half-dozen keys in the typewriter that you see up above. It’s a messy, slow, sometimes frustrating method, but it does work. Otherwise I wouldn’t share it on my blog. Hopefully, it will work for you as well!


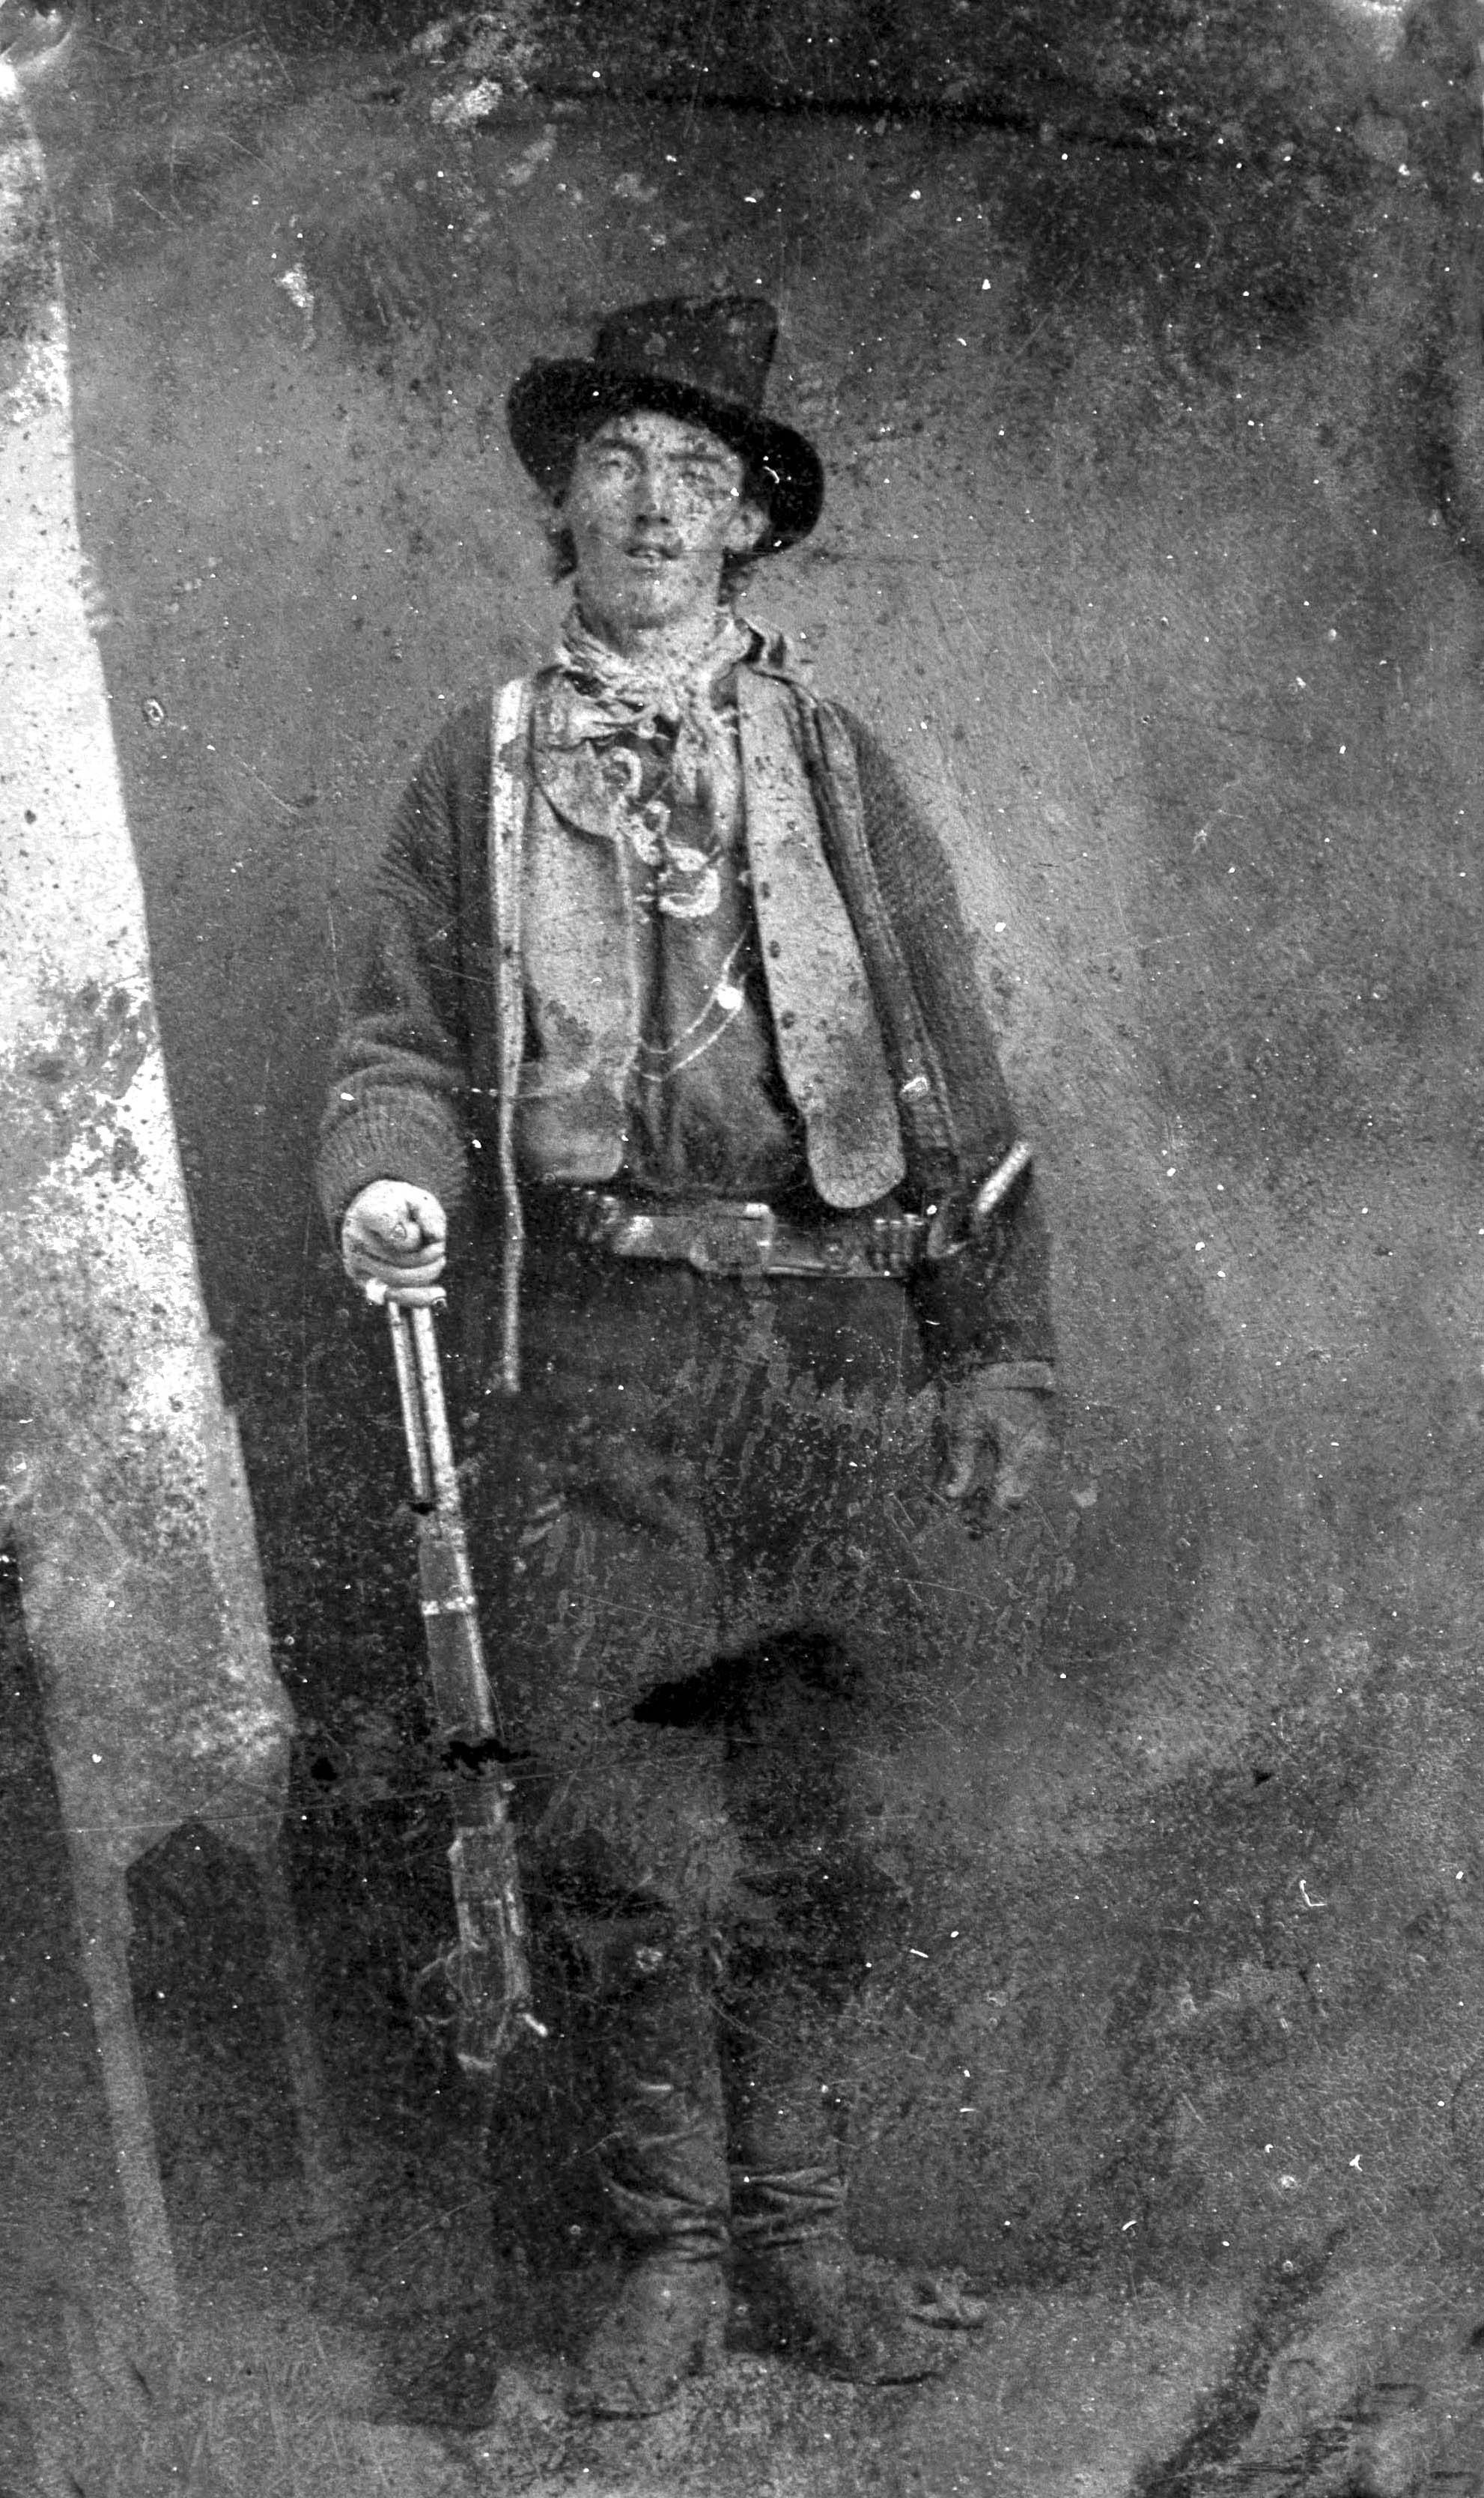
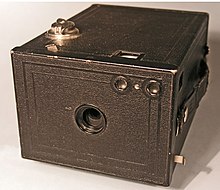
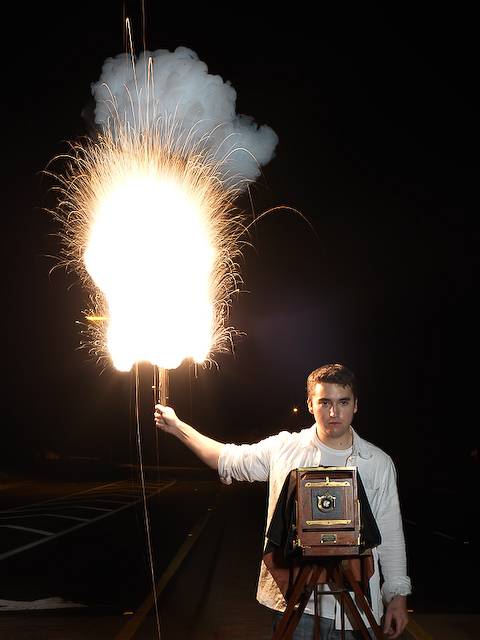 A Victorian-era camera with separate flash-stand and powder. Note how close the photographer’s right hand is to the igniting flash-powder
 “Take your picture, mister?”


 Ain’t it purdy?