To most people around the world, the word ‘Peranakan‘ means absolutely nothing, and to some people around the world, it means little more than that. But to others, it conjours up images of elegance, grandeur, intricacy and integration – a way of life, as the movie put it: ‘…gone with the wind‘.
I admit to having a personal, if tenuous link to the Peranakan. My paternal grandmother, my grand-aunts, my grand-uncle, my great-grandmother, and my great-great grandmother, and probably going back even more generations than I care to think – were all Peranakan.
Sadly, this was something which was lost on me during the days when I knew my grandmother well. Despite being extremely close to her for many years, when she was still reasonably healthy I was too young to understand, and didn’t have the depth of interest and appreciation of history which I do now, to fully grasp what a unique and minuscule world and culture my grandmother had grown up in.
Had she been younger, or I older, and if our paths had crossed sooner than they had done, I might’ve learned more about her fascinating life. But they did not, and I didn’t. Therefore, almost everything I learned about her early life and the culture she lived in, I learned secondhand – after her death at the age of 97, in November of 2011.
My grandmother – Bertha Fu Kui Yok – was born in Singapore, the capital of the British Straits Settlements, on the 7th of May, 1914 – the first of five children – four girls and one boy. She died on the 28th of November, 2011, in Melbourne, Australia – at the age of 97.
And she was Peranakan.
In this posting, I’ll be looking at who the Peranakan were, what their lives were like, how they lived them, and what remains of the Peranakan people, their culture and their cultural identity in the modern era. Make yourself comfortable! This could be a long journey…
The Peranakan – A Name and a People
If you asked anybody outside of southeast Asia what the ‘Peranakan’ were, they’d probably no damn idea what you were talking about!…And I don’t blame them. In fact, even people within southeast Asia sometimes don’t know what you’re talking about! And that’s hardly surprising. The Peranakan, with a culture long in decline, are now gradually on the rise again in Southeast Asia, and this long-forgotten ethnic cultural group is slowly clawing its way back up to the prominence it once held in the days of the British Empire.
The Peranakan traditionally occupied a very small area of the world: Singapore, Malacca, Penang Island, and Indonesia. So it’s perhaps not surprising that most people have never heard of them, and yet their lives and the culture they created was as vibrant as any other in Asia, or even in Europe!
So, who were they?
Who and What Is ‘Peranakan’?
‘Peranakan‘ is an Indo-Malay word meaning ‘child of..’, ‘descendant’, ‘cross-breed’, or ‘native-born’, depending on what translation you take to heart. The word ‘Anak‘ literally means ‘child’ or ‘descendant’ in Indonesian.
So, who were the Peranakan, and when, and where did they come from?
To fully understand their roots, we must go back hundreds of years to the days of Imperial China, and acquaint ourselves with the traders, merchants and sailors who plied their trade between the southern provinces of the Chinese mainland, and the islands of the South Pacific.
These merchants came from the south of China – Hong Kong, Canton, etc. Their native languages were either Mandarin Chinese, Hokkien, or Canton Dialect (‘Cantonese’). They sailed down the Malay Peninsula, around Indonesia, and through the Strait of Malacca, and the Strait of Johore, skirting the coastlines of what are today – Singapore, Malaysia, and Indonesia.
In time, these traders established themselves on the Malay Penisula at Malacca and Penang, at the island of Singapore, and in Sumatra and Java on the Indonesian islands. In time, they married local women (these traders were almost invariably men), and started to raise families.
The descendants from these first marriages are the people now known as the Peranakan. They were not Chinese, not Malay, not Indonesian, and not Singaporean. They were a hodge-podge of races and cultures. They did not come from China, but spoke Chinese dialects. They spoke Malay, but were not Malaysian. They used chopsticks and ate rice, but also cooked dishes unknown on the Chinese mainland. Their language, dress, customs, culture, food, architecture, furniture and everything else about them was a mix of cultures, traditions and customs, and only ever found in Malaya, Singapore and Indonesia.
This is one of the reasons why the Peranakan are so intriguing, but also relatively unknown outside of southeast Asia. The relatively small areas in which they lived mean that people of Peranakan descent are not only rare, but rarely heard of!
The Peranakan – What’s in a Name?
In their long history, the Peranakan were called many things – the first was obviously – Peranakan. But they were also called the Baba-Nyonya, the Straits Chinese, the King’s Chinese, or even the Royal Chinese!
Why?
‘Straits Chinese‘ comes from the fact that the majority of Peranakan lived in Singapore, Penang and Malacca – near the Straits of Malacca and Johore (between Sumatra, and Singapore, respectively), and were therefore within the boundaries of the British Straits Settlements for much of the 19th century – the Straits Settlements being the collection of British colonies as part of the British Empire, to be found in Southeast Asia.
‘Royal‘ or ‘King’s Chinese‘ comes from the fact that by the 1800s, the land occupied by the Peranakan was colonised by the British. During this time, an increasing number of Peranakan, already detatched and disassociating themselves from China, began to see themselves as being British subjects – and became known as the ‘King’s Chinese’, referring to King George IV, William IV, Edward VII, George V and George VI. In time, many Peranakan learned English, and had English-style educations. Some even converted to Christianity and added typically Christian names to their more traditional Chinese ones.
Apart from these broader and more general titles, there were also other, more specific ones. For example, Peranakan men were called ‘Babas‘. Young Peranakan women were called ‘Nyonyas‘. Older Peranakan women (usually married) were called ‘Bibiks‘ – accidentally calling an older, married Peranakan woman ‘nyonya’ would’ve been extremely rude!
Because of these titles, the Peranakan – already known as the King’s Chinese, the Royal Chinese, and the Straits Chinese, also had yet another title to add to the list: the ‘Baba-Nyonya‘.
My grandmother, her sisters, her mother, and her grandmother were all nyonyas. In the case of my great-grandmother, she was also a bibik.
Peranakan Family Life and Structure
As with many cultures in the past, from China to Britain, Italy to Russia, Japan to Egypt, family life in a Peranakan household was immensely hierarchical. Every person in the household had a rank and a position, and they were expected to adhere to it.
At the top of the tree was the family patriarch – the father or ‘Baba’. He conducted business, earned money for the household and kept the family together.
Directly below him was his wife, the ‘Bibik’ – sometimes called a ‘tai-tai‘ (a Chinese and Cantonese term for the matriarch of a large household, or the leisured wife of a wealthy husband).

Part of my grandmother’s family, consisting of my great-grandmother (front and center), my grandmother (second-right) and her sisters, sisters-in-law, and her brother. Although this picture was taken in the 1950s, you can see that some of the nyonyas still wear more traditional sarong-kebaya outfits (left, right & center), complete with slippers and silver belts.
Bibiks had a surprising level of power. They organised and ordered around the household servants, handled household accounts and finances, and, similar to society women in Europe, were expected to entertain and socialise for the benefit of themselves and their husbands.
Below the bibik came her children – any sons, and unmarried daughters, along with any daughters-in-law – the wives of her married sons. Below them, if they could afford any – came household servants, usually in the shape of one or more ‘Majie‘, ‘amahs‘ or ‘ayahs’. ‘Majie’ is Chinese for ‘Mother-Sister’.
A ‘Majie’ was a housemaid or domestic servant who took on a vow of celibacy. Their usual uniform consisted of sandals, a white tunic or blouse, and a pair of black trousers. They did everything from cooking, cleaning, child-rearing, serving food and drinks, running errands and almost anything else that the family required of them. Majie either lived-in, or rented a room in a tenement-house in a poorer part of town.
A wealthy family would have had several majie. A poorer family might only have one, colloquially called a ‘yat kiok tek‘ – Cantonese for ‘one leg kicking’ – meaning that they were all on their own and had to do all the heavy household work.

A photograph of the ‘majie’ that used to work for my grandparents since before the Second World War.
With familial rankings came familial obligations and expectations:
Father worked, earned money, saw to the financial security of the household and saw to the advancement of the family. Mother stayed at home and ran the household – including organising the household servants, and managing household expenditures, taken out of the allowance given to her by her husband. The patriarch of the household always handled any serious transactions but usually gave his wife a regular allowance to keep the household ticking over.
Sons who were old enough might work, or join their father in the family firm, or else go to school. Daughters were expected to learn various Peranakan crafts – cooking, cleaning, spice-grinding, sewing, etc. Mastery of these skills was meant to show that a woman was patient, attentive, creative and intelligent – Perfect material for marriage!
Unmarried daughters tended to lead very solitary lives – they were not allowed to be seen in public except on very special occasions – until after marriage!

Again from the 1950s – part of my grandmother’s family. Gran is in the second row, third on the right. To the left are her mother (great-grandma) and her grandmother (great-GREAT-grandma!). My grandfather is up the back, 1st on the left. The children arrayed down the front are my father, and my multitudes of aunts and uncles! Peranakan families were never small! I doubt this is even 10% of the entire clan! For special occasions like this, you’ll see that some women still held the habit of wearing sarong-kebaya.
The majority of Peranakan households, although it had been several generations since they’d come from China – nonetheless held onto Chinese beliefs. This included ancestor-worship, Taoism, and Buddhism, various superstitions, and Confucian-style filial piety.
Daily preoccupations of the Peranakan household generally included gambling, socialising, sewing or beading (for the women), smoking (for the men), and the chewing of betel nuts (for the women). Betel nuts and leaves are actually poisonous – long-term chewing has many of the same effects as smoking – including heightened risks of cancer!

My great-grandmother’s betel-nut box. The nuts (sliced, for convenience of chewing) are in the middle compartment.
Decorative boxes were often used to house betel nuts and leaves, and spittoons were kept nearby for clean disposal of chewed nuts.
The Peranakan Home
In the heyday of the Peranakan, they lived largely in Malacca, Singapore, Penang, and the two main islands of the Dutch East Indies – Java, and Sumatra.
The physical size of islands such as Singapore and Penang, and the humid, tropical climate of Southeast Asia were two of the factors which dictated the size, style, and layout of the houses which the Peranakan (and other people in Singapore, etc), lived.
Due to the limited amount of good land for building, houses typically had small, compact frontages, but might be two or even three storeys in height, as a result.
The typical home of the Peranakan, from the early 1800s until the middle part of the 20th century was the shophouse – a design of residence dictated by Sir Thomas Stamford Raffles himself. So, what was the shophouse?
The Shophouses of Southeast Asia
The classic shophouses of Southeast Asia, found all over Malaysia, Singapore and other countries in the region (for the style was popular, and widely copied) were made up of a mix of European and Asian design styles. The interior layout of the house and the ordering of the rooms was dictated by traditional Chinese house-plans, dating back to the days of the ‘siheyuan’ (four-sided courtyard-houses of ancient China).
However, the design and stylistic features were a mix of traditional Chinese, and European styles. Open windows with ‘jealousy shutters’, and brickwork were taken from building styles and methods used in England. However, the entrance-ways, window-coverings and decorations were typically Chinese in style or inspiration – such as decorative nameplates and calligraphy panels around the doors, fu-dogs outside the entrance to guard the home, and the symmetrical layout of the doors and windows facing the street.
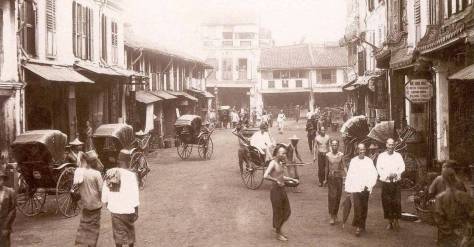
An old photograph of Singaporean shophouses, taken prior to WWII (rickshaws were banned in Singapore in 1945, after the liberation, due to health-and-safety concerns).
Shophouses, with their narrow frontages and (usually) multiple storeys, were always designed as terraced housing – cheap, mass-produced identical (or near-identical) dwellings built in long rows, which stretched for whole city blocks. Usually, one row of shophouses backed onto another, with an alleyway down the middle where the nightsoil men could haul away the pans and buckets of human waste each evening, without disturbing the household within. A trapdoor in the outhouse wall allowed easy, unobtrusive access at all times.
Not all shophouses had this feature – which meant having the nightsoil man haul an entire bucket of excrement through the middle of the house into the street outside – in the tropic heat! And remember, please, that nightsoil collection was not regular – it could be as infrequently as every second, or even every third day! The stench was often unbearable!
Lavatorial facilities aside, the shophouse was extremely popular. They could be deceptively large, and if well-ventilated, pretty comfortable, despite their narrow facades.
A similar style of residence was the terraced townhouse. It was similar to the shophouse in basic design, but had a couple of key differences. One was that while the shophouse had the ground floor dedicated to business, and the upper floors dedicated to living-space – townhouses were constructed solely to serve as a residence.

Peranakan-style townhouses. George Town, Penang.
Another feature which set shophouses apart from townhouses (apart from the fact that the front room on the ground floor was used for business), was the presence of the ‘five-foot way’. This was a design feature almost exclusive to shophouses. It was a covered walkway at street-level extending out the front of the house – it was created by the extension of the upper floors over the footprint of the ground floor. This created an overhang and space for a roofed pavement below.

Shophouse windows and balcony, Singapore.
The five-foot way was an idea of Thomas Raffles himself! The idea was that the five-foot way would protect pedestrians from the heat, sun, rain and filth on the streets, and provide then with a safe, sheltered and paved area in which to walk. Although they were called ‘five foot ways’, their width could vary anywhere from five to six to seven or eight feet across.
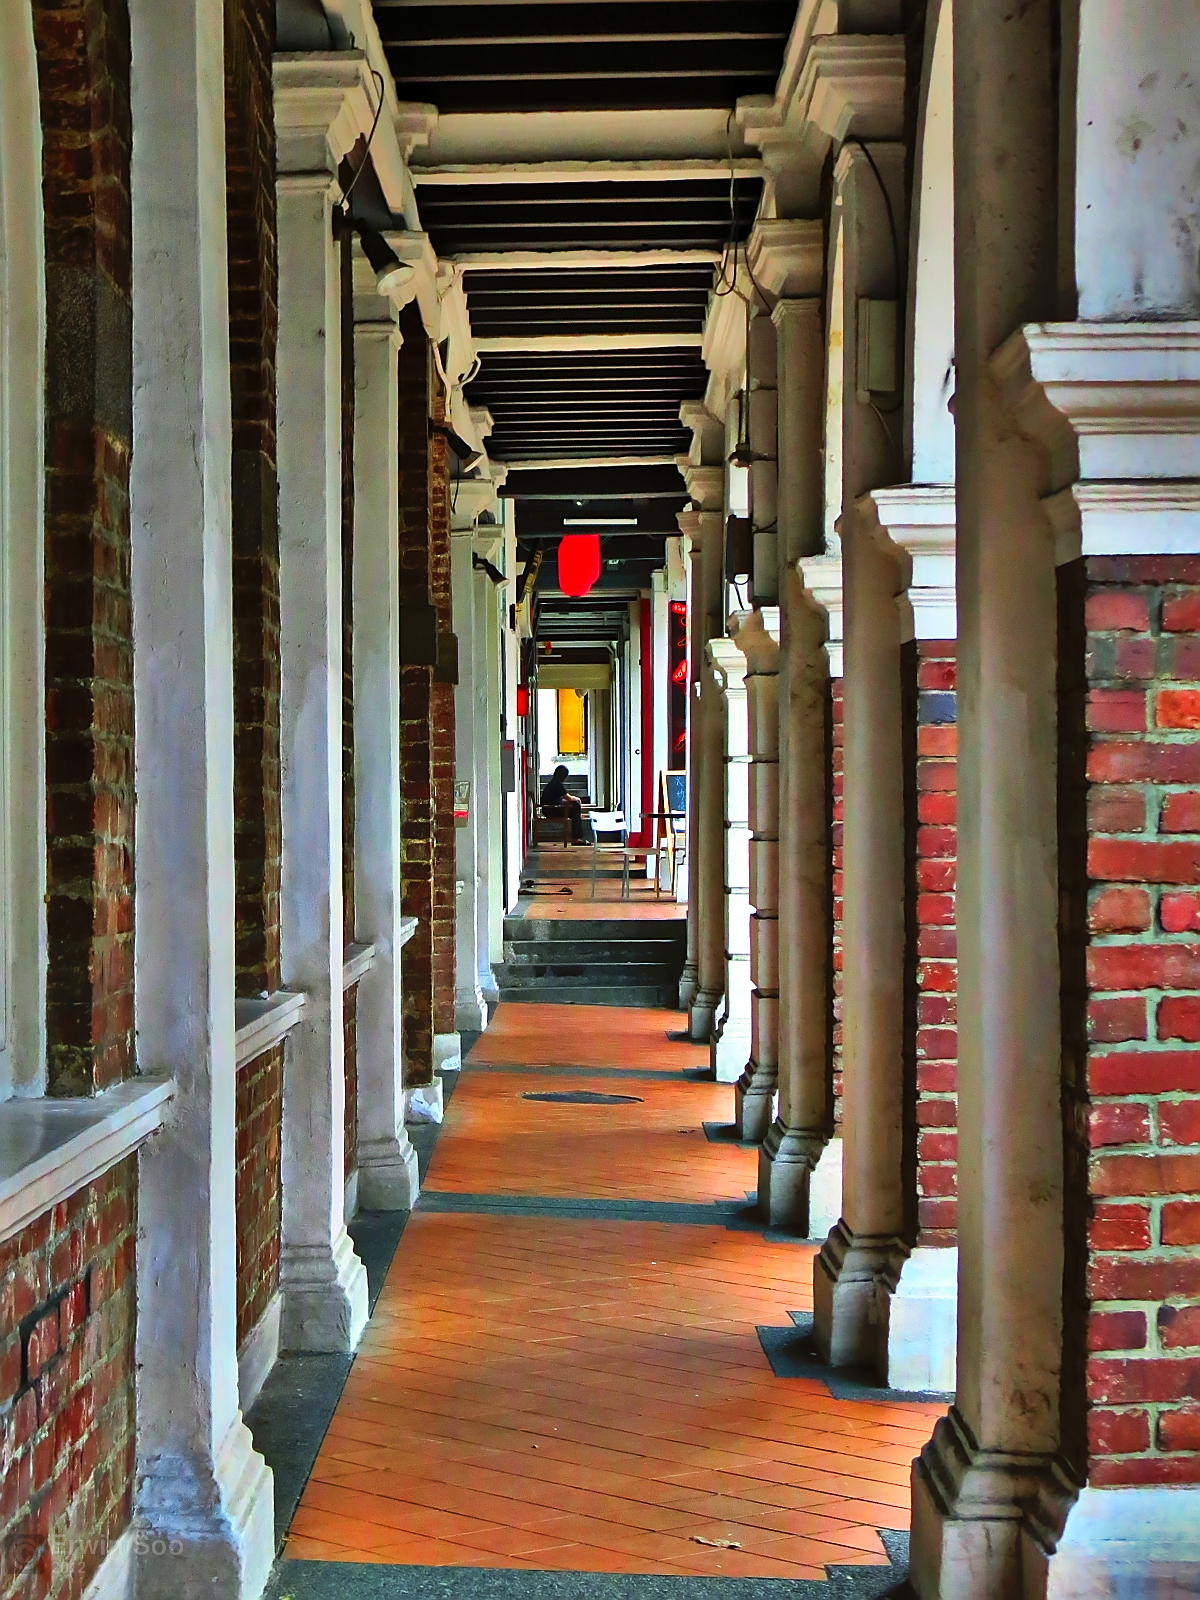
A ‘five foot way’ in Singapore. Despite the name, these covered walkways were not always five feet wide.
A common feature of shophouses and the five-foot way was that the front room on the first floor (which was built over the five-foot way in the street below), would have a removable floor-section about the size of a drinks-coaster. This peep-hole was so that you could see what was going on in the street below, see who might be knocking on your front door, or who might be coming into the shop – a primitive form of video-surveillance and communication!

Almost every shophouse possessed a covered peephole in the floor of the upstairs front room, overlooking the five-foot way below. The lid could be lifted up and you could see who was downstairs in the street below.
My father, uncles and aunts, who grew up in shophouses like these, remember when they were children – if they were too lazy to go downstairs to unlock the front door – they’d chuck the keys down through the hole into the five-foot way, so that visitors could unlock the door themselves! Money for street-hawkers selling fast food or other merchandise might also be chucked down the hole, to pay for goods and services!
Other than that – Peranakan townhouses and shophouses were the essentially same in that they had narrow frontages, were built side by side in long rows, and were usually 2-3 storeys high. Houses of this style were the mainstay of housing in Singapore, Malacca, Penang and other cities and towns during the colonial era, from the 1820s to the 1950s. Today – rows, or entire blocks of shophouses and terraced townhouses are heritage-protected by the Singaporean and Malaysian governments, to preserve their architectural legacy. Entire streets of them may be found in the oldest quarters of Singapore, such as Chinatown.
Peranakan Shophouses and Townhouses

Traditional terraced Peranakan townhouses.
Peranakan families often inhabited shophouses or townhouses such as these – and it was almost always obvious when a Peranakan family had moved in!
A typically Peranakan terraced townhouse was often brightly coloured – painted yellow, blue, green, red, or white. The entrance halls, the front courtyard, five-foot way, and much of the interior of the house would be tiled in exquisite imported tiles which were painted bright colours and patterns. A family motto would be painted onto a plaque fixed to the lintel above the front door, and words from lucky or prosperous sayings would be fixed to scrolls or panels either side of the front door.

Colonial-era shophouses like these were populated by many during the days of the Straits Settlements, but the more heavily decorated and embellished ones were typically designed, and owned by the Peranakan.
Immediately inside the front door was the front reception hall – this was where men did business, greeted guests and held functions, parties and meetings.
Beyond this would be a secondary room, which would serve as a sitting room. Close family friends, visiting relations, or good business-partners might be invited in here to relax and chat.
The next feature was often a ‘lightwell’ or ‘airwell’. This was an open courtyard in the middle of the house which went from the ground floor right up to the top of the house, and which was usually open to the sky. As shophouses were often long and narrow, with houses on either side, there were few (if any) side-windows.
The lightwell brought natural light into the rooms in the middle of the house, and allowed for ventilation, to cool the house down. Rainwater was usually collected in a pool or pond, or was used to water plants. Fish might be kept in the airwell pond, as pets.

More colonial-era shophouses. Most were two storeys (ground floor business with one floor above as residence), but three-storey shophouses, as shown here, became common after 1900.
Beyond this might be the dining room, and then the back parlour, where women (married or not) might socialise and hang out. These kinds of segregations were common in Peranakan society – as with many societies around the world at the time. Here, women would eat ‘nyonya kueh’ (Peranakan desserts), drink tea, and gossip among themselves. Games like mahjong, or the Peranakan card-game – ‘Checkee’, might be played here (both are similar to gin-rummy).
Bibiks and nyonyas often gambled while playing checkee or mahjong using real money or gold (usually taken from the household-expenses fund given to them by their husbands!). It wasn’t uncommon for some women to drive up impressive gambling debts, and they would either pawn, or sell their expensive Peranakan gold and silver jewelry to pay for their addictions.

A table with checkee cards scattered across it. Along with mahjong, this was one of the most popular Peranakan games.
To this day, checkee and mahjong are still heavily associated in Chinese culture with endemic gambling. As a friend of mine once said: “If you don’t gamble while playing mahjong, it’s bloody boring!”
Anyway – I digress! Back to houses…
As unmarried nyonyas were not traditionally allowed to be seen, or mingle with men without permission – there were often sliding doors and screens dividing each room. These screens and doors usually had decorative gilt carvings and piercings in them – ostensibly to allow air-flow and ventilation – but they also served a second purpose – to let young girls check out the visitors which their fathers might not allow them to meet!
Near the back of the house would be a room, or a shrine dedicated to the worshipping of one’s ancestors, with offerings of fruit, water and tea, and the burning of incense sticks, as well as possibly having candles or oil-lamps. Photographs or portraits of prominent ancestors might also be included.
At the very back of the house would be the kitchen, bathroom, and toilet. The stove was usually brick-built or made of clay, and fired with wood. Food was stored in wooden food-cabinets or pantries, either propped up off of the floor, or suspended from the rafters in the ceiling. This was to keep it away from insects like ants and roaches, and rats. Food cabinets on the floor were set off of the ground inside ceramic cups, usually filled with water to trap and kill any insects trying to access the food from below.
In larger houses, kitchens were divided into ‘wet’ and ‘dry’. ‘Wet’ was where washing of eating and cooking utensils, ingredients and ceramics would take place, as well as the drawing of water. ‘Dry’ was used for cooking, preparing and serving dishes.
The upper storeys of the house contained bedrooms, communicating corridors, staircases, storage spaces, and of course, the lightwell, with wooden, shuttered windows containing jealousy shutters, which could be opened to permit in air and sunlight, or closed to protect the interior of the house from monsoonal downpours.
Although shophouses were common as the homes of most people in the British Straits Settlements, where most Peranakan or ‘Straits Chinese’ lived, not everyone lived in such accommodations. Then, just as now – those with money wanted something different from what their neighbours had – and exceptionally wealthy Peranakans often built themselves grand townhouses and mansions, using a mixture of local, and imported materials, some coming from as far away as England!
Peranakan Arts and Crafts
The Peranakan or Straits Chinese are famous for many things – their food, their jewelry, their architecture, but possibly most famously – their various arts and crafts. From beading, shoemaking, cooking, silversmithing, carpentry, porcelain, and sewing, Peranakan arts and crafts are famous for their intricacy of design, and the bright colours used in their creation.
Peranakan Beading
Peranakan beading is famous – but also impossibly finicky! Miniscule glass beads – smaller than rice-grains, are embroidered onto a sheet of thin cloth, stretched tightly across a beading-frame. The beads are like the pixels on your computer screen – it takes hundreds – thousands, even! – to make something as tiny as the embroidered upper for a traditional Peranakan slipper.

A Peranakan beading-frame. The lady in the picture is beading the highly decorative uppers for a pair of traditional slippers.
Beading was used, not only for Peranakan slippers, but also for handbags, tablecloths and wall-hangings. Thousands, even millions, of tiny, tiny glass beads were woven into the fabric with microscopically thin needles to create scenes of flowers, birds, trees, plants, fish and mythical Chinese creatures. In some cases, the beading even extended to the decorative tassles on the edges of tablecloths and wall-hangings. And every single bead was sewn in by hand!

A Peranakan beaded tablecloth at the Peranakan Museum of Singapore. Tens of thousands of minuscule glass beads were woven together to make this exquisite piece of artwork. The entire thing is made of beads – even the tassels on the edges are thousands of tiny beads, all sewn together.
Along with beading were other pursuits such as sewing and porcelain-making. The most common type of clothing worn by Peranakan women was the two-piece outfit known as a Sarong-Kebaya. These were usually embroidered, woven and sewn by hand at home. If a nyonya, or more likely – her husband – was wealthy enough – then they might own a sewing machine.
Peranakan Porcelain
Sewing and beading was traditionally women’s work. The shaping, spinning, firing and glazing of intricate Peranakan porcelain was traditionally done by men. The item was moulded or hand-shaped, left to dry, and then painted. And then fired. And then painted again. And then fired a second time!

Peranakan tea-tray, complete with pot, and four teacups.
Peranakan porcelain, like almost everything else in the Peranakan world – was marked by their famous intricacy of design. Traditional Chinese-style spoons, bowls, plates, teapots, serving dishes, teacups, vases and the large, ceramic jars called ‘Kamcheng’, were all made this way.

Peranakan ‘kamcheng’ – the knobs and holes on the sides are so that you can attach a handle (usually made of wire or rope) to the body of the kamcheng and lift it without gripping the smooth sides and accidentally dropping it.
Peranakan-style Kamcheng were made in various sizes. From enormous ones the size of pumpkins, to tiny ones the size of rice-bowls. Bigger ones were used for storing drinking-water, and smaller ones for storing food, spices, sauces, and the really tiny ones were for cosmetics like face-creams and powders.
Peranakan Clothing
Peranakan clothing for women usually consisted of a two-piece outfit known as a Sarong Kebaya – the sarong was a long, ankle-or-shin-length tubular, wrap-around skirt, and the Kebaya was a close-fitting jacket or blouse, usually worn over a camisole or other supporting undergarment. Traditionally, these were made by the women themselves. Men either wore traditional Malay or Chinese-inspired outfits, or else wore Western-style clothing.

My late Aunty Noni, dressed in Sarong Kebaya. Ca. 1950.
Neither the kebaya nor the sarong came with any fixtures or fastenings – no buttons, clasps, straps or drawstrings. The sarong was kept together with a metal belt, traditionally made of either gold, or silver. The kebaya was held shut with a series of three brooches linked on a chain, variously spelled either as ‘Kerosang’ or ‘Kerongsang’ (the latter is the Malay spelling). Both are considered correct.
There is some speculation that the clothes were designed this way so that wealthy Peranakan husbands would have to buy their wives flashy jewelry to wear all the time!
On top of that, the sleeves of the kebaya were traditionally much shorter than sleeves worn today – they usually came to only halfway up the forearm, stopping before the wrist. If you look at the photograph of my aunt, you’ll see just how short the sleeves on the kebaya actually are. This again, was to show off any rings, bracelets or bangles which a husband could afford to buy his wife. Flaunting one’s wealth and affluence was very much part of Peranakan culture!
Although now thought of as being ‘traditional nyonya’ clothing, in truth, the Sarong-Kebaya combination only started taking over in the early 20th century, from around the 1910s/1920s, as women looked for a lighter, more comfortable daily outfit, made of thin, breathable materials in the humid atmosphere of Southeast Asia where they lived.
Peranakan Silver and Gold

Peranakan necklace, earrings, belt, rings, and the three ‘kerongsang’ on their chain.
Some Peranakan could be extremely wealthy, and it wasn’t uncommon for Peranakan men to buy jewelry for their wives or sweethearts. Traditional items were rings, bracelets or bangles, necklaces, sarong belts and Kerongsangs. Other items might include watches, earrings, handbags, and long hairpins called ‘cucuk sangul‘, used to secure women’s hair-buns, a popular style of the time.

Peranakan jewelry on display at the Penang Peranakan Museum in George Town.
All these things were made of gold or silver. As all the customers were different, all the various pieces of jewelry were custom-made by a Peranakan silversmith or goldsmith. Because of this, every single piece of Peranakan jewelry was a unique, one-off creation.

Nyonya belt, with a pair of antique keyholders clipped onto it.
That’s not to say that silversmiths, goldsmiths and jewelers did not follow particular styles and designs, which changed and rose and fell with the times, but each piece was always an individual, as different from the next one as it was from the last one.
Peranakan Furniture
Peranakan furniture was almost always made of wood. Influenced by Chinese and local Malay styles, their furniture was typically made of hard, dark woods, usually inlaid with ivory, mother-of-pearl, or patternated with lighter woods on top, or else fitted with marble slabs. Marble was cooling to the touch, making it comfortable to sit on, as well as being attractive to look at. Peranakan furniture comprised of tables, chairs, foot-stools, cabinets, day-beds and couches.
One of the most unique pieces of Peranakan furniture is the pillow. Although this is not any pillow that you’re likely to have ever seen – Peranakan pillows were made of wood!

A Peranakan day-bed. The red and black block on the left is a traditional Peranakan pillow. The black ends were usually decorated with plaques made of gold or silver, which were secured onto the sides with nails.
Peranakan pillows were rectangular or squarish in shape, with round, square, or rectangular ends – which, like almost everything else in the Peraakan world, was highly decorated. Often, pillow-ends were in the form of gold or silver plaques riveted or nailed into the ends of each pillow.

Pairs of Peranakan pillow-ends. They would’ve been nailed onto the pre-shaped ends of the wooden pillows commonly found in Peranakan households. Wooden pillows were cooler, and did not absorb sweat, like normal pillows would, making them more hygienic.
Peranakan Food
One could hardly talk about the Peranakan without mentioning their food! When I told my relations I was writing this article, it was something that many of my cousins, uncles and aunts were quick to point out, whether they were Peranakan or not!
So, Peranakan food. Where to begin?
Along with clothing, language, home-life, crafts and beliefs, the Peranakan also differed from mainland Chinese in terms of their cuisine. Like almost everything else about the Peranakan – their food was delicious, intricate, beautiful, and time-consuming to produce! While some dishes had clear links back to China, others would’ve been completely alien to the mainland Chinese.
Peranakan food is arguably the most famous aspect of Peranakan culture, and many Peranakan dishes remain famous to this day throughout southeast Asia. Intricate, spicy, beautifully cooked and presented, Peranakan food covers a whole range of tastes across the spectrum from sweet, spicy, cold, hot, tangy, warm, sour and salty.
Peranakan food is traditionally called ‘nyonya cuisine‘, since it was the nyonya (women) who usually did the cooking. The dessert snacks, cakes, buns and biscuits were called ‘nyonya kueh‘ (‘women’s cakes’), and the term is sometimes used as a catch-all phrase for all Peranakan sweet dessert cakes and buns.
So what are some of the more famous dishes associated with the Peranakan?
Rendang, a dry curry usually made of beef or chicken is a perennnial favourite. Although it was Indonesian in origin, it was extremely popular with the Peranakan, who did settle in Indonesia, after all.
A lot of Peranakan cooking is notoriously labour-intensive, and Rendang is no exception. The meat must be slow-cooked and simmered for hours to make it soft and tender, and also to cook the curry sauce that goes with it! These days, you can make rendang with special rendang curry pastes and sauces that you buy from the supermarket, but in the old days, the spices used in the sauces, and the sauces themselves, had to be laboriously ground, crushed and pounded by hand.
Much Peranakan cooking makes extensive use of spices – knowing how to crush, grind and mix them effectively was extremely important, as nyonyas were expected to be good cooks for their husbands. Mastery of the mortar and pestle was an essential part of the nyonya’s domestic education.
That said, the nyonyas were also famous, perhaps even more so, for their desserts!
Popular nyonya desserts include ‘ang ku kueh’, ‘Kueh Lapis’, and ‘ondeh ondeh’.
Probably the most famous is ‘ang ku kueh‘ – literally ‘red tortoise cake’ – so-called because of its small, oval shape, and the patterns pressed into the surface, making it look like a tortoise’s shell. They have a soft, sweet, chewy, gooey surface, and the interiors are usually stuffed with sweet mung-bean paste.

Antique wooden ang ku kueh moulds (modern ones are made of plastic). The mould was filled with flour, knocked empty, filled with the prepared balls of dough-and-filling, pressed, and then knocked empty once more, impressing the decorations onto the outside of each dumpling.
Like the rendang, and almost everything else about Peranakan cuisine, ang ku kueh are extremely labour-intensive to make. The filling has to be mixed and pounded into an extremely soft paste. The dough has to be mixed and kneaded until soft. The dough has to be pressed flat and the filling has to be rolled into balls.
The balls are then wrapped in dough and then pressed into intricately carved moulds to shape and decorate them. The moulds are dusted in flour before each pressing. They’re then slammed onto the table to release the freshly-pressed kueh onto banana-leaves which you pre-cut, and brushed with olive-oil earlier on!
…that’s the process to produce ONE ang ku kueh, about the size of a golf ball.
Imagine how long it takes to produce three or four dozen for a formal dinner party…without modern food-processors!
Another popular nyonya dessert is ‘ondeh ondeh’, sweet little dough-balls rolled in crushed coconut, and filled with an extremely sweet palm-sugar syrup. These things are about the size of large marbles and can be eaten warm or cool. Biting into one causes a flood of sweet warm or cold palm-sugar syrup to go all over the inside of your mouth – and it is amazing!…just don’t tell your dentist!

Ondeh-ondeh – delicious beyond measure, even if excessive consumption is likely to corrode your teeth in a hurry!
As delicious as they are, like the ang ku kueh before them, these are extremely labour-intensive and time-consuming to produce! Snacks like these were often served only during really special events, or when guests were present, just because of the effort required to make them.
‘Kueh lapis’, literallly ‘layered cake’, is another popular Peranakan dessert – comprised of thin layers of sweet pastes made from various fruit flavourings (pandan leaves, coconut, etc), they are poured one on top of the other, and steamed in a wok to cook them. The result is sweet, gooey, and multicoloured!
When the cake is sliced open, a rainbow cross-section of anywhere from two to three, to half a dozen or more colourful layers present themselves, each one a different flavour. The cakes are usually served in square, rectangular or diamond-shaped slices, each one bite-sized for convenience.
Although nyonya cuisine was very different from mainland Chinese cooking (you try finding rendang in Beijing…go on! I dare you!), as ever, the Peranakan still held onto some vestiges of ancient Chinese beliefs. One of these was the yearly offerings of ‘nian gao’ (‘year cake’, or new year’s cake) to Zao Jun – the Chinese Kitchen God. In traditional Chinese homes, and many Peranakan homes, there was usually an alcove, shelf or cabinet which served as a shrine to the Kitchen God, said to be the spirit of a Chinese peasant who committed suicide by climbing into a burning stove.
Giving offerings to the Kitchen God ensured that he would rise to Heaven each New Year giving a sweet and palatable report of a family’s activities, graces and sins to the Jade Emperor, encouraging the Emperor to bless the family with good fortunes for the year ahead. Religious and superstitious nyonyas would pray to Zao Jun for good health and nutrition from the food cooked in his presence.
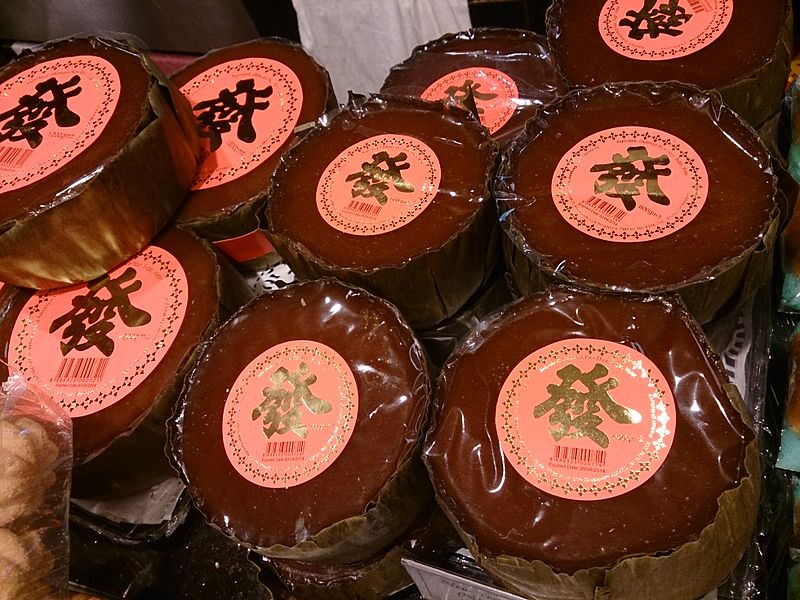
Chinese ‘nian gao’ or New Year’s Cake.
Honey, or Nian gao was often given as an offering because it is extremely sweet and notoriously sticky! If you’ve ever eaten it, you’ll know how tricky it can be to actually chew it. It’s so incredibly sticky that you’ll spend ten minutes just trying to lever your mouth back open with a pair of chopsticks! Gluing Zao Jun’s jaws shut with cake was one way to ensure he wouldn’t be able to tell the all-powerful Jade Emperor about any misdeeds done by the family!
Transporting Food
If, for any reason, a member of the family needed to transport food (lunch for school, a picnic, taking food home, or taking food to a friend’s house, for example), then they likely carried them in a tiffin carrier. Peranakan tiffin carriers were typically made of thin, pressed steel, and coated in brightly-coloured enamel paint, which was then fired on so that it set solid. Additional decorations of flowers, birds, and lettering of various auspicious sayings (usually in Malay) were added around the outside.

Antique Peranakan tiffin carriers (three on the right) are immediately distinguishable because of their bright colours, and floral decorations.
Tiffin carriers were usually of anywhere from two to five layers in height, although some extreme ones could be half a dozen or more!
Peranakan Society
In the racially-segregated and class-conscious society of the Straits Settlements, in many respects, the Peranakan stood out much more than some other social and ethnic groups. With backgrounds in fields as diverse as shipping, retail, import-export, banking, education, and real-estate and construction (those beautiful Peranakan homes didn’t build themselves!), the Peranakan were much better off than many other social and ethnic groups in colonial British Singapore and Malaya.
Because of their relative affluence, the Peranakan were able to afford things that other ethnic groups in the Straits Settlements could not – such as education in the English language – many Peranakan spoke either Cantonese, Hokkien, or Malay (usually at least two of those three), but those who could afford it also learned English as a second or third language – often becoming extremely fluent. My own grandmother spoke Malay, Cantonese, Chinese, Hokkien as well as being fluent in English! She spent her childhood being educated at a convent-school in Singapore, from 1921-1926.
Because of their command of the English language, Peranakan men (Babas) often had an advantage over other ethnic and cultural groups in the Straits Settlements. Because they spoke fluent English, but were also fluent in many local languages, they were able to translate and interpret orders and information with minimal mistakes. This fluency in languages as well as their own familiarity with local customs meant that the British often appointed babas to important government and civic positions.
The Peranakan ran the civil service, they ran Peranakan societies, they operated schools, and were often captains of industry, finance, government, commerce and high society! Some Peranakan men even became ‘Capitan Cina‘ – Chinese Captains. This was the title given to civic and community leaders in the Chinese community. The titles, and the jobs which came with them, varied depending on time and place.
In some instances, the title was more or less honourary – but in others, capitans held significant legal and political authority! Wealthy capitans who represented and worked for their communities often tried to give back to their fellow Peranakan by establishing benevolent funds, welfare projects, and funding public works projects for the improvement of their communities.
The Peranakan and the Sinkeh
By the mid-1800s, the Peranakan were well-established in the prewar British colonial society that existed in the Straits Settlements. A significant number held positions of wealth, authority and power, running, or funding civic institutions and helping to operate the local governments and communities, working and trading with the British colonial administrators.
The Peranakan had been living in what became the Straits Settlements for centuries! In some cases, two, three, or even four hundred years! Generations of them had grown up and died in this world. The Straits Settlements was their home! They were Peranakan and in their mind – the Peranakan lived in the Straits Settlements – working with, and protected by, the British colonial government, and the might of the Royal Navy and the British Empire. They were not going anywhere, thank you very much!
…And then came the arrival of the ‘sinkeh‘…
‘Sinkeh’ (pronounced ‘sin-kay’) was a term used to refer to the thousands of Chinese peasants, migrants and indentured labourers who fled China between the 1800s-1950s, trying to find new homes in Southeast Asia. They were fleeing things like the Taiping Rebellion, the Boxer Rebellion, the Chinese Civil War, famine, disease and natural disasters. Many sold everything they had for a ticket on a junk which would sail from China to the Dutch East Indies, or the British Straits Settlements to the south.
The word ‘sinkeh’ is a corruption of the Chinese words ‘Xin Ke‘ (‘New Guest’), a reference to the fact that these people arrived in Singapore, Malacca, Penang and other colonial bastions within the last few decades, whereas the Straits Chinese had been living there for dozens of generations! And despite the name given to them – they were hardly treated as guests!
Quite often, sinkeh were looked down upon by the well-entrenched Peranakan. The Straits Settlements was THEIR HOME! They’d lived here for countless generations – in some cases, dating all the way back to the 15th century! They were slow, if ever, to fully accept, or even embrace the presence of the sinkeh.
The sinkeh often carried out menial tasks and occupied themselves with what was called ‘ku li‘ – Bitter Labour – which became the English word – ‘Coolie’. Sinkeh were often night-soil men, street-hawkers, shoemakers, construction-workers, and general unskilled labourers. Perhaps their most famous jobs were as longshoremen – unloading cargo-ships and depositing their wares into warehouses, or as rickshaw pullers.

Many sinkeh coolies plied labour-heavy, exhausting trades, such as being a rickshaw puller.
Both these jobs were backbreaking, exhausting and dangerous, and they earned little more than a pittance. The wages earned by migrant rickshaw pullers between 1880-1930 hardly changed in fifty years. Many sinkeh fell to the vices of prostitution, gambling, and most famously of all – Opium.

Antique opium paraphernalia, including two pipes, a number of bowls, and a small opium-lamp (for heating the opium), all set on a tray. Opium had been a scourge to the Chinese people for centuries.
By comparison with the Sinkeh, the Peranakan were tailors, shopkeepers, teachers, government officials, social and community leaders, artisans, silversmiths, craftsmen, businessmen, the owners of rubber-estates…the list was almost endless! My own grandmother was a dressmaker for almost half her life! Her brother was a pharmacist who operated an apothecary out of the ground-floor of the family shophouse…where my uncle still lives.

The family’s old shophouse. This used to be where my great-grandmother lived, and where my uncle still lives. My grand-uncle’s pharmacy was on the ground floor (down the stairs, and to the left). The shutters on the left, the staircase and the long, narrow profile were common features of prewar shophouses like this.
Given the massive differences between the Sinkeh and the Peranakan, you can understand the latter’s reluctance to be mistaken by the British (or anyone else!) as having absolutely ANYTHING in common with these ‘new guests’ from China! Many sinkeh often encountered open hostility and discrimination from the Peranakan, who were in most cases, completely unwilling to have anything at all to do with them!
The Fall of the Peranakan
The world in which the Peranakan lived was a world on borrowed time. For hundreds of years, the Peranakan had lived on the Malay Peninsula and Singapore with the Malays, Indonesians and Indians who also cohabited the long, narrow strip of land, and tiny island on its southern tip.
In the 1800s and 1900s, they took on a modified identity as the ‘Straits Chinese’, living alongside the Strait of Malacca, the Strait of Johore, and within the protection of the British Straits Settlements, under the governance of the British Empire.
For the most part, they co-existed peacefully with everyone else, and were among the most prominent ethnic groups in the Settlements. However, as the 20th century dawned, the Peranakan world started coming under attack from outside forces. By the 1930s, the traditional Peranakan home-life, and the arts, crafts and industries which they had kept alive for generations were starting to disappear.
The reasons for this were numerous. Outside influences from the West (movies and radio, for example), exposure to other cultures (some Peranakan traveled to Europe on massive, eight-week steamship voyages to study in British schools and universities), and exposure to new ways of living all affected how the Peranakan lived and worked.
The Peranakan, both nyonyas and babas prided themselves on their various traditional crafts. These were beautiful, but also time-consuming, labour-intensive, and difficult to learn. And more often than not, there is no automation process. Peranakan handicrafts cannot be mass-produced by machines.
The only way to keep them going is to pass down the skills from generation to generation. Silversmithing, pottery, carpentry, cabinetmaking, beading, sewing, embroidery, cooking, shoemaking, etc. From father to son, mother to daughter, grandfather and grandmother to grandson and granddaughter.
As the culture and lives of the Peranakan are steadily affected by outside influences and the Great Depression, in which many once-wealthy Peranakan families lose their fortunes, when the bottom falls out of the rubber market, it only takes one more sharp blow to finish many of them off.
The Japanese Invasion
That blow came on the 7th of December, 1941. The day which lived in infamy. The day on which Imperial Japan attacked Hong Kong, Malaya, the Philippine Islands, Pearl Harbor, Guam, Wake Island, the International Settlement of Shanghai in China, and quite literally overnight – started a war.
Between December of 1941 until February of 1942, troops of the Imperial Japanese Army swept down the Malay Peninsula, occupying the various settlements, states and cities along the way, outmanouvering or overpowering British and colonial troops as they try to fight back the enemy.
Singapore falls in a matter of days. Despite a numerical inferiority, the Japanese were able to move fast and strike effectively. They achieved mobility and speed on bicycles and tanks, neither of which were used by the British, which put them at a distinct disadvantage. In a few short weeks, all of British-held Malaya and Singapore is in the hands of the Japanese.
As the Japanese pass through Peranakan enclaves heading down the peninsula, civilians take whatever they can pack, carry and push, and flee for Singapore. The British dynamite every bridge they can find in an attempt to slow down the Japanese. They even blast the causeway bridge between Johor and Singapore to buy them more time.

The Japanese marching through central Singapore in 1942.
By now, anybody who can find an ocean-liner, yacht, tramp-steamer or any other form of water-transport hurriedly evacuates from Singapore City as fast as they can. Official evacuations organised by the British are only for British expatriates and other foreign nationals. The Peranakan have to fend for themselves or arrange their own escape as Singapore collapses around them. Anyone left behind after the last boats leave will have to contend with three and a half years of Japanese occupation.
The effect of the Japanese occupation was crippling. Between air-raids, fighting, chronic food-shortages, rationing and other deprivations, the Perankan were unable to continue the lives that they had built up over the preceding decades and centuries.
When the war ended in 1945, a long period of rebuilding began, but the old ways were lost forever. Their lives had changed so much by everything, and so many people had died, or been killed in the occupation that the ways of life and the structures which the Peranakan were familiar with were fast disappearing.
Coupled with wider outside cultural influences, overseas immigration, travel and the desire to break away from the lives shattered by the Japanese, the Peranakan started to fragment and spread. In the chaos of war, many arts and crafts which the Peranakan prided themselves on had been lost. The very skills on how to carry on these crafts were wiped out in the war.
Intricate beading, embroidery, how to create certain architectural decorations and details, lantern-making, porcelain manufacture…one by one these skills and crafts, for centuries prided by the Peranakan…were dying out. People no longer had the time, the money, the patience, or the interest to take up trades and crafts which took a lifetime to learn, and which was appreciated by an ever-dwindling pool of people. Many elements of Peranakan culture did not survive the war, and today, fewer and fewer people take up the crafts and occupations of their forefathers.
The Peranakan Today
The hell of the Japanese occupation forced the Peranakan to spread out around the world. The inadequacies of the British defenses in Malaya and Singapore had shown the ‘native populations’ that they could not rely on Europeans for their survival and protection. The Peranakan families which stayed in the Malay states or Singapore gradually melted back into mainstream society, away from the heightened perch which they had enjoyed under the British as ‘the king’s Chinese’.
That said – there is an increasing interest in the Peranakan in the 21st century. More women are interested in Sarong-Kebaya outfits, old townhouses and shophouse are being restored, or turned into Peranakan museums. Collecting Peranakan jewelry, porcelain, beaded goods and other handicrafts is slowly increasing.

Two books of my Aunty Sylvia’s (Sylvia Lee Goh’s) artwork, given to me by the author. She autographed them both! There was an exhibition of her paintings about nyonya at the National Gallery of Malaysia in Kuala Lumpur earlier this year,
The sheer rarity of the Peranakan culture, and the people who made it possible, is what is driving up interest in this once prominent ethnic group. The fact that people can’t find out as much about the Peranakan as they’d like to, is part of the reason why so may people are interested – it’s the mystery of the unknown.
Today, many people with Peranakan roots are trying to revive their lost culture. All over the world, from Singapore, to Malaysia, to Australia, to even further afield – even the United States!…there are Peranakan or Straits Chinese associations, clubs and societies, where people with Peranakan heritage can meet and exchange information.
There’s also been a resurgence in interest in Peranakan crafts such as beadwork and porcelain, and some jewelry firms have started making traditional Peranakan jewelry (such as the Kerongsang) for commercial sale. Peranakan antiques are rising significantly in value as people learn to appreciate their cultural and historical significance.
That said – the one thing about Peranakan culture that has never really gone away is traditional nyonya cuisine – Peranakan food! Restaurants serving traditional Peranakan food have popped up all over Singapore, Malaysia, and Australia in the past few years…there used to be one down the road from my house!
Closing Remarks
In finishing, I would like to dedicate this article to the memory of my grandmother – Bertha Fu Kui Yok (1914-2011), her mother, my great-grandmother, Leong Ah-Hiong (ca. 1885-1984), and to their family, whose lives inspired the creation of this article.
Where can I Find out about the Peranakan?
Due to the small geographic area which they lived in, the Peranakan can be tricky to find information about. However, excellent museums and restored historic houses do exist in Malacca, Penang and Singapore. Peranakan associations and clubs exist wherever large numbers of Peranakan tend to congregate – especially in Malaysia, Singapore and Indonesia.
Acknowledgements
Thanks to the various members of my extended family for their assistance with this article! Thanks to…
…Cousin Joyce, for her help with betel nuts!
…Uncle Charles, and other relatives, for the family photographs!
…Aunty Sylvia, for providing information on the Peranakan, and signed copies of her books on Peranakan paintings!
…Cousin Carolyn, for her help with nyonya cuisine!
Thanks also, to the wonderful volunteers at the Peranakan Museum, on Armenian Street, Singapore, and to the incredible Peranakan Mansion, in George Town, Penang. Without these two incredible institutions, it would’ve been impossible for me to photograph so many Peranakan items in one place!


