Grandmother’s Dressmaking Shears!


Why Granny! What big knives you have… 

Wonders never cease.

I believed that these had been lost when my grandmother moved to the nursing-home. But I found them under a whole pile of junk in a drawer at home. Right at the back. Probably why I never found them before, on previous sweeps around the house.

This fearsome-looking digit detachment-device…also known as HUGE GODDAMN SCISSORS!…is my grandmother’s original pair of dressmaker’s shears!

I remember these from when I was a little boy, and when gran used to scold me for snapping them around with innocent childish glee.

These cold steel hedge-trimmers were what my grandmother used to cut the cloth from which she used to make clothing back in the 50s. They’re professional dressmaking shears, not scissors…shears. And now they’re all mine, with which to flirt with the possibility of horrendous injury on a daily basis!

The shears, as far as I can tell, are about 60 years old. They’re made by the J. Wiss & Sons company of Newark, New Jersey, U.S.A., a respected German-American toolmaking firm of over 100-years experience and manufacture of bladed instruments. They’re the No. 28 bent-handle shears, meaning that they’re dressmaking shears, with an 8-1/8th inch overall length, and with a cutting-length of 3-7/8th inches. The bent handles at the end (which are deliberately bent upwards) are so that you can cut fabric while it’s lying on the table, without the bottom handle getting in the way.

Near as I can figure, these shears date to ca. 1950. I have found variations of the No. 28 shears in Wiss catalogues dating as far back as 1915, and as recent as right now, on a website selling J. Wiss products, but only the shears from the 1950s exactly match the ones I have on my desk right now. They’re stamped with the words:

“STEEL FORGED”
NO. 28″

inside an anvil-shape, on one side of the pivot, and…

WISS
Newark, N.J.
U.S.A.

…on the other, and WISS – INLAID, on the same side, along the blade.

They come with nice, black, Japanned handles, and the entire thing is made of steel. The shears are made of two parts (handle and blade – left, handle and blade – right), plus a screw and rivet at the pivot-point. There’s no plastic anywhere. That means that there’s nothing here which can snap off or warp or bend or crack and break. Solid, dependable and sharp.

These are not the biggest dressmaker’s shears you can buy, and nor are they the smallest. Wiss & Sons sell shears in sizes anywhere from 6.5 inches, all the way up to monsters which are a foot long! These are kind of like middle-of-the-road shears.

I had them professionally sharpened, and now, they’re back to being functional shears once more. Originally, the pivot was very stiff and squeaky. I tried to remedy this with oil, but it didn’t do anything to help the situation. In the end, I found that the best solution was to soak the scissors in an ultrasonic bath full of hot water. The heat and the sonic vibrations loosened up all the rust and gunk and dust and oil inside the pivot-point, and now the shears swing and slice cleanly, smoothly, sharply and most importantly, silently…apart from a quality-reassuring ‘schink!’ with each closure of the blades…

I cleaned the shears and have since added them to my growing pile of stuff that I need to restore my grandmother’s 1950 Singer 99k. Here’s a photo I took showing (most) of the stuff I gathered so far:

Looking for a pair of top-quality dressmaking shears like granny’s? Here’s a website with information on the company which made the ones I have: Joseph Wiss & Sons website.

J. Wiss & Sons officially lasted from 1848-1976. But the J. Wiss & Sons. brand is still used today, and you can still buy their marvellous, gigantic, all-steel dressmaker’s and tailor’s shears today.  

How to Service your Vintage Sewing Machine


Since posting my first sewing-machine piece here on my blog, I’ve received a comment asking for tips and tricks on how to service, clean and oil these machines. I figured I’d write up a posting here, to answer that question in greater detail.

Disclaimer etc: I am not a qualified, certified, expert, professional, master machine-repairman by any stretch of fact, fiction or the most rabid and erratic of imaginations. This is merely a small side-hobby of mine; but everything written hereafter, has been done so with the backing of research and experience gained from practice. I have serviced vintage and antique sewing-machines as a hobby, and have restored some for friends and family.

The information pertaining to sewing-machines as mentioned in this posting is strictly for older machines which are mechanically driven, and not those which are generally, post-1960s, which tend to be operated more via electronics and computerised systems instead of cranks, levers, cams and pistons.

How Does a Sewing Machine Work?

I figured I’d do a bit about this first, since it might bear importance later on.

Be they 100 years old, 150 years old, 50 years old, or brand new, all sewing-machines operate in the same basic manner.

Having prepared the machine for sewing, the following actions occur:

1. The needle descends and pierces the fabric. It retracts. As the needle rises up, it leaves a small loop of thread on the underside of the fabric.

2. The transverse shuttle/vibrating shuttle/rotating hook/oscilating hook (dependent on machine’s age and design) swings around. The nose of the shuttle or the swinging hook, catches the loop of thread left by the upper needle.

3. The loop of thread passes over and around the shuttle or the hook, which pulls the bottom thread through the loop as it goes along.

4. At the top of the machine, the thread take-up lever jerks upwards. This pulls the stitch tight and closes the loop.

5. The feed-dogs perform a four-motion movement. Up, back, down, forwards. This pushes the fabric up against the presser-foot, and shoves it back, out of the machine.

After those five steps, the whole process repeats again. Sometimes as slow as hand-sewing, or, as fast as you can run the machine.

Alright…let’s get to what you’ll need to do.

*SPECIAL NOTE: The instructions in this posting are on how to clean, oil and operate your machine. NOT on how to repair them or fix broken parts. By following the instructions in this tutorial, you understand that your machine is in WORKING ORDER, but requires cleaning and general maintenance*

Tools and Equipment 

This pertains specifically to old Singer sewing machines, but most of these things you can use to service any antique or vintage sewing-machine.

You will need…

Needle-nosed Tweezers

I cannot stress this enough. If you don’t have a pair of these…forget it.

You must have a pair. There is absolutely NO other way to get into the TINY little recesses of the machine to dig out the dust, lint, fluff, dead insects, broken needle-tips and other crap that builds up in a sewing-machine over the course of decades.

Forget about the Dyson or the Hoover or the Miele. They can suck like a tornado, they will not remove the bits of grime that are glued and stuck onto the machine, or which are hiding in tiny, inaccessible places. Without needle-nosed pliers, it’s almost pointless to start.

Tissues or Bog-Roll

Tissues or toilet paper to clean, wipe, polish, stop oil from dripping, etc. Don’t just take one or two sheets. Keep a box of the things next to you while you do this.

Cotton Buds

I think the Yanks call these things ‘Q-tips’. Everywhere else in the world, they’re called cotton-buds. Those little plastic shafts with fluffy cotton balls on the end, about two inches long.

You need these to clean, wipe or polish areas of the machine which a tissue or other polishing-cloth won’t reach.

A Powerful Torch

Personally, my eyesight is not good. But this would apply to anyone. You need a bright, powerful (preferably small) torch (‘flashlight’ to the Yanks) while you work. This is so that you can shine extra light into the really dark, tiny, tucked-away places of the machine where conventional lights won’t be able to reach.

A Miniature Screwdriver

Cute little thing, isn’t it? This little Singer screwdriver (or one like it) would’ve come with most vintage Singers when they left the factory, or your local shop. This is my screwdriver

Some sewing-machines come with these little wotsits already supplied. Very handy. I know for a fact that Singer machines were sold with their own personal screwdrivers. If you have one, good. If you don’t, toddle off to find the very smallest screwdriver you can find. A flat-head screwdriver, by the way. Ideally, the size should be 3mm wide.

*SPECIAL NOTE: For owners of Singer sewing machines with bentwood cases. If you don’t have the key for your case and the machine is locked inside, you can use a 3mm flat-head screwdriver as a makeshift key. It does not damage the lock and will serve the purpose admirably*

The screwdriver will be essential for…well…undoing screws and removing plates.

General-Purpose Oil

Get yourself a can of general lubricating oil. Something that’s used on things like hinges and suchlike.

THIS IS NOT TO BE USED TO LUBRICATE THE MACHINE.

The purpose of this oil is to lubricate the case-lock which holds the machine-case onto the machine-base. And this is just about the only thing that it should be used for.

Sewing Machine Oil

You will also need a bottle or can of sewing-machine oil. Ideally, you want sewing-machine SPECIFIC oil. But if you can’t, a high-grade, thin, runny machine-oil, suitable for sewing-machines, will suffice. Just don’t use 3-in-1 oil. It may say that it’s for sewing-machines, but I have it on good authority that this stuff is not the best thing to use. Personally, I use SuperLube machine-oil, which was the one recommended to me by my local repairman. You can buy this oil from your local hardware shop or your local sewing-shop in little 125ml bottles.

Eyedropper or Syringe

This is to distribute the oil around the machine. If you have a spray-can of machine-oil, of the type described above, then you can use the little plastic tube that comes with the can instead, but if the oil comes in a little glass or plastic bottle, then you’ll want something like an eyedropper or a syringe.

Some of the places that you need to apply oil to in a sewing-machine are quite inaccessible to a big, bulky bottle. This is where a local-application tube, or an eyedropper can come in handy.

A Bowl or Plate

Something that you don’t use anymore. This is to house any screws, nuts, feet, plates etc, that you remove from the machine during the course of your restoration. These things are TINY and they will roll away from you, given the chance. And if your machine is 50, 70, 90, 120 years old, chances are, if you lose a particular piece, you won’t be able to just go out and buy a new one.

Metal-Polishing Paste

You’ll also want a tube of metal-polishing paste. You can get this stuff from hardware stores and car-maintenance shops and suchlike. Personally, I use a German-made product called Simichrome, it does the job on most metals with ease (except brass, I think), and the results will look stunning.

Machine-Manual

If possible, you should get a hold of your sewing-machine’s manual. Now I realise that if you’re reading this, your machine is probably one that you picked up at an antiques shop, a flea-market, or which you inherited from granny (that’s how I got mine!) and that half the crap that should have come with it, is missing (just like with me!).

Don’t worry. You can buy (or sometimes if you search really hard, download for free) facsimiles of original sewing-machine manuals.

Having the manual is a big help for obvious reasons. It shows you how the machine goes together, how to oil it, what all the parts are, and most importantly, how to use it!

Right…Got all those things? Let’s get started.

Cleaning the Machine

I’m going to assume that the machine you have is a really old one. By that, I mean at least 60 years old. No later than about 1955-1960 (after that, the technology kinda changes a fair bit and this sort of information isn’t as pertinent to more modern machines). Most likely, it looks something like this:

My Singer 128 Vibrating Shuttle machine

This little sweetheart is a Singer 128 model, and is representative of the kinds of machines seen around the turn of the last century. For those not very good with dates, that’s ca. 1890-1910. Possibly, you might have a slightly later model, such as a Singer 99-series model, from ca. 1920-1960. They look like this:

My grandmother’s Singer 99k

Or perhaps you’ve got one of those big, old foot-driven treadle-machines, which look like this?

Singer 66 treadle machine that I snapped at an antiques shop

Regardless of what machine you have, if it looks like those (or is very similar to those) and is of advanced age, this tutorial should cover all the necessary directions for getting it running again.

The first process of cleaning is de-linting or de-fluffing the machine.

These old machines have a LOT of places where dust, broken needles, fluff, lint, loose thread, bread-crumbs, loose diamonds and other bits and pieces can fall in and hibernate. They jam up the machine and make it difficult to run (or make it run not at all!). It is essential to remove as much of this stuff as possible before moving onto the next step.

When cleaning the machine, you want to start with ONE area at a time. Broadly speaking, a sewing-machine is divided into four basic areas:

1. Needlebar Assembly

The needle-bar is the area of the machine at the head of the arm (the bit that you pass the fabric under). This is comprised of the…

– Faceplate.
– Needle-bar.
– Presser-foot bar.
– Foot-lever.
– Takeup-lever.

 2. Bobbin Area

The bobbin area is directly beneath the needle-bar and presser-foot. It is comprised of the…

– Bobbin
– Bobbin-case
– Oscilating hook/rotating hook/shuttle.
– Feed-dogs.
– Slide-plate/s.
– Needle-plate.

3. The Undercarriage

The underside of the machine is where all the secondary cranks and pistons hide out. This is accessed by unscrewing any securing-bolts or nuts, and lifting the whole machine UP and BACK on a pair of hinges. This is where you would traditionally store things like spare needles, manuals, bobbins, scissors, etc. Small fiddly things that you might need. You need to clean in here to ensure that the bobbin-case and the oscilating hook (or other stitch-making apparatus) works properly.

4. Handwheel Assembly

The handwheel assembly and clutch-wheel is the part of the machine right at the back, on your right. This is comprised of…

– The handwheel (big wheel).
– the clutch-wheel (small wheel inside the big wheel. Also called a stop-motion wheel).
– Bobbin-winder
– Drive-belt (if your machine is electrically powered, or a mechanical treadle-machine).
– Hand-crank (if your machine is manually-powered).

Now that I’ve labelled those areas, pick one, and start the de-linting or de-fluffing process. This involves disassembling the area to as far a level as you’re comfortable with/capable of, and poking around with your tweezers (the all-important needle-nosed tweezers I mentioned earlier!) to remove any and all fluff, dust, hair, lint and thread that you might find.

Take your time with this. These old machines gather dust and crud like the Amish gather weaving-looms.

Work through each part of the machine, area by area, systematically. After delinting/defluffing, you want to take your tissues and wipe the area as clean as you can. You might also like to squirt a TEENSY bit of polishing-paste to clean a particular area and give it more of a sparkle. This does a lot more than make it look nice – it helps the machine to run better.

A Word of Caution

 In old Singer sewing-machines (and, I believe, in other makes and models), there is often a piece of RED FELT hiding inside the bobbin-well. LEAVE IT ALONE!!!

It is NOT lint. It is NOT junk. It is part of the machine’s design. Do NOT remove it. It is important. Exactly why it is important, I will explain later.

This is the red felt. I’ve included these photographs at the request of a reader, who wanted to see its exact placement within the machine: 

If the machine looks a bit weird, its because I unscrewed and removed the needle-plate underneath the presser-foot to take these photographs.

In these photos, you can also see the bobbin (round spool), bobbin-case (thing that the round spool is housed in), bobbin-release button (round button with crosshatching on top) and the feed-dogs (the raised bits with little corrugations on top).

After thoroughly de-linting and wiping down every part of the machine where lint is want to hide (take your time with this, trust me, there’s a LOT of places!), then you move onto the fun part.

Oiling your Machine

Right. You’ve pulled the whole thing apart. You’ve de-linted the machine, you’ve wiped it down, you’ve polished it nice and clean. Now you need to oil it.

Do NOT skimp on this step. Trust me, it’s important. Don’t ever worry about putting in too much oil. Better that the machine should drown in happiness, rather than break it’s back from overwork.

Now that you have thoroughly cleaned the ENTIRE machine, you need to oil it.

Take out your bottle of high-grade machine-oil, made for, or suitable for use in sewing-machines.

If you have a can of the stuff with a local-application tube, even better. If not, then also take out of its place of secretion, your eyedropper or syringe.

What you want to do now is to oil your machine. This is not hard to do. And to be honest, it’s kinda fun. It may take a while, but don’t give up hope. Just keep squirting and testing, squirting and testing.

Oiling a sewing machine is easy. Just follow the golden rule: Oil anything that moves. And oil it more than less.

Now, your machine might run jerkily and stiffly, or, as was in my case, it literally would NOT run AT ALL, and that’s with considerable effort put into trying to rotate the handwheel.

In either case, the procedure is the same.

Take your oil and drip it into, and onto any place in the machine where something moves, or something rubs up against something else. The key spots to oil are the key spots where I mentioned earlier, you need to clean. The four main parts of the machine. The needle-bar area, the bobbin-area, the handwheel-area and the underside.

How long does all this take? I can’t tell you. It’s dependent on the machine. With my first machine, which didn’t move at all before it was oiled, it took nearly an hour (about 45-50 minutes). Yours might take longer, or shorter than that.

Don’t worry about getting oil all over the place. These machines are designed to put up with that. More oil is better than not enough. So squirt or drip it all over the machine in places where it needs to go.

Your machine may have a series of holes all over it. Such as along the top of the arm, around the handwheel-area, at the top of the needle-bar area, and so-forth. These are OILING HOLES. Yay! You can pour as much oil down there as you can fit. The oil will seep into places such as pistons, rods, shafts and cams, and get them to wake up and start moving.

A word, though. Be sure that you clean these holes BEFORE you pour oil down them. You don’t want a dead blowfly inside your machine-head oiling hole to be sucked down into the guts of your great-grandmother’s Singer, to be mashed up into bug-goo.

While you oil the machine, periodically operate it. Pump the treadle, press the foot-pedal, push the knee-lever or turn the crank-handle. This will encourage the machine to move, and this, in turn, will spread the oil further around the machine. Keep oiling, pausing, operating, oiling, pausing, operating, over and over and over.

Oh, and remember that red felt I mentioned earlier? The stuff that hides in the bobbin-area?

Drench it in oil.

It’s there to act as a sponge. Squirt a whole eyedropper of oil onto it. This will keep it moist and happy, and will stop the shuttle or the oscilating/rotating hook from scratching against the metal near the felt, and prevent wear, tear and possible damage.

When have you put on enough oil?

You’ll have put on enough oil when the machine runs freely. You should be able to put your foot down, you should be able to press the knee-bar, you should be able to treadle like an Olympic cyclist, you should be able to crank at the fastest possible speed, and the machine offers no resistance at all.

At the same time, the machine should be a lot quieter. It won’t rattle, squeak, jerk, groan or shake the entire table when it runs. If it does, then it needs more oil.

“I’m done…Now what?”

Okay. You’ve finished the entire project! Now wasn’t that fun?

Once the machine is running and you’re hankering to become the next Savile Row master-tailor, you need to keep your machine in good condition.

Basically, this means keeping the dust off it, changing any broken needles, finding accessories, spare parts and other doodads for it, and keeping it oiled.

These old machines drink oil. And it’s important to keep them hydrated. After any significant project (say you just finished making a whole new set of slip-covers for the pillows and cushions of that big, three-seater couch and two armchairs in the living-room), you should oil the machine all over again. Not much, maybe 2-3 drops in each place. When you’ve done that, run the machine at-speed for about 2-3 minutes, to work the oil in, and then put it away.

Given regular maintenance, a vintage or antique sewing-machine will run for another 100 years. These machines were incredibly tough and they were designed to sew together anything short of sheet-metal. They will EASILY chomp through canvas, leather, denim, or even multiple layers of paper (my record is 56 pages, or 28 sheets of paper…I used the machine to sew together it’s own instruction manual!). Being made of steel and wood, there’s almost nothing on these machines that will ever wear out, apart from tires, protective rubber feet, belts and needles. These can generally be easily replaced, either with reproduction parts, original parts, or from materials jerry-rigged for the purpose (I have seen people who re-belted their old treadle or electromechanical machines using nylon rope, to great effect, I might add).

Dos and Don’ts with Old Machines

DO – Take your time with cleaning and oiling it. Nothing was ever gained by trying to rush something, when restoring a vintage or antique *anything*

DO – Use the proper equipment, materials and tools. You won’t get anywhere if you don’t have the right stuff to do it with.

DO – make sure that you cover EVERY part of the machine when you service it.

DO – check for things such as broken and/or bent needles (if such, then remove them), worn belts or tires, missing plates, bobbins etc. Finding reproduction or original parts for your machine will depend on make, model and of course, age. Singer being the most popular brand, it will be easier to find parts for a Singer machine than almost any other).

DO NOT – run the machine with the presser-foot down, and no fabric between the foot and the teeth of the feed-dogs. This will cause the teeth to scrape against the bottom of the presser-foot, and cause unnecessary wear and damage.

DO NOT – force the machine to operate when it won’t do so. Just keep oiling it.

DO NOT – operate an electrically-powered machine UNLESS you are either damn sure that the electrics are intact, or unless you’ve just had the electrics checked by a certified sewing-machine repairman, or qualified electrician. Don’t forget, these machines are about 75% metal. You don’t want to zap yourself making a quilt.

To the person who inspired this posting (I’m going to assume you know who you are), I hope this answers everything you needed to know about restoring your Singer sewing-machine. If it doesn’t, you’re welcome to post a comment or a question and I’ll do my level best to answer it.

Lots of Little Singer Pieces!


No, I didn’t drop my grandmother’s sewing machine down the staircase, resulting in a carnage of wood, metal, rubber and broken tiles. What I did manage to do, was to get my hands on the first group of several attachments which I’m chasing after for my restoration project involving my grandmother’s 1950 Singer 99k sewing machine.

I already have the buttonholer, and now, I managed to get some more extra bits and pieces for it.

A poke around the flea-market today dredged up the following treasures from the sludge of the drudge:

Yes, some of it is hidden by the sticker in the middle (which was original to the booklet), but it reads in its entirety:

“INSTRUCTIONS 
for using and adjusting
Singer BRK electric motors
with knee-control for
family sewing-machines

The Singer Manufacturing Co”

The bit in italics is the part that’s covered by the warning-sticker.

Along with the cutesy little booklet, which is the one which my Singer would’ve come with when it was brand-new, I bought this:

It’s a box of Singer sewing-machine attachments…or some of them. I haven’t managed to find ALL the pieces I need yet, but good things come to those who wait. Inside the box, we have:

I know what about 3/4 of the objects inside that box are. Others, not so sure. For example, we have inside the box, a…

Seam Guide

The seam-guide, held in-place by it’s accompanying nut (which simply screws into the appropriate hole in the machine-base), is used to guide two pieces of fabric under the presser-foot during sewing and to make sure that the size of the seam is consistent throughout the piece. This is an older seam-guide and sewing-machine, so it doesn’t come with measurement-markings. If you wanted that, you’d need to use your measuring-tape as well.

Hemmer Foot

The hemmer-foot is used to create a hem along the edge of raw fabric (to prevent fraying). You feed the fabric through the machine and through the hemmer. As the fabric passes through, the curved bit at the top flips the fabric over to create a neat, even fold which is then stitched into a nice, crisp hem.

Adjustable Hemmer

This is an adjustable hemmer. It’s much like the one above…it does the same thing, it makes hems. But this one has a slide and gauge on it that allows you to make hems of different widths, according to your taste. Anywhere from a full inch, all the way down to 1/16 inch.

Binder Foot

The binder or binding foot does…just what it says it does. It binds. It’s handy for stuff like attaching lace, ribbons and other decorative things to the edges of clothing.

Screwdriver

Isn’t this cute!? It’s a teensy-weensy-widdle-bitty screwdriver! And, it’s a Singer-brand screwdriver, too! It’s probably got a head of 2mm or something. Exactly WHAT one would use this for on a sewing machine…I’ve no idea…but it sure is cute. None of the screws on the Singer are this tiny, but I suppose I’ll hold onto it for the sake of completeness. And I can let the mice borrow it when they need it.

Finally, there are two mystery-feet inside the box. I haven’t figured out what they do or what they are.

They hold SIMANCO part-numbers 86177, and 85954. I’ve tried looking them up, but I can’t find any lists of serial-numbers that correspond.

If anyone knows, tell me!

In the meantime, my quest to complete the Singer continues.

In an unrelated note, I found an antique handcrank sewing-machine at the flea-market today. I had no intention of buying it, for a number of reasons (completenes, quality, manufacture, the list goes on), but I reckoned it looked kinda cool. So I took a couple of photos of it:

It came with it’s original coffin-style case and was dated to ca. 1900, made in Germany. Other than that…the seller had no idea.

Hand-crank machines such as this one were very common. Big companies like Singer were still making them, well into the 1940s and 50s when electronic machines had already taken over. I suppose they had an advantage during the War, when electrical supply was unreliable at best…

I’m still on the hunt for a Singer oil-can and more and more feet and fiddly bits. Here’s a group-shot of everything I’ve found so far:

The red box contains the buttonholer. The green box contains the feet and attachments. The manual balancing on top is how to install and/or remove the machine-motor that’s hidden around the back of the machine. The machine itself is a 1950 Singer 99k knee-lever machine.

Drifting over the Deep: The Mystery of the Mary Celeste


The Mary Celeste is one of the most famous ships in all history. It’s up there with the Titanic, the Lusitania, the Normandie and the Andrea Doria. It’s claim to fame was the disappearance of all its passengers and crew during a voyage across the Atlantic Ocean in 1872.

How, and why the crew and passengers deserted the ship, never to be seen again, has been a mystery for over a century, and to this date, nobody knows the real reason, although there have been several theories, some more plausible than others. But what really happened onboard the ship?

The story of the Mary Celeste is so famous that there are dozens of conflicting accounts about what is real, and what isn’t. So…what is real, and what isn’t?

What Was the Mary Celeste?

The Mary Celeste was a sailing ship. To be precise, she was a square-rigged brigantine, a medium-sized ocean-going ship with two masts. She plied the oceans of the world as a cargo-vessel, transporting goods across the Atlantic Ocean.

She was built in the early 1860s before and during the American Civil War, and was originally a Canadian ship named the Amazon. She ran aground in 1867, off the coast of Nova Scotia. She was floated, repaired, and then sold to the United States. The ship was restored, rebuilt and modified, and in 1872, it became a merchant-ship transporting cargo across the Atlantic…the Mary Celeste.

The Last Voyage

On the 3rd of November, 1872, the Mary Celeste’s new captain, Benjamin Spooner Briggs, wrote a letter which he addressed to his mother. In it, he wrote, in part:

“My Dear Mother:

It’s been a long time since I have written you a letter and I should like to give you a real interesting one but I hardly know what to say except that I am well and the rest of us ditto, It is such a long time since I composed other than business epistles.

It seems to me to have been a great while since I left home, but it is only over two weeks but in that time my mind has been filled with business cares and I am again launched away into the busy whirl of business life from which I have so long been laid aside. For a few days it was tedious, perplexing, and very tiresome but now I have got fairly settled down to it and it sets lightly and seems to run more smoothly and my appetite keeps good and I hope I shan’t lose any flesh. It seems real homelike since Sarah and Sophia got here, and we enjoy our little quarters…”

“Sarah” and “Sophia” are Sarah and Sophia Briggs, the captain’s wife, and two-year-old daughter, who accompanied him on the voyage.

“…We seem to have a very good mate and steward and I hope I shall have a pleasant voyage. We both have missed Arthur and I believe we should have sent for him if I could have thought of a good place to stow him away. Sophia calls for him occasionally and wants to see him in the Album which by the way is a favorite book of hers.

She knows your picture in both albums and points and says Gamma Bis, She seems real smart, has gotten over her bad cold she had when she came and has a first rate appetite for hash and bread and butter. I think the voyage will do her lots of good. We enjoy our melodeon and have some good sings. I was in hopes that Oli might get in before I left but I’m afraid not now.

We finished loading last night and shall leave on Tuesday morning if we don’t get off tomorrow night, the Lord willing. Our vessel is in beautiful trim and I hope we shal have a fine passage but I have never been in her before and cant say how she’ll sail. Shall want to write us in about 20 days to Genoa, care of Am. Consul and about 20 days after to Messina care of Am. Consul who will forward it to us if we don’t go there…

…Hoping to be with you in the spring with much love

I am Yours affectionately
Benj”

“Arthur” is Arthur Briggs, the captain’s other child, his seven-year-old son (who at the time, was living with his grandmother, the captain’s mother, the ‘Gamma Bis’ mentioned in the letter).

At this time, the ship was docked in New York Harbor.

On the evening of the 4th of November, 1872, Captain Briggs and his wife, Sarah, have dinner with Captain David Reed Morehouse, and Mrs. Morehouse. The two captains have been friends for years, and coincidentally, are both sailing across the Atlantic to Europe, but on different ships, a few days apart.

It is the 5th of November, 1872. The Mary Celeste takes on its cargo for the voyage: 1,704 barrels of highly flammable industrial-grade alcohol. It is to be transported to Italy where it will be used in the manufacture of wine. It also finishes its provisioning for the crossing. It carries enough food for ten people for six months at sea. The ship is seaworthy and ready to go.

On the 5th of November, 1872, the Mary Celeste says farewell to civilisation. It weighs anchor, sets its sails and leaves Staten Island, New York, for the Atlantic Ocean.

On board are six sailors, all of them experienced. All of them level-headed, reasonable men, English-speaking and religious. Providing their meals is the ship’s cook. Their commanding officer is the captain, Benjamin Briggs, who has had several years experience at sea. Joining him on his voyage across the sea to Italy is his wife, Sarah Briggs. With her, she brings their two-year-old daughter, Sophia. Sarah is not afraid, and is not worried about the safety of her daughter. She is an experienced sailor, and is confident that this will just be another of several voyages that she has made with her husband’s company. She’s already been on at least four voyages with her husband before, and is a hardy woman, used to life at sea. Her husband has been a maritime captain for the past ten years. What could possibly go wrong?

The Mary Celeste leaves the safety of the New England shore and sets out into the Atlantic. It charts a course East-by-South, which would take it into the mid-Atlantic, and then straight across, past the Rock of Gibraltar and into the Mediterranean Sea.

For three weeks, the voyage is uneventful. The weather was unremarkable and there were no storms or especially strong winds. Onboard the Mary Celeste, everything is calm and normal. The crew man the ship, and Mrs. Briggs tends to her husband and daughter. On the 25th of November, Captain Briggs notes in his logbook that they have sighted the island of Santa Maria (“Saint Mary”), part of the collection of islands known as the Azores…and then…

Nothing.

As far as the world is concerned, the crew and passengers of the Mary Celeste abandoned their ship on, or shortly after that date, for reasons unknown. For the next nine days, the ship wandered the ocean, in a vaguely eastern course. With no-one at the helm to guide the ship, it started a northward tack that it never pulled away from, and just kept sailing…

Onboard the ship, in detail, were… 

The Captain. Benjamin Briggs. An experienced sailor of several years experience. He is 37 years old.

Sarah Elizabeth Briggs. The captain’s wife. She is 31 years old. They have been happily married for ten years and have two children. A boy, Arthur, aged seven (then living with his grandmother, the captain’s mother back in Massachusetts, U.S.A.), and a girl…

Sophia Matilda Briggs. The captain’s youngest child, and daughter. She is two years old. She is being brought with her mother on this voyage across the Atlantic.

Albert Richardson. First Mate. Twenty-eight years of age, and a capable and trustworthy seaman.

Andrew Gilling. Second Mate. A Danish man of 25.

Ship’s Cook and Captain’s Steward: Edward William Head. 23 years old. Not part of the deck-crew, his job is to provide good, wholesome food for the captain, his family, and for the crew of six, strong young men whose job it is to sail the ship safely across the Atlantic Ocean. The remaining crew are four German sailors:

Volkert Lorenson (29), Boy Lorenson (23), Arian Martens (35), and Gottlieb Godenschall (23).

Discovery of the Ship

As if by fate, the ship that stumbled across the Mary Celeste was the cargo-ship Dei Gratia, loaded with petroleum and bound for Europe. It had left New York on the 15th of November, sailing East-by-North. It too, had had a rather unremarkable, and ordinary voyage. It was on a southerly tack that the ship’s helmsman, John Johnson, noticed something out of the ordinary.

Let’s be honest. Standing in front of a ship’s wheel for hours and hours and hours on end…is…boring.

So what would you do?

You’d find ways to distract yourself from your boredom.

For a helmsman at sea, the best way to distract yourself was to go sightseeing.

Johnson, probably bored with standing at the ship’s wheel for ages, popped out his telescope and had a peek around the ship. Eventually, his peekings glanced in a southerly direction, off the starboard side of the ship. It was at this point that he noticed a ship several miles away. Even at that distance, he could guess that something was wrong. It was not so much ‘sailing’ as it was just ‘floating’. It sloshed around and only seemed to be making a show of keeping to some sort of course. It wasn’t sailing, it was yawing. ‘Yawing’ is when a ship’s bow swings from side to side as it moves forwards. No ship with someone in control of it would ever do that, since the bow would always be pointed straight ahead. Johnson knew at once that something was up, and called Second Mate, John Wright to have a look.

Wright agreed that the ship was acting weird, and together, they alerted the captain.

The captain ordered the ship turned southwards so that it would meet up with the phantom vessel. When they were within shouting distance, the captain took out his telescope to have another look. He recognised the ship at once as the Mary Celeste.

How could he do that? Not just by the name painted on the bow, but because he’d actually seen the ship at anchor in New York! The captain was David R. Morehouse, the man who had dined with Captain Briggs on the night before the Mary Celeste’s departure.

To say that Capt. Morehouse was surprised was to put it lightly. The Mary Celeste had a ten day head-start on its voyage! It should already be docked at the Italian city of Genoa by now! …Instead, it was floating around like a tin cup in the middle of the ocean…

As they drew even closer, they noticed nobody in the rigging…on deck…and nobody manning the ship’s wheel. By now seriously perplexed, Captain Morehouse ordered First Mate, Oliver Deveau overboard. Deveau lowered one of the Dei Gratia’s lifeboats and rowed across to the Mary Celeste. He made his boat fast against the side of the ship and climbed aboard.

He called out for the captain, his wife, and the crew…but nobody answered. With the Dei Gratia sailing alongside, Deveau began making an examination of the ship.

First, you have to understand that the Mary Celeste is not an isolated incident. Ships were found abandoned in the middle of the ocean on a regular basis. Deveau’s examination of the ship was to determine whether or not it was seaworthy enough to sail it back to land. If he could, then he and the rest of the Dei Gratia’s crew would get salvage-money! By law, any persons who found an abandoned ship at sea in usable condition, and returned it to land, was entitled to salvage-payment. Salvage-payment being a paid out as a cut of the ship’s insurance-claim.

But as Deveau explored the ship, he found more and more things curiously wrong. He, and other subsequent investigators noted that…

– The ship’s one lifeboat was missing, its davits empty.
– Two of the ship’s three hatch-covers were open to the sea.
– The hatch to the hold was sealed and shut.
– The ship’s cargo, highly flammable alcohol, was tied down and secure and undamaged.
– Nine of the 1,704 barrels had sprung leaks. Alcohol had dribbled out of them.
– Two of the ship’s three emergency water-pumps were out-of-action.
– The ship’s papers, apart from the logbook, were missing.
– The ship’s chronometer (sea-clock used for navigation) was also missing.
– The ship’s sextant (another navigational-aid) was also missing.
– The ship’s stove in the galley (kitchen) had been shifted from its foundations.
– There was a 3ft-depth of water in the ship’s bilge.
– Most, if not all, of the crew and passengers’ personal possessions had been left behind.
– The glass shield over the ship’s compass was smashed to pieces.
– The ship flew no distress-flags of any kind.
– The ship carried no alcohol at all (Capt. Briggs was a teetotaler), except for its cargo.
– The ship’s provisions of water, food and essential supplies were undamaged.
– A single length of rope trailed off the ship into the water.

Captain Morehouse did not understand at all. He knew Captain Briggs well. He had been his personal friend for years. They’d eaten dinner together just a few weeks before! He knew Briggs to be a steadfast, intelligent man of sound mind. Religious and a teetotaler. And yet, he, his wife, his child and all of their crew had left the ship, gotten into the lifeboat and just gone!

Why?

The ship was in no danger of sinking. The ship had not had a fire onboard. The ship’s cargo was not in any immediate danger. There was six months’ worth of food, fresh water and other provisions stored safely away below deck. It was all unspoiled and perfectly good for eating. What would make a seasoned seaman, an experienced set of crew and a hardy and trusting wife leave a perfectly good ship and trust their lives to a small, wooden, six-oared lifeboat?

Neither Captain Morehouse, nor any of his crew could figure out why.

After a thorough examination of the ship, First Mate Oliver Deveau determined that…apart from the water sloshing around in the bottom of the ship, which could easily be pumped out…the vessel was in no immediate danger of sinking, fire, breaking up, or any other potential emergency.

Captain Morehouse decided to claim salvage rights on the ship. He ordered a skeleton crew aboard the Mary Celeste, and escorted the mystery ship to the Mediterranean Sea.

On the 13th of December, 1872, the Mary Celeste and the Dei Gratia arrived at Gibraltar. At once, an inquiry was held into the condition of the ship, its cargo, its insurance, and of course…the mystery surrounding its lack of crew and passengers.

The Admiralty Court in Gibraltar questioned, examined, cross-examined and interrogated every witness they could find. This included Captain Morehouse, his officers, and James Winchester, principal owner of the ship (of which the late Capt. Briggs was a partner).

Hundreds of questions were asked about the captain, the crew, the crew of the salvaging vessel, the type and condition of the cargo, conditions onboard the ship, and what might possibly have caused an experienced captain, his family and crew, to abandon a perfectly sound vessel.

Theories of the Mary Celeste

There are as many theories about what happened to the passengers and crew of the Mary Celeste as there are hairs on your head (or grains of sand on the beach, if you happen to be bald).

I won’t list them all here, but they ranged from the possible, the plausible, to the outright ludicrous. Everything from krakens (giant, squid-like sea-monsters), to the Bermuda Triangle, to the Black Death and pirates.

What REALLY happened will of course, never be known. All we can surmise is what we can gleam from the evidence. But what were some of the theories that were put forward, both at the time, and later on?

Piracy

An obvious theory. Pirates attacked the ship. They kidnapped and/or killed everyone onboard, and then sailed off.

But why did they take the ship’s chronometer? It was a valuable scientific instrument. Maybe they hoped to sell it. But why the sextant? Surely they had their own. And what about all the charts, maps and documents?

On top of this, there was no violence seen onboard. No blood, no gunshots, no damage to the ship other than what might be caused by the sea. Under the captain’s bed, his sword remained sheathed and unused. Surely if the ship was attacked, he would’ve used it to defend his family and men?

Any valuables that the ship might have held were untouched. Jewellery, men’s personal effects such as their pipes, clothing, pocketwatches, rings, money…were all left as they were. In the captain’s cabin, Mrs. Brigg’s sewing-machine, in the 1870s, a valuable piece of household equipment, sat untouched. A dress that she was making for her daughter was still laid on it, the thread unbroken.

Sea Monsters!

Another popular one. This theory supposes that a giant squid, octopus, kraken or other equally horrific and ugly sea-creature attacked the ship and snatched off all its crew and passengers, which it then either drowned or ate.

Fascinating…but unfounded. If it was a sea-monster…why was the ship’s lifeboat missing? Why was the ship’s master timekeeper, it’s chronometer, gone? Why was half the captain’s paperwork missing from his desk? And the sextant? A sea-monster would have no need for such things.

Mutiny and Drunkeness

Perhaps the crew mutinied against the captain and his family, killing them, dumping them overboard and then sailing off in the lifeboat?

But then why didn’t they take clothes? And food? Money?

On top of that, the captain was sailing with his wife and young child. He wouldn’t have just Shanghaiied a bunch of men, chucked them onboard ship and sailed off across the ocean. Indeed, the crew were carefully chosen for their temperaments, skills and experience. Furthermore, Capt. Briggs was a teetotaler. There was not a drop of alcohol aboard his ship, apart from the barrels in the hold. And the alcohol there was of an industrial quality, quite unfit for regular consumption. Although it’s not mentioned anywhere what it was, it’s likely that it was methanol, a highly concentrated alcohol that would’ve been toxic to humans.

The Bermuda Triangle!

Absolute rot.

The Bermuda Triangle is located off the south coast of North America, several hundreds, thousands of miles, from the course and position of the Mary Celeste.

Seaquake!

One of the more plausible theories, although not one given very much serious consideration back in the 1870s, was that of a seaquake.

A seaquake is like an earthquake. Except…it…happens at sea. This theory supposed that the ship sailed over a seismically active area of the sea. Without warning, the tectonic plates shifted. The resulting abrasion sent off shockwaves through the water, which threw the ship around. Fearing for their lives, the passengers and crew dropped everything, boarded the lifeboat and sailed off!

The Azores, the last recorded sighting of land in the ship’s log on the 25th of November, is a seismically unstable part of the ocean. The Azores themselves were formed of volcanos and earthquakes. Such a jolt might explain why the ship’s stove, a solid iron structure bound to weigh several dozen pounds, was thrown off its mountings.

But ships are designed to cope with stuff like this. And even if the ship had sprung a leak, it had three pumps to drive the water out! Abandoning ship was done only as an absolute last resort. A captain such as Briggs would have to have had a truly stupendous reason for abandoning ship. And his vessel being rocked around  a bit by the waves was not deemed sufficiently life-threatening to allow this to happen.

Fume Explosion

The theory given the most credence by the evidence, apart from the possible seaquake one, is that of an alcoholic explosion.

This theory supposed the following:

Faulty barrels stored within the ship’s hold sprang a leak. When the ship was discovered, nine barrels of the 1,704 were found to be leaking or empty.

The alcohol within the barrels, no-longer contained, spread out across the floor of the hold, which was tightly sealed to prevent damage from water. Fumes from the alcohol seeped throughout the ship. This possibly caused a panic. Capt. Briggs was not used to transporting such dangerous substances such as alcohol…in fact, this was the first time he’d done so!

To prevent a potential explosion, from the alcohol-fumes coming in contact with a spark or naked flame, or possibly, because of a naked flame igniting the fumes, fear of, or the result of an explosion blew off two of the hatch-covers.

Fearing for their lives and the safety of the ship, the captain, crew and the captain’s family lowered the ship’s lifeboat into the water. There might be a fire onboard caused by the deadly alcohol fumes. The captain took with him what he judged to be the most important documents, along with the ship’s marine-clock. In the panic, he forgot the logbook.

The boat was secured to the side of the ship with a rope. Once the fumes had dissipated and the danger had passed, the decision would be made to pull on the line and draw the boat back to the ship and resume their journey.

During the wait, the rope securing the boat to the ship snapped or came undone, possibly due to a change in the wind, or a storm. The ship, being under sail, would be moving too fast for the occupants of the boat to catch up with it using the lifeboat’s oars. The passengers and crew of the Mary Celeste would’ve drifted rapidly out of sight of the ship, and would’ve either been wrecked near the Azores, drowned in the Atlantic, or died of starvation and dehydration in the packed lifeboat.

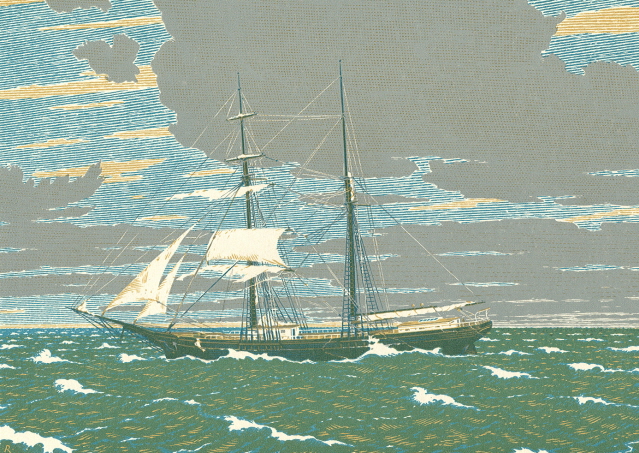
This engraving of the Mary Celeste, made according to witness testimonies, shows how the ship’s sails were set when the vessel was found adrift. In their haste to abandon ship, for fear of a fume-explosion, not all the sails were trimmed. This left the ship with enough surface-area to pick up significant amounts of speed if the strength of the wind increased, causing the single lifeline that held the lifeboat to the ship to snap under the strain, setting the ship’s passengers and crew adrift in the open ocean.

The Inquiry into the Mary Celeste

Shortly after the two ships, the salvager and the salvaged, reached Gibraltar, an inquiry into the Mary Celeste disaster was held at the Admiralty Court by the British Royal Navy. Witnesses, experts, sailors, friends, business-partners and acquaintances were all questioned and interrogated. It was a slow, frustrating process.

Not least of all because of a man who’s name was Flood.

Frederick Solly-Flood, to be precise.

Frederick Solly-Flood was the Attorney-General of Gibraltar at the time.

During the inquiry, the judge listened acutely to everything that was told, and praised the crew of the Dei Gratia for their attention to detail, their bravery and skill in rescuing the ship (if not it’s crew and passengers), and bringing it safely back to land.

Frederick Flood, however, had his own agenda.

Flood was hell-bent on proving that the passengers and crew of the Mary Celeste had all met with some horrible, violent, bloody end. It was he who first suggested the theory of a drunken mutiny. He even rowed out to the ship to find evidence!

He found the broken, leaking barrels, the alcohol, the captain’s sword and cut-marks along the railings. He proposed the theory that the crew got at the alcohol, drank themselves blind, murdered the captain, his wife, his daughter, his first mate, chucked them all overboard, then got into the lifeboat and rowed…away…from a perfectly good ship…

…Yeah it kinda…fell to pieces in court.

Indeed, not a single piece of ‘evidence’ that Flood submitted was found to be what it was! The barrels were empty because they were leaking (they’d been built of red oak, a porous wood which would’ve explained the empty barrels). The damage to the railings? Ropes rubbing across the wood.

The blood on the captain’s sword?

It wasn’t blood. It wasn’t even the captain’s sword…that sword was stored under his bed! The sword that Flood found was an old, rusty knife lying on the deck. Scientists examined the blade and determined that the red substance on it was nothing but rust and old paint. It was probably used to lever open paint-cans and stir coagulated paint around!

Flood dreamed up even more insane theories. He suggested that Capt. Briggs had drawn Capt. Morehouse into an insurance fraud of some sort and that they were both in this together. Perhaps Briggs tricked his family and crew off the ship, hid somewhere on an island, while Morehouse found the abandoned ship, towed it away, took all the money, and then when the storms had died down, gave half of it to Briggs?

The idea was so preposterous that it was considered insulting and was denied by Capt. Morehouse and his officers.

Yet another madcap idea Flood proposed to the court was that it had been the crew of the Dei Gratia themselves, who had dispatched the crew of the Mary Celeste, along with the three members of the Briggs family…another theory that fell on deaf ears!

But the damage was done!

Crime-fever swept around the world! The idea that a madman had killed the entire ship’s company and then stole away in the ship’s one boat, captured the imagination of thousands, millions of people!

The alcohol-fumes explosion theory, which was put forward at the inquiry by none other than the Mary Celeste’s owner and principal shareholder, James Winchester, was disregarded as fanciful rot! Flood’s ruthless questioning, cross-questioning and wild accusations had painted a red mark over the memory of the Mary Celeste.

After the Inquiry

In the end, Capt. Morehouse did get…some…of the salvage-money that he hoped to receive from returning his late friend’s ship safely to land, but he never got all of it. In total, he received about 1,700 pounds sterling. As for the Mary Celeste? She was deemed to be a cursed ship. She passed from owner to owner to owner, before finally being burned and wrecked on the coast of Haiti in 1885…this time, in a real insurance fraud!

The Mary Celeste was not an isolated incident. Back then, before the days of the internet, cellphones and wireless radio, ships regularly went missing out at sea for various reasons, and were never seen from again, or were found, abandoned. But what made this ship so famous?

In a word, the mystery. WHY did the crew, the captain and his family flee the vessel in such haste, entrusting their lives to a tiny lifeboat? What happened to them? Where did they end up? How did they die? Why did they do what they did, if the ship was in no danger?

The stories of the ship that leaked out of Gibraltar and which were telegraphed around the world as fast as cables could send them, and which were splashed across the newspapers of the day, made the ship famous. And not least of all because of a story that appeared in a literary magazine of the age.

In 1884, a short story appeared in the Cornhill Magazine.

The Cornhill was not some soppy farthing-rag that tittery housewives bought and which grandmothers used to line bird-cages with. It was a famous and well-respected literary journal. Some of the biggest names in 19th century literature started off writing to this magazine. Names like…Charlotte Bronte…Thomas Hardy…George Eliot!…Alfred Lord Tennyson!

In 1884, a short story appeared in the Cornhill Magazine. It was unsigned and submitted anonymously to the magazine, but was published nonetheless. It was given the rather flashy title of “J. Habakuk Jephson’s Statement“, supposedly, a true story about a ship found abandoned at sea. The ship was called the “Marie Celeste“, and it had been found floating around in the middle of the ocean with nobody onboard. Hot food was still on the table in the galley. Tea was still steaming in the teacups. The lifeboat was lashed to the deckhouse roof. A bottle of machine-oil was left balancing on a sewing-machine in the captain’s cabin. But there was nobody there!

Sound familiar?

The story was supposed to be a fictional account of something that never really happened. It was inspired by, but was not written about, the mystery of the Mary Celeste. How do we know this? Because the story’s author was a rather famous person, you know…

At the time of writing it and submitting it to the Cornhill Magazine, the author was a struggling Scottish physician. A general practitioner of the medical sciences, who had no patients, little money, a lot of time and who was incredibly, incredibly bored.

If you’d gone to the doctor’s surgery, the plaque you might’ve seen nailed on the front door probably read something like this:

“Dr. A. C. Doyle. Consultant Physician”

It was Sir Arthur Conan Doyle, the inventor of the famous fictional detective, Sherlock Holmes, who wrote that story! Perhaps foreshadowing his great success as a mystery writer, Doyle’s ghost-ship story was so incredible that people thought it was real! It wasn’t, of course, but it was that story which captured the world’s imagination, and which kept the mystery of the Mary Celeste alive to this day.

Whatever happened to Capt. Briggs, his crew, the ship’s cook, Mrs. Briggs, and little Sophia Briggs?

Nobody will ever know.

What caused them to abandon a perfectly good ship and risk their lives in an open rowboat in the middle of the ocean?

Nobody will ever know.

There has been all kinds of conjecture about the fate of the Mary Celeste’s passengers and crew, but just like the colour of the Queen’s underpants, it’s something that we’ll never know.

Singer Attachment No. 86718 – Buttonholer


Well, I said I’d keep you folks updated with what I found for my Singer sewing-machine, and this is the first of those updates.

First, my sewing-machine restoration-adventure.  

Okay. This posting is about the first attachment which I purchased for my Singer. It is a buttonholer. It is Singer Part No. 86718. This attachment is designed to fit onto Singer 99, 99k and 66-model machines (and other Singers with a single square slide-plate in the middle of the left side of the machine-bed). It came in a handsome red box…

And has a pretty red and cream colour-scheme, with ‘SINGER’ on top:

The bit that you see on the right is the dog-cover. It covers the feed-dogs underneath the presser-foot, to stop them shifting the fabric to where you don’t want it (on older machines like this, dropping the dogs isn’t an option).

The two red knobs at the back are to adjust SPACE (size of the buttonhole) and BIGHT (closeness of the stitches that form the buttonhole outline). The big red knob at the front is to adjust the position of the sliding foot at the front of the buttonholer, to determine where you want the buttonhole to start.

Just like everything else made by Singer back in the ‘Good Old Days’, this thing is solid steel. All it needs to work is oil.

After I bought it, I took it home and opened it up. In this photo, you can see (…or not, it’s REALLY small…) that the cream-coloured cover is held on by one tiny little screw, to the right of the big red knob:

It was moving very stiff and jerkily, and after I opened it up and wiggled it around a bit, I found out why. It was full of this thick, grey, gummy oil that was acting more like paste than lubricant. So I wiped off as much of it as I could before re-oiling the whole thing using machine-oil and putting it back together.

This is a very simple buttonholer. It doesn’t do fancy keyhole-buttonholes or buttonholes of different lengths and whatnot. It just does buttonholes. And in the end, that’s really all you need. You can adjust the size of the buttonhole manually anyway, by turning the red knob on the side as you go.

Oh, and for the Americans who are looking confused right now, my research tells me that this style of buttonholer was manufactured in the 1950s and was prevalent in Australia and in the United Kingdom and Europe. But it appears not to have been exported to America or Canada, which will probably explain why folks stateside are unaware of its existence.

How to Use It?

Your guess is as good as mine. When I bought it, it didn’t come with a manual (although it did come with a sheet of “anti-corrosion paper“). To figure out how to use it, I mostly watched videos, read blogs and just used common sense. But for anyone else who picks up one of these things without the manual…

1. Screw Down Dog-Cover

The feed-dog cover/plate is the rectangular thing with the black bit dangling off it. The black dangly bit goes over the two holes that you’ll find in the machine-bed, to the right of the needle-plate. In the attachment-box, you’ll find one or two small screw-bolts. Poke one of these through the hole in the middle of the black dangly bit, and screw it into one of the two holes in the middle of the machine-bed (it doesn’t matter which one).

Raise the presser-foot and slide the main body of the dog-plate over the feed-dogs and needle-plate.

There is a small rectangular hole in the dog-plate. This is where the NEEDLE goes through, to make the lockstitch under the needle-plate. Make sure that this tiny hole lines up with the hole in the needle-plate. Otherwise your needle will just be smacking its head against solid steel and going nowhere. Once it’s lined up, tighten up that little nut from earlier, to make sure the plate doesn’t wriggle away.

2. Remove presser-foot and attach buttonholer

This is a little easier said than done.

First, you gotta unscrew the bolt that holds the presser-foot onto the foot-bar and remove it. Put it somewhere where it ain’t gonna walk off on you.

The attachment hooks onto the presser-foot bar from the back. There’s a hook in the middle of the front of the attachment that goes around the presser-foot bar, and a ‘fork’ that sticks out, which should go above and below the needle-clamp on the needle-bar. Best to shove it in at an angle. It can be fiddly, so take your time.

Once it’s on, drop the foot-bar lever, and screw the attachment firmly onto the presser-foot bar using the supplied bolt (it’s the bigger one, about an inch long). Once it’s in, adjust the buttonhole guide so that it’s at its outermost setting.

Note: When preparing your machine to put the attachment on, be weary of the orientation of the thread-breaker (that’s the little clampy-piece that’s stuck onto the presser-foot bar). You may need to twist it around so that it’s out of the way of the front of the attachment, otherwise it’ll scratch against the buttonholer, like you see it had in mine.

Raise the attachment, feed in the patch of fabric that you want a buttonhole to be made in, and drop it.

3. Run the Attachment

Once it’s in and bolted on, drop the foot-lever, and then run the machine SLOWLY. Running it too fast will tangle up the cloth and lead to all kinds of strife. Better slow than sorry. The attachment will pull the fabric in, punching in little holes and driving the needle and thread through them, making neat stitches. It’ll then move the fabric to the right, stitch across, and then stitch back, and then shift the fabric over to the left, stitch across…and that’s a buttonhole! Some people like to run the attachment through again, to make the buttonhole nice and thick.

Whatever you do, make sure that the thread-tension discs are set correctly. If not, you’ll end up with snapping thread, and huge masses of loose thread on the underside of the buttonhole. That not only looks messy, but it jams the machine.

Once you’ve done one buttonhole, raise the needlebar, raise the foot-bar, shift the fabric over to the next space, and do it again!

Easy as pie.

The Story of the Rape of Nanking


“Nanking”. A beautiful name, isn’t it? In Chinese, it means ‘Southern Capital’, similiar to how ‘Peking’ means ‘Northern Capital’. In the 21st Century, the city of Nanjing (it’s modern spelling) is one of the biggest and most important cities in all of China, just as it was back in the 1930s, when soldiers from the Japanese Imperial Army overran the city and murdered, burned, raped and pillaged it to the ground in one of the most horrendous war-crimes in the history of the world. The infamous ‘Rape of Nanking’ is one of the most brutal and controversial war-crimes ever. But what actually happened?

For the purposes of continuity, the original Wade-Giles spelling of ‘Nanking‘ will be used throughout this posting.

What Was Nanking?

Nanking was and is one of the most important cities in China. Built along the famous Yangtze River in southern China, it has been a major center for culture, trade, commerce, politics and government for centuries. After the fall of the Qing Dynasty, the last of the great Imperial Chinese dynasties, which for countless centuries, had ruled over the lands of ‘Zhongguo‘…the Central Kingdom…the new Republic of China nationalist government, the Kuomintang, set up shop in Nanking. This ancient and proud city was to be the capital of the new, capitalist, democratic China. After much thumb-twiddling, um-ing, ah-ing and foot-shuffling, in 1927, Nanking became the new capital of the new China.

Nanking, like almost every other major city in China at the time, played host to a significant Western expatriate community. Just like in Peking and Shanghai, Western businessmen, religious leaders, reporters, journalists, artists, writers and families descended on Nanking, carving out their own portions of the city where they lived alongside the local and native Chinese population.

The Second Sino-Japanese War

In 1931, the Japanese began their assault on China. By degrees, they claimed larger and larger swathes of Chinese land for themselves, starting with Manchuria in 1931. In 1932, they unwisely attempted to invade the city of Shanghai, an important sea-port. The Chinese Nationalist Army fought them off and kept the city safe for another five years.

In August, 1937, the Japanese Imperial Army invaded Chinese Shanghai. The city was then divided into two sectors – the Chinese sector on the outsides of town, and the famous Shanghai International Settlement, the vast expatriate zone, in the heart of the city. Not wanting to draw Western powers into the war (yet), Japanese troops only attacked Chinese Shanghai. After fierce fighting for three months, the city fell in October of 1937. Thousands of Shanghai Chinese fled into the Settlement, secure in the knowledge that the Japanese would not dare attack them within its boundaries, for fears of bringing British and American troops on their heads.

After the fall and occupation of Chinese Shanghai, and the road now clear into the interior, the Japanese headed westwards, seeking out the Nationalist capital, the ancient Chinese city of Nanking.

The Battle of Nanking

Nanking was the next great city that the Japanese attacked, after capturing Peking and Shanghai. The battle started on the 9th of December, 1937.

Back in September, the Japanese had carried out extensive air-raids on Nanking, softening it up for the impending invasion. Heavy raids were carried out for weeks on end. When Shanghai fell in October, the Nationalist Army abandoned the city and retreated to Nanking, to try and defend the capital.

It was soon realised that defending the capital against hardened Japanese troops was pointless. Although most Chinese officers had received the most modern military training (mostly in Russia), the majority of regular soldiers were uneducated peasants or working-class Chinese with only mediocre training, hardly fit to take on the strength of the Japanese.

Rather than risk his entire army being gobbled up by the Japanese, Chiang Kai-Shek ordered it to retreat even further into the Chinese interior, while leaving a small force behind to stall the Japanese.

By November, bombing-raids on Nanking had intensified and it was at this time that everyone who could leave, did leave. Wealthy Chinese of means, businessmen, Western expatriates and anyone who could find a car, boat, bicycle, horse and cart or had a decent pair of shoes fled the city to escape the Japanese.

The Japanese overran Nanking in a matter of weeks. The Chinese defense-strategies collapsed as inexperienced Chinese soldiers fled from the Japanese. Although there were pockets of resistance, the Japanese annihilated Nanking even easier than Shanghai. In early December, the city was placed under siege. The Chinese defenders were given an ultimatum of surrendering the city, or facing an all-out Japanese assault. When a surrender was not given, the Japanese began their invasion-proper, of the city of Nanking.

The city’s ancient defensive walls were blasted aside by the Japanese. Once they’d gained control of the city by mid-December, 1937, the most infamous Japanese war-crime in history began.

The Rape of Nanking

It’s called by many names. The ‘Nanking Incident’, the ‘Nanjing Massacre’…but most people will know it by its most famous name.

The Rape of Nanking.

Starting on the 13th of December, 1937, and lasting for six weeks until the end of January, Japanese soldiers raped, killed, pillaged, looted, burned and destroyed anything and everyone left within the confines of the city of Nanking. Men, women, children, the elderly, the babies, the walking-wounded, were all shot, clubbed, bayoneted, raped, burned alive, buried alive, decapitated or drowned in an orgy of destruction that went for a month and a half without end. Estimates of victims range from 40,000…to 200,000….to 320,000 Chinese civilians of all ages. That sounds even bigger when you consider the fact that in 1937, the population of Nanking about a million people.

It was the most horrific Japanese war-crime ever. And even today, seventy years later, it’s still not taught in Japanese schools. Japanese schoolchildren have never heard of it. Never read about it in their textbooks, and their teachers have never told them about it. They’ll learn about the battle and the siege and the invasion…but the rape is suspiciously absent.

During the war, the Japanese Imperial Army was notorious for ignoring the rules of war, more commonly known as the Geneva Conventions. Chinese prisoners of war were executed along with civilians, and no quarter was given to anyone.

The Chinese civilians still left within the confines of Nanking would search for anywhere to hide. Cellars, bunkers, bombed out buildings…but most famously, about 250,000 of them managed to find security…for a time at least…in the unofficial D.M.Z. in the middle of Nanking.

The Nanking Safety Zone

With the Japanese invasion imminent, Western expatriates still within the city (mostly religious leaders, diplomats and medical staff) took it upon themselves to try and set up a D.M.Z within the city…a demilitarised zone.

It was given the rather misleading title of the “Nanking Safety Zone”.

It might be a zone.

It might be in Nanking.

But it certainly didn’t guarantee safety.

The Japanese were not willing to attack Western institutions or persons, for fear of bringing Western powers into ‘their war’. To try and use this to their advantage, the Westerners attempted to set up a safety-zone in the middle of Nanking. The Japanese had said that they would not attack any part of Nanking where no threat existed (i.e: Where there weren’t any Chinese soldiers).

To that end, Chinese soldiers evacuated an area of the city about 8.5 square kilometers in size. Within that space were established about twenty to thirty individual refugee-camps, which took up about 3.8 square kilometers. For the sake of comparison, Central Park in Manhattan is 3.4 square kilometers in area.

Into this space was crammed roughly 250,000 Chinese refugees. Surveying the entire project were all the Western expatriates then left in the city, about 27-30 of them, all told.

One of the men who was central to the establishment and operation of the Nanking Safety Zone was a German. His name was John Rabe. He was a businessman, which some people might know…and he was a Nazi, which some people might not know.

Despite the name, the Nanking Safety Zone, the zone did not automatically provide ‘safety’.

The Japanese agreed not to attack any place which did not pose a threat to their interests. But at the same time, they did not recognise the fact that the Safety Zone existed at all. To them, it was just another part of the city for them to loot and pillage. So remaining within the Safety Zone did not mean that you were entirely secure. The Japanese were well-known for entering the Zone when it took their fancy, snatch up a few hundred men and women and either haul them off and execute them or rape them, or just shoot them dead where they stood. Unlike the International Settlement in Shanghai, the Japanese had no qualms about just going in and causing havoc.

At the end of January, 1938, the Japanese claimed to have ‘restored order’ to Nanking. The Nanking Safety-Zone was forcibly disbanded and everyone was made to return to their homes. Although not entirely effective, John Rabe, commonly known as the “Good Nazi of Nanking“, is credited with saving the lives of approximately 250,000 people.

Want to know more?

I suggest you read this website dedicated to the Battle of Nanking.

Momentos of the Past – Restoring My Grandmother’s Singer 99k Sewing Machine


This is a little outside the normal realm of what I post on this blog, but I figured it might make interesting reading.

The Backstory

My grandmother was born on the 7th of May, 1914, in Singapore. She was a first-generation Chinese-Singaporean, her parents having migrated to Singapore from southern China. She had a mere five years’-worth of education at an English-language school in what was then Singapore Town, from 1921-1926.

She married my grandfather during the Second World War in 1943.

When the War ended, she occupied herself in looking after her husband’s three children by his first marriage. In 1953, she opened her own dressmaking and tailoring shop, in the Malaysian town of Batu Pahat. She shared the premises with a women’s beauty-salon, and consequently, it was called the ‘Kam Seng Beauty Parlour‘ (Kam Seng is Cantonese. It means ‘Golden Star‘).

When my grandmother opened her shop, she was gifted a beautiful, and brand-new sewing-machine. She used that machine for every single one of the thirty years that she ran her shop, and when my grandfather died in May, 1983, she closed the shop, retired, and immigrated to Australia.

She brought the machine with her, and continued to use it almost every single day, up until about 2003. She repaired clothes for friends, she took in alterations from her church-group, and she repaired the many rips and tears in clothing that will come from it being worn by two lively grandsons…one of them was me.

Gran and her sewing-machine were inseparable. I remember when my father purchased her a modern machine, she barely touched it, and went back to using her Singer. She was always a bit set in her ways, and while she was more receptive to other modern technologies (at the age of 85, she knew how to use Microsoft Word, type, and print on a computer), she was absolutely dead-set that the only machine she would ever use for sewing was her own.

Around 2000-2003 (I forget exactly when), my grandmother had to move into a nursing-home. Her Alzheimer’s Disease had become too much of a liability and a risk to house her safely at home. Alzheimer’s is a horrible, crippling illness. Unless they’ve seen it firsthand and had to deal with it for years on end, don’t believe anyone who tells you that “I understand” when you talk about Alzheimers…because they don’t. Unless they’ve seen it, or studied it, or treated it…they really don’t.

When gran moved to the nursing-home, her sewing-machine was put downstairs in the basement, where it has sat for the past 10 years.

My grandmother died on the 28th of November, 2011, at the impressive age of 97.

With her gone, and my father and I constantly discussing antiques and heirlooms and him telling me all the stuff that his family used to own, but which they don’t anymore, because they were thrown out, but which today would be worth a pretty penny…my mind was drawn towards gran’s sewing-machine.

That machine was her life. She carried it EVERYWHERE with her and it was her baby. She would let nobody else touch it (except me, because I used to set it up for her every morning. The machine weighs 31lb, 4oz…about 15kg…and it wasn’t easy for an seven-year-old boy to haul that thing around!). Now that she was gone, we had nothing left to remind us of gran, except her sewing-machine.

With all of my father’s stories ringing around in my ears, I began to wonder what would happen?

That machine was gran’s mainstay and anchor and rock for 50 years, or over half her life. And it was the one machine that represented her character and told her life-story better than anything else. Tough, simple, elegant, stubborn and impossible to destroy.

Be there as it may, I knew that it wasn’t going to last long rotting downstairs in the basement. So I decided to haul it out of that godforsaken hole in the ground, and restore it to a level where it was once again a functional piece of machinery.

STEP ONE – Cleaning the Machine

Carrying it as carefully as I could, I hauled gran’s Singer…because that’s what it is…out of the basement. It was locked up tightly inside the curved ‘Bentwood’ case, cocooned by wood and shrouded in the dust of a decade. I cleaned off the dust and then set about opening the case.

The cases are held onto the machine-bases by very simple, but surprisingly effective locks. Without a key, these cases are literally impossible to open. I squirted some oil into the lock and while I waited for it to settle, I went off to find the one tool that I would need to open the case.

Not the key, that was long gone.

A 3mm flat-head screwdriver.

If anyone reading this has ever tried to open a Singer bentwood case but doesn’t have the key…pay close attention…

The profile of a 3mm flat-head screwdriver perfectly fits the keyhole of a Singer bentwood case’s lock. A few generous squirts of oil, a few minutes of waiting, then I shoved the screwdriver, horizontally, into the lock. I turned it clockwise 90 degrees, until the lock was in the vertical “Unlocked” position.

Then, I shifted the whole top of the case to the left about a quarter of an inch. This is to disengage the other bolt or latch, which secures the right side of the case to the machine-base (the lock with the key is always on the left), and then lifted it up.

Here’s the bentwood case:

Here’s the keyhole:

That rectangular thing is the keyhole. It’s 1mm high by 3mm wide. You can also see the bolt underneath, that you have to throw over, to unlock the case

And this was the machine as it looked when I broke open the pharaoh’s tomb:

I’m no expert with sewing-machines. I just like old, vintage, antique-y things. And this is the closest thing we have in my family to an heirloom, so I decided almost immediately, to try and get it running again.

In all honesty, this thing probably hasn’t been serviced by your friendly local Singer Man since it left the factory back in 1950. I had no idea what I was getting myself in for, but I started, anyway.

‘Singer Manufacturing Company’ factory; Kilbowie, Clydebank, Scotland, U.K (Photo ca. 1901).
Gran’s machine was made here

First, I had to clean out all the gunk and fluff and crap that was inside the machine. Over the decades, this machine built up an enormous amount of dust and fluff, lint, loose thread, dead insects, coagulated oil and other…crap!…which rendered it totally unusable. I basically had a really awesome boat-anchor sitting on the living-room floor.

So, off with the face-plate…

The faceplate is that pretty steel plate with all the patterns on it that you see in the photo above. It was held on by one screw, and one nut. Somewhere in there is a bad joke…

Behind the plate is the crankshaft mechanism that powers the needle-bar (along with everything else in the machine apart from the light). It looks like this:

It’s quite simple, really. The crank turns around. It simultaneously lifts the needle-bar and lowers the uptake-lever (that’s the doohickey sticking out on the right with the hole in it), and then does the opposite when it completes one revolution.

As you see it there, the machine was completely immovable. It was covered in gunk and crud that I had to pick out with tweezers and wipe down with tissues to remove. It’s not just taking out the Dyson or the Hoover and sucking all the crap out of the machine…a vacuum-cleaner wouldn’t be able to remove 90% of the gunk inside here, because it’s stuck in really inaccessible places which only tweezers are able to reach, like behind levers, rods, shafts and plates.

Once that was done, I then had to tackle the handwheel assembly, at the other end of the machine. The handwheel is this big shiny wheel:

The handwheel spins around thanks to a belt-drive wrapped around it, which hooks up to the machine-motor at the back. You can see it here:

That black lump at the bottom left is the machine-motor. Above it, you can see the black light-shade. To the left of the lightshade is the drive-belt that runs the machine.

Anyway, I digress. I had to remove the clutch-wheel, also called the stop-motion wheel, which is that silvery wheel in the middle of the handwheel. You might notice that it’s held on by a single, but surprisingly effective screw, which took quite a while to loosen up. Once it was loose and I could unscrew the clutchwheel, I was confronted with this enchanting scene:

This is a part of the machine that NEVER sees the light of day, and yet it’s full of fluff, lint, gunk, dried oil and other crap. This is why complete disassembly of the machine was necessary…it’s this stuff that stops it from running, because it jams up the works. I took off the washer (that’s the doughnut with the three nubs sticking off it), and cleaned it, the crankshaft and the wheel, thoroughly. This is what it looked like when I was done:

This is the other (non-shiny) side of the clutch-wheel, with the washer sitting on top of it:

If you’re reading this as a guide on how to clean and fix your Singer (provided it’s the same model that I have!), you’ll notice that there’s a little nub sticking out of the clutch-wheel, around the 9 o’clock position. That’s the screw that holds the clutch-wheel onto the larger handwheel. It’s sticking out there because it doesn’t (and is not supposed to) be removed entirely from the clutch-wheel. It’ll unscrew a few milimeters and then it will stop. Do NOT force it…you won’t achieve anything at all, and what you want to have achieved (which is removal of the clutch-wheel) should be well within your capabilities by then.

Anyway, next step was to clean the bobbin-mechanism:

The bobbin mechanism is what holds the…bobbin. The bobbin being that shiny steel spool with the three big holes and the one small hole in it. It’s what feeds the thread to the underside of the machine to make the classic lockstitch.

Oh, and a warning note here…

See that nice fluffy red felty cloth on the right?

If you’re fixing, cleaning or repairing a sewing-machine, and you see the felt…

LEAVE IT ALONE!!!

The felt is your friend. It is there for a purpose! So DO NOT touch it! Without the felt, you’d have the oscillating hook (that catches the thread and pulls it under the needle to make the lock part of the lockstitch) scraping against metal inside the machine, and that would wear everything down and eventually just break it.

Fortunately, I”d read this warning on another blog before commencing work on this machine, so no undue damage was done to the intricate inner workings of this Singer by my hands.

Once the topside of the machine was cleaned, polished and defluffed, I had to tackle the underside of the machine. To do that, I unscrewed this nut, and swung back this catch:

That allows me to lift up the whole machine and tilt it back on hinges to access the storage-compartment underneath the machine:

This handy little compartment is where you would store things like thread, spare needles, bobbins, the machine-manual and all that other stuff. But more importantly, it was where I could get my hands on this:

This is the other side of this:

And it had just as much fluff, crap and mostly…loose thread…as the topside did.

Once the entire machine was completely cleaned, inside and out, topside, downside, upside and underside, it was ready to oil it.

STEP TWO – Oiling the Machine

Singers were made to be idiot-proof and user-friendly. To that end, they are incredibly easy to use, and look after. Especially a machine like this. The next step was to oil the machine to unjam all those frozen pistons and rods and cranks. To do that, you need high-grade machine-oil. You can buy this stuff at sewing-shops, decent hardware shops and whatever. Ideally, you want sewing-machine-specific oil. But if you can’t get that, any really thin, runny, high-grade oil (which will work for sewing-machines, and says so on the label), will do.

For this, I used SuperLube machine-oil.

And a LOT of it.

It took about an hour to fully lubricate the machine to the point where it would move as it once did. Oiling it is pretty easy. Just remember to squirt oil where-ever something moves. On a sewing-machine, that’s a surprisingly large number of places!

Fortunately for us, Singer thought about this, and provided us with these:

Those holes (next to the ‘T’ the ‘The‘ and under the ‘i’ in ‘Singer‘) are just two of several oiling-holes. You squirt or drip the oil down those holes to lubricate the machine!

What’s in there?

Why the crankshaft that runs the machine, of course! But before you do that, make sure you stick your needle-nosed tweezers down those holes first. There might be some unexpected surprises in there (like dead insects or dust, lint and fluff), that you don’t want to get all over the insides of your beautiful vintage sewing-machine.

Once the machine was generously oiled, I ran it by hand for several minutes to work the oil into the mechanism. You can do this easily by just turning the big, black and silver handwheel anticlockwise to work the mechanism. It doesn’t damage the machine, so don’t worry about that. Now that the machine was running, it was time for…

STEP THREE – Testing the Machine

This is a Singer 99k knee-lever machine made in Kilbowie, Clydebank, Scotland, in 1950. It’s called a knee-lever because it uses one of these to get it running:

That’s the knee-lever. And this is the socket that it slots into, on the right of the machine:

So, you plug in the power-cord, you stick in the weird, twisted “?”-shaped crank-thingy and you let ‘er rip!

And boy does it ever.

The machine was running like a jackhammer on steroids. In other words…perfectly!

Then, I had to make sure that, not only the sewing-mechanism was working, but that the bobbin-winding mechanism was working.

The bobbin-winder is this little thingo here:

It’s used to mechanically wind thread back onto the bobbin (that little steel thread-spool from further up in the posting) when the thread runs out. It turns a task that would take several minutes, into an event that’s over in about 30 seconds. You work the bobbin-winder by loosening the clutch-wheel (turning it anticlockwise), slotting a bobbin onto the rod:

Setting the release-lever against the bobbin (to stop it flying off the rod when this thing gets moving!), threading the bobbin, and then pressing the knee-lever to do the rest.

The automatic bobbin-winder will keep spinning, and the bobbin will keep filling, until such time as the thread in the bobbin fills up to such a level that it pushes away the release-lever. This automatically disengages the flywheel, which stops the mechanism dead in its tracks. And you have a full bobbin.

STEP FOUR – Accessorising the Machine

The next step was to accessorise the machine, or to find extra bits and bobs for it. These aren’t essential things, but they’re things that would be nice to have…like…extra needles…extra bobbins…original packaging…oil-cans…all that stuff. When the machine was brand new, it would’ve come with all kinds of nick-nacks and doodads and whizzle-whozzles that would’ve allowed the owner to attain a mastery of the machine good enough to make a suit.

I got lucky at the local flea-market and picked up a whole heap of needles and bobbins (eleven bobbins and two packs of original Singer needles) for a good price. Here they are, along with the one bobbin and the one Singer packet (with the one extra needle) that came along with my machine when I found it in the basement:

In time, I do hope to get other bits and pieces to make the machine more complete.

Along with the needles and bobbins, I got my hands on an original Singer bentwood key, for the case, kindly given to me by a friend…

“SIMANCO” is the “Singer Manufacturing Company”. The number next to it (96507) is the part-number for the key.

It was now that I also started looking at the bentwood case which housed this machine. It had all these weird little things inside it which I had no idea what they were for. That was when I found the bracket to hold the knee-bar:

This bracket is directly under the handle on the top of the case, and in the apex of the arch. You stick one end of the knee-bar into the socket on the left, then slot the rest of it into the slot on the right, and swing the catch (which will then go up and over the bar) to lock into place, to stop it wriggling around and falling off. Also inside the machine is a little black, wire bracket. It would have originally held a dome-shaped Singer oil-can, which would’ve looked like this:

Unfortunately, I don’t have a dome-shaped Singer oil-can (…yet…), but that’s what that bracket is there for, if you’ve ever wondered.

At the time of this posting, I’m still searching for extra bits and bobs and thingummies for the machine. If and when I find them, I’ll probably post about it here on the blog.

STEP FIVE – Replacement Parts

The next step was to find replacement parts…or to be precise, one part.

The part that goes here:

As you can see, the jerry-rig solution was a piece of balsa-wood held on with tape. Hardly the best substitute for the machine’s slide-plate, which is supposed to cover the bobbin-mechanism. Fortunately, I found a reproduction slide-plate (and yes, there are modern reproduction Singer parts), which I found on eBay (and that’s where you can get them, if you need them. There are also websites out there which sell original spare Singer parts. It’s just a matter of how desperate you are and what you want to pay). It was purchased on my behalf by my cousin, Hansen, who lives in Singapore, and which was hurried off to me with all due speed. It arrived…today, actually…and now the same part of the machine looks like this:

Yes, the slide-plate has a different metal-finish to the needleplate next to it, so they don’t match exactly, but it’s close enough for my purposes. And the important thing is that it fits and it does what it’s supposed to do!…Slide!:

All modern replacement slide-plates for Singer 99’s, 99k’s, 66’s, and 66k’s (and any other Singer models that take the square slide-plate…Singer parts were surprisingly interchangeable!) come in this same matte-finish, and not the shiny mirror-finish of the originals. But we should be thankful that there are reproduction plates at all!

The machine is now essentially complete. And I mean that literally..all the essential parts are present and correct. Needles, bobbins, plates, thread, machine-oil…the machine has been cleaned, oiled, tested, and it’s back to operational condition. I’m still after other Singer bits and pieces (attachments, extra feet, button-holers etc), but as it sits now, this machine will do, without any kind of hindrance, the task for which it was built when it left Scotland 60+ years ago…sew!

This is my grandmother’s Singer 99k knee-lever, as it appears now:

A Note on Construction

During this little adventure of mine, it occurred to me how fantastically-built these old Singers were. Of ALL the components on this machine, a grand-total of…FIVE…are made of something OTHER than cast iron, steel or wood. The plastic (bakelite?) shield on the steel light-shade…the lightbulb itself…the tire on the flywheel for the bobbin-winder, the drive-belt on the handwheel, and the power-cord and plug (also bakelite, I believe).

The Singer 99k was one of the MOST popular Singer machines ever made. They were produced from 1920 until 1962 and they’re incredibly simple, robust and powerful. Their simplicity is obvious. The motor is only there to power the drive-belt, and the light. Literally everything else on the machine is mechanical. And there’s no plastic on there at all. Nothing to crack…melt…warp…twist…shrink…expand…It just WORKS. I can’t think of a damn thing made today which was this solid when it was new, and which would still be that solid 60 years later. The Singer 99k was originally a handcranked model:

When it was released, it was a manual, hand-cranked machine, but an electrically-powered variation, with the knee-lever attachment, or the electric foot-pedal attachment (depending on variant, of course), were also available. These machines are so tough that they just NEVER break down. If you have an electrical one like I do, you might need to get the wiring checked if it’s spotty, but otherwise, they just never stop working.

And a Singer like the 66 or the 99/99k was a big investment. 11 pounds, 3s in 1930s Britain, or about a hundred and twenty dollars in America at the same time. Even in the 20s and 30s, a lot of people (mostly women) still made their own clothes, or clothes for their family, at home. Having a solid and dependable sewing-machine like a Singer was part an essential, and part a luxury, because their quality meant that they were priced pretty high. Even today, a sewing machine like my grandmother’s Singer 99k will easily sew through things like…

Denim.

Canvas.

Leather.

Multiple layers of cloth.

Things that would probably kill a modern machine…

ADDITIONAL PHOTOS

Here’s some additional photos of the machine, now that it’s complete:

The machine in its entirety!

The slide-plate doing what it does best – sliding!

The name of the beautiful pattern on the Singer 99k was called the ‘Filigree’

The Singer Manufacturing Company

More filigree!

Filigree + Plates!

Presser-foot, needle and feed-dogs (the little bumpy things)

Australia: From Colonies to Country


Some of you may remember that I wrote this posting for Australia Day, back in January. At the end of it, you may recall that I said I’d write about more Australian history sometime in the future.

Well, the future is now. So let’s get cracking.

Colonial Australia

For all of the 19th century, Australia was an island of colonies. They were given names such as “Van Diemen’s Land”, “Victoria”, “New South Wales”, and “Queensland”. Admittedly, the remaining colonies of South Australia, Western Australia and the Northern Territory were hardly the most poetic of names to go along with the names of the other colonies, but I digress…

In the second half of the 19th century, Australia had finally broken out of the phase of being “Terra Australis Incognitia“, the great unknown southern land. It was now firmly established that an island south of Asia did exist, and that it was inhabitable, and that it now had a name. “Australia”.

Australia was seen as a great social experiment. Prior to this, no Western civilisation had colonised a landmass further south than this great, empty sandpit in the bottom left of the Pacific Ocean. The British Government was quick to realise that having Australia as a British colony would be very useful. It would be able to secure British dominance in the Southeast Asian region, along with their holdings in Singapore and Hong Kong. This would balance out the colonial scale, since nearby, the French, the Dutch and the Germans also had colonies. Colonies like French Indochina (Vietnam), the Dutch East Indies (Indonesia) and the German-held Papua New Guinea.

Colonial Australia was a hard and dangerous place to live. Summers are hot, scorching and dry. Cities were still mostly made up of wooden buildings, two storeys high, and streets were largely unpaved. Also, then, as now, Australia played host to the largest number of dangerous animals in the world – Spiders, sharks, snakes, and the vicious Spotted Quoll:

…D’awwwww…

The Victorian Gold Rush

Life in colonial Australia cheered up in the 1850s, though. Gold had been found sporadically for years, but in 1851, the great Victorian Gold Rush hit Australia. And it was a rush, alright. People from all over the world came to Australia, to go to Victoria, to find gold! The population of Victoria’s capital city, Melbourne, went from 10,000 people in 1840, to 123,000 people by the mid-1850s!

Towns like Bendigo and Ballarat popped up overnight and became booming centers of trade. Just like in almost every other gold-rush in history, in California, or Canada…a significant amount of the money made came, not from mining, but from merchants and shopkeepers who sold equipment to the miners at inflated prices. Shovels, buckets, pans, tents, billys (kettles, that is), bedrolls and countless other things were in high demand, and the scheming and unscrupulous shopkeepers could make a pretty penny or two from “mining the miners” for their hard-saved money.

The Victorian Gold Rush allowed Melbourne to grow at a fantastic rate, and it soon rivaled Sydney, the oldest city in Australia, in population, if not yet in size.

The Rush allowed Melbourne to build magnificent public buildings, like the state library, the town hall, the state parliament building, treasury, and several bridges across the Yarra River in the middle of town.

Australia slowly cast off the criminal element of its past and began to grow. Famous people came to Australia to look around. Prince Alfred, son of Queen Victoria, came for a look in 1868. Two hospitals (one in Sydney, one in Melbourne) were named after him. And it’s probably just as well that there were hospitals around, because the prince was the target of an assassination attempt while he was there! He was shot in the back, but the bullet was recovered and the prince made a full recovery.

Towards a Country

Australia was a ‘country’, but not yet a nation. It had separate colonial militias, but no national army. It had lots of railroads, but it was not possible to travel all around the continent without changing trains at each border, since each colony used a different gauge of rails. As the 19th century drew to a close, Australians wanted more and more to become their own country, their own nation and their own people.

Much like the United States, a hundred and thirty years before.

But unlike the United States, Australians didn’t start stockpiling rifles and muskets.

By the 1880s, there was increasing nationalism in Australia. A higher and higher percentage of people who lived in Australia were actually born there, instead of coming to Australia from overseas. Fewer people saw themselves as being “British” but as being “Australian”. Improved communications in the 1800s, such as finally, a nationwide telegraphic network in 1872, allowed them to communicate with each other faster and easier. This brought people closer together, and strengthened the ideas that Australia should become a nation.

To that end, in the 1880s, the Federal Council was formed, a body of men whose job it was to make Australia a nation. The Federal Council was the closest thing to a national government that existed before Federation itself.

Colonies were not all in favor of federation, however. They worried that having a big national government would mean that colonies with larger populations would bully those with smaller populations. They feared that individual colonial laws, taxes and tariffs would be stamped out by a more powerful national government. They were also scared that giving power over the country to one body, instead of splitting it up amongst lots of small ones, would cause problems, since any decision made by the national government would affect everyone. In the 1870s and 80s, the American Civil War was still very fresh, and Australians didn’t want to have their own civil war!

As the years ticked by, however, federation started looking more and more interesting, and in referendums held in each state, a higher and higher percentage of people were voting for the creation of the Australian nation.

1901 – Australian Federation

On the 1st of January, 1901, the 20th Century began. And so did Australia. It was now its own nation. Its colonies were now states, and it had its own national government. It was now the Commonwealth of Australia.

It still is.

Australia was the new kid on the block in the world stage. And it wanted to do things differently. Much differently. Australia was seen as the great big new social experiment that the world would gather around to watch. Things would be done differently here and the global community sat back to watch the results of this new experiment, this new country, this new nation called Australia. Laws were enacted in Australia which were never seen in England, or indeed, in any other country on earth at the time. Some laws were popular. Some were not. Some were incredibly controversial, even for the time! Australia in the 21st Century might pride itself on multiculturalism, but it wasn’t always like that…

Immigration Restriction Act (1901)

A similar law existed in America. It was called the Asian Exclusion Act of 1924. But Australia was the first country to implement a law such as this.

What was it?

The Immigration Restriction Act of 1901 was an act that regulated who could come into Australia. They didn’t want any undesirable people in this great social experiment that Australia was! They wanted Australia to be pure, clean, innocent and…

…white.

Incredibly white.

More bleach was air-dropped into Australia before 1965 than any other country on earth.

The Immigration Restriction Act of 1901 was designed to keep out undesirable people from the Australian nation. Asians. Jews. Africans. Americans. Anyone seen as undesirable. How did they do this?

Simple. They asked them if they could speak English!

There wasn’t going to be any other language in this new country other than English, so if you wanted to live here, you had to speak English. If you couldn’t, you couldn’t come in. Simple!

This was primarily designed to keep out Asians. I’m here, so it obviously didn’t work.

The problem was that a surprisingly large number of foreigners spoke English.

So much for that idea. To try and add a few more tripwires in this new immigration law, the government started changing the conditions of entry. How did they do this?

When you arrived in Australia, you had to take an English test to evaluate your language-skills. When it was found out that this wasn’t effective in keeping out the global rabble, the law was…altered.

Instead of giving a test in English, a test could now be given in ANY European language. And I do mean ANY language. German. French. Italian. Polish. Russian. Latish. Czech. Spanish!

…it still didn’t work. But it’s what they tried.

Pacific Island Labourers Act (1901)

Along with the Immigration Restriction Act of 1901, there was also the Pacific Island Labourers Act of 1901. This was designed to kick out of Australia any persons living there who came from islands near to Australia. Again, this backfired. While several thousand Pacific-Islanders were indeed shipped out of Australia, a significant portion of them were able to apply to stay in Australia.

How?

Simple. Because they weren’t from the Pacific Islands. Their parents, or grandparents were. But they were born in Australia! It wasn’t legal to send them back to some place which they weren’t from in the first place, so the government had to let them stay put.

And there were a lot of them in Australia. They’d been brought over starting in the 1860s to work in Queensland, on the sugar-plantations. They were dark-skinned people, after all, and they were surely much better at working in the harsh, humid, hot and sunny Queensland climate than white folks. But then it was decided that they just had to leave.

The “White Australia Policy”

All these acts and laws and regulations were designed to create something unique in the history of the world. A completely white country. It wasn’t like America where blacks and whites were simply segregated…no. In Australia, they wanted to make sure that the whole country was white from the very start!…The Aborigines didn’t count, though…

There was a lot of support for a White Australia, but just was just as much dissent. And a significant amount of dissent came from Britain.

Why?

Australia was part of the British Empire. And the British expected Australia to trade with other countries within the Empire. Countries like Singapore, Hong Kong and India. The White Australia Policy irritated the British and they weren’t happy with the fact that it existed, because it meant that non-white subjects from British colonies couldn’t live and work in Australia, an act that was sometimes necessary for purposes of trade and business. This was why the British objected to the White Australia Policy. But then, Australia was by now its own country and nation…it could do what it liked without having to listen to England.

The White Australia Policy survived for decades, strengthening and weakening and gaining and losing support through the years. During the 1930s, fears of the Japanese and a second coming of the “Yellow Peril” increased support for a White Australia. However, after the Second World War, the need to repopulate Australia caused the Policy to be significantly relaxed, when the government realised that it could not afford to be picky about who it allowed into the country if they expected Australia to survive. It was during the postwar years that the White Australia Policy began to crumble in earnest.

The fact was that the policy had never really been any good. Non-whites had been trickling into Australia for years, and the policy never completely kept unwanted foreigners off of Australian soil. On top of that, Australia needed a larger population in the postwar era to fill up the gaps left by all the dead soldiers from the War. It was unreasonable and impossible to ask all red-blooded Australian males to do their patriotic duty and shag like rabbits on Viagra, and copulate for the good of the nation, so the Australian Government had to look…overseas! (horror of horrors!)…for more people!

The popular slogan became: “Populate, or Perish!”

This meant that Australia had to increase its population if it expected to survive in the dangerous and uncertain postwar world. Massive tourism and immigration campaigns started, encouraging people from everywhere (so long as it was white) to come to Australia!

A large percentage of the new arrivals in Australia were refugees from the Second World War. European Jews, British war-brides, displaced persons with nowhere else to go. But in the 1950s, 60s and 70s, more and more Asians started flooding into Australia. Trouble in Asia was encouraging people to leave and move south. The Chinese Civil War, the Korean War and the Vietnam War were driving people out of Asia towards Australia.

The White Australia Policy finally collapsed when international events made it impossible to implement – the numbers of Korean, Chinese and Vietnamese refugees pouring into Australia made the Policy a joke, and it was officially ended in 1966.

Universal Female Suffrage

Australia, the great social experiment, while it may not have been as forward thinking in issues of race and culture, was certainly more open to other ideas…such as the shocking notion of allowing women to…vote!

In 1902, Australian women were allowed to vote alongside men.

…Yeah. So what’s the big deal?

The deal is that Australia was the first country in the Western world to do this!

Britain? Nope. 1918.

America? Try again. 1920.

Germany? 1918.

France? Good luck. Not until 1944.

China? Surely, communists with all their equality and whatnot? Nope. 1947.

Canada? 1917.

Australia was the first! (Okay, second. New Zealand – 1893…damn Kiwis…).

Australia’s Place in the World

In 1901, Australia officially became a nation. It could go to war, it could run its own affairs, create its own laws, set its own taxes and was no-longer tied to Britain!…Except that it still (and still does) have the Queen as its head of state, and the Governor-General as the Queen’s representative in the Land Down Under.

Australia was a big exporter…and importer. It sent out shiploads of gold, iron, wool, wheat and leather, and in came things such as consumer-goods from England and America.

Australia was miles from England…it took two months to get there by ocean-liner…but a lot of Australians saw themselves still as being British. They supported Britain in wartime and peacetime. When Britain went to war with the Dutch South-Africans (the Boers) in 1899, Australia sent troops off to fight. When Britain went to war with Germany in 1914, Australia sent troops off to fight. When Britain went to war with Germany (again!) in 1939, Australia sent troops off to fight.

Why?

Australia is on the other side of the world, for God’s sake! Why on earth would it get involved in British wars?

Popular opinion in Australia listed reasons such as…

– Similar cultures.
– Helping “Mother England”.
– Failure to hep England in her time of need would result in England being too weak to help Australia in hers.

In the Edwardian-era, imperial pride and ties to “Mother England” still ran strong through the fabric of Australian culture and society. When soldiers fought and died in the First World War, they died in service of “The Empire”, not Australia. Indeed, such was Australia’s closeness to Britain that when the First World War came around in 1914, over sixty thousand Australians signed up to go to war.

The interesting bit?

Not a single one of them was a career-soldier.

Australia was the only country to participate in the First World War, which had a completely volunteer army. Shopkeepers, schoolteachers, engine-drivers, cable-car gripmen, farmers, shearers, bank-tellers and waiters rushed to sign up for the army. The most experience that Australia really had of fighting in big wars was in the Boer War of 1899 (during which, Australian soldier Harry ‘Breaker’ Morant was tried…and executed…for trumped-up charges of ‘Treason’, disobeying orders, and killing innocent noncombatant Boers).

After the Second World War, Australia stopped looking to Britain for aid, and turned increasingly towards the United States. Colonialism died a slow death as the European powers grudgingly (in the case of France, incredibly so!) gave up their colonial posessions. Australia joined the British Commonwealth, the collection of countries which shared historic, colonial ties with Britain.

A Stitch in Time – A History of the Sewing Machine


Open your closet.

Take out any article of clothing.

A shirt. A coat. A pair of trousers. A pair of boxer-shorts, a blouse, a waistcoat, a T-shirt, a singlet, a glove…anything!

Now take out a magnifying glass and count every single stitch on the garment you’ve selected.

Imagine for a minute that you had to remake this garment. By hand. And that every single one of those dozens…hundreds…thousands of stitches…all had to be done, painstakingly, by you. One at a time.

Even working as fast as you could, as neatly as you could, it would be an exhausting, eye-bending, finger-numbing process to even make a simple shirt, taking countless hours and days and weeks.

But imagine that there was a machine that could do this for you. Something that could make dozens of stitches, hundreds of stitches every minute. Every single one the same, every single one identical, every single one just as strong and as permanent and as unmovable as the one that preceded it.

Now wouldn’t that be nice?

This is the story of the remarkable machine that singlehandedly changed the clothing industry forever. It is called the sewing-machine.

Who Invented the First Machine?

The sewing-machine was first conceived in 1790. It was the brainchild of English cabinetmaker, Thomas Saint. It was a heavy-duty thing used to sew together leather and canvas, but it was a sewing-machine. No actual Saint-style sewing-machines survive (if indeed one ever made it off the drawing-board). It wasn’t until nearly 100 years later, in 1874, that another sewing-machine manufacturer (a man named William Newton Wilson), discovered Saint’s original schematic drawings, hidden away somewhere in the London Patent Office. Out of curiosity, Wilson copied Saint’s diagrams and built a working replica of Saint’s 1790 machine.

It’s still around today. You can see it at the London Science Museum. Here’s a photo of a copy of that reproduction, in a museum in Japan:


The world’s first sewing machine! This model of a Saint sewing machine sits in the Sewing Machine Museum, in Nagoya, Japan.

Developing the Machine

Over the next few decades, the sewing machine was altered, improved and updated by a successive number of inventors and mechanics. Much like with the weaving machines of the 1700s, the sewing machines of the 1800s were met with considerable…

…anger.

See, because sewing took SUCH a long time, if you did it by hand, tailors could make a lot of money, since not everybody could do the precise, time-consuming, eye-straining work that they did every single day.

But if you had a machine that could do this, suddenly, their edge was gone!

Terrified that they’d be out of business, French tailors went on a riot! A French tailor named Thimonnier patented a new kind of sewing-machine in the early 1830s. Was it a success?

Hardly.

His brethren were so enraged that he’d developed a machine to take over their prized and highly specialised craft that they went on the rampage! Thimonnier’s machine-factory was ransacked! The machines were smashed to pieces and the entire factory was destroyed! By the early 1840s, it was all over.

So much for the French attempts at a sewing machine.

The next player in this game was an American. Walter Hunt.

Hunt was an inventor. And a big one. Here’s a list…

– Sewing-machine
– Safety-pin
– Repeating rifle
– Knife-sharpener
– Streetcar bells
– Coal-fired stoves
– Street-sweepers
– Ice-and-snow ploughs
– The velocipede

For those people scratching their heads right about now, the velocipede was an early type of bicycle.

Hunt’s machine was interesting, but hardly practical. Due to a design-fault, the machine was more of a hindrance than a help. The feed-dogs didn’t work very well, and this held the machine up.

The feed-dogs are little teethed pieces of metal underneath the needle-plate. The needle-plate is the plate of steel directly underneath the needle. As the machine runs, the feed-dogs rub back and forth and their ribbed surfaces push the fabric along, tugging it between the needle-plate, and the foot-plate (the metal clamp that snaps down on top to hold the fabric in place to stop it sliding around). Ideally, the dogs would move back and forth ‘feeding’ fresh fabric under the needle (and between the needle-plate and foot-plate), while also passing the finished fabric out the other side of the machine.

Ingenious!

But Hunt’s machine didn’t have dogs that worked properly. Instead of the machine pushing the fabric through at a regular pace, the sewer had to do it instead. And this was slow, tricky, imprecise and very frustrating. For all of Hunt’s inventions, his sewing-machine was a failure.

The next man to come along was Elias Howe.

Howe’s entry into the sewing-machine was pretty interesting. Like everyone else, he was trying to figure out how to make a better, smoother machine with stronger, more permanent stitches that didn’t come apart so easily.

To achieve this, Elias Howe invented something that every single machine has today.

A needle with its eye (hole) near the tip of the needle, instead of near the head (which is where the eye usually is, for hand-sewing needles).

Legend has it that Howe came to this realization after a nightmare. During the 1840s, while he was turning his sewing-machine idea over in his head, he had a horrifying dream. He’d been kidnapped by savage natives who were planning to kill him. They’d harpoon him to death with their spears!

Spears with…holes in the spearheads…

When Howe woke up, he suddenly realised that a needle with a hole in its tip would feed the thread headfirst into the fabric, instead of having the thread trail into the fabric after the needle. This would make the whole process faster and neater. And it allowed him to create the lockstitch sewing machine.

The lockstitch is the basic sewing-machine stitch. It happens when the thread fed down from the needle intertwines (locks) with the thread fed to the fabric from the bobbin, underneath the machine. The result is a tight, unbreakable stitch formed from two lengths of thread…something that would have been impossible without Howe’s eye-point needle.

Howe’s luck didn’t last long, though.

The moment this new revelation went public, everyone started copying him! Howe had long and frustrating court-battles to protect his invention, and he did eventually win, forcing his competitors to pay him royalties everytime they built a machine that utilised his new needle. They couldn’t get around it because a machine needed his needle to work properly. So there was at least a certain level of happiness to the end of this story.

One of the men that Howe dragged, kicking and screaming to the courthouse was the son of a German millwright. A man named Isaac…Merritt…Singer.

Singer Sewing Machines

Every industry has one leader or one brand which is instantly identifiable.

Rolex makes watches. Mercedes makes cars. Harley Davidson makes motorcycles. Steinway makes pianos.

Singer makes sewing-machines.

Although, what the connection between sewing and pizza happens to be, I’m not quite sure…

For over 160 years, Singer has been considered the first name in quality sewing-machines. Ask your mother. Grandmother. Aunt. Most likely, they own, or know, or knew, someone who did own, or does own…a Singer. And it’s not a sewing-machine…it’s a Singer. ‘Sewing machine’ is a mean, base word, offensive to the ears. ‘Singer’ is a sign of quality, craftsmanship, durability and style.

So where did it start?

Singer, the name known the world-over for its top-quality sewing-machines, was established in 1851 by Isaac Merritt Singer, the guy who Elias Howe dragged to court for stealing his special needle.

With the aid of New York lawyer Edward Clark (1811-1882), the company was established as I.M. Singer & Co. In 1865, when the American Civil War ended, the company changed to the Singer Manufacturing Company. Most vintage Singers will have “SIMANCO” stamped onto their various components. It stands for the SInger MANufacturing COmpany. Now you know.

Singer machines were stupendously popular. In 1853, the company sold just 810 machines. By 1876, they had sold 262,316! And climbing!

Singer machines were popular because they were stylish, simple, well-built, easy to care for and solid as Gibraltar. Even today, Singer machines that are 60, 70, 90, 100, 120, 140 years old…still work perfectly…for the pure fact that no corners were cut and everything was machined to perfection.

Like a lot of companies, Singer stopped manufacturing its breadwinning products during the Second World War. Instead, they built military hardware. They tried manufacturing automatic pistols (five hundred all told), but the results were hardly spectacular, and five hundred were all that were ever made. Today, those five hundred Singer sidearms are pretty rare…and valuable!

Singers were made all over the world. Not just in America, but also in Russia and the United Kingdom, and exported to every corner of the globe.

Singers were popular because of their wide range, good designs and their easy operation and maintenance. They built everything from huge desktop treadle-powered, belt-driven machines that were as big as desks, and which could sit in a standard parlour or living-room in a middle-class residence, to small, portable, hand-cranked machines, like this one:

Something small like this could be carried onboard a ship and placed on a table. The hand-crank meant that there was no electricity required to run it. Just muscles – handy in parts of the world which didn’t have electrical grids. Hand-cranked Singers were made well into the 1930s, even as electrical models were starting to come out in the ’20s.

Singers were famous for their jet-black bodies with their fancy goldwork and patterns around the wheels, machine-beds, sides and tops, a distinctive style that lasted for over a hundred years.

Designed to be as portable and as self-sufficient as possible, Singers came with all kinds of nifty attachments and features, as did some other machine-makers of the day. Underneath the machine-bed was a storage-compartment. Here you could put extra thread, needles, chalk, spare keys and any other necessities that you needed. The machine-manual, attachments, accessories, repair-tools and equipment were also stored in these little hidden compartments. The famous curved ‘bentwood’ cases that covered the tops of most (but not all) Singers came with brackets and hooks inside them, to safely store things like knee-bars, cans of machine-oil and so-forth, to stop them rattling around and damaging the machine. It was expected that no matter where you were, you could operate, clean and repair your machine, no matter what happened.

The sewing machine has come a long way from the Georgian one-time experiment to the robber of tailor’s livelihoods, to becoming the cornerstone of the clothing industry. This is just a brief look at the history of a truly marvelous machine that made countless lives easier around the world.

Looking for more Information?

www.oldsingersewingmachines.com

www.sewalot.com

www.singer.com

Dedication

This posting is affectionately dedicated to my beloved, late and much-missed grandmother (7th May, 1914 – 28th Nov., 2011). A professional tailor and seamstress of nearly fifty years’ experience, she fixed all my clothes when I was a child. She passed away at the impressive age of 97. It was her machine which was the inspiration for this article.

My grandmother’s sewing-machine, a Singer model 99k, made in 1950, in Kilbowie, Scotland