Singer No. 99 Sewing Machine Manual

I found this at the flea-market, together with a box of about a hundred Singer machine-needles, for $5. It is an original 1930s SINGER No. 99 sewing-machine instruction-manual, which I automatically snapped up to add to my grandmother’s machine.

Here is the manual:

It’s all complete and in great condition. There’s no rips, tears, stains, missing pages or loose bits about to fall off. I know you can get scanned reprint copies off the internet for free, but they’re never as nice as having the real thing. You print those out and you have no idea how to get them bound, the pictures are horrible, the size is SO inconvenient and they’re not always *precisely* what you want, but you gotta take it because you can’t find anything else!

This little manual is conveniently sized so that it fits comfortably in your hand, and you can store it easily in the compartment underneath the machine-bed, along with the electric-motor installation manual that I bought previously:

I also bought this neat little box of machine-needles:

This box is REALLY small! It’s about 2/3 to 1/2 the size of a regular 50-a-box matchbox. But it holds something like 90 or more needles! I’ll never need to buy any more for the rest of my life!…Okay maybe a few more…

Still on the lookout for more stuff.


Cleaning a Singer Model 15 Treadle Sewing Machine

Last week, I paid a visit to a family friend. She was a retired tailor who had been sewing ever since she was a little girl. She learnt how to sew on her mother’s old Singer treadle-machine…which has since been sold out of her family.

Her friends had an old Singer treadle-machine that had been in their family for a while and which they had absolutely no use for. Not sure what else to do with it, they gave the old sewing-machine to her as a birthday present, and it now sits on a scrap piece of carpet/rug in her living-room, as a display-piece.

The machine had been through a rough old time. According to my friend, it had sat in her friend’s garage for years, untouched. It’d been rained on and dripped on and neglected and left to rot. She cleaned it up some when she had it moved into her house, just so that it wouldn’t track grime everywhere, but other than that, she’d never touched it.

When I told her I was interested in having a look at the machine, she tried to show me how it worked, but found out that she couldn’t, because the presser-foot lever was jammed in place! I told her that if she wanted, I’d be happy to fix it for her. For a really simple ‘non-functional-to-operational-condition’ quick fixer-upper, I would need pliers, machine-oil, a rag, a box of tissues, tweezers, a screwdriver, and a powerful torch. She found these things for me, and I set to work.

The handwheel spun around really nicely and the needle-bar and takeup lever and the oscillating hook and the feed-dogs were all moving perfectly; I oiled them anyway, just in case, but the foot-lever, and the foot-tension screw were completely jammed from years of neglect. Neglect and possibly, rust. It took a lot of tissue-wiping to remove all the dust, gunk, grime and crap that had built up inside the machine, and a lot of oil, and quite a bit of force with the pliers, to get the tension-knob moving up and down like it should. I kept turning it all the way one way, and then all the way the other way, up and down, to clean off the gunk inside the threads of the foot-bar, and replace the grime with oil, to make it screw up and down more smoothly.

This was my first time working on what we found out later, was a Singer Model 15. This information (along with much more!) was supplied to us when we found the original, 80-year-old manual inside one of the drawers of the machine! I wasn’t entirely sure how this machine all went together, but I figured it out in the end and found out where I had to put the oil.

By the time I’d satisfied myself that the tension-screw for the presser-foot was moving about as well as it was going to, the oil that I’d let soak into the other parts of the presser-foot bar had pretty much done its job. All I had to do was to add a drop of oil at the very top of the presser-foot bar (to let it run all the way down the sides of the shaft), and then I started working the presser-foot lever up and down several times, to spread the oil around. In the beginning, I had to apply a bit of force to the foot-bar to encourage it to move, but once the oil got into everywhere, it moved freely and comfortably with no issues.

After that, I pulled apart the rest of the machine – the clutch-wheel at the back, and so-forth, and cleaned, polished and oiled all those parts of the machine as well, before putting the whole thing back together.

This was a rather rushed, spur-of-the-moment fixup which I hadn’t intended to do when I went to visit, but which I ended up doing, anyway! All up, the job took about two hours. Of course, I could’ve done a much better and more intricate job and cleaned up the ENTIRE machine to like-new condition, but I didn’t have the time to do that. I got it running at least, and that was the main thing.

We fitted in a new needle, we threaded it up and took it for a spin. It worked perfectly!

When you’re working on these old, purely mechanical machines, with solid steel parts (such as the old treadle, hand-crank, or early electric-power machines, mostly pre-1950s), you shouldn’t be afraid to use a *bit* of extra force when encouraging the mechanism to move. Don’t try and break it (if you do that, then you’ve got some serious upper-body strength, these machines are nearly indestructible!), but at the same time, if the mechanism clearly isn’t going to move…don’t try and make it. Most likely, you just need patience, to let the oil do its job. Let it soak in for a few minutes, and then try again a little bit later.

Anyway, back to the machine…

The treadle-mechanism doesn’t work, yet. The old belt was broken and my friend hadn’t had a chance to find a new one yet. But it works fine just by turning the handwheel…by hand…and I’m pretty happy with the results. She said she’d get her husband to fit on a new belt, and then she would clean up the rest of the machine in her own time, and start using it for sewing! Yay!

Another beautiful vintage machine brought back to life and saved from the scrap-heap. And all in two hours, with stuff that you can probably find around the house, or buy at your local hardware shop.

These are just some of the photographs I took of the machine. Yes, they’re a bit blurry, but that’s cause I took them in a hurry… 

And last but not least, the serial-number…

An EC-XXX-XXX serial-number dates this machine to 1939, so pre-WWII.


Singer Attachment No. 160990 – Automatic Zigzagger

I never thought I’d get my hands on one of these, but wonders never cease. This is a Singer Automatic Zigzagger which I purchased today:

As sewing-machine technology improved significantly in the postwar years of the mid-1950s, with the the end of rationing (which in the United Kingdom, lasted twice as long as the war itself!), countries like America and the United Kingdom could start producing better and more advanced consumer-goods than ever. One of the new improvements was sewing-machines that could produce decorative zig-zag, slanting stitches, something unheard of before the war, with all prewar machines being ‘straight-stitchers’, performing a standard, straight lockstitch.

These newer, postwar machines worked by having the needlebar jerk back and forth, from left to right as the machine stitched from front to back. The side-to-side motion of the needle and the front-to-back motion of the machine allowed various types of decorative zigzag-stitches to be created. The machines were popular, but still very expensive. And Singer still had thousands of old-fashioned straight-stitch machines leftover from before the War. How to sell these older, increasingly out-of-date but still reliable machines to a public hungry for the newest postwar technology, not some dated, 1920s piece of junk?

Enter the automatic zigzagger.

A wide variety of zigzaggers, just like a wide variety of buttonholers, were produced by Singer, to be sold all over the world. This particular model, the 160990 (which also came in a 160991 variation), was manufactured for the European and British market (and by extension, the British Commonwealth) in Switzerland. It’s fitting that a country long-famed for its expertise in chocolates and watches, should manufacture an attachment of this quality. It’s exposed, it’s bare, it’s naked, it looks half-complete and you’re probably wondering where the rest of it is…but it is all there.

The beauty of this is that it’s very simple. The parts move freely and smoothly and won’t jam or seize up when the machine is in operation. It has a loose-ish feel to it, but that’s important when anything tighter would cause operational problems.

This zigzagger comes with its original cream box:

And it’s original manual:

It also comes with a dog-plate and all the necessary bits and pieces that go along with it. But most importantly, it comes with these:

These steel discs, roughly the size of a penny, are the cams that you insert into the zigzagger before commencing stitching. The cam you insert will determine the type of stitching that the zigzagger will produce. As the zigzagger operates, its arm will move over the ridges on the cams. The length and depth of each ridge determines the length and size of the stitch, and therefore, the pattern left behind by the zigzagger as it moves across the cloth.

They came in sets of five and ten cams (there’s eight there, so this would be a ten-cam set. Two of them are missing) as well as the zigzagger itself having a default cam set into it to produce a standard back-and-forth zigzag stitch.

Zigzaggers like these, with their cams, were simply fastened onto the machine via the presser-foot bar, in-place of the standard presser-foot. The arm or fork on the right of the zigzagger (in the photo above) went over and under the needle-clamp, moving up and down with the needle as the machine operated. These worked with all old-fashioned Singer straight-stitch machines and were very popular. For a couple of dollars more, you’d purchased a hardware upgrade to your machine and it could now compete with those newfangled “slantomatic” Singers that were just coming off the production-line.


Lubricating your Sewing Machine – More Accessories!

In my ongoing quest to find bits and pieces to complete the restoration of my grandmother’s Singer 99k knee-lever sewing-machine, I have two kinds of lubricant, with which to tantilise you.

When you ambled into your friendly local Singer Sewing Center and left with your brand-spanking-new sewing machine, it would’ve come complete with all manner of wizzlewozzles and doohickies, doodads and thingdoodles.

Today, few vintage machines have these bits and pieces still with them. They’ve been used up, lost, thrown out, broken or just forgotten about, and you can’t just go back down to your local Singer shop to buy them anymore. So instead, you have to seek them out all individually and separately. It’s frustrating because you don’t always know what to look for. But sometimes, you get lucky.

Using the BRK motor-manual which I bought last week (see other posts in this category) as a guide for what to look for, I headed out into the world of the local flea-market. While there, in the pre-dawn chill of a Melbourne winter, with only my torchlight to guide me, I chanced upon this:

Holy mackrel! It’s a Singer oil-can!

After anywhere from 40-90 years, there’s obviously no OIL left in the can. But I bought it anyway, for a couple of dollars, for the sake of completeness. Why did I buy it?

Because, even though it’s as dry as the Sahara Desert, it is, nonetheless, the original style of oil-can that went with my machine when it was brand-new.

This is a a standard Singer bentwood case:

On the inside of that case, on the back left-hand side (if the ‘SINGER’ logo is facing you), is a little bent wire bracket, screwed into the paneling.

If you’ve got a Singer machine with a bentwood case and ever wondered what that bracket was there for…well…take a look at the picture of the oil-can up above. Keep it well in your mind, and then scroll down…

Yup! That little bent metal bracket is to hold the oil-can! See how nicely it sits in there and how HAPPY it is to finally be back home? You can tell it’s smiling. You can just tell.

When oiling your vintage Singer sewing machine, be sure that you oil all the moving parts which are MECHANICAL. That means NO OIL should go into the electric BRK machine-motor at the back/side of the machine. If you do that, horrible things will happen. It will heat up, start smoking and will probably catch fire and blow up, because the oil’s gone all through the motor, interfered with the electronics (such as they are on these old machines) and started an irreversible chain of catastrophic events.

Oil the pistons, shafts, cranks, levers, wheels, hooks…anything that’s mechanical. But do NOT apply sewing-machine oil to the motor. Or you’ll live to regret it.

But hold on. I told you I had TWO types of lubricant!…What’s the other one?

You might remember this manual from a previous posting:

Having read the warning, you’re sitting at your desk wondering “What the hell is this ‘motor-lubricant’ stuff?”

The motor-lubricant, which is the only thing that should be used to lubricate the BRK Singer sewing-machine motor, is a thickish, pasty substance. Originally, it came in this tube, which I purchased today for a paltry $1.00:

The tube is, structurally, in excellent condition, without cracks or leaks, and it’s almost completely full of its original supply of paste! This is the lubricant which you should use to lubricate your Singer BRK machine-motor.

If you can’t find any of these neat little tubes of paste, then nick down to your local sewing-machine shop (if you have one) or hardware store (if you don’t), and ask for good-quality motor lubricant. It should be like a soft, gel-like paste which can sit inside the motor and keep things nice and smooth, but without dribbling and leaking everywhere like oil would.

Once you have it, take it home and apply it sparingly, to the oiling holes either side of your Singer BRK machine-motor. The oiling-holes are these little metallic holes at either end of the motor:

See it? It’s that tiny little steel-lined hole, above the big, fat, black plastic screw-head. That’s why the nozzle on the paste-tube is so small, because it has to fit into that miniscule little opening.

Still hunting for more bits and pieces…


Grandmother’s Dressmaking Shears!

Why Granny! What big knives you have… 

Wonders never cease.

I believed that these had been lost when my grandmother moved to the nursing-home. But I found them under a whole pile of junk in a drawer at home. Right at the back. Probably why I never found them before, on previous sweeps around the house.

This fearsome-looking digit detachment-device…also known as HUGE GODDAMN SCISSORS!…is my grandmother’s original pair of dressmaker’s shears!

I remember these from when I was a little boy, and when gran used to scold me for snapping them around with innocent childish glee.

These cold steel hedge-trimmers were what my grandmother used to cut the cloth from which she used to make clothing back in the 50s. They’re professional dressmaking shears, not scissors…shears. And now they’re all mine, with which to flirt with the possibility of horrendous injury on a daily basis!

The shears, as far as I can tell, are about 60 years old. They’re made by the J. Wiss & Sons company of Newark, New Jersey, U.S.A., a respected German-American toolmaking firm of over 100-years experience and manufacture of bladed instruments. They’re the No. 28 bent-handle shears, meaning that they’re dressmaking shears, with an 8-1/8th inch overall length, and with a cutting-length of 3-7/8th inches. The bent handles at the end (which are deliberately bent upwards) are so that you can cut fabric while it’s lying on the table, without the bottom handle getting in the way.

Near as I can figure, these shears date to ca. 1950. I have found variations of the No. 28 shears in Wiss catalogues dating as far back as 1915, and as recent as right now, on a website selling J. Wiss products, but only the shears from the 1950s exactly match the ones I have on my desk right now. They’re stamped with the words:

“STEEL FORGED”
NO. 28″

inside an anvil-shape, on one side of the pivot, and…

WISS
Newark, N.J.
U.S.A.

…on the other, and WISS – INLAID, on the same side, along the blade.

They come with nice, black, Japanned handles, and the entire thing is made of steel. The shears are made of two parts (handle and blade – left, handle and blade – right), plus a screw and rivet at the pivot-point. There’s no plastic anywhere. That means that there’s nothing here which can snap off or warp or bend or crack and break. Solid, dependable and sharp.

These are not the biggest dressmaker’s shears you can buy, and nor are they the smallest. Wiss & Sons sell shears in sizes anywhere from 6.5 inches, all the way up to monsters which are a foot long! These are kind of like middle-of-the-road shears.

I had them professionally sharpened, and now, they’re back to being functional shears once more. Originally, the pivot was very stiff and squeaky. I tried to remedy this with oil, but it didn’t do anything to help the situation. In the end, I found that the best solution was to soak the scissors in an ultrasonic bath full of hot water. The heat and the sonic vibrations loosened up all the rust and gunk and dust and oil inside the pivot-point, and now the shears swing and slice cleanly, smoothly, sharply and most importantly, silently…apart from a quality-reassuring ‘schink!’ with each closure of the blades…

I cleaned the shears and have since added them to my growing pile of stuff that I need to restore my grandmother’s 1950 Singer 99k. Here’s a photo I took showing (most) of the stuff I gathered so far:

Looking for a pair of top-quality dressmaking shears like granny’s? Here’s a website with information on the company which made the ones I have: Joseph Wiss & Sons website.

J. Wiss & Sons officially lasted from 1848-1976. But the J. Wiss & Sons. brand is still used today, and you can still buy their marvellous, gigantic, all-steel dressmaker’s and tailor’s shears today.  


How to Service your Vintage Sewing Machine

Since posting my first sewing-machine piece here on my blog, I’ve received a comment asking for tips and tricks on how to service, clean and oil these machines. I figured I’d write up a posting here, to answer that question in greater detail.

Disclaimer etc: I am not a qualified, certified, expert, professional, master machine-repairman by any stretch of fact, fiction or the most rabid and erratic of imaginations. This is merely a small side-hobby of mine; but everything written hereafter, has been done so with the backing of research and experience gained from practice. I have serviced vintage and antique sewing-machines as a hobby, and have restored some for friends and family.

The information pertaining to sewing-machines as mentioned in this posting is strictly for older machines which are mechanically driven, and not those which are generally, post-1960s, which tend to be operated more via electronics and computerised systems instead of cranks, levers, cams and pistons.

How Does a Sewing Machine Work?

I figured I’d do a bit about this first, since it might bear importance later on.

Be they 100 years old, 150 years old, 50 years old, or brand new, all sewing-machines operate in the same basic manner.

Having prepared the machine for sewing, the following actions occur:

1. The needle descends and pierces the fabric. It retracts. As the needle rises up, it leaves a small loop of thread on the underside of the fabric.

2. The transverse shuttle/vibrating shuttle/rotating hook/oscilating hook (dependent on machine’s age and design) swings around. The nose of the shuttle or the swinging hook, catches the loop of thread left by the upper needle.

3. The loop of thread passes over and around the shuttle or the hook, which pulls the bottom thread through the loop as it goes along.

4. At the top of the machine, the thread take-up lever jerks upwards. This pulls the stitch tight and closes the loop.

5. The feed-dogs perform a four-motion movement. Up, back, down, forwards. This pushes the fabric up against the presser-foot, and shoves it back, out of the machine.

After those five steps, the whole process repeats again. Sometimes as slow as hand-sewing, or, as fast as you can run the machine.

Alright…let’s get to what you’ll need to do.

*SPECIAL NOTE: The instructions in this posting are on how to clean, oil and operate your machine. NOT on how to repair them or fix broken parts. By following the instructions in this tutorial, you understand that your machine is in WORKING ORDER, but requires cleaning and general maintenance*

Tools and Equipment 

This pertains specifically to old Singer sewing machines, but most of these things you can use to service any antique or vintage sewing-machine.

You will need…

Needle-nosed Tweezers

I cannot stress this enough. If you don’t have a pair of these…forget it.

You must have a pair. There is absolutely NO other way to get into the TINY little recesses of the machine to dig out the dust, lint, fluff, dead insects, broken needle-tips and other crap that builds up in a sewing-machine over the course of decades.

Forget about the Dyson or the Hoover or the Miele. They can suck like a tornado, they will not remove the bits of grime that are glued and stuck onto the machine, or which are hiding in tiny, inaccessible places. Without needle-nosed pliers, it’s almost pointless to start.

Tissues or Bog-Roll

Tissues or toilet paper to clean, wipe, polish, stop oil from dripping, etc. Don’t just take one or two sheets. Keep a box of the things next to you while you do this.

Cotton Buds

I think the Yanks call these things ‘Q-tips’. Everywhere else in the world, they’re called cotton-buds. Those little plastic shafts with fluffy cotton balls on the end, about two inches long.

You need these to clean, wipe or polish areas of the machine which a tissue or other polishing-cloth won’t reach.

A Powerful Torch

Personally, my eyesight is not good. But this would apply to anyone. You need a bright, powerful (preferably small) torch (‘flashlight’ to the Yanks) while you work. This is so that you can shine extra light into the really dark, tiny, tucked-away places of the machine where conventional lights won’t be able to reach.

A Miniature Screwdriver

Cute little thing, isn’t it? This little Singer screwdriver (or one like it) would’ve come with most vintage Singers when they left the factory, or your local shop. This is my screwdriver

Some sewing-machines come with these little wotsits already supplied. Very handy. I know for a fact that Singer machines were sold with their own personal screwdrivers. If you have one, good. If you don’t, toddle off to find the very smallest screwdriver you can find. A flat-head screwdriver, by the way. Ideally, the size should be 3mm wide.

*SPECIAL NOTE: For owners of Singer sewing machines with bentwood cases. If you don’t have the key for your case and the machine is locked inside, you can use a 3mm flat-head screwdriver as a makeshift key. It does not damage the lock and will serve the purpose admirably*

The screwdriver will be essential for…well…undoing screws and removing plates.

General-Purpose Oil

Get yourself a can of general lubricating oil. Something that’s used on things like hinges and suchlike.

THIS IS NOT TO BE USED TO LUBRICATE THE MACHINE.

The purpose of this oil is to lubricate the case-lock which holds the machine-case onto the machine-base. And this is just about the only thing that it should be used for.

Sewing Machine Oil

You will also need a bottle or can of sewing-machine oil. Ideally, you want sewing-machine SPECIFIC oil. But if you can’t, a high-grade, thin, runny machine-oil, suitable for sewing-machines, will suffice. Just don’t use 3-in-1 oil. It may say that it’s for sewing-machines, but I have it on good authority that this stuff is not the best thing to use. Personally, I use SuperLube machine-oil, which was the one recommended to me by my local repairman. You can buy this oil from your local hardware shop or your local sewing-shop in little 125ml bottles.

Eyedropper or Syringe

This is to distribute the oil around the machine. If you have a spray-can of machine-oil, of the type described above, then you can use the little plastic tube that comes with the can instead, but if the oil comes in a little glass or plastic bottle, then you’ll want something like an eyedropper or a syringe.

Some of the places that you need to apply oil to in a sewing-machine are quite inaccessible to a big, bulky bottle. This is where a local-application tube, or an eyedropper can come in handy.

A Bowl or Plate

Something that you don’t use anymore. This is to house any screws, nuts, feet, plates etc, that you remove from the machine during the course of your restoration. These things are TINY and they will roll away from you, given the chance. And if your machine is 50, 70, 90, 120 years old, chances are, if you lose a particular piece, you won’t be able to just go out and buy a new one.

Metal-Polishing Paste

You’ll also want a tube of metal-polishing paste. You can get this stuff from hardware stores and car-maintenance shops and suchlike. Personally, I use a German-made product called Simichrome, it does the job on most metals with ease (except brass, I think), and the results will look stunning.

Machine-Manual

If possible, you should get a hold of your sewing-machine’s manual. Now I realise that if you’re reading this, your machine is probably one that you picked up at an antiques shop, a flea-market, or which you inherited from granny (that’s how I got mine!) and that half the crap that should have come with it, is missing (just like with me!).

Don’t worry. You can buy (or sometimes if you search really hard, download for free) facsimiles of original sewing-machine manuals.

Having the manual is a big help for obvious reasons. It shows you how the machine goes together, how to oil it, what all the parts are, and most importantly, how to use it!

Right…Got all those things? Let’s get started.

Cleaning the Machine

I’m going to assume that the machine you have is a really old one. By that, I mean at least 60 years old. No later than about 1955-1960 (after that, the technology kinda changes a fair bit and this sort of information isn’t as pertinent to more modern machines). Most likely, it looks something like this:

My Singer 128 Vibrating Shuttle machine

This little sweetheart is a Singer 128 model, and is representative of the kinds of machines seen around the turn of the last century. For those not very good with dates, that’s ca. 1890-1910. Possibly, you might have a slightly later model, such as a Singer 99-series model, from ca. 1920-1960. They look like this:

My grandmother’s Singer 99k

Or perhaps you’ve got one of those big, old foot-driven treadle-machines, which look like this?

Singer 66 treadle machine that I snapped at an antiques shop

Regardless of what machine you have, if it looks like those (or is very similar to those) and is of advanced age, this tutorial should cover all the necessary directions for getting it running again.

The first process of cleaning is de-linting or de-fluffing the machine.

These old machines have a LOT of places where dust, broken needles, fluff, lint, loose thread, bread-crumbs, loose diamonds and other bits and pieces can fall in and hibernate. They jam up the machine and make it difficult to run (or make it run not at all!). It is essential to remove as much of this stuff as possible before moving onto the next step.

When cleaning the machine, you want to start with ONE area at a time. Broadly speaking, a sewing-machine is divided into four basic areas:

1. Needlebar Assembly

The needle-bar is the area of the machine at the head of the arm (the bit that you pass the fabric under). This is comprised of the…

– Faceplate.
– Needle-bar.
– Presser-foot bar.
– Foot-lever.
– Takeup-lever.

 2. Bobbin Area

The bobbin area is directly beneath the needle-bar and presser-foot. It is comprised of the…

– Bobbin
– Bobbin-case
– Oscilating hook/rotating hook/shuttle.
– Feed-dogs.
– Slide-plate/s.
– Needle-plate.

3. The Undercarriage

The underside of the machine is where all the secondary cranks and pistons hide out. This is accessed by unscrewing any securing-bolts or nuts, and lifting the whole machine UP and BACK on a pair of hinges. This is where you would traditionally store things like spare needles, manuals, bobbins, scissors, etc. Small fiddly things that you might need. You need to clean in here to ensure that the bobbin-case and the oscilating hook (or other stitch-making apparatus) works properly.

4. Handwheel Assembly

The handwheel assembly and clutch-wheel is the part of the machine right at the back, on your right. This is comprised of…

– The handwheel (big wheel).
– the clutch-wheel (small wheel inside the big wheel. Also called a stop-motion wheel).
– Bobbin-winder
– Drive-belt (if your machine is electrically powered, or a mechanical treadle-machine).
– Hand-crank (if your machine is manually-powered).

Now that I’ve labelled those areas, pick one, and start the de-linting or de-fluffing process. This involves disassembling the area to as far a level as you’re comfortable with/capable of, and poking around with your tweezers (the all-important needle-nosed tweezers I mentioned earlier!) to remove any and all fluff, dust, hair, lint and thread that you might find.

Take your time with this. These old machines gather dust and crud like the Amish gather weaving-looms.

Work through each part of the machine, area by area, systematically. After delinting/defluffing, you want to take your tissues and wipe the area as clean as you can. You might also like to squirt a TEENSY bit of polishing-paste to clean a particular area and give it more of a sparkle. This does a lot more than make it look nice – it helps the machine to run better.

A Word of Caution

 In old Singer sewing-machines (and, I believe, in other makes and models), there is often a piece of RED FELT hiding inside the bobbin-well. LEAVE IT ALONE!!!

It is NOT lint. It is NOT junk. It is part of the machine’s design. Do NOT remove it. It is important. Exactly why it is important, I will explain later.

This is the red felt. I’ve included these photographs at the request of a reader, who wanted to see its exact placement within the machine: 

If the machine looks a bit weird, its because I unscrewed and removed the needle-plate underneath the presser-foot to take these photographs.

In these photos, you can also see the bobbin (round spool), bobbin-case (thing that the round spool is housed in), bobbin-release button (round button with crosshatching on top) and the feed-dogs (the raised bits with little corrugations on top).

After thoroughly de-linting and wiping down every part of the machine where lint is want to hide (take your time with this, trust me, there’s a LOT of places!), then you move onto the fun part.

Oiling your Machine

Right. You’ve pulled the whole thing apart. You’ve de-linted the machine, you’ve wiped it down, you’ve polished it nice and clean. Now you need to oil it.

Do NOT skimp on this step. Trust me, it’s important. Don’t ever worry about putting in too much oil. Better that the machine should drown in happiness, rather than break it’s back from overwork.

Now that you have thoroughly cleaned the ENTIRE machine, you need to oil it.

Take out your bottle of high-grade machine-oil, made for, or suitable for use in sewing-machines.

If you have a can of the stuff with a local-application tube, even better. If not, then also take out of its place of secretion, your eyedropper or syringe.

What you want to do now is to oil your machine. This is not hard to do. And to be honest, it’s kinda fun. It may take a while, but don’t give up hope. Just keep squirting and testing, squirting and testing.

Oiling a sewing machine is easy. Just follow the golden rule: Oil anything that moves. And oil it more than less.

Now, your machine might run jerkily and stiffly, or, as was in my case, it literally would NOT run AT ALL, and that’s with considerable effort put into trying to rotate the handwheel.

In either case, the procedure is the same.

Take your oil and drip it into, and onto any place in the machine where something moves, or something rubs up against something else. The key spots to oil are the key spots where I mentioned earlier, you need to clean. The four main parts of the machine. The needle-bar area, the bobbin-area, the handwheel-area and the underside.

How long does all this take? I can’t tell you. It’s dependent on the machine. With my first machine, which didn’t move at all before it was oiled, it took nearly an hour (about 45-50 minutes). Yours might take longer, or shorter than that.

Don’t worry about getting oil all over the place. These machines are designed to put up with that. More oil is better than not enough. So squirt or drip it all over the machine in places where it needs to go.

Your machine may have a series of holes all over it. Such as along the top of the arm, around the handwheel-area, at the top of the needle-bar area, and so-forth. These are OILING HOLES. Yay! You can pour as much oil down there as you can fit. The oil will seep into places such as pistons, rods, shafts and cams, and get them to wake up and start moving.

A word, though. Be sure that you clean these holes BEFORE you pour oil down them. You don’t want a dead blowfly inside your machine-head oiling hole to be sucked down into the guts of your great-grandmother’s Singer, to be mashed up into bug-goo.

While you oil the machine, periodically operate it. Pump the treadle, press the foot-pedal, push the knee-lever or turn the crank-handle. This will encourage the machine to move, and this, in turn, will spread the oil further around the machine. Keep oiling, pausing, operating, oiling, pausing, operating, over and over and over.

Oh, and remember that red felt I mentioned earlier? The stuff that hides in the bobbin-area?

Drench it in oil.

It’s there to act as a sponge. Squirt a whole eyedropper of oil onto it. This will keep it moist and happy, and will stop the shuttle or the oscilating/rotating hook from scratching against the metal near the felt, and prevent wear, tear and possible damage.

When have you put on enough oil?

You’ll have put on enough oil when the machine runs freely. You should be able to put your foot down, you should be able to press the knee-bar, you should be able to treadle like an Olympic cyclist, you should be able to crank at the fastest possible speed, and the machine offers no resistance at all.

At the same time, the machine should be a lot quieter. It won’t rattle, squeak, jerk, groan or shake the entire table when it runs. If it does, then it needs more oil.

“I’m done…Now what?”

Okay. You’ve finished the entire project! Now wasn’t that fun?

Once the machine is running and you’re hankering to become the next Savile Row master-tailor, you need to keep your machine in good condition.

Basically, this means keeping the dust off it, changing any broken needles, finding accessories, spare parts and other doodads for it, and keeping it oiled.

These old machines drink oil. And it’s important to keep them hydrated. After any significant project (say you just finished making a whole new set of slip-covers for the pillows and cushions of that big, three-seater couch and two armchairs in the living-room), you should oil the machine all over again. Not much, maybe 2-3 drops in each place. When you’ve done that, run the machine at-speed for about 2-3 minutes, to work the oil in, and then put it away.

Given regular maintenance, a vintage or antique sewing-machine will run for another 100 years. These machines were incredibly tough and they were designed to sew together anything short of sheet-metal. They will EASILY chomp through canvas, leather, denim, or even multiple layers of paper (my record is 56 pages, or 28 sheets of paper…I used the machine to sew together it’s own instruction manual!). Being made of steel and wood, there’s almost nothing on these machines that will ever wear out, apart from tires, protective rubber feet, belts and needles. These can generally be easily replaced, either with reproduction parts, original parts, or from materials jerry-rigged for the purpose (I have seen people who re-belted their old treadle or electromechanical machines using nylon rope, to great effect, I might add).

Dos and Don’ts with Old Machines

DO – Take your time with cleaning and oiling it. Nothing was ever gained by trying to rush something, when restoring a vintage or antique *anything*

DO – Use the proper equipment, materials and tools. You won’t get anywhere if you don’t have the right stuff to do it with.

DO – make sure that you cover EVERY part of the machine when you service it.

DO – check for things such as broken and/or bent needles (if such, then remove them), worn belts or tires, missing plates, bobbins etc. Finding reproduction or original parts for your machine will depend on make, model and of course, age. Singer being the most popular brand, it will be easier to find parts for a Singer machine than almost any other).

DO NOT – run the machine with the presser-foot down, and no fabric between the foot and the teeth of the feed-dogs. This will cause the teeth to scrape against the bottom of the presser-foot, and cause unnecessary wear and damage.

DO NOT – force the machine to operate when it won’t do so. Just keep oiling it.

DO NOT – operate an electrically-powered machine UNLESS you are either damn sure that the electrics are intact, or unless you’ve just had the electrics checked by a certified sewing-machine repairman, or qualified electrician. Don’t forget, these machines are about 75% metal. You don’t want to zap yourself making a quilt.

To the person who inspired this posting (I’m going to assume you know who you are), I hope this answers everything you needed to know about restoring your Singer sewing-machine. If it doesn’t, you’re welcome to post a comment or a question and I’ll do my level best to answer it.


Lots of Little Singer Pieces!

No, I didn’t drop my grandmother’s sewing machine down the staircase, resulting in a carnage of wood, metal, rubber and broken tiles. What I did manage to do, was to get my hands on the first group of several attachments which I’m chasing after for my restoration project involving my grandmother’s 1950 Singer 99k sewing machine.

I already have the buttonholer, and now, I managed to get some more extra bits and pieces for it.

A poke around the flea-market today dredged up the following treasures from the sludge of the drudge:

Yes, some of it is hidden by the sticker in the middle (which was original to the booklet), but it reads in its entirety:

“INSTRUCTIONS 
for using and adjusting
Singer BRK electric motors
with knee-control for
family sewing-machines

The Singer Manufacturing Co”

The bit in italics is the part that’s covered by the warning-sticker.

Along with the cutesy little booklet, which is the one which my Singer would’ve come with when it was brand-new, I bought this:

It’s a box of Singer sewing-machine attachments…or some of them. I haven’t managed to find ALL the pieces I need yet, but good things come to those who wait. Inside the box, we have:

I know what about 3/4 of the objects inside that box are. Others, not so sure. For example, we have inside the box, a…

Seam Guide

The seam-guide, held in-place by it’s accompanying nut (which simply screws into the appropriate hole in the machine-base), is used to guide two pieces of fabric under the presser-foot during sewing and to make sure that the size of the seam is consistent throughout the piece. This is an older seam-guide and sewing-machine, so it doesn’t come with measurement-markings. If you wanted that, you’d need to use your measuring-tape as well.

Hemmer Foot

The hemmer-foot is used to create a hem along the edge of raw fabric (to prevent fraying). You feed the fabric through the machine and through the hemmer. As the fabric passes through, the curved bit at the top flips the fabric over to create a neat, even fold which is then stitched into a nice, crisp hem.

Adjustable Hemmer

This is an adjustable hemmer. It’s much like the one above…it does the same thing, it makes hems. But this one has a slide and gauge on it that allows you to make hems of different widths, according to your taste. Anywhere from a full inch, all the way down to 1/16 inch.

Binder Foot

The binder or binding foot does…just what it says it does. It binds. It’s handy for stuff like attaching lace, ribbons and other decorative things to the edges of clothing.

Screwdriver

Isn’t this cute!? It’s a teensy-weensy-widdle-bitty screwdriver! And, it’s a Singer-brand screwdriver, too! It’s probably got a head of 2mm or something. Exactly WHAT one would use this for on a sewing machine…I’ve no idea…but it sure is cute. None of the screws on the Singer are this tiny, but I suppose I’ll hold onto it for the sake of completeness. And I can let the mice borrow it when they need it.

Finally, there are two mystery-feet inside the box. I haven’t figured out what they do or what they are.

They hold SIMANCO part-numbers 86177, and 85954. I’ve tried looking them up, but I can’t find any lists of serial-numbers that correspond.

If anyone knows, tell me!

In the meantime, my quest to complete the Singer continues.

In an unrelated note, I found an antique handcrank sewing-machine at the flea-market today. I had no intention of buying it, for a number of reasons (completenes, quality, manufacture, the list goes on), but I reckoned it looked kinda cool. So I took a couple of photos of it:

It came with it’s original coffin-style case and was dated to ca. 1900, made in Germany. Other than that…the seller had no idea.

Hand-crank machines such as this one were very common. Big companies like Singer were still making them, well into the 1940s and 50s when electronic machines had already taken over. I suppose they had an advantage during the War, when electrical supply was unreliable at best…

I’m still on the hunt for a Singer oil-can and more and more feet and fiddly bits. Here’s a group-shot of everything I’ve found so far:

The red box contains the buttonholer. The green box contains the feet and attachments. The manual balancing on top is how to install and/or remove the machine-motor that’s hidden around the back of the machine. The machine itself is a 1950 Singer 99k knee-lever machine.


Singer Attachment No. 86718 – Buttonholer

Well, I said I’d keep you folks updated with what I found for my Singer sewing-machine, and this is the first of those updates.

First, my sewing-machine restoration-adventure.  

Okay. This posting is about the first attachment which I purchased for my Singer. It is a buttonholer. It is Singer Part No. 86718. This attachment is designed to fit onto Singer 99, 99k and 66-model machines (and other Singers with a single square slide-plate in the middle of the left side of the machine-bed). It came in a handsome red box…

And has a pretty red and cream colour-scheme, with ‘SINGER’ on top:

The bit that you see on the right is the dog-cover. It covers the feed-dogs underneath the presser-foot, to stop them shifting the fabric to where you don’t want it (on older machines like this, dropping the dogs isn’t an option).

The two red knobs at the back are to adjust SPACE (size of the buttonhole) and BIGHT (closeness of the stitches that form the buttonhole outline). The big red knob at the front is to adjust the position of the sliding foot at the front of the buttonholer, to determine where you want the buttonhole to start.

Just like everything else made by Singer back in the ‘Good Old Days’, this thing is solid steel. All it needs to work is oil.

After I bought it, I took it home and opened it up. In this photo, you can see (…or not, it’s REALLY small…) that the cream-coloured cover is held on by one tiny little screw, to the right of the big red knob:

It was moving very stiff and jerkily, and after I opened it up and wiggled it around a bit, I found out why. It was full of this thick, grey, gummy oil that was acting more like paste than lubricant. So I wiped off as much of it as I could before re-oiling the whole thing using machine-oil and putting it back together.

This is a very simple buttonholer. It doesn’t do fancy keyhole-buttonholes or buttonholes of different lengths and whatnot. It just does buttonholes. And in the end, that’s really all you need. You can adjust the size of the buttonhole manually anyway, by turning the red knob on the side as you go.

Oh, and for the Americans who are looking confused right now, my research tells me that this style of buttonholer was manufactured in the 1950s and was prevalent in Australia and in the United Kingdom and Europe. But it appears not to have been exported to America or Canada, which will probably explain why folks stateside are unaware of its existence.

How to Use It?

Your guess is as good as mine. When I bought it, it didn’t come with a manual (although it did come with a sheet of “anti-corrosion paper“). To figure out how to use it, I mostly watched videos, read blogs and just used common sense. But for anyone else who picks up one of these things without the manual…

1. Screw Down Dog-Cover

The feed-dog cover/plate is the rectangular thing with the black bit dangling off it. The black dangly bit goes over the two holes that you’ll find in the machine-bed, to the right of the needle-plate. In the attachment-box, you’ll find one or two small screw-bolts. Poke one of these through the hole in the middle of the black dangly bit, and screw it into one of the two holes in the middle of the machine-bed (it doesn’t matter which one).

Raise the presser-foot and slide the main body of the dog-plate over the feed-dogs and needle-plate.

There is a small rectangular hole in the dog-plate. This is where the NEEDLE goes through, to make the lockstitch under the needle-plate. Make sure that this tiny hole lines up with the hole in the needle-plate. Otherwise your needle will just be smacking its head against solid steel and going nowhere. Once it’s lined up, tighten up that little nut from earlier, to make sure the plate doesn’t wriggle away.

2. Remove presser-foot and attach buttonholer

This is a little easier said than done.

First, you gotta unscrew the bolt that holds the presser-foot onto the foot-bar and remove it. Put it somewhere where it ain’t gonna walk off on you.

The attachment hooks onto the presser-foot bar from the back. There’s a hook in the middle of the front of the attachment that goes around the presser-foot bar, and a ‘fork’ that sticks out, which should go above and below the needle-clamp on the needle-bar. Best to shove it in at an angle. It can be fiddly, so take your time.

Once it’s on, drop the foot-bar lever, and screw the attachment firmly onto the presser-foot bar using the supplied bolt (it’s the bigger one, about an inch long). Once it’s in, adjust the buttonhole guide so that it’s at its outermost setting.

Note: When preparing your machine to put the attachment on, be weary of the orientation of the thread-breaker (that’s the little clampy-piece that’s stuck onto the presser-foot bar). You may need to twist it around so that it’s out of the way of the front of the attachment, otherwise it’ll scratch against the buttonholer, like you see it had in mine.

Raise the attachment, feed in the patch of fabric that you want a buttonhole to be made in, and drop it.

3. Run the Attachment

Once it’s in and bolted on, drop the foot-lever, and then run the machine SLOWLY. Running it too fast will tangle up the cloth and lead to all kinds of strife. Better slow than sorry. The attachment will pull the fabric in, punching in little holes and driving the needle and thread through them, making neat stitches. It’ll then move the fabric to the right, stitch across, and then stitch back, and then shift the fabric over to the left, stitch across…and that’s a buttonhole! Some people like to run the attachment through again, to make the buttonhole nice and thick.

Whatever you do, make sure that the thread-tension discs are set correctly. If not, you’ll end up with snapping thread, and huge masses of loose thread on the underside of the buttonhole. That not only looks messy, but it jams the machine.

Once you’ve done one buttonhole, raise the needlebar, raise the foot-bar, shift the fabric over to the next space, and do it again!

Easy as pie.


Momentos of the Past – Restoring My Grandmother’s Singer 99k Sewing Machine

This is a little outside the normal realm of what I post on this blog, but I figured it might make interesting reading.

The Backstory

My grandmother was born on the 7th of May, 1914, in Singapore. She was a first-generation Chinese-Singaporean, her parents having migrated to Singapore from southern China. She had a mere five years’-worth of education at an English-language school in what was then Singapore Town, from 1921-1926.

She married my grandfather during the Second World War in 1943.

When the War ended, she occupied herself in looking after her husband’s three children by his first marriage. In 1953, she opened her own dressmaking and tailoring shop, in the Malaysian town of Batu Pahat. She shared the premises with a women’s beauty-salon, and consequently, it was called the ‘Kam Seng Beauty Parlour‘ (Kam Seng is Cantonese. It means ‘Golden Star‘).

When my grandmother opened her shop, she was gifted a beautiful, and brand-new sewing-machine. She used that machine for every single one of the thirty years that she ran her shop, and when my grandfather died in May, 1983, she closed the shop, retired, and immigrated to Australia.

She brought the machine with her, and continued to use it almost every single day, up until about 2003. She repaired clothes for friends, she took in alterations from her church-group, and she repaired the many rips and tears in clothing that will come from it being worn by two lively grandsons…one of them was me.

Gran and her sewing-machine were inseparable. I remember when my father purchased her a modern machine, she barely touched it, and went back to using her Singer. She was always a bit set in her ways, and while she was more receptive to other modern technologies (at the age of 85, she knew how to use Microsoft Word, type, and print on a computer), she was absolutely dead-set that the only machine she would ever use for sewing was her own.

Around 2000-2003 (I forget exactly when), my grandmother had to move into a nursing-home. Her Alzheimer’s Disease had become too much of a liability and a risk to house her safely at home. Alzheimer’s is a horrible, crippling illness. Unless they’ve seen it firsthand and had to deal with it for years on end, don’t believe anyone who tells you that “I understand” when you talk about Alzheimers…because they don’t. Unless they’ve seen it, or studied it, or treated it…they really don’t.

When gran moved to the nursing-home, her sewing-machine was put downstairs in the basement, where it has sat for the past 10 years.

My grandmother died on the 28th of November, 2011, at the impressive age of 97.

With her gone, and my father and I constantly discussing antiques and heirlooms and him telling me all the stuff that his family used to own, but which they don’t anymore, because they were thrown out, but which today would be worth a pretty penny…my mind was drawn towards gran’s sewing-machine.

That machine was her life. She carried it EVERYWHERE with her and it was her baby. She would let nobody else touch it (except me, because I used to set it up for her every morning. The machine weighs 31lb, 4oz…about 15kg…and it wasn’t easy for an seven-year-old boy to haul that thing around!). Now that she was gone, we had nothing left to remind us of gran, except her sewing-machine.

With all of my father’s stories ringing around in my ears, I began to wonder what would happen?

That machine was gran’s mainstay and anchor and rock for 50 years, or over half her life. And it was the one machine that represented her character and told her life-story better than anything else. Tough, simple, elegant, stubborn and impossible to destroy.

Be there as it may, I knew that it wasn’t going to last long rotting downstairs in the basement. So I decided to haul it out of that godforsaken hole in the ground, and restore it to a level where it was once again a functional piece of machinery.

STEP ONE – Cleaning the Machine

Carrying it as carefully as I could, I hauled gran’s Singer…because that’s what it is…out of the basement. It was locked up tightly inside the curved ‘Bentwood’ case, cocooned by wood and shrouded in the dust of a decade. I cleaned off the dust and then set about opening the case.

The cases are held onto the machine-bases by very simple, but surprisingly effective locks. Without a key, these cases are literally impossible to open. I squirted some oil into the lock and while I waited for it to settle, I went off to find the one tool that I would need to open the case.

Not the key, that was long gone.

A 3mm flat-head screwdriver.

If anyone reading this has ever tried to open a Singer bentwood case but doesn’t have the key…pay close attention…

The profile of a 3mm flat-head screwdriver perfectly fits the keyhole of a Singer bentwood case’s lock. A few generous squirts of oil, a few minutes of waiting, then I shoved the screwdriver, horizontally, into the lock. I turned it clockwise 90 degrees, until the lock was in the vertical “Unlocked” position.

Then, I shifted the whole top of the case to the left about a quarter of an inch. This is to disengage the other bolt or latch, which secures the right side of the case to the machine-base (the lock with the key is always on the left), and then lifted it up.

Here’s the bentwood case:

Here’s the keyhole:

That rectangular thing is the keyhole. It’s 1mm high by 3mm wide. You can also see the bolt underneath, that you have to throw over, to unlock the case

And this was the machine as it looked when I broke open the pharaoh’s tomb:

I’m no expert with sewing-machines. I just like old, vintage, antique-y things. And this is the closest thing we have in my family to an heirloom, so I decided almost immediately, to try and get it running again.

In all honesty, this thing probably hasn’t been serviced by your friendly local Singer Man since it left the factory back in 1950. I had no idea what I was getting myself in for, but I started, anyway.

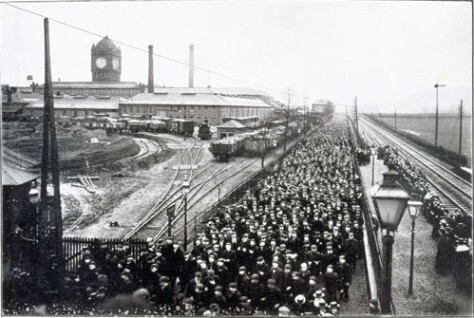
‘Singer Manufacturing Company’ factory; Kilbowie, Clydebank, Scotland, U.K (Photo ca. 1901).
Gran’s machine was made here

First, I had to clean out all the gunk and fluff and crap that was inside the machine. Over the decades, this machine built up an enormous amount of dust and fluff, lint, loose thread, dead insects, coagulated oil and other…crap!…which rendered it totally unusable. I basically had a really awesome boat-anchor sitting on the living-room floor.

So, off with the face-plate…

The faceplate is that pretty steel plate with all the patterns on it that you see in the photo above. It was held on by one screw, and one nut. Somewhere in there is a bad joke…

Behind the plate is the crankshaft mechanism that powers the needle-bar (along with everything else in the machine apart from the light). It looks like this:

It’s quite simple, really. The crank turns around. It simultaneously lifts the needle-bar and lowers the uptake-lever (that’s the doohickey sticking out on the right with the hole in it), and then does the opposite when it completes one revolution.

As you see it there, the machine was completely immovable. It was covered in gunk and crud that I had to pick out with tweezers and wipe down with tissues to remove. It’s not just taking out the Dyson or the Hoover and sucking all the crap out of the machine…a vacuum-cleaner wouldn’t be able to remove 90% of the gunk inside here, because it’s stuck in really inaccessible places which only tweezers are able to reach, like behind levers, rods, shafts and plates.

Once that was done, I then had to tackle the handwheel assembly, at the other end of the machine. The handwheel is this big shiny wheel:

The handwheel spins around thanks to a belt-drive wrapped around it, which hooks up to the machine-motor at the back. You can see it here:

That black lump at the bottom left is the machine-motor. Above it, you can see the black light-shade. To the left of the lightshade is the drive-belt that runs the machine.

Anyway, I digress. I had to remove the clutch-wheel, also called the stop-motion wheel, which is that silvery wheel in the middle of the handwheel. You might notice that it’s held on by a single, but surprisingly effective screw, which took quite a while to loosen up. Once it was loose and I could unscrew the clutchwheel, I was confronted with this enchanting scene:

This is a part of the machine that NEVER sees the light of day, and yet it’s full of fluff, lint, gunk, dried oil and other crap. This is why complete disassembly of the machine was necessary…it’s this stuff that stops it from running, because it jams up the works. I took off the washer (that’s the doughnut with the three nubs sticking off it), and cleaned it, the crankshaft and the wheel, thoroughly. This is what it looked like when I was done:

This is the other (non-shiny) side of the clutch-wheel, with the washer sitting on top of it:

If you’re reading this as a guide on how to clean and fix your Singer (provided it’s the same model that I have!), you’ll notice that there’s a little nub sticking out of the clutch-wheel, around the 9 o’clock position. That’s the screw that holds the clutch-wheel onto the larger handwheel. It’s sticking out there because it doesn’t (and is not supposed to) be removed entirely from the clutch-wheel. It’ll unscrew a few milimeters and then it will stop. Do NOT force it…you won’t achieve anything at all, and what you want to have achieved (which is removal of the clutch-wheel) should be well within your capabilities by then.

Anyway, next step was to clean the bobbin-mechanism:

The bobbin mechanism is what holds the…bobbin. The bobbin being that shiny steel spool with the three big holes and the one small hole in it. It’s what feeds the thread to the underside of the machine to make the classic lockstitch.

Oh, and a warning note here…

See that nice fluffy red felty cloth on the right?

If you’re fixing, cleaning or repairing a sewing-machine, and you see the felt…

LEAVE IT ALONE!!!

The felt is your friend. It is there for a purpose! So DO NOT touch it! Without the felt, you’d have the oscillating hook (that catches the thread and pulls it under the needle to make the lock part of the lockstitch) scraping against metal inside the machine, and that would wear everything down and eventually just break it.

Fortunately, I”d read this warning on another blog before commencing work on this machine, so no undue damage was done to the intricate inner workings of this Singer by my hands.

Once the topside of the machine was cleaned, polished and defluffed, I had to tackle the underside of the machine. To do that, I unscrewed this nut, and swung back this catch:

That allows me to lift up the whole machine and tilt it back on hinges to access the storage-compartment underneath the machine:

This handy little compartment is where you would store things like thread, spare needles, bobbins, the machine-manual and all that other stuff. But more importantly, it was where I could get my hands on this:

This is the other side of this:

And it had just as much fluff, crap and mostly…loose thread…as the topside did.

Once the entire machine was completely cleaned, inside and out, topside, downside, upside and underside, it was ready to oil it.

STEP TWO – Oiling the Machine

Singers were made to be idiot-proof and user-friendly. To that end, they are incredibly easy to use, and look after. Especially a machine like this. The next step was to oil the machine to unjam all those frozen pistons and rods and cranks. To do that, you need high-grade machine-oil. You can buy this stuff at sewing-shops, decent hardware shops and whatever. Ideally, you want sewing-machine-specific oil. But if you can’t get that, any really thin, runny, high-grade oil (which will work for sewing-machines, and says so on the label), will do.

For this, I used SuperLube machine-oil.

And a LOT of it.

It took about an hour to fully lubricate the machine to the point where it would move as it once did. Oiling it is pretty easy. Just remember to squirt oil where-ever something moves. On a sewing-machine, that’s a surprisingly large number of places!

Fortunately for us, Singer thought about this, and provided us with these:

Those holes (next to the ‘T’ the ‘The‘ and under the ‘i’ in ‘Singer‘) are just two of several oiling-holes. You squirt or drip the oil down those holes to lubricate the machine!

What’s in there?

Why the crankshaft that runs the machine, of course! But before you do that, make sure you stick your needle-nosed tweezers down those holes first. There might be some unexpected surprises in there (like dead insects or dust, lint and fluff), that you don’t want to get all over the insides of your beautiful vintage sewing-machine.

Once the machine was generously oiled, I ran it by hand for several minutes to work the oil into the mechanism. You can do this easily by just turning the big, black and silver handwheel anticlockwise to work the mechanism. It doesn’t damage the machine, so don’t worry about that. Now that the machine was running, it was time for…

STEP THREE – Testing the Machine

This is a Singer 99k knee-lever machine made in Kilbowie, Clydebank, Scotland, in 1950. It’s called a knee-lever because it uses one of these to get it running:

That’s the knee-lever. And this is the socket that it slots into, on the right of the machine:

So, you plug in the power-cord, you stick in the weird, twisted “?”-shaped crank-thingy and you let ‘er rip!

And boy does it ever.

The machine was running like a jackhammer on steroids. In other words…perfectly!

Then, I had to make sure that, not only the sewing-mechanism was working, but that the bobbin-winding mechanism was working.

The bobbin-winder is this little thingo here:

It’s used to mechanically wind thread back onto the bobbin (that little steel thread-spool from further up in the posting) when the thread runs out. It turns a task that would take several minutes, into an event that’s over in about 30 seconds. You work the bobbin-winder by loosening the clutch-wheel (turning it anticlockwise), slotting a bobbin onto the rod:

Setting the release-lever against the bobbin (to stop it flying off the rod when this thing gets moving!), threading the bobbin, and then pressing the knee-lever to do the rest.

The automatic bobbin-winder will keep spinning, and the bobbin will keep filling, until such time as the thread in the bobbin fills up to such a level that it pushes away the release-lever. This automatically disengages the flywheel, which stops the mechanism dead in its tracks. And you have a full bobbin.

STEP FOUR – Accessorising the Machine

The next step was to accessorise the machine, or to find extra bits and bobs for it. These aren’t essential things, but they’re things that would be nice to have…like…extra needles…extra bobbins…original packaging…oil-cans…all that stuff. When the machine was brand new, it would’ve come with all kinds of nick-nacks and doodads and whizzle-whozzles that would’ve allowed the owner to attain a mastery of the machine good enough to make a suit.

I got lucky at the local flea-market and picked up a whole heap of needles and bobbins (eleven bobbins and two packs of original Singer needles) for a good price. Here they are, along with the one bobbin and the one Singer packet (with the one extra needle) that came along with my machine when I found it in the basement:

In time, I do hope to get other bits and pieces to make the machine more complete.

Along with the needles and bobbins, I got my hands on an original Singer bentwood key, for the case, kindly given to me by a friend…

“SIMANCO” is the “Singer Manufacturing Company”. The number next to it (96507) is the part-number for the key.

It was now that I also started looking at the bentwood case which housed this machine. It had all these weird little things inside it which I had no idea what they were for. That was when I found the bracket to hold the knee-bar:

This bracket is directly under the handle on the top of the case, and in the apex of the arch. You stick one end of the knee-bar into the socket on the left, then slot the rest of it into the slot on the right, and swing the catch (which will then go up and over the bar) to lock into place, to stop it wriggling around and falling off. Also inside the machine is a little black, wire bracket. It would have originally held a dome-shaped Singer oil-can, which would’ve looked like this:

Unfortunately, I don’t have a dome-shaped Singer oil-can (…yet…), but that’s what that bracket is there for, if you’ve ever wondered.

At the time of this posting, I’m still searching for extra bits and bobs and thingummies for the machine. If and when I find them, I’ll probably post about it here on the blog.

STEP FIVE – Replacement Parts

The next step was to find replacement parts…or to be precise, one part.

The part that goes here:

As you can see, the jerry-rig solution was a piece of balsa-wood held on with tape. Hardly the best substitute for the machine’s slide-plate, which is supposed to cover the bobbin-mechanism. Fortunately, I found a reproduction slide-plate (and yes, there are modern reproduction Singer parts), which I found on eBay (and that’s where you can get them, if you need them. There are also websites out there which sell original spare Singer parts. It’s just a matter of how desperate you are and what you want to pay). It was purchased on my behalf by my cousin, Hansen, who lives in Singapore, and which was hurried off to me with all due speed. It arrived…today, actually…and now the same part of the machine looks like this:

Yes, the slide-plate has a different metal-finish to the needleplate next to it, so they don’t match exactly, but it’s close enough for my purposes. And the important thing is that it fits and it does what it’s supposed to do!…Slide!:

All modern replacement slide-plates for Singer 99’s, 99k’s, 66’s, and 66k’s (and any other Singer models that take the square slide-plate…Singer parts were surprisingly interchangeable!) come in this same matte-finish, and not the shiny mirror-finish of the originals. But we should be thankful that there are reproduction plates at all!

The machine is now essentially complete. And I mean that literally..all the essential parts are present and correct. Needles, bobbins, plates, thread, machine-oil…the machine has been cleaned, oiled, tested, and it’s back to operational condition. I’m still after other Singer bits and pieces (attachments, extra feet, button-holers etc), but as it sits now, this machine will do, without any kind of hindrance, the task for which it was built when it left Scotland 60+ years ago…sew!

This is my grandmother’s Singer 99k knee-lever, as it appears now:

A Note on Construction

During this little adventure of mine, it occurred to me how fantastically-built these old Singers were. Of ALL the components on this machine, a grand-total of…FIVE…are made of something OTHER than cast iron, steel or wood. The plastic (bakelite?) shield on the steel light-shade…the lightbulb itself…the tire on the flywheel for the bobbin-winder, the drive-belt on the handwheel, and the power-cord and plug (also bakelite, I believe).

The Singer 99k was one of the MOST popular Singer machines ever made. They were produced from 1920 until 1962 and they’re incredibly simple, robust and powerful. Their simplicity is obvious. The motor is only there to power the drive-belt, and the light. Literally everything else on the machine is mechanical. And there’s no plastic on there at all. Nothing to crack…melt…warp…twist…shrink…expand…It just WORKS. I can’t think of a damn thing made today which was this solid when it was new, and which would still be that solid 60 years later. The Singer 99k was originally a handcranked model:

When it was released, it was a manual, hand-cranked machine, but an electrically-powered variation, with the knee-lever attachment, or the electric foot-pedal attachment (depending on variant, of course), were also available. These machines are so tough that they just NEVER break down. If you have an electrical one like I do, you might need to get the wiring checked if it’s spotty, but otherwise, they just never stop working.

And a Singer like the 66 or the 99/99k was a big investment. 11 pounds, 3s in 1930s Britain, or about a hundred and twenty dollars in America at the same time. Even in the 20s and 30s, a lot of people (mostly women) still made their own clothes, or clothes for their family, at home. Having a solid and dependable sewing-machine like a Singer was part an essential, and part a luxury, because their quality meant that they were priced pretty high. Even today, a sewing machine like my grandmother’s Singer 99k will easily sew through things like…

Denim.

Canvas.

Leather.

Multiple layers of cloth.

Things that would probably kill a modern machine…

ADDITIONAL PHOTOS

Here’s some additional photos of the machine, now that it’s complete:

The machine in its entirety!

The slide-plate doing what it does best – sliding!

The name of the beautiful pattern on the Singer 99k was called the ‘Filigree’

The Singer Manufacturing Company

More filigree!

Filigree + Plates!

Presser-foot, needle and feed-dogs (the little bumpy things)